I’ve created a picture profile for my friends in Asia. This gives accurate but vivid colour reproduction with a nice contrasty look. It uses Hypergamm 3 so handles highlights and over exposure well, but by using some black gamma tweaks the picture still has a nice rich look. You’ll find the full details by clicking here.
Sony NEX-EA50 First Tests: Really rather good!

Been out and about in Hong Kong shooting with a pre-production EA50 and I really quite like it. It is not an FS700 or FS100, the image quality is not quite that good.
The pictures are contrasty and it’s not as sensitive. It’s really nice to have the same familiar menu’s as the FS100 including the same picture profiles so you can dial in a look to suit your needs. The servo zoom is OK. It’s not perfect, there is a picture shift when you change zoom direction and some small focus shifts (these should be significantly reduced in production units).

It was really nice to have a functioning zoom on a big sensor camera. But even if you don’t have a zoom lens the EA50’s 2x electronic zoom works really well and I didn’t notice any significant change in image quality when using the digital zoom. The camera is front heavy, but it’s not a heavy weight camera so I didn’t find it too bad to use.
The buttons and switches are easy to access when it’s on your shoulder. I missed having builtin ND filters and had to resort to using the shutter to deal with brighter scenes and there are no special functions like S&Q so no time-lapse or slow motion other than by shooting at 50p/60p and slowing it down in post.

I did shoot some time lapse by just letting the camera roll and then speeding it up in post. It does have a few slow shutter speeds so I was able to use these in some of the night sequences I shot for a blurry effect. I’ll be writing a longer more detailed review in due course and posting some sample clips and frame grabs.
Litepanels LED lighting Patent Upheld, ITC Bans Import of LED Video Lights In to USA!
This really is quite incredible. For some time now Litepanels have held an number of very broad and vague patents on the use of semiconductor (includes LED) lighting in photography and video production. The patents are vague, rambling and deliberately unspecific. Most of these are not patents on new technology, new ideas, new or innovative designs. These patents exist purely to try to prevent anyone else from putting LED’s into lights for use in photography and video production.
Now following a lengthy court case on the 11th of Sept a USITC Judge upheld Litepanels complaint that the only way to prevent abuse of their patent was an import ban on any type of LED lamp designed for photo or video use that may infringe on their patents. Because the patents are so ridiculously broad and basically cover any use of any fixture designed for film and video production that uses LED’s, an import ban would in effect be a total ban on the import of all photographic and video lighting devices that use LED’s. The final determination of the case is expected by January.
The problem is not so much the upholding of the patents, but that the patents were issued in the first place. There have been attempts to get the patents nullified, most of these involve showing that the patents lack “Novelty”. A patent is supposed to demonstrate a novel, new design or concept never seen before. If it can be shown that LED video lights were sold prior to litepanels patent was issued then it may be nullified, but all this costs money. There are examples of people using LED flashlights as lights for video well before Litepanels came on the scene so they can hardly claim that using LED’s for video is a new or novel idea.
I don’t have a problem with inventors or designers protecting their research and development, but come on, you shouldn’t be able to patent something as vague as the use of LED’s in a frame as a light for photographic applications. That’s like having a patent on the use of lightbulbs in a socket to illuminate a home! Let them patent specific designs like the Sola or specific layouts of LED’s and specific housing designs, but having patents on the general concepts isn’t right.
Litepanels didn’t invent the LED, they didn’t invent the video light and I don’t think they can legitimately claim that they alone came up with the idea of using LED’s to light a scene for photo or video. This is the US patent office at it’s worst. I didn’t think you could patent a concept. You can patent a specific design or an invention but surely not a the vague concept of putting LED’s in a frame for use in photography. The Litepanels patents make amusing reading as they include lots of “maybe” or “might” statements and are as vague as you can get. If this ban goes ahead then Litepanels will effectively have a monopoly on the sale LED video lights in the USA. This will prevent competition which in turn reduces innovation and new product development.
Bangkok, Thailand, FS100 and FS700 workshops. October 3rd 2012
I’m running a couple of half day FS100 and FS700 workshops in Bangkok, Thailand on Wednesday the 3rd of October. There will be a morning session and an afternoon session. Both will cover camera setup, lens choices, picture settings and include a hands on session for you to try the cameras. These are free workshops. If you would like a place please contact me.
Back to Basics; White Balance.
While chatting to a few people at IBC it was brought to my attention that some people find my blog a little too advanced and intimidating. So in order to try to address that I’m going to go back to basics and write about some of the basic principles of digital video. The plan is to look at some basic concepts and then expand on these so that even beginners will gain a deeper understanding of these topics.
To kick off I’m going to look at White Balance.
What Does it Do?
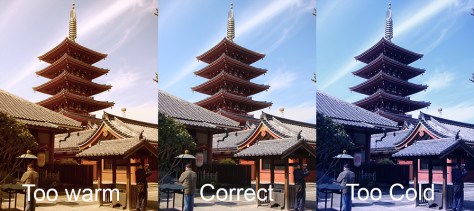
Accurate white balance ensures that white objects in your video appear white, in addition it ensures that colours look natural and similar to the colours you see with your own eyes while shooting the scene.
How do I set it?
You can use the cameras auto mode, often called ATW (auto tracing white balance), a preset white balance, calibrate the white balance using a white or grey object or manually dial in the white balance.
Background:

Different light sources have different colour temperatures. For example an incandescent light bulb, the type with a glowing filament has a low colour temperature while an arc lamp which is much hotter will have a higher colour temperature. Low colour temperature light sources like a filament light bulb are at the red or orange end of the visible light spectrum while hotter light sources like an arc lamp or the sun are at the blue end of the light spectrum. Our own visual system will adapt to these varying colour temperatures but a video camera needs to be set to the correct colour temperature to reproduce colours correctly. The colour temperature of a light source is measured in “degrees Kelvin” or “K”. Lower numbers will be at the red end and higher numbers at the blue end. So a filament light bulb will glow orange at typically 2,300k while the mid day sun will be around 5,500k and the light from a clear blue sky is around 9,000k. If you shoot with a camera set for a low colour temperature i.e. 3,200k outside on a sunny day your pictures will be very blue. If you shoot with a camera set for a higher temperature like daylight, typically 5,600k under filament lamps the pictures will be very orange.
Different Types of White Balance Setting.
Full Auto, ATW, Auto Tracking White, Auto White: This is generally a fully automatic mode that tries to guess the correct white balance. It normally works by assuming that the brightest parts of the scene are white objects and will try to correct these objects so that they appear white. As a result ATW is often easily fooled especially by bright slightly off white walls. As ATW is always active if the scene you are shooting changes then so may the white balance and this can be seen as a colour shift during the shot. ATW can be a little unpredictable and trying to later correct a shot where the white balance changes part way through can be very difficult. One advantage with ATW is that if you move from one place with one colour temperature to a place with a different colour temperature, for example moving from an interior room lit by filament lights to outside daylight then the ATW should compensate for the change in colour temperature automatically. On many pro cameras ATW can be assigned to the white balance “preset, A, B” switch “B” position.
Preset White: Preset White allows you to pre set the colour temperature manually. Normally this preset will be for 3,200K (Tungsten filament lamps) or 5,600K (average daytime exterior). Many more recent Sony cameras will have a switch to select preset white and then a further button to alternate between 3,200 and 5,600K. Preset white is useful when you have a multi camera shoot to get all cameras matching or for setting the white balance when shooting under coloured lights such as stage or concert lighting where ATW would really struggle or manual white balancing may give an incorrect colour balance. It’s is also often the white balance method of choice on projects that will be colour graded in post production as it gives a constant setting from shot to shot, scene to scene which colourists often find easier and faster to work with.

Manual White Balance: This is sometimes misunderstood, but when done correctly will give the most accurate results. This is where you have a 3 way switch marked “Prst” (preset) “A” and “B”. When in the “A” or “B” position (assuming ATW has not been assigned to the “B” position) a white balance memory is used to determine the colour balance of the camera. To get the correct colour balance the camera needs to be sample and memorise the colour temperature of the light in the scene you want to shoot. This is done using a white or grey card or object. It doesn’t really matter which you use provided the card or object is not coloured in any way and can be correctly exposed. Be careful what you use, a lot of paper is dyed slightly blue to make it appear brighter. If you have a choice the best thing to use is a grey card designed for photography or video exposure and white balance. Place the card at the center of your shot, you want the primary light source for your scene to be falling on the card. Point the camera at the card, it should fill at least 50% of the frame and expose it so that it is around the middle of your exposure range, not bright white and not dark grey, right in the middle. Then with the white balance switch in the “A” or “B” position press the “white balance” button (often found on the front of the camera under the lens or close to the white balance switch). The camera will then adjust the gain of the red, blue and green channels so that the grey/white card shows no colour and will often display the measured colour temperature in the viewfinder or a simple “OK” message. If you get a “NG” or error message you may need to adjust your exposure up or down a little. Look at the pictures on a colour screen and check that they look OK. If not, check that the grey/white card is in the centre of your frame again and try repeating the process. You can store two manual white balance settings one in the “A” memory and one in the “B” memory and switch between them as needed.
Advanced White Balance Techniques: Sometimes it can be useful to use a white balance colour temperature that may be different from the actual colour temperature of the scene. For example if you are shooting a sunset the colour temperature of the actual light might be around 2,000 to 3,000K. If you were to white balance the camera to match this it would neutralise the orange glow of the sunset making it much less colourful. So to shoot a sunset you might want to have the camera set to a higher colour temperature to accentuate the orange sunset light. Setting the camera to preset 5,600k might work, but perhaps this takes things too far and makes it too orange. In this case you might want to dial in an in between value for your white balance like 4,400K. Some cameras will allow you to do this by changing the preset white value (in picture profiles or scene files on most Sony cameras). Alternately some cameras will allow you to add an offset to your manually set white balance, but do remember if you do this to remove it again once your done with it.
Another way to white balance the camera with a warmer or cooler white balance than the actual lighting conditions is to use a coloured card instead of a white/grey card. If you use a card with a slight blue tint then the camera will think the scene is bluer than it really is. This results in a final image that is warmer (more orange) than if you had used a white/grey card. If you use a card with a slight orange tint then the camera will think the ambient light is warmer resulting in a final image that looks cooler (more blue). Instead of using coloured cards (often called warming or cooling cards) you can achieve exactly the same effect by doing your white balance through a blue or orange lighting gel or filter.
What to avoid: Try to avoid mixing different light sources with different colour temperatures. For example a person sat close to a window, lit by a filament light will be illuminated by the orange 3,200K light from the lamp as well as the blue 5,600K light from outside. This can result in some strange colours and the scene may look odd (of course you may deliberately choose to have this colour contrast to enhance your scene). Some light sources contain peaks and gaps in the light spectrum that they emit and this can result in odd colour reproduction. A common example of this is fluorescent lights used in homes and offices that often have a pronounced green tint to them that white balancing alone will not remove.
Video overview of MTF Services B4 2/3″ to super35mm adapter.
In this video I take a look at the MTF Services (http://www.lensadapter.com) B4 2/3″ to super35 mm lens adapter. This adapter allows you to use a conventional 2/3″ ENG zoom lens on most video capable cameras that have a Super35 sized sensor or APS-C sized sensor. It comes in two parts, the optical converter (the expensive bit) and a simple low cost lens mount adapter ring. Adapters are available to work with the Sony PMW-F3, Sony E-Mount (FS100, FS700, EA50, NEX5 etc) as well as Canon EF (C100, C300, C500, 7D, 550D etc). To work correctly the lens must have a 2x extender. All is explained in the video.
Fujifilm to stop making movie film stock.
This is not entirely unexpected. Digital production of movies is common place now and rapidly taking over from film. As a result Fujifilm has decided to concentrate on other key business areas and will stop making positive and negative film stocks for movie production from March next year. The end of an era!
See the Fujifilm press release for the full details.
Zunow SWV-E11-16, 11 to 16mm E-Mount Lens Review.

Before I went to Arizona to shoot the monsoon thunderstorms and Grand Canyon I felt that I would need a nice fast wide angle lens to help capture some of the panoramas and vistas that I would see. A little while ago my friends at Alphatron told me about an E-Mount wide angle lens that was soon to be launched. So after a couple of phone calls I managed to secure the loan of one of the SWV-E11-16 cine style E-Mount lenses. Even before opening the box I knew this was something a bit special as the box was pretty heavy, no lightweight plastic lens in this box. On opening the box I was not disappointed. Inside was a very solid looking cine style lens with substantial gears on the focus, zoom and iris rings. This isn’t really a zoom lens, more of a variable focal length lens. The difference between the field of view at 11mm and 16mm isn’t all that great, but it does allow you to vary the framing.

As this is an E-Mount lens, not only does it work on the FS100 and FS700 but it also fits on any other E-mount camera such as my NEX5N.
This isn’t a lightweight lens, it is a substantial, beautifully constructed lens that is a real pleasure to use. Compared to a typical DSLR lens the focus ring has a much greater travel which makes accurate focus much easier to achieve. The 0.8 mod gear rings allow the use of standard follow focus systems so no need to use add-on adapters. I can’t stress enough how nice this lens feels to use. But the feel of a lens is only a small part of the story, of course it’s the image performance that is what’s really important and again the Zunow does not disappoint.

I used it in various light conditions from bright desert sun to after dark. The wide f2.8 aperture makes this quite a fast lens considering it’s wide field of view. Most ultra wide lenses tend not to be as fast as this. When set to 11mm there is some noticeable barrel distortion which is really surprising and it’s not particularly objectionable as you zoom in to 16mm this distortion decreases to very low levels. This is one sharp lens. The images from this lens, both stills and HD video show huge amounts of crisp clear details.

The best performance was from f4, but even fully open a f2.8 the centre of the image remains sharp and with good contrast. There is some slight softening in the corners at very wide apertures but this is not severe and I felt that the lens was perfectly useable even at f2.8 unlike some other wide angle lenses I have used. Colour fringing and chromatic aberrations are well controlled and I didn’t observe anything objectionable.
I really liked using this lens. It has the feel of a high end PL mount lens and performance to match. It looks the part and looks like it will last a very long time. I was very sad to have to hand it back after the shoot. The European distributor, Alphatron, tell me that as well as this E-Mount lens, Zunow are planning on producing PL mount versions as well as additional similar lenses of different focal lengths.
PMW-200 and FS700 Open Day and Workshops at H Prestons, 20th Sept.
Want to learn more about the new Sony PMW-200 or NEX-FS700? Why not come to H Prestons in Malvern next Thursday for an open day where I will be going through the key features and functions of the cameras and how to get the most out of them. Come and have a go at shooting Super Slow Mo or learn about how to create your own custom looks with picture profiles. The event is free and starts at 10am.

My IBC round-up.
Well here’s yet another IBC round up. I didn’t get much time to look around the show, I was completely swamped helping people out on the Sony booth (it was great to meet so many of you). So these are just a few things that got my attention. I’ll start with the Sony booth as that’s where I was based.
Of course there was the new XDCAM HD PMW-150. I’ll be getting one for review soon, so full details will come elsewhere and you can read my earlier post with footage from the PMW-150 for more info.

Also on the Sony booth was the NEX-EA50 shoulder mount camcorder. The EA50 has an APS-C sized sensor, so it’s just a little smaller than a Super 35mm sensor. Being a sensor originally developed for stills it’s not quite as optimised for video as the sensor in an FS100 or FS700, but it does a quite reasonable job in most situations although you may get a bit of stair stepping and aliasing or moire in some shots. It is perhaps a little smaller than it looks in many of the pictures, but wow! When you pick this low cost camera up, it really surprises as it feels really well made. The body is nice and solid, the buttons and switches have a good feel. Given that this is an entry level camera I didn’t perhaps expect this high build quality. The demo units were fitted with the new E-Mount servo zoom based on the now familiar Sony 18-200mm f3.5-f6.3 zoom lens (sel18200). This lens will fit on any E-mount camera. The zoom speed is variable but the maximum speed is quite slow, so no crash zooms with this lens. I also noticed some focus shifts as you start to zoom and throughout the zoom range. This was expected, after all this is a very cheap servo zoom based on a stills camera lens and stills zooms are rarely par-focal (constant focus throughout the zoom range). If you used autofocus the lens would hold focus as you zoom, but this isn’t always going to be ideal. I was told by one of Sony’s engineers that they will be improving the focus look-up tables to minimise the focus shifts, but don’t expect it to perform like a $20k broadcast zoom. I think the EA50 will be very popular amongst videographers and schools/colleges on a tight budget but needing a professional looking camera.

Nearby the EA50 was one of Sony’s new HDR-AS15 “Action Cams”. There are two models of this tiny POV camera, one with WiFi, one without. Both have some great features. The lens is a Zeiss lens and the sensor is a back illuminated EXMOR-R sensor so the low light performance is very good indeed. It can shoot at up to 60fps at 1920×1080 and 120fps at 720p. It has an electronic steadyshot system as well as switchable fields of view giving 120 and 170 degree angles. Recording is AVCHD at 16Mb/s in normal modes and 24Mb/s in super slow mo modes on to micro SD cards. The really cool function is the WiFi option that will allow you to use a phone or tablet to align and control the camera as well as play back your recordings. There’s an underwater housing as well as a comprehensive range of additional brackets for things like helmets and handle bars. The price is going to be about £250 for the WiFi version. I’m not sure whether there will be a 25p/50p version but I liked it so much that I’ve placed a pre-order for one. Should be shipping at the beginning of October.

Moving on to post production, one of the biggest headaches for many of us these days is backup and archive. Sony’s optical disc system has always been a good, robust long term solution, but has been too expensive for many and the capacity of an individual disc somewhat limited. But now Sony have developed a new disc cartridge that contains not just one but up to 12 optical discs with total capacities of 300GB, 600GB, 1.2TB and 1.5TB. These cartridges slot into the ODS-D55U (great name… not!) Optical disc Archive unit which connect to your computer using USB3. Included with the ODS-D55U is a content management utility to help you backup and and archive your material or data. It’s much faster than LTO and you can access any part of the cartridge near instantly so excellent for online or near online storage.

The discs can store any type of data, not just video making this a very versatile system. The best bit however is that from what I could gather the disc cartridges won’t be all that much more than similarly sized good quality hard drives. With a projected shelf life in excess of 50 years and no need to spin the discs up regularly or store them in special environments I think this system has a lot going for it.

Of course before you can archive your footage you need to get it off your recording media. If your an XDCAM EX or XDCAM HD shooter using SxS your options have been fairly limited. You can always use the camera as a very expensive card reader, the express card slot in a laptop (if it has one) or there are the various Sonnet eSata and thunderbolt adapters as well as the original Sony SBAC-US10 USB card reader. Well now there is another option from Sony, the SBAC-US20. looking much like the original US10 reader the new US20 has USB 3 so is much, much faster and does not require external power making it far more portable.
 As well as the SxS card reader there is also the new PMW-50 field deck. This is a compact player/recorder with a flip up screen, two SxS slots with HDSDI and HDMI in and out as well as USB and Firewire. It can be powered by a BP-U60 battery (Sony also had the new extra capacity BP-U90 battery on show) for field operation and makes an ideal player for satellite trucks, OB units etc or as a recorder for mini cams or remote cameras. It supports all of the current XDCAM HD modes including 50Mb/s 4:2:2 and 35mb/s 4:2:0.
Moving on to some non Sony products but still related to XDCAM there is a new backup device from NextoDI. Not available just yet (October) this new box called the NVS-Air (NVS-2825) can back up from SxS and P2 cards as well as SD and compact flash cards via an adapter to it’s internal hard drive as well as an external USB 2 or USB 3 or eSata hard drive.

There are various levels of file verification and the ability to play back the your footage. There’s even a headphone jack for audio playback. The NVS-Air also has built in WiFi and you can connect wirelessly to it with almost any device with a web browser, such as a phone, tablet or PC to view and playback clips remotely. You can even move clips to a trash bin and add notes so that when you get back to the edit suite the editor doesn’t need to sift through any junk clips. Clip copies from SxS cards are extremely fast with a 16GB card taking about 90 seconds to back up. I have an older NVS2500 which has performed extremely well for over 2 years including trips up to the Arctic and I’m really looking forward to reviewing the 2825 in the near future.
My regular followers may be aware that I’m still looking around at video lights at the moment as I wish to update my lighting kit. One of my favourite types of light is the Tungsten Fresnel. A fresnel allows you to focus the light reducing spill and makes it easier to light specific areas of your shot. However tungsten lights are not very efficient and run very hot. LED fresnels are few and far between and often lack the punch of a tungsten lamp.

At IBC Brightcast were showing a new design of LED panel. Whilst not a fresnel in the traditional sense this flat, compact LED panel features a grid of LED emitters with lenses that allow you to focus the light. The BP18F allows you to adjust the light beam between 4 and 50 degrees. It’s very bright, to me it looked to be the equivalent of at least a 1K tungsten lamp. Viewed off-axis there was very little spill, so keeping ambient light levels low while just lighting small areas should be straightforward with this lamp. It can be fitted with barn doors for even greater control and can be dimmed by a dimmer knob on the rear or controlled using DMX. It can be powered from the mains or with a V-Lock battery making it very versatile.
There were some new products for FS700 owners. As well as the very nice but rather pricey 3Ality – Elements rig used on the FS700 on the Sony booth, which I would love to have but cannot afford, there were some lower cost items including a new top cheese plate for the FS700 from GenusTech.

As well as the GenusTech cheese plate range with new top plates for the C300 and F3, GenusTech were also showing off their new shoulder mount system which is very impressive and will fit a wide range of cameras. It has interchangeable base plates which are anodised in a nice looking gold finish. The shoulder pad and arms are heavily machined to minimise the weight and it uses standard Arri rosettes for the joints and links so it’s very adjustable and expandable. Genus also had a rather clever cage system for the Blackmagic Design Cinema Camera (which will get a much more useful micro 4/3rds mount later in the year). Although only showing a prototype on the stand this looks like it will really help turn the BMD camera into a more user friendly shooting rig. There are pictures below for those interested.
An essential accessory for anyone shooting outside in Europe with winter just around the corner is a rain cover. Dutch company Camrade have always been quick to bring out high quality rain covers for new camera models and at IBC they had a pre-production rain cover for the FS700. The odd shape of the FS700 makes it hard to cover the camera whilst retaining the ability to see all the controls and use the EVF, but Camrade have managed to produce a rain cover that does just that.

It even zips up underneath for protection in extreme conditions. There are clear panels around the switch and control areas plus a removable sleeve for the viewfinder extension so you can use the camera with or without the viewfinder tube. A panel on the right side opens out to allow you to insert your hand inside the cover so you can easily operate the controls on the hand grip.

Of course Canon were showing the c500 outputting 4K on their stand and the images were very impressive indeed. Helped along by some of their very nice PL and EF mount Cinema lenses. Some serious money there but very nice all the same. However the amount of data that the camera produces is staggering and it requires dual 3G HDSDI outputs to transfer the raw image data to the external recorder or recorders. Convergent Design have new firmware for the Gemini that allows a pair of them to record the 4K C500 data. I’m not sure I’m ready to start dealing with those kinds of data rates just yet but I do hope to get to play with some of those lovely lenses on future projects.
So thats about it. As I said I didn’t get to see much of the show, I know JVC had some new cameras that I would have liked time to see but didn’t get a chance. One last thing…. How about a stunning 84″ 4K TV? This one from Sony was stunning, but I’ll need a bigger living room and deeper pockets first, its $25k!

Here are some pictures of some of the products mentioned above.
Genus shoulder rig.

Genus C300 top plate.

Genus BMD Cinema camera cage.
