This time last year I was just starting to earn about a new codec from Sony called XOCN (eXtended Original Camera Negative). XOCN is currently only available with the Sony F5/F55 and the new AXS-R7 raw recorder. Sony’s original R5 raw recorder takes 16 bit sensor data and applies a very mild amount of compression before recording the sensor data as linear raw. I have never seen any compression artefacts when using the 16 bit linear raw and it really is an amazing format to work with. So much so that I will always use it whenever possible.
But now as well as 16 bit linear raw the R7 can record 16 bit linear XOCN. Now, I’ll be completely honest here, I’m really not sure what the difference is between raw and XOCN. As far as I can tell XOCN is very, very similar to raw but sufficiently different to raw to avoid infringing on patents held by other manufacturers for compressed raw. XOCN is more highly compressed than Sony’s raw, but in every test I’ve done I have found it hard to spot any compression problems or any significant difference between XOCN and the original 3:1 raw.
So, I hear you ask…. “If it’s really that good what don’t we just do away with XAVC and use XOCN?” Well that is a good question. It all depends on processing power. XAVC is a traditional codec so inside the codec is a normal video image, so the only thing a computer has to do to play it back is uncompress the codec. XOCN is a compressed wrapper that contains sensor data, in order to view the image the computer has to uncompress the data and then it has to construct the image from the data. So you need a really good graphics card in a decent computer to work with XOCN. But if you do have a decent edit or grading workstation you should find XOCN straight forward to work with, it doesn’t require specialist cards to accelerate the decoding as Red raw does.
The key benefit that XOCN brings over traditional video is that it is 16 bit. 10 bit video is pretty good. In a 10 bit video you have almost 1000 tonal values, not bad when you consider that we have been using 8 bit for decades with only 235 shades. But 16 bit brings the potential for a whopping great 65,535 shades. This starts to make a big difference when you are extensively manipulating the image in post production. Any of you that are in to photography will know that you can push and pull a 16 bit raw photograph far, far further than an 8 bit jpeg. 16 bit video is no different.
But what’s really amazing about XOCN is you get almost all the benefits of linear raw but in a file size smaller than the same resolution 10 bit ProResHQ. If you use XOCN-LT the files are roughly half the size of ProResHQ. This means your media lasts a sensible amount of time and backups, transfers and archiving are all much easier, much faster than with uncompressed raw. Sony’s 3:1 compressed raw from the R5 has always been pretty easy to deal with. XOCN is even easier. Using XOCN-LT you can squeeze well over 2 hours of 16bit 4K on to a 512GB AXS card! In fact the file sizes are only marginally larger than XAVC class 480.
The reduction in data rates becomes really significant if you shoot at high frame rates. As 50p and 60p productions become more common XOCN allows production companies to shoot 60fps with the benefits of 16 bit data but with files sizes barely any bigger than 24fps ProResHQ. If you have a Sony PMW-F55 you can shoot at 120fps in 4K using XOCN and the files are twice as big as 24fps raw.
For further information on XOCN please take a look at this page from Sony, it’s very informative and has a very good example of why 16 bit data is important, especially if you are shooting for HDR.
I produced 3 video blogs during my trip to Norway to shoot the northern lights. These blogs are now on youtube for you to watch. In the first video I take a look at some of the equipment that I took to Norway for the trip. I also look at how I like to lay everything out before I pack it and give some insight into some of the accessories that I like to take.
The second video looks back at the first week of the trip. You will see examples of the weather we had to deal with as well as some information on how some of the time lapse sequences of the aurora were shot.
The third video is about shooting a sunrise with 3 different cameras. The Sony a6300, FDR-AX3000 Action Cam and the PXW-FS5.
Packing for the shoot.
At the bottom of the page you’ll find a quick cut of a small selection of some of the Aurora footage shot on this trip.
Today I leave for my annual Northern Lights expeditions. So, I am off to the very north of Norway to shoot in the cold, long nights of the arctic winter. Currently sunrise is at 11am and sunset at about 12:30. You get golden hour all day and then a very long night (fully dark from about 3:30pm). If the weather gods are kind we will get clear skies and lots of opportunities to photograph and video the Northern Lights.
Over the next 3 weeks I will be releasing a number of video blogs about this adventure. They won’t be every day as I won’t always have internet access and the picture quality of the blogs may not be the best. But what I hope to cover are some of the practical aspects of a project like this. The first blog is about the equipment I’m taking, why I’ve chosen it and how I like to check what I’m packing.
There will be videos on shooting time-lapse, tips for shooting in the cold and more about the gear I’m using.
I’ve written about this many times before, but still it comes up again and again. Which is better? Which should I use? I hear all kinds of crazy comments and a lot of incorrect information, so first of all lets dispel a few myths:
S-Log2 captures more dynamic range than S-Log3, it goes to a higher level on the waveform, S-Log3 clips the highlights sooner.
On most of Sony’s current cameras S-Log2 and S-Log3 both currently record exactly the same dynamic range as this is limited by the sensors that Sony are using. The S-log3 curve could be used in a future camera to capture up to 16 stops and in fact the new Venice camera records over 15 stops. But as all of Sony’s other cameras sensors can only see 14 stops and the S-Log3 curve is designed to go beyond 14 stops, stop No. 14 is not recorded all the way at the top of the recording range. S-Log2 is a 14 stop maximum curve, so the peak level is recorded right at the top of the recording range. There is no space held in reserve for anything beyond 14 stops.
In Sonys current camera range (other than Venice) the limit is 14 stops whether it’s S-Log2 or S-Log3. The chart that Sony provide showing both S-Log2 and S-Log3 is a little confusing as it shows the entire gamma curve rather than what the camera can actually “see”. In their current implementations both curves stop at +6 stops over middle grey, both capture the same dynamic range, there is no difference.
S-Log2 is brighter than S-Log3 so it must be capturing highlights better.
No, not really, see above. Playback and on screen brightness comes from the levels chosen to record something at and is dependant on the shape and range of the gamma curve. But the actual captured range is dependant on what the sensor can cope with. As we are not changing the sensor, the captured dynamic range, brightness range and shadow range does not change between S-Log2 and S-log3, both of which take the entire sensor range (they just store that same range using slightly different levels or code values). After applying a LUT or other conversion to your normal viewing gamma both S-Log2 and S-log3 will have the same brightness, same highlight and same shadow range.
S-Log3 has noisy shadows.
No, not really. Shadows appear noisy with S-Log3 as the shadow part of the curve is stored using higher code values compared to S-Log2. So when you view S-Log3 uncorrected the shadows are raised and stretched on your conventional monitor and this gives the impression of a noisy picture. In reality once you restore the levels to normal there is no additional noise. See this article for a full explanation.
Chart showing S-Log2 and S-Log3 plotted against f-stops and code values. Note how little data there is for each of the darker stops, the best data is above middle grey. Note that current sensors only go to +6 stops over middle grey so S-Log2 and S-Log record to different peak levels.
S-Log3 is newer than S-Log2 so it must be better.
Newer, perhaps not. Better, no not really. S-Log3 is based on the industry standard Cineon log gamma curve. This curve was developed in the 1980’s to allow the digitising of film using 10 bit data. So S-Log3 matches a curve designed to work with negative film and is capable of storing more than the 14 stops that most of the current cameras sensors can see. In effect it is an old log gamma curve. As it is a curve designed for more than 14 stops, when used in a 14 stop camera some of the available recording data is empty and wasted.
S-Log2 was specifically designed by Sony to work with an electronic sensor with 14 stops of dynamic range and is optimised to match the performance characteristics of video sensors. By using a 14 stop curve with a 14 stop camera almost every bit of available data is utilised, there is no wastage. So S-Log2 makes better use of the data you have available to you,
BUT THERE ARE SOME OTHER FACTORS WE NEED TO CONSIDER.
S-Log2 and S-Gamut:
As well as the gamma curve we also have different Gamuts or color ranges. S-Log2 was originally designed for the F65 camera. The F65 sensor can capture a huge color range beyond the range that most conventional video sensors can see. So as well as S-Log2 Sony introduced S-Gamut which was matched to the very wide color range of the F65 sensor. S-Log2 is designed to be used with S-Gamut. But many of the cameras we use, like the FS7, F5, FS5 cannot see this color range (Sony’s F55 and Venice can). In addition this very large color range can be a little tricky to deal with in post production. Add to this the fact that S-Log2 is quite different to the quite common Cineon gamma curve and behaves differently to other curves in post. The end result was that in the early days of S-Log2 there were a number of complaints and comments that Sony’s S-log2 material was difficult to grade.
S-Log3 and S-Gamut3.
Because some people were struggling a bit with S-Gamut and S-Log2 in post production (Resolve and many of the other tools we have today were not as well developed 4 years ago), Sony introduced S-Gamut3 and S-log3 as well as a further Gamut called S–Gamut3.cine. S-Log3 was based on Cineon as that’s what people were familiar with. Arri’s Log-C is also based on Cineon as are many other log curves. This makes it a more “familiar” grading experience for many colorists. In addition Sony created a modified version of the super large S-Gamut to make it easier to grade. S-Gamut3 is just as big as S-Gamut but some tweaks inside make it easier to grade (fewer color shifts). At the same time Sony realised that most users were producing content for TV, the web or digital cinema that had little use for the huge color range of S-Gamut/S-Gamut3. So S-Gamut3.cine was developed as a smaller, more manageable version of S-Gamut3 and it incorporated a few tweaks to the color science to provide colors closer to those used by other manufacturers. S-Gamut3.cine is also a better match for cameras with sensors that cannot see the full S-Gamut range (like the FS5, FS7, F5, A7).
The end result is that in general most people prefer or find it easier to grade S-Log3/S-Gamut3.cine material than S-Log2/S-Gamut. Plus you can often use LUT’s designed for Log-C or Cineon with S-log3 material (this isn’t optimum, but it can work).
SGamuts Compared.
Getting the data from camera to post.
In terms of getting the data from your cameras sensor in to post production S-Log2 is the better choice (unless you have a Sony Venice which only has S-Log3). S-Log2 is optimised for the way an electronic sensor works. S-log3 is essentially a curve designed for negative film applications, not video and no matter how you look at it, these are electronic video cameras. However, if you are recording 10 bit or greater you have a lot of data whichever curve you use, so in practice it will be rare to see any difference in the final result.
So use the curve you find easiest to work with. It is true that S-Log 3 allocates a little more data to the shadows and less to the highlights than S-Log2, but don’t confuse data and code values with more range. S-Log3 has a few extra code values in it’s darkest stops, S-log2 has a few extra in the bright stops, but the dynamic range, highlight and shadow handling is governed by the sensor not the gamma curve. Overall S-Log3 has fewer code values than S-Log2, S-Log2 makes better use of the data available, but with 10 bit this really isn’t going to make a huge difference.
8 Bit Recording.
But if you are only recording with an 8 bit codec you are already at a disadvantage. When recording 8 bit you really need to maximise the way what little data you have is used. For that reason I will always recommend that S-Log2 is used when recording 8 bit on a camera like the FS5 in UHD or A7s or similar (FS5 is 10 bit in HD). By using S-Log2 you are using as many of the limited code values available as you can. This doesn’t mean you can’t use S-log3, it just wouldn’t be my choice.
The end result should be the same.
At the end of the day, if you were to use matching LUTs, S-log2 and S-log3 material should look more or less exactly the same after grading or application of the LUT, no matter what the scene you are shooting. If they do look significantly different then you are doing something wrong. So your choice of curve, other than for 8 bit recordings will most likely come down to ease of use rather than anything else.
If your camera doesn’t have LUT’s then S-Log2 can be easier to work with as it is more contrasty. This makes it a bit easier to focus and also makes it easier to gauge exposure. If your camera has LUT’s and you use them, then you may decide to use S-Log3 simply because you should find it a little easier to work with in post. Either way both curves capture the same range of picture information and both should give more or less the same end result.
There may be some very, very subtle differences due to the small differences in data distribution, but often these will be hard to really see in the final image.
I was recently asked by Sony to produce some videos to help users get the most from the PXW-FS5. The videos and articles can now be found on Sony’s website by following the links below. Part 1 covers the camera setup including using Picture Profiles to change the way the images look. Part 2 covers the special effects modes including S&Q, super-slow-motion, clear image zoom and the variable ND filter. Part 3 looks at the raw option for the FS5.
UPDATE: It appears that Adobe may have now addressed this. Luma and YC scopes now show the same levels, not different ones and the scaling of S-Log XAVC. signals now appears to be correct.
This came up as the result of a discussion on the FS5 shooters group on Facebook. An FS5 user shooting S-log2 was very confused by what he was seeing on the scopes in Adobe Premiere. Having looked into this further myself, I’m not surprised he was confused because it’s also confused me as there is some very strange behaviour with S-Log2 XAVC material.
First: BE WARNED THE “LUMA” SCOPE APPEARS TO BE A RELATIVE LUMINANCE SCOPE AND NOT A “LUMA” SCOPE.
THIS IS THE “LUMA” Scope, I suggest you don’t use it! Look at the scale on the left side of the scope, it appears to be a % scale, not unlike the % scale we are all used to working with in the video world. In the video world 100% would be the maximum limit for broadcast TV, 90% would be white and the absoulte maximum recording level would be 109%. These % (IRE) levels have very specific data or code values. For luma, 100IRE has a code value of 940 in 10 bit or 235 in 8 bit. Then look at the scale on the right side of the luma scope. This appears to be an 8 bit code value scale, after all it has those key values of 128, 255 etc.
100% is not Code Value 235 as you would normally expect (Lumtri scopes).
Now look again at the above screen grab of the lumetri luma scope in Premiere 2017 – V11. On the left is what appears to be that familiar % scale. But go to 100% and follow the line across to where the code values are. It appears that on these scopes 100% means code value 255, this is not what anyone working in broadcast or TV would expect because normally code value 255 means 109.5%.
I suggest you use the YC waveform display instead.
Lumetri YC Scope showing S-log2
The YC waveform shown on the above screen capture is of an S-Log2 frame. If you go by the % scale it suggests that this recording has a peak level of only 98% when in fact the recording actually goes to 107%.
But here’s where it gets even stranger. Look at the below screen capture of another waveform display.
Lumetri YC scope and Cinegamma 1
So what is going on here? The above is a screen grab of Cinegamma 1 recorded in UHD using 8 bit XAVC-L. It goes all the way up to 109% which is the correct peak level for Cinegamma 1. So why does the S-Log2 recording only reach 98% but the Cinegamma recording, recorded moments later using the same codec reach 109%. This is a value 10% higher than S-Log2 and I know that the Cinegammas cannot record at a level 10% greater than S-Log2 (the true difference is only about 2%).
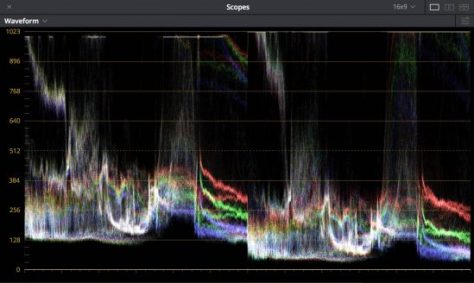
Lets now compare the difference between how Premiere and Resolve handle these clips. The screen grab below shows the S-Log2 and Cinegamma 1 recordings side by side as handled in Adobe Premiere. On the left is the S-Log2, right Cinegamma1. Look at the very large difference in the peak recording levels. I do not expect to see this, there should only be a very small difference.
Lumetri YC scope with XAVC S-Log2 on the left and XAVC Cinegamma 1 on the right.
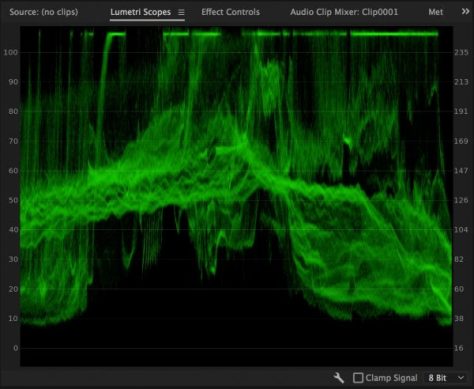
Now lets look at exactly the same clips in DaVinci Resolve. Note how much smaller the difference in the peak levels is. This is what I would expect to see as S-Log2 gets to around 107% and Cinegamma 1 reaches 109%, only a very small difference. Resolve is handling the files correctly, Premiere is not. For reference to convert 8 bit code values to 10 bit just multiply the 8 bit value by 4. So 100IRE which is CV235 in 8 bit is CV940 in 10 bit.
S-log2 on the left, Cinegamma 1 on the right. Notice the very small difference in peak levels. This is expected and correct.
So, until I get to the bottom of this all I can say is be very, very careful and don’t use the “Luma” scope, use the YC scope if you want to know your code values. It also appears that Premiere scales the code values of S-Log recordings differently to normal gammas.
Additionally: Record exactly the same S-Log2 or S-Log3 image using XAVC internally in the camera and at the same time record a ProRes version on an external recorder. Bring both of these clips, which are actually recorded using exactly the same levels into Premiere and Premiere handles them differently. The XAVC squashed into a reduced range while the ProRes fills the larger range.
Lumetri YC scope and a ProRes S-Log2 recording. Note how this goes all the way to 107%.
This has huge implications if you use LUT’s!!!!
The same LUT will result in a very different looking image from the XAVC and PRoRes material. There should not be a difference, but there is and it’s big. So this isn’t just a scopes issue, it’s an internal signal handling issue.
I’ve always preferred doing my color grading in a dedicated grading package with external scopes. It’s stuff like this that reminds me of why I prefer to work that way. I always end up with a better end result when I grade in Resolve compared to Premiere/Lumetri.
As I learn more about this I will post a new article. Use the subscribe button on the left to subscribe to the blog to be notified of new posts.
Sony’s Raw Viewer for raw and X-OCN file manipulation.
Sony’s raw viewer is an application that has just quietly rumbled away in the background. It’s never been a headline app, just one of those useful tools for viewing or transcoding Sony’s raw material. I’m quite sure that the majority of users of Sony’s raw material do their raw grading and processing in something other than raw viewer.
But this new version (2.3) really needs to be taken very seriously.
Better Quality Images.
For a start Sony have always had the best de-bayer algorithms for their raw content. If you de-bayer Sony raw in Resolve and compare it to the output from previous versions of Raw Viewer, the raw viewer content always looked just that little bit cleaner. The latest versions of Raw Viewer are even better as new and improved algorithms have been included! It might not render as fast, but it does look very nice and can certainly be worth using for any “problem” footage.
Class 480 XAVC and X-OCN.
Raw Viewer version 2.3 adds new export formats and support for Sony’s X-OCN files. You can now export to both XAVC class 480 and class 300, 10 or 12bit ProRes (HD only unfortunately), DPX and SStP. XAVC Class 480 is a new higher quality version of XAVC-I that could be used as a ProResHQ replacement in many instances.
Improved Image Processing.
Color grading is now easier than ever thanks to support for Tangent Wave tracker ball control panels along with new grading tools such as Tone Curve control. There is support for EDL’s and batch processing with all kind of process queue options allowing you to prioritise your renders. Although Raw Viewer doesn’t have the power of a full grading package it is very useful for dealing with problem shots as the higher quality de-bayer provides a cleaner image with fewer artefacts. You can always take advantage of this by transcoding from raw to 16 bit DPX or Open EXR so that the high quality de-bayer takes place in Raw Viewer and then do the actual grading in your chosen grading software.
HDR and Rec.2100
If you are producing HDR content version 2.3 also adds support for the PQ and HLG gamma curves and Rec.2100 It also now includes HDR waveform displays. You can use Raw Viewer to create HDR LUT’s too.
So all-in-all Raw Viewer has become a very powerful tool for Sony’s raw and XOCN content that can bring a noticeable improvement in image quality compared to de-bayering in many of the more commonly used grading packages.
Lets face it cameras are becoming more and more sensitive. We no longer need the kinds of light levels that we once used to need. So why is lighting still so incredibly important. Why do we light?
Starting at a most basic level, there are two reason for lighting a scene. The first and perhaps most obvious is to add enough light for the camera to be able to “see” the scene, to get an adequate exposure. The other reason we need to light, the creative reason why we need to light is to create shadows.
It is not the light in a scene that makes it look interesting, it is the shadows. It is the contrast between light and dark that makes an image intriguing to our eyes and brain. Shadows add depth, they can be used to add a sense of mystery or draw the viewers gaze to the brighter parts of the scene. Without shadows, without contrast most scenes will be visually uninteresting.
Take a typical daytime TV show. Perhaps a game show. Look at how it has been lit. In almost every case it will have been lit to provide a uniform and even light level across the entire set. It will be bright so that the cameras can use a reasonable aperture for a deep depth of field. This helps the camera operators keep everything focus. The flat, uniform light means that the stars or contestants can go anywhere in the set and still look OK. This is lighting for exposure, where the prime driver is a well exposed image. The majority of the light will be coming from the camera side of the set or from above the set with all the light flooding inwards into the set.
Typical TV lighting, flat, very few shadows, light coming from the camera side of the set or above the set.
Then look at a well made movie. The lighting will be very different. Often the main source of light will be coming from the side or possibly even the rear of the scene. This creates dark shadows on the opposite side of the set/scene. It will cast deep shadows across faces and it’s often the shadow side of a face that is more interesting than the bright side.
Striking example of light coming from opposite the camera to create deep shadows – Bladerunner.
A lot of movie lighting is done from diagonally opposite the cameras to create very deep shadows on faces and to keep the background of the shot dark. If, as is typical in TV production your lights are placed where the cameras are and pointed into the set, then all the light will go into set and illuminate the set from front to back. If your lights are towards the side or rear of the set and are facing towards the cameras the light will be falling out of and away from the set rather than into the set. This means you can then keep the rear of the set dark much more easily. Having the main light source opposite the camera is also why you see far more lens flare effects in movies compared to TV as the light is often shining into the camera lens.
Another example of the main light sources coming towards the camera. The assassination of Jesse James by the coward Robert Ford.
If you are shooting a night scene and you want to get nice clean pictures from your camera then contrast becomes key. When we think of what things look like at night we automatically think “dark”. But cameras don’t like darkness, they like light, even the modern super sensitive cameras still work better when there is a a decent amount of light. So one of the keys to a great looking night scene is to light the foreground faces of your cast well but keep the background very dark. You expose the camera for the bright foreground (which means you should not have any noise problems) and then rely on the fact that the background is dark to make the scene look like a night scene. Again the reason to light is for better shadows, to make the darker parts of the scene appear very dark relative to the foreground and a high level of contrast will make it look like night. Consider a bright moonlit night, faces will be bright compared to everything else.
A well lit face against a very dark background means low noise night shot. Another example from The assassination of Jesse James by the coward Robert Ford.
So in cinematography, very often the reason to add light is to create shadows and contrast rather than to simply raise the overall light level. To make this easier we need to think about reflections and how the light that we are adding will bounce around the set and reduce the high contrast that we may be seeking. For this reason most film studios have black walls and floors. It’s amazing how much light bounces of the floor. Black drapes can be hung against walls or placed on the floor as “negative fill” to suck up any stray light. Black flags can be used to cut and control any undesired light output from your lamps and a black drape or flag placed on the shadow side of a face will often help increase the contrast across that face by reducing stray reflections. Flags are as important as lights if you want to control contrast. Barn doors on a lamp help, but if you really want to precisely cut a beam of light the flag will need to be closer to the subject.
I think most people that are new to lighting focus too much on the lights themselves and don’t spend enough time learning how to modify light with diffusers, reflectors and flags. Good video lights are expensive, but if you can’t control and modify that light you may as well just by a DIY floodlight from your local hardware store.
Also consider using fewer lights. More is not necessarily better. The more lights you add the more light sources you need to control and flag. The more light you will have bouncing around your set reducing your contrast and spilling into your otherwise nice shadows. More lights means multiple shadows going in different directions that you will have to deal with. Instead of using lots of lights be more careful about where you place the lights you do have, make better use of diffusion perhaps by bringing it closer to your subject to get more light wrap around rather than using separate key and fill lights.
In case you missed the webinars I presented yesterday here are recordings of the 2 afternoon sessions. The first one on HDR, what is it and what does it mean for you. The second is a question and answers session on Sony’s large sensor cameras, from the FS5 to the F55. There were quite a few a6300 and A7s questions thrown in there too!
Hopefully I will be able to find a sponsor that will be able to make these a regular event.
This post might be a little controversial, I am often told “you don’t need to know the technical stuff to be a cinematographer” or “I don’t need to know about log and gamma, I just want to shoot”.
I would argue that unless you are working closely with a good DIT a modern DP/Cinematographer really does need to understand many of the technical aspects of the equipment being used, in particular the settings that alter the way the camera captures the images. Not just things like “set it to gamma x for bright scenes” but why you would want to do that.
Now I’m not saying that you have to be a full blown electronics engineer, but if you really want to capture the best possible images it really is very important that you truly understand what the camera is doing. It’s also a huge help to understand how your footage will behave in post production. Any craftsman should understand the correct way to use his tools and not only know how to use them but how they work.
Part of the understanding of how your chosen camera behaves comes from testing and experimentation. Shooting test clips across a range of exposures, trying different gamma or log curves and then taking the footage into post production and seeing how it behaves.
Film cinematographers will shoot tests with different film stocks before a large production under the kinds of lighting conditions that will be encountered during the film. Then the film would be processed in different ways to find the best match to the look the cinematographer is trying to achieve. Digital cinematographers should be doing the same and importantly understanding what the end results are telling them.
Most of the great painters didn’t just pick up a paint brush and slap paint on a canvas. Many artists from Da Vinci to Turner studied chemistry so they could develop new paints and painting techniques. DaVinci was a pioneer of oil painting, Turner used to make his own paints from base pigments and chemicals and patented some of the unique colors he created.
This doesn’t take anything away from the traditional skills of lighting and composition etc, those are just as important as ever and always will be. But modern electronic cameras are sophisticated devices that need to be used correctly to get the best out of them. I believe that you need to understand the way your camera responds to light. Understands it’s limitations, understand it’s strengths and learn how to use those strengths and avoid the weaknesses.
And that’s a really important consideration. Today the majority of the cameras on the market are capable of making great images…… Provided you know how to get the best from them. One may be stronger in low light, one may be better in bright light. It may be that one camera will suit one job or one scene better than another. You need to learn about these differences and understanding the underlying technologies will help you figure out which cameras may be candidates for your next project.
It’s not just the camera tech that’s important to understand but also how to manage the footage all the way from the camera to delivery. While you don’t need to be an expert colorist, it certainly helps if you know the process, just as film cameramen know about color timing and film processing. A trend that is growing in the US is high end cinematographers that also grade.
This has come about because in the days of film the cinematographer could determine the look of the finished production through a combination of lighting, the choice of film stock and how it was to be processed. Today a cinematographer may have much less control over the final image as it passes through the post production and grading process. Often the final look is determined by the colorist as much as the cinematographer. By also becoming colorists and staying with their material all the way through post production, cinematographers can retain control of the final look of the production.
As HDR (High Dynamic Range) delivery becomes more important along with the need to deliver SDR content at the same time, a good understanding of the differences between and limitations of both systems will be needed as you may need to alter the way you expose to suit one or the other.
So, there is lots that you need to know about the technology used in todays world of digital cinematography. Where there is a big enough budget DIT’s (Digital Imaging Technicians) can help cinematographers with guidance on camera setups, gamma, color science, LUT’s and workflows. But at the low budget end of the market, as a cinematographer you need at the very least a firm grasp of how a modern camera works, how to correctly mange the dat it produces (you would be amazed how many people get this wrong). Finally how the material handles in post production, if you really want to get the best from it.
It isn’t simple, it isn’t always easy, it takes time and effort. But it’s incredibly rewarding when it all comes together and results in beautiful images.
If you disagree or have your own take on this please post a comment. I’d love to hear other views.
This website uses cookies to improve your experience. We'll assume you're ok with this, but you can opt-out if you wish. Read More
Necessary cookies help make a website usable by enabling basic functions like page navigation and access to secure areas of the website. The website cannot function properly without these cookies.
Name
Domain
Purpose
Expiry
Type
wpl_user_preference
www.xdcam-user.com
WP GDPR Cookie Consent Preferences
1 year
HTTP
YSC
youtube.com
YouTube session cookie.
54 years
HTTP
Marketing cookies are used to track visitors across websites. The intention is to display ads that are relevant and engaging for the individual user and thereby more valuable for publishers and third party advertisers.
Name
Domain
Purpose
Expiry
Type
VISITOR_INFO1_LIVE
youtube.com
YouTube cookie.
6 months
HTTP
Analytics cookies help website owners to understand how visitors interact with websites by collecting and reporting information anonymously.
Name
Domain
Purpose
Expiry
Type
__utma
xdcam-user.com
Google Analytics long-term user and session tracking identifier.
2 years
HTTP
__utmc
xdcam-user.com
Legacy Google Analytics short-term technical cookie used along with __utmb to determine new users sessions.
54 years
HTTP
__utmz
xdcam-user.com
Google Analytics campaign and traffic source tracking cookie.
6 months
HTTP
__utmt
xdcam-user.com
Google Analytics technical cookie used to throttle request rate.
Session
HTTP
__utmb
xdcam-user.com
Google Analytics short-term functional cookie used to determine new users and sessions.
Session
HTTP
Preference cookies enable a website to remember information that changes the way the website behaves or looks, like your preferred language or the region that you are in.
Name
Domain
Purpose
Expiry
Type
__cf_bm
onesignal.com
Generic CloudFlare functional cookie.
Session
HTTP
NID
translate-pa.googleapis.com
Google unique id for preferences.
6 months
HTTP
Unclassified cookies are cookies that we are in the process of classifying, together with the providers of individual cookies.
Name
Domain
Purpose
Expiry
Type
_ir
api.pinterest.com
---
Session
---
Cookies are small text files that can be used by websites to make a user's experience more efficient. The law states that we can store cookies on your device if they are strictly necessary for the operation of this site. For all other types of cookies we need your permission. This site uses different types of cookies. Some cookies are placed by third party services that appear on our pages.