I often hear people talking about future proofing content or providing the best they can for their clients when talking about 4K. Comments such as “You’d be crazy not shoot shoot 4K for a professional production”. While on the whole I am a believer in shooting in 4K, I think you also need to qualify this by saying you need to shoot good 4K.
As always you must remember that bigger isn’t always better. Resolution is only one part of the image quality equation. Just take a look at how Arri’s cameras, the Alexa etc, continue to be incredibly popular for high end production even those these are in effect only HD/2K cameras.
Great images are a combination of many factors and frankly resolution comes some way down the list in my opinion. Just look at how DVD has managed to hang on for so long, feature films on DVD still look OK even though the resolution is very low. Contrast and dynamic range are more important, good color is vital and low noise and artefact levels are also essential.
A nice contrasty image with great color, low noise and minimal artefacts up scaled from HD to 4K may well look a lot better than a 4K originated image that lacks contrast or has other artefacts such as compression noise or poor color.
So it’s not just about the number of pixels that you have but also about the quality of those pixels. If you really want to future proof your content it has to be the best quality you can get today, not just the largest you can get today.
This comes up in many of my workshops. It seems like a very simple question and the correct answer is really very simple, but many cameramen, especially those from a TV and video background actually get this a little wrong.
The word “expose” means to lay open, reveal or un-mask. In film terms it’s obvious what it means, it is opening the shutter and aperture/iris to let the correct amount of light fall on the film stock. In the video world it means exactly the same thing. It is how much light we allow to fall on the sensor.
Exposure is controlled by the speed of the shutter (how long we let the light in) and the aperture of the lens (the volume of light we let in).
So why do video people get a bit confused about exposure? Well it’s the down to the way we measure it with video cameras.
In the film world you would use a light meter to measure the intensity of the light in a scene and then perform a calculation to determine the correct amount of light we need to allow to fall on the film based on the sensitivity (ISO) of the film stock. But in the video world it is common practice to look at a monitor and asses the exposure by looking at, or measuring, how bright the picture is using a waveform meter, zebras or histogram etc.
What are we measuring when we look at a video picture or measure a video signal? We are not measuring how much light is falling on the sensor, we are measuring how bright the picture is on the screen or what the recording levels of the video signal are. Most of the time there is a direct relationship between on screen brightness and exposure, but it is important to make a clear distinction between the two as variations in brightness are not always due to changes in exposure.
It’s important because something like changing a cameras gamma curve will alter the brightness of the on screen image. This isn’t an exposure change, this is a change in the recording levels used by that particular gamma curve that in turn result in a change in the brightness levels you see on the screen. This is why if you take a camera such as the FS7 or F5/F55 and correctly expose the camera using Rec709 as the gamma curve you will find middle grey at 42% and white at 90%. Then switch to a Cinegamma or Hypergamma without adjusting the shutter speed or aperture and you will find middle grey at and white at much lower, perhaps the very same white target as low as 70%.
In both cases the exposure is correct, but the on screen brightness greatly different. The difference in on screen brightness comes from the different recording levels used by 709 and Hypergammas/Cinegammas. In order to be able to record a greater dynamic range than the 6 stops offered by 709, we need to compress the original 6 stop 709 range into a much smaller range to make room for the extra stops of dynamic range that the Hypergammas or Cinegammas can record.
So as you can see, exposure should really be the absolute measurement of the amount of light falling on the sensor. Brightness is related to exposure, but just how bright the picture should be depends on many factors of which exposure is just one. Once you realise that brightness and exposure are not always the same thing it becomes easier to understand how Cinegamma, Hypergamma, log and raw recording works. Levels are just levels and it doesn’t really matter whether something is recorded at 90%, 70% or 61%. Provided you have enough data (and this is where 10bit or better recording really helps) you have the same amount of picture information at both levels and you can easily shift from one level to the other without degrading the image in any way in post production.
Of course we do want to have our video levels in the finished production at the right levels to match the levels that the TV, monitor or display device is expecting. But when shooting, especially with non standard gammas such as Hypergamma or log it’s perfectly normal to have levels that are different to what we would see with plain vanilla 709 and these typically lower levels should not be considered too dark or under exposed, because they are not. Dark does not necessarily mean under exposed, nor does it mean a noisy image. How much noise there is depends on the signal to noise ratio which is dependant on the amount of light that we let on to the sensor. I’ll be explaining that in my next article.
It’s amazing how poorly this is understood. I’m also rather surprised at some peoples expectations when it comes to noise in shadow areas of video images.
First of all, all video camera sensors produce noise. There will always be noise to some degree and this is typically most visible in the darker parts of the image because if your actual image brightness is 5% and your noise is 5% the noise is as big as the desired signal. In the highlights the same noise is still there, but when the brightness is 80% and the noise is 5% the noise is much, much less obvious.
ISO: What is ISO with a video camera? On it’s own it’s actually a fairly meaningless term. Why? Well because a camera manufacturer can declare more or less any ISO they choose as the cameras sensitivity. There is no set standard. It’s up to the camera manufacturer to pick an ISO number that gives a reasonably bright image with an acceptable amount of noise. But what is acceptable noise? Again there is no standard, so ISO ratings should be ignored unless you also know what the signal to noise ratio is at that ISO. For decades video camera sensitivity was rated in db. The sensitivity is measured at 0db in terms of the aperture needed to correctly expose a 90% white card at 2000 lux. This is very precise and easily repeatable. The signal to noise ratio is then also measured at the unity (0db) gain point and from this you can actually get a really good understanding of how that camera will perform, not just sensitivity, but more importantly how much noise at the nominal native sensitivity.
But now, because it’s fashionable and makes us sound like film camera operators it’s all about ISO. But ISO on it’s own doesn’t really tell us anything useful. Take a Sony FS7 or F5. In standard gamma at 0db the ISO rating is 800 ISO. But when you switch to S-Log it becomes 2000 ISO (but you are still at 0db). Have you ever noticed that the image doesn’t get brighter even though you are increasing the ISO? The ISO is increased because what is actually happens is that you gain the ability to record a little over 1 stop further into the shadows as you are now using more of the sensors low range (which is normally well below the black level chosen for 709) with the side effect of also seeing a little more than twice as much more noise (1 stop = 6db = double). The camera isn’t actually becoming any noisier, but because your using a lower sensor range you will see more noise in the shadows, noise that in normal gammas goes unseen. It’s really important that you understand this as it explains why S-log looks very noisy in the deepest shadows compared to standard gammas.
Native sensitivity… again this is open to a bit of wriggle room by the camera manufacturer. With a camera shooting log, generally it is a case of mapping the entire sensor capture range from black to white to the zero to 100% recording range. Normally this is done using as little gain as possible as gain adds noise. But as noise reduction processes get better, including on sensor noise reduction, camera manufacturers have some space to move the mapping of the sensor to the recording up and down a bit. Sadly or us, high ISO’s sell cameras. So camera manufacturer’s like to have cameras with high ISO’s because people look at the ISO rating, but ignore the signal to noise figure. The end result is cameras with high ISO’s (because it sounds cool) but with less than optimum signal to noise ratios. It would probably be better for all of us if we started paying much more attention to the signal to noise ratios of cameras, not just the ISO. That may help prevent manufacturers from bring out cameras with ridiculously high native ISO’s that are noisy and frankly far from what we need, which is a good low noise base sensitivity.
The next issue is that people appear to expect to be able to magically pull something out of nothing. If you have areas of deep shadow in your image you can’t magically pull out details and textures from those areas without significantly increasing the noise in those parts of the picture. You can’t do it and you shouldn’t be trying to do it. If you have an 8 bit camera the noise in the shadows will be really coarse, you try to stretch those levels, even by a tiny bit, it’s going to get ugly fast (the same with 12 bit linear raw too). What’s the answer…. LIGHT IT PROPERLY OR EXPOSE IT BRIGHTER.
We appear to have lost the ability to light or expose properly. If you want detail in your shadows either expose them brighter or throw some light in there, then take the levels down in post. Remember it’s all about contrast ratios. Faces are normally 1.5 stops above middle grey and 3.5 stops above our dark shadow range. So if you want a lot of textures in your deep shadows expose the entire scene brighter, not just the foreground but the background and shadows too. If you expose faces at +4.5 above black. Mid grey will still be -1.5 stops below those skin tones and your shadows will still be 3.5 stops below your faces. the contrast ratio remains the same if you increase the overall light level, so now everything will be 1 stop brighter. Then take the levels down by 1 stop in post and bingo, you noise levels are cut in half and your shadows look so much better and might actually now contain some useable picture information.
If you have a modern camera that can record log or raw and has 13 stops or more of dynamic range you need to stop thinking “video” and think “film”.
A big mistake most traditional video camera operators make with these big DR cameras is to treat them as they would a typical limited dynamic range video camera and constantly worry and obsess about protecting highlights. Why do we do this? Well probably because that’s what you do with cameras with a very limited range and that’s probably what you have had drummed into you for years. But now with modern large sensor cameras everything changes. When you get to a 14 stop range camera, even if you choose to shoot 2 stops over exposed (perhaps by using 500 EI on an FS7 or F5) you still have as much or more over exposure range as a conventional video camera and the highlight range that you do have is not subject to a knee or other similar acute highlight compression. So any highlights will contain a ton of high quality, usable picture information. By shooting over exposed by a controlled amount (1 to 2 stops), perhaps by using a low EI you gain very big improvements in the signal to noise ratio and get better saturated colors (opening the aperture lets more light onto the sensor, your colors will be better recorded). This allows you to pull a lot more information out of the data thin shadows and mid range. Most cameras that use log have very little data in the shadows. If you are recording with a 10 bit codec cameras that use variations of the Cineon log curve (Arri LogC, Sony S-Log3, Panasonic V-Log) only have about 80 luma shades covering the first 4 stops of exposure in total. Above the 4th stop the amount of data per stop increases rapidly so a little bit of deliberate over exposure really helps lift your darkest shadows up out of the noise and mire. Up in the highlights each stop has exactly the same amount of data, so over exposing a bit doesn’t compress the highlights as it would with a conventional camera, so a bit of mild over exposure is normally not noticeable.
Really with a 14 stop log camera you want to treat it like film, not video. Just like film, a 14 stop log camera will almost always benefit from a controlled amount of over exposure, highlights will rarely suffer or look bad just because you’re one stop hot, but he shadows and midtones will be significantly improved. And just like film, if you under expose log you will take a big hit. You will loose a lot of shadow information very quickly, have less color, it will be noisy and the highlight benefit will be marginal.
OK, my hands are high in the air. I’m as guilty of this as everyone else. I test cameras, present results here and elsewhere and I report on my observations. Typically providing frame grabs of what I have shot, maybe some nice scenic shots, maybe people shots, but not often shots of test charts. I use them all the time in my workshops and when setting up cameras for myself so why don’t I shoot test charts for my reviews? Well because they are boring and often don’t reflect the real world that we shoot.
But here’s the problem. In my previous post I commented about how some footage of Panasonic’s V-Log from the GH4 looked. The shooter, like me, had chosen to shoot some random shots and then grade them. But here’s the problem. I don’t know what those scenes actually looked like when they were shot and I don’t know what look the reviewer was trying to achieve. Plus there is always the issue that a look that one person finds pleasing may be the next persons least attractive look.
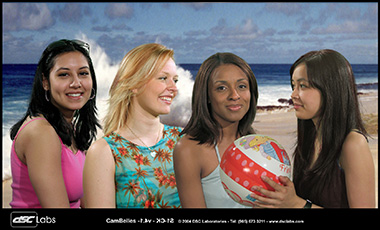
This is where charts should be used. If you shoot a known test chart you eliminate a lot of variables. One of my all time favourite charts is the DSC labs Cambelles.
It’s not a chart in the traditional sense, it’s just a picture of some attractive young ladies on a beach. But it’s a very clever image as it contains some very useful markers. It has very deep shadows and bright highlights (with a 5 stop dynamic range). It has a very broad range of skin tones and the skin tones have the same shade as the industry standard Chroma Du Monde charts. It has all the colors that you are going to encounter in normal shooting, blues, green. reds, they are all there. But here’s one of the key things – repeatability. Every one of these charts that you buy from DSC is exactly the same. So Fred in Australia could get a new camera, shoot his copy of the chart and straight away I know exactly what it should look like here on the other side of the world. Also because it’s a picture of people on a beach, we all know what that looks like and when it isn’t right we notice it. How many of you right now without looking it up can tell me exactly what color the 3rd bar from the left on an SMPTE color bars chart should be?
The use of a decent chart also becomes especially important when looking at cameras where the final image isn’t derived in the camera but in post production. By shooting a known chart and providing a frame grab of that unprocessed image those reading the review can make their own assessment of how easily the footage will grade and how it will respond to different lookup tables. Also when providing ready graded examples of footage, by including a chart in a corner of the shot the reader can see exactly what you have done to the footage. Maybe the reviewer likes strong reds, if there is a chart or other known color reference in the shot then the person reading the review will be able to see this from the strong reds on the chart in the graded footage.
Of course test charts do only show a part of the story about how a camera will behave in the real world. Real shots of real scenes are still incredibly important. But well designed charts brings a known reference and helps both the reviewer and those reading the review see through a lot of the variables that creep into creative shooting of real world scenes.
So: Note to self: Try to include charts in your test shots more often.
So I have just watched a TV commercial that I assume would have had a pretty big budget (it was shot on film) on the TV. If you are in the UK it’s the new John Lewis Insurance ad.
Now when I first saw the add it immediately looked washed out and the blacks looked really milky, at first I thought there was something wrong with the encoding. But now I’ve seen it a few times in a few different places, in reality it’s meant to look like that, it’s obviously a creative look or style.
Frankly I don’t get it and I’m not sure many normal viewers appreciate the flat look and in some of the shots in this ad the blacks really are washed out. We have spent decades trying to figure out how to accurately capture deep shadows and display them convincingly. We are told how expensive OLED TV’s are so much better than LCD TV’s because they can show true deep blacks. People spend lots of money creating a home cinema with the right low light levels. Most modern TV’s include some kind of automatic contrast boosting mechanism. But at the same time it has become fashionable to show flat, low contrast, almost log like pictures on TV and online. Pictures that to me look like the pedestal/black level has been incorrectly set.
I guess here’s the thing: Shooting with log is in. Shooting with log is cool, shooting with log is the new fangled way to shoot. Producers, directors, creative people are being told that log is the best thing since sliced bread and from a capture point of view it does have some real benefits. The problem is that it appears that these people also believe that the normal viewing public also thinks that flat, log like pictures are cool. I’m not so sure that they do. Even though this was a film shoot it’s likely that the telecine would have used Cineon which is also a log curve, so the rushes would have looked very flat before grading.
Does grandma at home appreciate that a flat picture means a picture with a high dynamic range? Does Joe public think a flat washed out picture is special? Do they get the trendy flat creative style. Maybe they do, perhaps I’ve got it wrong, but to me it just looks all wrong. I’d much rather see a nice striking, contrasty image with rich colors and blacks that really are black. I think that sometimes creative people forget that outside of the industry peoples views on what looks good can be very different to the views of those of us that work in TV and film production.
4K is cool, higher resolution, sharper pictures, but sometimes it’s tough to tell the difference between good HD and 4K, especially on a small screen. But HDR….. well HDR really does have that wow factor. Finally we will be able to see images on the screen that have contrast and brightness that is true to life. Vibrant, vivid high resolution images, no more muddy low contrast, dull images.
First of all, lets get this straight, this is not the same thing as the HDR photography that’s been around for an age where you take multiple images at different exposures to capture a massive dynamic range that you then process with photoshop or similar to create some kind of artistic but otherwise un-natural looking picture with un real contrast. Video HDR (or at least what’s being talk about now) is about displaying images on screens that have a dynamic range that closely matches the real world.
And you know what the best bit of this is? A lot of us already have cameras that are shooting HDR or that can be made at least partially HDR capable at no additional cost!
So what is HDR?
Historically television and cinema standards have been limited by display technology. Today a high quality LCD TV will only show a dynamic range of around 6 stops. If you have a light meter check it out. Measure the brightest whites and the deepest blacks and you should find a 5 to 6 stop range. Because cinema screens depend on reflecting light there are limits as to the contrast range that you will see in the cinema too. This has been the case since the very beginning of film making. Yet today we have cameras that can capture dynamic ranges well in excess of this, even an older camera such as a Sony EX1 can manage to record 11 stops, but with normal TV’s and monitors we have no way of showing this 11 stop (or more) range 1:1. So we massage the captured image to fit within the current conventional 6 stop display range using fancy things like the “knee” or special gamma curves like cinegamma, hypergamma or by grading and fine tuning the image in post production.
It’s all about the display.
The key technology that’s changing this is OLED displays. Remember dynamic range is not just about highlights but also about deep, dark shadows. We can make LCD screens brighter, much brighter. An LCD panel works by having a large light source behind an array of tiny electronically controlled ND filters. But these ND filters are never 100% dark, some light always leaks through. This means that when you make the back light brighter the blacks become less black as more light leaks through, so you don’t increase the contrast, only the brightness. The other issue is that current TV broadcasting standards (rec-709) are designed to work within the limitations of current display tech, so we don’t actually broadcast more than a 6 stop range. If we did the pictures wouldn’t look right on a 6 stop screen.
An OLED display on the other hand uses an array of individual LED emitters that are totally dark when they are off and can be very bright when all the way on. As a result they are capable of displaying a far greater dynamic range. TV and monitor manufacturers are now producing displays that are capable of showing dynamic ranges well in excess of the normal 6 stop range. If we then change the standard of the signals that we send to these displays to include a greater dynamic range that’s when the magic starts to happen. But it’s not just about contrast, it’s also about color. OLED displays can also show much more highly saturated colors.
You have to see it to believe it.
Sony HDR demo at NAB
Unfortunately there is no way I can show you HDR here. Your computer monitor probably only has a 6 stop range. So to really see and appreciate HDR you are going to have to go and see a demo. There will be many at IBC. Imagine a picture of a sunset where the clouds and sky really are VIVID orange, an orange that positively glows from the screen illuminating the faces of the viewers. Meanwhile in the same shot there is a deep dark canyon in the foreground and you can see every detail in the deepest shadows of that canyon. Or how about a night time cityscape where the unlit buildings are dark but still clear to see, meanwhile the lights on the buildings are like tiny bright diamonds of brilliant light. Maybe the easiest to imagine is a shot across water where the ripples of the water catching the sun really, really do sparkle and catch your eye. But remember it’s not just about a brighter display, but ones with much, much greater contrast and much richer colors.
HDR Limits.
Are there limits to HDR? Well yes there are, but these limits are becoming more to do with what is comfortable to view rather than what the display technology can do. Sony’s X300 HDR monitor can show I believe around an 11 stop range. Some colorists have told me that working on HDR material in a dark grading suite for a few hours can be quite tiring due to the increased eyestrain. Let’s face it, we wouldn’t want a shot of the setting sun that is so bright that it makes your eye’s hurt. So in practice I think 10 to 11 stops is about the natural limit of what we will be comfortable watching on a screen at home. But this is an enormous 10 fold increase over what we have now.
It’s FREE! Well, at least shooting and distribution is.
One key thing about HDR is that it doesn’t need any more bandwidth to broadcast or distribute than any other image of the same size. All you need to do is change the gamma curve and color space used. This means that OTT (Over The Top – web and internet) delivery services such as Netflix or Amazon can stream in HDR without needing to make any changes to their infrastructure, all they need to do is grade the programme to suit an HDR display. Right now you can already find a number of movies to stream in HDR and many, many more programmes will be available from Netflix and Amazon Prime in HDR this year.
The next thing to consider is that if you have been shooting material with a camera dynamic range greater than 10 or 11 stops then you may already have content that is going to look great in HDR. S-Log material is perfect for HDR, material shot by the F55 using S-Gamut or S-Gamut3 is excellent for HDR as not only does it have a high dynamic range but it’s sensor also has a wide color gamut that will capture those highly saturated vibrant colors that only an HDR display can show. The F5 and FS7 will also shoot great material ready for HDR, although without some of the extended color range that the F55 is capable of. Even material shot with a Cinegamma or Hypergamma can be graded for HDR and in most cases will look better in HDR than it does on a conventional display.
Sony BVM-X300 HDR monitor.
So for us shooters, many of us already have equipment that can produce HDR content, in fact HDR will be the first time many of us will actually truly be able to see what we are shooting! To grade and produce HDR content you are going to need to invest in an HDR display. I’d love to get one of the new HDR capable Sony BVM-X300 monitors, but at £25k it’s too steep for me, so I will have to wait for a good quality HDR TV. The biggest issue with HDR will be that you will need to produce a different grade for HDR distribution compared to conventional Rec-709 distribution. But it must be remembered that many high end productions will already have different grades depending on the distribution method. After all a DVD or Bluray Rec-709 release of a film will need a different grade to the DCI-P3 cinema release.
Like 4K, HDR is already here. It’s not mainstream just yet, but it really isn’t far away. This isn’t a technology for the future, it’s a technology for today. Give it another 18 months and HDR TV’s will be common place in most TV stores, just as 4K TV’s are readily available now. Movie studios are sitting on huge archives of films that with a re-grade will look amazing in HDR. With the new 4K Bluray standard able to carry HDR content we really are looking at a tangible revolution in the quality of home viewing. Not just higher resolution but also higher contrast and dynamic range. If you are starting a big project now or want your material to have a long shelf life, you really should be shooting in 4K and using log or raw right now.
Better at home than in the cinema?
It’s interesting to consider that HDR is something that’s going to work much better in the home or at least via a display panel rather than via projection, so the home viewing experience may well exceed the cinema viewing experience (assuming that you have decent sized screen and good sound system). The next generation broadcasting standard Rec-2020 allows for HDR. These are exciting times times and in the coming weeks I’m hoping to spend some time over at Sony’s Digital Motion Picture Center at Pinewood to learn more about grading and producing content for HDR, the details of which I’ll share with you here.
Bureaucracy in the way in Europe 🙁
In Europe we may have a problem. For HDR to work TV’s need to be brighter. Brighter TV’s consume more energy. At the moment it’s hard to sell an HDR TV in Europe as most exceed the power consumption limits laid down by the EU for televisions which are based on typical LCD technology 🙁 So you may need to personally import an HDR TV from elsewhere.
Cameras with bayer CMOS sensors can in certain circumstances suffer from an image artefact that appears as a grid pattern across the image. The actual artefact is normally the result of red and blue pixels that are brighter than they should be which gives a magenta type flare effect. However sometimes re-scaling an image containing this artefact can result in what looks like a grid type pattern as some pixels may be dropped or added together during the re scaling and this makes the artefact show up as a grip superimposed over the image.
Grid type artefact.
The cause of this artefact is most likely off-axis light somehow falling on the sensor. This off axis light could come from an internal reflection within the camera or the lens. It’s known that with the F5/F55 and FS7 cameras that a very strong light source that is just out of shot, just above or below the image frame can in some circumstances with some lenses result in this artefact. But this problem can occur with almost any CMOS Bayer camera, it’s not just a Sony problem.
The cure is actually very simple, use a flag or lens hood to prevent off axis light from entering the lens. This is best practice anyway.
So what’s going on, why does it happen?
When white light falls on a bayer sensor it passes through color filters before hitting the pixel that measures the light level. The color filters are slightly above the pixels. For white light the amount of light that passes through each color filter is different. I don’t know the actual ratios of the different colors, it will vary from sensor to sensor, but green is the predominant color with red and blue being considerably lower, I’ve used some made up values to illustrate what is going on, these are not the true values, but should illustrate the point.
In the illustration above when the blue pixel see’s 10%, green see 70% and red 20%, after processing the output would be white. If the light falling on the sensor is on axis, ie coming directly, straight through the lens then everything is fine.
But if somehow the light falls on the sensor off axis at an oblique angle then it is possible that the light that passes through the blue filter may fall on the green pixel, or the light from the green filter may fall on the red pixel etc. So instead of nice white light the sensor pixels would think they are seeing light with an unusually high red and blue component. If you viewed the image pixel for pixel it would have very bright red pixels, bright blue pixels and dark green pixels. When combined together instead of white you would get Pink or Blue. This is the kind of pattern that can result in the grid type artefact seen on many CMOS bayer sensors when there are problems with off axis light.
This is a very rare problem and only occurs in certain circumstances. But when it does occur it can spoil an otherwise good shot. It happens more with full frame lenses than with lenses designed for super 35mm or APSC and wide angles tend to be the biggest offenders as their wide Field of View (FoV) allows light to enter the optical path at acute angles. It’s a problem with DSLR lenses designed for large 4:3 shaped sensors rather than the various wide screen format that we shoot video in today. All that extra light above and below the desired widescreen frame, if it isn’t prevented from entering the lens has to go somewhere. Unfortunately once it enters the cameras optical path it can be reflected off things like the very edge of the optical low pass filter, the ND filters or the face of the sensor itself.
The cure is very simple and should be standard practice anyway. Use a sun shade, matte box or other flag to prevent light from out of the frame entering the lens. This will prevent this problem from happening and it will also reduce flare and maximise contrast. Those expensive matte boxes that we all like to dress up our cameras with really can help when used and adjusted correctly.
I have found that adding a simple mask in front of the lens or using a matte box such as any of the Vocas matte boxes with eyebrows will eliminate the issue. Many matte boxes will have the ability to be fitted with a 16:9 or 2.40:1 mask ( also know as Mattes hence the name Matte Box) ahead of the filter trays. It’s one of the key reason why Matte Boxes were developed.
Note the clamp inside the hood for holding a mask in front of the filters on this Vocas MB216 Matte Box. Not also how the Matte Box’s aperture is 16:9 rather than square to help cut out of frame light.Arri Matte Box with Matte selection.
You should also try to make sure the size of the matte box you use is appropriate to the FOV of the lenses that you are using. An excessively large Matte Box isn’t going to cut as much light as a correctly sized one. I made a number of screw on masks for my lenses by taking a clear glass or UV filter and adding a couple of strips of black electrical tape to the rear of the filter to produce a mask for the top and bottom of the lens. With zoom lenses if you make this mask such that it can’t be seen in the shot at the wide end the mask is effective throughout the entire zoom range.
Many cinema lenses include a mask for 17:9 or a similar wide screen aperture inside the lens.
I’ve been running a lot of workshops recently looking at creating LUT’s and scene files for the FS7, F5 and F55. One interesting observation is that when creating a stylised look, almost always the way the footage looks before you grade can have a very big impact on who far you are prepared to push your grade to create a stylised look.
What do I mean by this? Well if you start off in your grading suite looking at some nicely exposed footage with accurate color and a realistic representation of the original scene, when you start to push and pull the colors in the image the pictures start to look a little “wrong” and this might restrict how far you are prepared to push things as it goes against human nature to make things look wrong.
If on the other hand you were to bring all your footage in to the grading suite with a highly stylised look straight from the camera, because it’s already unlike the real world, you are probably going to be more inclined to further stylise the look as you have never seen the material accurately represent the real world so don’t notice that it doesn’t look “right”.
An interesting test to try is to bring in some footage into the grade and apply a very stylised look via a LUT and then grade the footage. Try to avoid viewing the footage with a vanilla true to life LUT if you can.
Then bring in the same or similar footage with a vanilla true to life LUT and see how far you are prepared to push the material before you star getting concerned that it no longer looks right. You will probably find that you will push the stylised footage further than the normal looking material.
As another example if you take almost any recent blockbuster movie and start to analyse the look of the images you will find that most use a very narrow palette of orange skin tones along with blue/green and teal. Imagine what you would think if your TV news was graded this way, I’m sure most people would think that the camera was broken. If a movie was to intercut the stylised “look” images with nicely exposed, naturally colored images I think the stylised images would be the ones that most people would find objectionable as they just wouldn’t look right. But when you watch a movie and everything has the same coherent stylised look it works and it can look really great.
In my workshops when I introduce some of my film style LUT’s for the first time (after looking at normal images), sometimes people really don’t like them as they look wrong. The colors are off, it’s all a bit blue, it’s too contrasty, are all common comments. But if you show someone a video that uses the same stylised look throughout the film then most people like the look. So when assessing a look or style try to look at it in the right context and try to look at it without seeing a “normal” picture. I find it helps to go and make a coffee between viewing the normal footage and then viewing the same material with a stylised look.
Another thing that happens is the longer you view a stylised look the more “normal” it becomes as your brain adapts to the new look.
In fact while typing this I have the TV on. In the commercial break that’s just been on most of the ads used a natural color palette. Then one ad came on that used a film style palette (orange/teal). The film style palette looked really, really odd in the middle of the normal looking ads. But on it’s own that ad does have a very film like quality too it. It’s just that when surrounded by normal looking footage it really stands out and as a result looks wrong.
I have some more LUT’s to share in the coming days, so check back soon for some film like LUT’s for the FS7/F5/F55 and A7s.
This website uses cookies to improve your experience. We'll assume you're ok with this, but you can opt-out if you wish. Read More
Necessary cookies help make a website usable by enabling basic functions like page navigation and access to secure areas of the website. The website cannot function properly without these cookies.
Name
Domain
Purpose
Expiry
Type
wpl_user_preference
www.xdcam-user.com
WP GDPR Cookie Consent Preferences
1 year
HTTP
YSC
youtube.com
YouTube session cookie.
54 years
HTTP
Marketing cookies are used to track visitors across websites. The intention is to display ads that are relevant and engaging for the individual user and thereby more valuable for publishers and third party advertisers.
Name
Domain
Purpose
Expiry
Type
VISITOR_INFO1_LIVE
youtube.com
YouTube cookie.
6 months
HTTP
Analytics cookies help website owners to understand how visitors interact with websites by collecting and reporting information anonymously.
Name
Domain
Purpose
Expiry
Type
__utma
xdcam-user.com
Google Analytics long-term user and session tracking identifier.
2 years
HTTP
__utmc
xdcam-user.com
Legacy Google Analytics short-term technical cookie used along with __utmb to determine new users sessions.
54 years
HTTP
__utmz
xdcam-user.com
Google Analytics campaign and traffic source tracking cookie.
6 months
HTTP
__utmt
xdcam-user.com
Google Analytics technical cookie used to throttle request rate.
Session
HTTP
__utmb
xdcam-user.com
Google Analytics short-term functional cookie used to determine new users and sessions.
Session
HTTP
Preference cookies enable a website to remember information that changes the way the website behaves or looks, like your preferred language or the region that you are in.
Name
Domain
Purpose
Expiry
Type
__cf_bm
onesignal.com
Generic CloudFlare functional cookie.
Session
HTTP
NID
translate-pa.googleapis.com
Google unique id for preferences.
6 months
HTTP
Unclassified cookies are cookies that we are in the process of classifying, together with the providers of individual cookies.
Name
Domain
Purpose
Expiry
Type
_ir
api.pinterest.com
---
Session
---
Cookies are small text files that can be used by websites to make a user's experience more efficient. The law states that we can store cookies on your device if they are strictly necessary for the operation of this site. For all other types of cookies we need your permission. This site uses different types of cookies. Some cookies are placed by third party services that appear on our pages.