This seems to be a source of frustration for many people shooting raw or using S-Log2 or S-Log3 on a Sony camera. When shooting log and raw you should also be using a matching S-Gamut colour gamut if you want to get the best from the camera and this ties you into one of 3 preset white balances.
With a PXW-FS7, PMW-F5 or F55 it is possible to use custom mode to select a different colour space to mix with S-Log2 or S-Log3 and then have a variable white balance. With the Alpha cameras, PXW cameras such as the FS5 you can choose any Gamut you want in the picture profiles, but I don’t recommend this. For a start, if you don’t use one of the S-Gamuts you will be limited to Rec-709 Gamut, so you won’t be recording the cameras full colour range. Also in custom mode there are some other things like noise reduction that you really don’t want when shooting S-log2/3 (it can cause banding).
So why is the S-Gamut white balance fixed to the 3 presets for daylight, fluorescent and tungsten? The main reason is to ensure you get the cameras full dynamic range in each colour. White balance is a gain function, it adjusts the gain of the red, green and blue channels so that white objects appear white under differing light sources. So if the light source lacks blue light – making the pictures look excessively warm – you add extra gain to the blue channel to compensate.
But the problem with this is that gain affects dynamic range. When shooting log (or raw) the camera needs to operate the sensor at the optimum gain level to squeeze the highest possible dynamic range from the it. Changing the gain in just one colour channel to shift the white balance could result in a reduction of dynamic range in the channel. This could manifest itself as colours in one channel that clip sooner than the others. This can be really hard to deal with in post production and can show up as things like bright clouds with a colour cast that isn’t in the rest of the picture.
Another potential issue is that because of the way silicon sensors work the blue channel is almost always noisier than the red and green. So you want to keep the gain in the blue channel as low as possible to prevent the pictures getting too noisy. This is particularly important when shooting log as you won’t see your end result until after the images have been graded. So manually shifting the gain of the blue channel in camera to correct the white balance could lead to footage that ends up noisier than you would expect.
So – Sony chose to fix the white balance to 3 carefully tuned presets designed to avoid this situation and maximise the dynamic range. After all, when shooting log or raw it is expected that the footage will be graded anyway, so the white balance will normally be adjusted as part of the post production process.
There are some people that advocate adjusting the FS5’s white balance via the picture profile settings, personally I don’t recommend this or feel that it’s necessary. But yes, you can do this, but just keep a very close eye on your highlights and if you can use monitor with RGB parade to make sure you have equal recording levels for your whites without one colour channel clipping ahead of the others. Also apply a LUT in the monitor that is close to your desired output so that you can keep an eye on the noise levels.
In summary – the white balance is preset to ensure you don’t encounter problems later on. You should be able to fully adjust and fine tune your white balance in post production to a far greater degree than is possible in camera anyway, so don’t worry if the WB is a touch off when shooting.
The only exception to this is the new Sony Venice. Venice has enough dynamic range and enough internal processing power to allow you to make a wide range of white balance adjustments in camera. Hopefully we will see some of this flexibility trickle down to the next generations of lower cost Sony digital cinema cameras.
With Sony’s log capable cameras (and most other manufacturers) when you switch between the standard gamma curves and log gamma there is a change in the cameras ISO rating. For example the FS7 is rated at 800 ISO in rec709 but rated at 2000 ISO in log. Why does this change occur and how does it effect the pictures you shoot?
As 709 etc has a limited DR (between around 6 and 10 stops depending on the knee settings) while the sensor itself has a 14 stop range, you only need to take a small part of the sensors full range to produce that smaller range 709 or hypergamma image. That gives the camera manufacturer some freedom to pick the sweetest part of the sensors range. his also gives some leeway as to where you place the base ISO.
I suspect Sony chose 800 ISO for the FS7 and F5 etc as that’s the sensors sweet spot, I certainly don’t think it was an accidental choice.
What is ISO on an electronic camera? ISO is the equivalent sensitivity rating. It isn’t a measure of the cameras actual sensitivity, it is the ISO rating you need to enter into a light meter if you were using an external light meter to get the correct exposure settings. It is the equivalent sensitivity. Remember we can’t change the sensor in these cameras so we can’t actually change the cameras real sensitivity, all we can do is use different amounts of gain or signal amplification to make the pictures brighter or darker.
When you go switch the camera to log you have no choice other than to take everything the sensor offers. It’s a 14 stop sensor and if you want to record 14 stops, then you have to take 100% of the sensors output. The camera manufacturer then chooses what they believe is the best exposure mid point point where they feel there is an acceptable compromise between noise, highlight and lowlight response. From that the manufacture will get an ISO equivalent exposure rating.
If you have an F5, FS7 or other Sony log camera, look at what happens when you switch from rec709 to S-Log2 but you keep your exposure constant.
Middle grey stays more or less where it is, the highlights come down. White will drop from 90% to around 73%. But the ISO rating given by the camera increases from 800ISO to 2000ISO. This increased ISO number implies that the sensor became more sensitive – This is not the case and a little missleading. If you set the camera up to display gain in dB and switch between rec709 (std gamma) and S-Log the camera stays at 0dB, this should be telling you that there is no change to the cameras gain, no change to it’s sensitivity. Yet the ISO rating changes – why?
The only reason the ISO number increases is to force us to underexpose the sensor by 1.3 stops (relative to standard gammas such as rec709 and almost every other gamma) so we can squeeze a bit more out of the highlights. If you were using an external light meter to set your exposure if you change the ISO setting on the light meter from 800 ISO to 2000 ISO the light meter will tell you to close the aperture by 1.3 stops. So that’s what we do on the camera, we close the aperture down a bit to gain some extra highlight range.
But all this comes at the expense of the shadows and mid range. Because you are putting less light on the sensor if you use 2000 ISO as your base setting the shadows and mids are now not as good as they would be in 709 or with the other standard gammas.
This is part of the reason why I recommend that you shoot with log between 1 and 2 stops brighter than the base levels given by Sony. If you shoot 1 stop brighter that is the equivalent to shooting at 1000 ISO and this is closer to the 800 ISO that Sony rate the camera at in standard gamma. Shooting that bit brighter gives you a much better mid range that grades much better.
I have been asked whether you should still expose log a bit brighter than the recommended base levels on the Sony PXW-FS5 now that Sony have released new firmware that gives it a slightly lower base ISO. In this article I take a look at why it might be a good idea to expose log (with any camera) a bit brighter than perhaps the manufacturer recommends.
There are a couple of reasons to expose log nice and bright, not just noise. Exposing log brighter makes no difference to the dynamic range. That’s determined by the sensor and the gain point at which the sensor is working. You want the camera to be at it’s native sensitivity or 0dB gain to get that maximum dynamic range.
Exposing brighter or darker doesn’t change the dynamic range but it does move the mid point of the exposure range up and down. Exposing brighter increases the under exposure range but decreases the over exposure range. Exposing darker decreases the under exposure range but increases the over exposure range.
Something that’s important when thinking about dynamic range and big dynamic ranges in particular is that dynamic range isn’t just about the highlights it’s also about the shadows, it isn’t just over exposure, it’s under exposure too, it’s RANGE.
So why is a little bit of extra light often beneficial? You might call it “over exposure” but that’s not a term I like to use as it implies “too much exposure”. I prefer to use “brighter exposure”.
It’s actually quite simple, it’s about putting a bit more light on to the sensor. Most sensors perform better when you put a little extra light on them. One thing you can be absolutely sure of – if you don’t put enough light on the sensor you won’t get the best pictures.
Put more light on to the sensor and the shadows come up out of the sensors noise floor. So you will see further into the shadows. I’ve had people comment that “why would I ever want to use the shadows, they are always noisy and grainy”? But that’s the whole point – expose a bit brighter and the shadows will be much less noisy, they will come up out of the noise. Expose 1 stop brighter and you halve the shadow noise (for the same shadows at the previous exposure). Shadows are are only ever noise ridden if you have under exposed them.
This is particularly relevant in controlled lighting. Say you light a scene for 9 stops. So you have 9 stops of dynamic range but a 14 stop sensor. Open up the aperture, put more light on the sensor, you get a better signal to noise ratio, less noisy shadows but no compromise of any type to the highlights because if the scene is 9 stops and you have 14 to play with, you can bring the exposure up by a couple of stops comfortably within the 14 stop capture range.
Chart showing S-Log2 and S-Log3 plotted against f-stops and code values. Note how little data there is for each of the darker stops, the best data is above middle grey. Note that current sensor only go to +6 stops ove middle grey so S-Log2 and S-Log record to different peak levels.
Look at the above diagram of Sony’s S-Log2 and S-Log3 curves. The vertical 0 line in the middle is middle grey. Note how above middle grey the log curves are more or less straight lines. That’s because above the nominal middle grey exposure level each stop is recorded with the same amount of data, this you get a straight line when you plot the curve against exposure stops. So that means that it makes very little difference where you expose the brighter parts of the image. Expose skin tones at stop + 1 or stop +3 and they will have a very similar amount of code values (I’m not considering the way dynamic range expands in the scene you shoot as you increase the light in the scene in this discussion). So it makes little difference whether you expose those skin tones at stop +1 or +3, after grading they will look the same.
Looking at the S-Log curve plots again note what happens below the “0” middle grey line. The curves roll off into the shadows. Each stop you go down has less data than the one before, roughly half as much. This mimics the way the light in a real scene behaves, but it also means there is less data for each stop. This is one of the key reasons why you never, ever want to be under exposed as if you are underexposed you mid range ends up in this roll off and will lack data making it not only noisy but also hard to grade as it will lack contrast and tonal information.
Open up by 1 additional stop and each of those darker stops is raised higher up the recording curve by one stop and every stop that was previously below middle grey doubles the amount of tonal values compared to before, so that’s 8 stops that will have 2x more data than before. This gives you a nice fat (lots of data) mid range that grades much better, not just because it has less noise but because you have a lot more data where you really need it – in the mid range.
Note: Skin tones can cover a wide exposure range, but typically the mid point is around 1 to 1.5 stops above middle grey. In a high contrast lighting situation skin tones will start just under middle grey and extend to about 2 stops over. If you accidentally under expose by 1 stop or perhaps don’t have enough light for the correct exposure you will seriously degrade the quality of your skin tones as half of your skin tones will be well below middle grey and in the data roll-off.
Now of course you do have to remember that if your scene does have a very large dynamic range opening up an extra stop might mean that some of the very brightest highlights might end up clipped. But I’d happily give up a couple of specular highlights for a richer more detailed mid range because when it comes to highlights – A: you can’t show them properly anyway because we don’t have 14 stop TV screens and B: because highlights are the least important part of our visual range.
A further consideration when we think about the highlights is that with log there is no highlight roll-off. Most conventional gamma curves incorporate a highlight roll-off to help increase the highlight range. These traditional highlight roll-offs reduce the contrast in the highlights as the levels are squeezed together and as a result the highlights contain very little tonal information. So even after grading they never look good, no matter what you do. But log has no highlight roll-off. So even the very brightest stop, the one right on the edge of clipping contains just as much tonal information as each of the other brighter than middle grey stops. As a result there is an amazingly large amount of detail than can be pulled out of these very bright stops, much more than you would ever be able to pull from most conventional gammas.
Compare log to standard gammas for a moment. Log has a shadow roll-off but no highlight roll-off. Most standard gammas have a strong highlight roll-off. Log is the opposite of standard gammas. With standard gammas, because of the highlight roll-off, we normally avoid over exposure because it doesn’t look good. With Log we need to avoid under exposure because of the shadow roll-off, it is the opposite to shooting with standard gammas.
As a result I strongly recommend you never, ever under expose log. I normally like to shoot log between 1 and 2 stops brighter than the manufacturers base recommendation.
Next week: Why is a Sony camera like the FS7,F5 800 ISO with standard gamma but 2000 ISO in log and how does that impact the image?
That may seem like quite a sensational headline – beware exposing to the right with log – but let me explain.
First of all, I’m not saying you can’t or shouldn’t expose to the right, all I am saying is beware – understand the implications.
First of all what is normally meant by exposing to the right? Well it’s a term that comes from the world of photography where you would use the cameras histogram to measure the exposure levels. Exposing to the right would normally mean setting the shutter speed and aperture so that the levels shown on the histogram are as far to the right as you can get them without going beyond the right side of the histogram. This would ensure a nice bright exposure with lots of light falling on the sensor, something that is normally highly desirable as you get a nice low noise picture once you have adjusted and processed it in your photo editing software.
You can expose to the right with a video camera too. However when shooting with Rec-709 or conventional gammas this can often result in nasty looking highlights thanks to the default knee settings, so it’s not normally a good idea for 709 and standard gammas.
With log or raw as there is no highlight roll off you can expose to the right and it should give you a nice bright exposure… or will it?????
The problem with exposing to the right is that you are exposing for the highlights in the scene. If shooting a low contrast or low dynamic range scene this isn’t going to cause any problems as exposing to the right will mean that everything in the scene is nice and bright.
But if shooting a high dynamic range scene, say an outdoor scene with bright clouds in the sky but large areas of shadow, the exposure will be optimised for the highlights. The mid range and shadows may end up too dark. On a sunny day if shooting a person with their back to the sun the sky could easily be 6 or 7 stops brighter than the skin tones. If you expose for the sky/highlights the skin tones will be 1 or 2 stops darker than the basic exposure level recommended for most log curves.
(S-log2/3 has 14 stops. At the base exposure you have 6 stops above middle grey and 8 below. Skin tones are normally between 1 and 2 stops above middle grey. So if the sky/highlights are 6 stops above the skin tones, then exposing for the highlights will put the skin tones where middle grey should be, which is 1 stop under exposed and 2 stops below where I would normally like to see skin tones when shooting with log or raw).
The first thing a viewer will notice when they look at a scene with faces or people will be the skin tones. If these have been under exposed they will be grainy and less than ideal. The viewer will notice noise and grain and poor shadows long before they look at the brightest highlights. Shooting log and protecting the highlights or exposing to the right will often compromise the all important mid tones because you are exposing for the highlights, not the midrange. In addition exposing for highlights with a high dynamic range scene can often push the shadows down in level and they will end up noisy and grainy. The biggest issue with exposing to the right is that it’s extremely difficult to estimate how many stops there are between your mid tones and the highlights, so you never know quite where your mid tones are falling.
(Midtones – generally a white piece of paper or a 90% reflectivity white card would be considered to be the top end of the mid tones. Go down about 2.5 stops from white and you hit middle grey (18% grey card). This range between middle grey and white is where skin tones, plants, most animals etc will be and it probably the most important part of most images).
An important consideration with log and raw is that there is no highlight roll off. Standard gammas (with the default knee found on almost every camera) , cinegammas, hypergammas etc all roll off the highlights. That is to say that as you approach the peak recording level the contrast is reduced as the highlights are squeezed together to try to extend the dynamic range. This reduction in contrast means that it is very difficult, if not impossible, to recover any nice, useable picture information out of anything close to the peak recording level. As a result with conventional gammas we tend to avoid over exposure at all costs as it looks nasty. This highlight roll off is one of the things that gives video the video look.
Log and raw don’t have this same kind of highlight roll off. The image gets brighter and brighter until it clips. With log the stop immediately below clipping contains just as much picture information as any other stop brighter than middle grey. With linear raw the stop just below clipping has more information than any other stop. As a result in post production there is a very large amount of data that can be pulled out of these highlights, even if they are a little clipped! So don’t worry about a few clipped highlights when shooting log. The other thing to remember is there is no TV or monitor that can show these highlights as they really are, so they will never look perfect anyway.
Another thing that happens when exposing to the right is that grading becomes harder than it needs to be. Because the separation between the mid tones and highlights will vary greatly depending on things like whether you are shooting into or away from the sun, when you expose to the right you mid tone brightness will be up and down all over the place. So in post production as well as adding the look that you want to your footage, you are also going to have to spend a lot of time matching the mid range exposure to balance skin tones etc from shot to shot.
Rather than exposing to the right what I recommend is exposing for the mid range. After all this is the important part of the image. To do this you need to use a diffuse reflective shade. The most commonly used shades are a 90% white card and/or an 18% reflectivity grey card – middle grey. Get the mid range right and in most cases the highlights will take care of themselves. Getting the mid range right might mean exposing the mid range brighter than the recommended levels. But it’s the mid range we need to measure, not the highlights, this is the important part of the image.
90% white is an incredibly important level in the world of film and video. A typical piece of office paper reflects about 92-94% of the light falling on it. Office paper often uses brighteners and special chemicals to make it look bright and white. This white is the brightest diffuse surface you will likely ever see. Anything brighter than this is normally going to be an actual source of light. The sky perhaps or a direct bounced reflection off a shiny, reflective surface such as the bodywork of a car. So anything brighter than 90% white would normally be considered to be a highlight and to us humans, highlights are visually less important than the mid range. This is why the knee on most video cameras kicks in at around 90%. Anything brighter than 90% is a highlight so the knee only effects highlights and leaves the all important mid range alone.
Middle grey is also very important because it’s a shade of grey that to most people looks to be half way between black and white. Skin tones fall roughly half way between middle grey and white. In addition if you average all the brightness levels within a typical scene the end result is typically very close to middle grey. Light meters are calibrated to middle grey. The relationship between middle grey and white is fixed. White reflects 90%, middle grey 18%, no matter how bright the actual light source. So whether you are indoors, outside. Whether it’s sunny or overcast, white and middle grey will always be close to 2.5 stops apart. They are extremely useful fixed reference levels.
There are many ways to measure the brightness of a white or grey card. My preferred method is with a waveform display. But you could also use zebras (use a narrow zebra window if you can). You can also use false colour. Unfortunately it’s very difficult to use a histogram to measure the brightness of a specific target. The histogram is a great measuring tool for photography, but less than ideal for video. If you can’t get a white/grey card out in front of the camera you could consider using a light meter. It’s also worth noting that skin tones sit just a little over half way between middle grey and white, so if you have no other reference you could simply place your skin tones a touch brighter than half way between the values you are targetting for middle grey and white.
Just to be clear: I do still recommend exposing Sony’s S-log2, S-log3 and raw between 1 and 2 stops brighter than the Sony base levels. But the key take-away is that it’s the mid range you need to measure and expose at this level. Exposing to the right using a histogram or waveform and just looking at the peaks and brightest parts of the image does not tell you what is happening in he mid range. Measure the mid range, not the peak brightness.
This is a question that comes up time and time again. I’ve been using the F5 and FS7 for almost 5 years. What I’ve discovered in that time is that the one thing that people notice more than anything from these cameras is noise if you get your exposure wrong. In addition it’s much harder to grade a noisy image than a clean one.
Lets take a look at a few key things about how we expose and how the F5/FS7 works (note the same principle applies to most log based cameras, the FS5 also benefits from being exposed brighter than the suggested base settings).
What in the image is important? What will your audience notice first? Mid-range, shadows or highlights?
I would suggest that most audiences first look at the mid range – faces, skin tones, building walls, plants etc. Next they will notice noise and grain or perhaps poor, muddy or murky shadows. The last thing they will notice is a few very brightly highlights such as specular reflections that might be clipped.
The old notion of protecting the highlights comes from traditional gamma curves with a knee or highlight roll off where everything brighter than a piece of white paper (90% white) is compressed into a very small recording range. As a result when shooting with conventional gamma curves ALL of the brighter parts of the image are compromised to some degree, typically showing a lack of contrast and texture, often showing some weird monotone colors. Log is not like that, there is no highlight roll off, so those brighter than white highlights are not compromised in the same way.
In the standard gammas at 0dB the PXW-FS7, like the PMW-F5 is rated at 800 ISO. This gives a good balance between noise and sensitivity. Footage shoot at 0dB/800ISO with the standard gammas or Hypergammas generally looks nice and clean with no obvious noise problems. However when we switch to log the native ISO rating of the cameras becomes 2000 ISO, so to expose “correctly” we need to stop the aperture down by 1.3 stops. This means that compared to 709 and HG1 to HG4, the sensor is being under exposed by 1.3 stops. Less light on the sensor will mean more noise in the final image. 1.3 stops is the equivalent of 9dB. Imagine how Rec709 looks if it is under exposed by 1.3 stops or has to have +9dB of gain added in. Well – thats what log at 2000 ISO will look like.
However log has lots of spare headroom and no highlight compression. So we can choose to expose brighter than the base ISO because pushing that white piece of paper brighter in exposure does not cause it to become compressed.
If you open the aperture back up by 1.3 stops you get back to where you would be with 709 in terms of noise and grain. This would be “rating” the camera at 800 ISO or using 800 EI. Rating the camera at 800EI you still have 4.7 stops of over exposure range, so the only things that will be clipped will in most cases be specular reflections or extreme highlights. There is no TV or monitor in existence that can show these properly, so no matter what you do, they will never be true to life. So don’t worry if you have some clipped highlights, ignore them. Bringing your exposure down to protect these is going to compromise the mid range and they will never look great anyway.
You should also be extremely cautious about ever using an EI higher that 2000. The camera is not becoming more sensitive, people are often misslead by high EI’s into thinking somehow they are capturing more than they really are. If you were to shoot at 4000 EI you will end up with footage 15dB noisier than if you were shooting the same scene using 709 at 800 ISO. That’s a lot of extra noise and you won’t necessarily appreciate just how noisy the footage will be while shooting looking at a small monitor or viewfinder.
I’ve been shooting with the F5 and then the FS7 for almost 5 years and I’ve never found a situation where I going to an EI higher than 800 would have resulted in a better end result. At the same time I’ve seen a lot of 2000 EI footage where noise in the mid range has been an issue, one particular example springs to mind of a high end car shoot where 2000 EI was used but the gloss and shine of the car bodywork is spoilt because it’s noisy, especially the darker coloured cars.
Of course this is just my opinion, based on my own experience, others may differ and the best thing you can do is test for yourself.
The short answer is it all depends on the camera you are using. With the F55 or F65 then S-Log2/S-Gamut and S-Log3/S-Gamut3 will give you a larger range of colours in your final image than S-Log3/S-Gamut3.cine. But if you have a PMW-F5, PXW-FS7 or PXW-FS5 this is not going to be the case.
What is Gamut?
The word Gamut means the complete range or scale of something. So when we talk about Gamut in a video camera we are talking about dynamic range and color range (colorspace) taken together. Then within the Gamut we can break that down into the dynamic range or brightness range which is determined by the gamma curve and the color range which is determined by the colorspace.
Looking at the current Sony digital cinema cameras you have a choice of 3 different gamuts when the camera is in log mode plus a number of conventional gamuts you get when shooting rec-709, rec-2020 or any other combination of rec-709 color with cinegammas or hypergammas.
Log gamma and gamuts.
But it’s in the log mode where there is much confusion. When shooting with log with the current cameras you have 3 recommended combinations.
The S-log2 and S-log3 gamma curves both capture the same dynamic range – 14 stops, there is no difference in the dynamic range captured.
In terms of the range of colors that can be recorded S-Gamut and S-Gamut3 are the same size and the largest recording colorspaces the cameras have. S-Gamut3.cine is a smaller colourspace but still larger than P3 (digital cinema projection) or rec-709.
But those were all designed for the F55 and F65 cameras that have extremely high quality (expensive) colour filters on their sensors. The reality is that the F5/FS7/FS5 sensor cannot see the full range of any of the S-Gamut colorspaces so in reality you gain very little by using the larger versions. Don’t expect to see a noticeably greater range of colours than any of the other colour modes if you have the F5/FS7/FS5. But all the LUT’s designed for these cameras are based on the S-Gamuts and if you want to mix an FS5 with an F55 in one production it helps to use the same settings so that grading will be easier. It is worth noting at this point that most natural colors do fall within Rec-709, so while it is always nicer to have a bigger color range it isn’t the end of the world for most of what we shoot.
S-Log3 is a great example of what it means to have a bigger recording range than the camera can “see”. S-log3 is based on the Cineon film transfer log gamma curve developed back in the late 1980’s. Cineon was carefully tailored to match film response and designed around 10 bit data (as that was state of the art back then). It allows for around 16 stops of dynamic range. Much later, Arri and many others then adapted Cineon for use in video cameras – The “C” in Arri’s LogC stands for Cineon.
When Sony started doing wide dynamic range cameras they developed their own log gammas starting with S-Log, then S-Log2. These curves are matched very precisely to the way a video sensor captures a scene rather than film. In addition they are matched to the sensors actual capture range, S-Log can record 13 stops as that’s what the sensors in the cameras with S-Log can see. Then S-Log2 is 14 stops as the second generation cameras can all see 14 stops. As a result of being purpose designed for a video sensor, when using S-Log2 you maximise the entire recording range because the sensor is matched to the log which is matched to the record range.
But, these curves drew much criticism from early adopters and colorists because they were very different from the Cineon curve and all the other log curves based on this old school film curve. Colorists didn’t like it because none of their old Cineon LUT’s would work as expected and it was “different”.
Chart showing S-Log2 and S-Log3 plotted against f-stops and code values. Note how little data there is for each of the darker stops, the best data is above middle grey. Note that current sensors only go to +6 stops over middle grey so S-Log2 and S-Log3 record to different peak levels.
In response to this Sony then developed S-Log3 and surprise, surprise – S-log3 is based on Cineon. So S-log3 is based on a 16 stop film transfer curve, but the current cameras can only see 14 stops. What this means is that the top 14% of the gamma curve is never used (that’s where stops 15 and 16 would reside) and as a result s-Log3 tops out at 92% and never gets to the 107% that S-Log2 can reach. If Sony were to release a 16 stop camera then S-Log3 could still be used and then it would reach 107%.
Coming back to colorspace. If you understand that the sensor in the F5/FS7/FS5 cannot see the full colour range that S-Gamut or S-Gamut3 are capable of recording then you will appreciate that like S-log3 (that is larger than the camera can see and therefore part empty) many of the possible code values available in S-Gamut are left empty. This is a waste of data. So from a colourspace point of view the best match when shooting log for these cameras is the slightly smaller colorspace S-Gamut3.cine. But S-Gamut3.cine is meant to be matched with S-Log3 which as we have seen wastes data anyway. If the camera is shooting using a 10 bit codec such as XAVC-I or XAVC-L in HD there are plenty of code values to play with, so a small loss of data has little impact on the final image. But if you are recording with only 8 bit data, for example XAVC-L in UHD then this does become much more of a problem and this is when you will find that S-Gamut with S-Log2 is going to give a better result as S-Log2 was designed for use with a video sensor from day 1 and it maximises the use of what little data you have.
Unfortunately every now and again a new term or buzzword comes along that gets taken as a holy grail term. Two that come to mind right now are log and raw. Neither log, nor raw, are magic bullet solutions that guarantee the best performance. Used incorrectly or inappropriately both can result in inferior results. In addition there are many flavours of log and raw each with very different performance ranges.
A particular point in case is the 12 bit raw available from several of Sony’s mid range large sensor cameras, the FS700, FS7 and FS5.
Raw can be either log or linear. This particular flavour of raw is encoded using linear data. If it is linear then each successively brighter stop of exposure should be recorded with twice as many code values or shades as the previous stop. This accurately replicates the change in the light in the scene you are shooting. If you make the scene twice as bright, you need to record it with twice as much data. Every time you go up a stop in exposure you are doubling the light in the scene. 12 bit linear raw is actually very rare, especially from a camera with a high dynamic range. To my knowledge, Sony are the only company that offer 14 stops of dynamic range using 12 bit linear data.
There’s actually a very good reason for this: Strictly speaking, it’s impossible! Here’s why: For each stop we go up in exposure we need twice as many code values. With 12 bit data there are a maximum of 4096 code values, this is not enough to record 14 stops.
If stop 1 uses 1 code value, stop 2 will use 2, stop 3 will use 4, stop 4 will use 8 and so on.
As you can see from the above if we only have 12 bit data and as a result 4096 code values to play with, we can only record an absolute maximum of 12 stops of dynamic range using linear data. To get even 12 stops we must record the first couple of stops with an extremely small amount of tonal information. This is why most 14 stop raw cameras use 16 bit data for linear or use log encoded raw data for 12 bit, where each stop above middle grey (around stop +8) is recorded with the same amount of data.
So how are Sony doing it on the FS5, FS7 etc? I suspect (I’m pretty damn certain in fact) that Sony use something called floating point math. In essence what they do is take the linear data coming off the sensor and round the values recorded to the nearest 4 or 8. So, stop +14 is now only recorded with 2,048 values, stop +13 with 512 values etc. This is fine for the brighter stops where there are hundreds or even thousands of values, it has no significant impact on the brighter parts of the final image. But in the darker parts of the image it does have an impact as for example stop +5 which starts off with 16 values ends up only being recorded with 4 values and each stop below this only has 1 or two discreet levels. This results in blocky and often noisy looking shadow areas – a common complaint with 12 bit linear raw. I don’t know for a fact that this is what they are doing. But if you look at what they need to do, the options available and you look at the end results for 12 bit raw, this certainly appears to be the case.
Meanwhile a camera like the FS7 which can record 10 bit log will retain the full data range in the shadows because if you use log encoding, the brighter stops are each recorded with the same amount of data. With S-Log2 and 10 bit XAVC-I the FS7 uses approx 650 code values to record the 6 brightest stops in it’s capture range reserving approx 250 code values for the 8 darkest stops. Compare this to the linear example above and in fact what you will see is that 10 bit S-Log2 has as much data as you would expect to find in a straight 16 bit linear recording below middle grey (S-Log 3 actually reserves slightly more data for the shadows). BUT that’s for 16 bit. Sony’s 12 bit raw is squeezing 14 stops into what should be an impossibly small number of code values, so in practice what I have found is that 10 bit S-log has noticeably more data in the shadows than 12 bit raw.
In the highlights 12 bit linear raw will have more data than 10 bit S-log2 and S-Log3 and this is borne out in practice where a brightly exposed raw image will give amazing results with beautiful highlights and mid range. But if your 12 bit raw is dark or underexposed it is not going to perform as well as you might expect. For dark and low key scenes 10 bit S-Log is most likely going to give a noticeably better image. (Note: 8 bit S-log2/3 as you would have from an FS5 in UHD only has a quarter of the data that 10 bit has. The FS5 records the first 8 stops in 8 bit S-log 2 with approx 64 code values, S-Log3 is only marginally better at approx 80 code values. 12 bit linear outperforms 8 bit log across the entire range).
Sony’s F5 and F55 cameras record to the R5 and R7 recorders using 16 bit linear data. 16 bit data is enough for 14 stops. But I believe that Sony still use floating point math for 16 bit recording. This time instead of using the floating point math to make room for an otherwise impossible dynamic range they use it to take a little bit of data from the brightest stop to give extra code values in the shadows. When you have 16,384 code values to play with you can afford to do that. This then adds a lot of extra tonal values and shades to the shadows compared to 10 bit log and as a result 16 bit linear raw will outperform 10 bit log across the entire exposure range by a fairly large margin.
So there you have it. I know it’s hugely confusing sometimes. Not all types of raw are created equal. It’s really important to understand this stuff if you’re buying a camera. Just because it has raw it doesn’t necessarily mean an automatic improvement in image quality in every shooting situation. Log can be just as good or possibly even better in some situations, raw better in others. There are reasons why cameras like the F5/R5 cost more than a FS5/Shogun/Odyssey.
I’ve written about this many times before, but still it comes up again and again. Which is better? Which should I use? I hear all kinds of crazy comments and a lot of incorrect information, so first of all lets dispel a few myths:
S-Log2 captures more dynamic range than S-Log3, it goes to a higher level on the waveform, S-Log3 clips the highlights sooner.
On most of Sony’s current cameras S-Log2 and S-Log3 both currently record exactly the same dynamic range as this is limited by the sensors that Sony are using. The S-log3 curve could be used in a future camera to capture up to 16 stops and in fact the new Venice camera records over 15 stops. But as all of Sony’s other cameras sensors can only see 14 stops and the S-Log3 curve is designed to go beyond 14 stops, stop No. 14 is not recorded all the way at the top of the recording range. S-Log2 is a 14 stop maximum curve, so the peak level is recorded right at the top of the recording range. There is no space held in reserve for anything beyond 14 stops.
In Sonys current camera range (other than Venice) the limit is 14 stops whether it’s S-Log2 or S-Log3. The chart that Sony provide showing both S-Log2 and S-Log3 is a little confusing as it shows the entire gamma curve rather than what the camera can actually “see”. In their current implementations both curves stop at +6 stops over middle grey, both capture the same dynamic range, there is no difference.
S-Log2 is brighter than S-Log3 so it must be capturing highlights better.
No, not really, see above. Playback and on screen brightness comes from the levels chosen to record something at and is dependant on the shape and range of the gamma curve. But the actual captured range is dependant on what the sensor can cope with. As we are not changing the sensor, the captured dynamic range, brightness range and shadow range does not change between S-Log2 and S-log3, both of which take the entire sensor range (they just store that same range using slightly different levels or code values). After applying a LUT or other conversion to your normal viewing gamma both S-Log2 and S-log3 will have the same brightness, same highlight and same shadow range.
S-Log3 has noisy shadows.
No, not really. Shadows appear noisy with S-Log3 as the shadow part of the curve is stored using higher code values compared to S-Log2. So when you view S-Log3 uncorrected the shadows are raised and stretched on your conventional monitor and this gives the impression of a noisy picture. In reality once you restore the levels to normal there is no additional noise. See this article for a full explanation.
Chart showing S-Log2 and S-Log3 plotted against f-stops and code values. Note how little data there is for each of the darker stops, the best data is above middle grey. Note that current sensors only go to +6 stops over middle grey so S-Log2 and S-Log record to different peak levels.
S-Log3 is newer than S-Log2 so it must be better.
Newer, perhaps not. Better, no not really. S-Log3 is based on the industry standard Cineon log gamma curve. This curve was developed in the 1980’s to allow the digitising of film using 10 bit data. So S-Log3 matches a curve designed to work with negative film and is capable of storing more than the 14 stops that most of the current cameras sensors can see. In effect it is an old log gamma curve. As it is a curve designed for more than 14 stops, when used in a 14 stop camera some of the available recording data is empty and wasted.
S-Log2 was specifically designed by Sony to work with an electronic sensor with 14 stops of dynamic range and is optimised to match the performance characteristics of video sensors. By using a 14 stop curve with a 14 stop camera almost every bit of available data is utilised, there is no wastage. So S-Log2 makes better use of the data you have available to you,
BUT THERE ARE SOME OTHER FACTORS WE NEED TO CONSIDER.
S-Log2 and S-Gamut:
As well as the gamma curve we also have different Gamuts or color ranges. S-Log2 was originally designed for the F65 camera. The F65 sensor can capture a huge color range beyond the range that most conventional video sensors can see. So as well as S-Log2 Sony introduced S-Gamut which was matched to the very wide color range of the F65 sensor. S-Log2 is designed to be used with S-Gamut. But many of the cameras we use, like the FS7, F5, FS5 cannot see this color range (Sony’s F55 and Venice can). In addition this very large color range can be a little tricky to deal with in post production. Add to this the fact that S-Log2 is quite different to the quite common Cineon gamma curve and behaves differently to other curves in post. The end result was that in the early days of S-Log2 there were a number of complaints and comments that Sony’s S-log2 material was difficult to grade.
S-Log3 and S-Gamut3.
Because some people were struggling a bit with S-Gamut and S-Log2 in post production (Resolve and many of the other tools we have today were not as well developed 4 years ago), Sony introduced S-Gamut3 and S-log3 as well as a further Gamut called S–Gamut3.cine. S-Log3 was based on Cineon as that’s what people were familiar with. Arri’s Log-C is also based on Cineon as are many other log curves. This makes it a more “familiar” grading experience for many colorists. In addition Sony created a modified version of the super large S-Gamut to make it easier to grade. S-Gamut3 is just as big as S-Gamut but some tweaks inside make it easier to grade (fewer color shifts). At the same time Sony realised that most users were producing content for TV, the web or digital cinema that had little use for the huge color range of S-Gamut/S-Gamut3. So S-Gamut3.cine was developed as a smaller, more manageable version of S-Gamut3 and it incorporated a few tweaks to the color science to provide colors closer to those used by other manufacturers. S-Gamut3.cine is also a better match for cameras with sensors that cannot see the full S-Gamut range (like the FS5, FS7, F5, A7).
The end result is that in general most people prefer or find it easier to grade S-Log3/S-Gamut3.cine material than S-Log2/S-Gamut. Plus you can often use LUT’s designed for Log-C or Cineon with S-log3 material (this isn’t optimum, but it can work).
SGamuts Compared.
Getting the data from camera to post.
In terms of getting the data from your cameras sensor in to post production S-Log2 is the better choice (unless you have a Sony Venice which only has S-Log3). S-Log2 is optimised for the way an electronic sensor works. S-log3 is essentially a curve designed for negative film applications, not video and no matter how you look at it, these are electronic video cameras. However, if you are recording 10 bit or greater you have a lot of data whichever curve you use, so in practice it will be rare to see any difference in the final result.
So use the curve you find easiest to work with. It is true that S-Log 3 allocates a little more data to the shadows and less to the highlights than S-Log2, but don’t confuse data and code values with more range. S-Log3 has a few extra code values in it’s darkest stops, S-log2 has a few extra in the bright stops, but the dynamic range, highlight and shadow handling is governed by the sensor not the gamma curve. Overall S-Log3 has fewer code values than S-Log2, S-Log2 makes better use of the data available, but with 10 bit this really isn’t going to make a huge difference.
8 Bit Recording.
But if you are only recording with an 8 bit codec you are already at a disadvantage. When recording 8 bit you really need to maximise the way what little data you have is used. For that reason I will always recommend that S-Log2 is used when recording 8 bit on a camera like the FS5 in UHD or A7s or similar (FS5 is 10 bit in HD). By using S-Log2 you are using as many of the limited code values available as you can. This doesn’t mean you can’t use S-log3, it just wouldn’t be my choice.
The end result should be the same.
At the end of the day, if you were to use matching LUTs, S-log2 and S-log3 material should look more or less exactly the same after grading or application of the LUT, no matter what the scene you are shooting. If they do look significantly different then you are doing something wrong. So your choice of curve, other than for 8 bit recordings will most likely come down to ease of use rather than anything else.
If your camera doesn’t have LUT’s then S-Log2 can be easier to work with as it is more contrasty. This makes it a bit easier to focus and also makes it easier to gauge exposure. If your camera has LUT’s and you use them, then you may decide to use S-Log3 simply because you should find it a little easier to work with in post. Either way both curves capture the same range of picture information and both should give more or less the same end result.
There may be some very, very subtle differences due to the small differences in data distribution, but often these will be hard to really see in the final image.
UPDATE: It appears that Adobe may have now addressed this. Luma and YC scopes now show the same levels, not different ones and the scaling of S-Log XAVC. signals now appears to be correct.
This came up as the result of a discussion on the FS5 shooters group on Facebook. An FS5 user shooting S-log2 was very confused by what he was seeing on the scopes in Adobe Premiere. Having looked into this further myself, I’m not surprised he was confused because it’s also confused me as there is some very strange behaviour with S-Log2 XAVC material.
First: BE WARNED THE “LUMA” SCOPE APPEARS TO BE A RELATIVE LUMINANCE SCOPE AND NOT A “LUMA” SCOPE.
THIS IS THE “LUMA” Scope, I suggest you don’t use it! Look at the scale on the left side of the scope, it appears to be a % scale, not unlike the % scale we are all used to working with in the video world. In the video world 100% would be the maximum limit for broadcast TV, 90% would be white and the absoulte maximum recording level would be 109%. These % (IRE) levels have very specific data or code values. For luma, 100IRE has a code value of 940 in 10 bit or 235 in 8 bit. Then look at the scale on the right side of the luma scope. This appears to be an 8 bit code value scale, after all it has those key values of 128, 255 etc.
100% is not Code Value 235 as you would normally expect (Lumtri scopes).
Now look again at the above screen grab of the lumetri luma scope in Premiere 2017 – V11. On the left is what appears to be that familiar % scale. But go to 100% and follow the line across to where the code values are. It appears that on these scopes 100% means code value 255, this is not what anyone working in broadcast or TV would expect because normally code value 255 means 109.5%.
I suggest you use the YC waveform display instead.
Lumetri YC Scope showing S-log2
The YC waveform shown on the above screen capture is of an S-Log2 frame. If you go by the % scale it suggests that this recording has a peak level of only 98% when in fact the recording actually goes to 107%.
But here’s where it gets even stranger. Look at the below screen capture of another waveform display.
Lumetri YC scope and Cinegamma 1
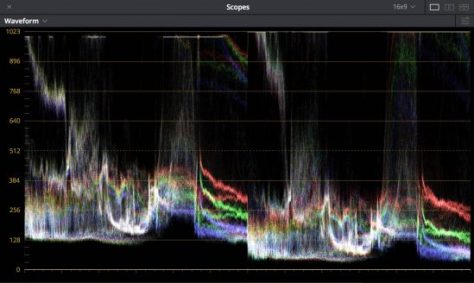
So what is going on here? The above is a screen grab of Cinegamma 1 recorded in UHD using 8 bit XAVC-L. It goes all the way up to 109% which is the correct peak level for Cinegamma 1. So why does the S-Log2 recording only reach 98% but the Cinegamma recording, recorded moments later using the same codec reach 109%. This is a value 10% higher than S-Log2 and I know that the Cinegammas cannot record at a level 10% greater than S-Log2 (the true difference is only about 2%).
Lets now compare the difference between how Premiere and Resolve handle these clips. The screen grab below shows the S-Log2 and Cinegamma 1 recordings side by side as handled in Adobe Premiere. On the left is the S-Log2, right Cinegamma1. Look at the very large difference in the peak recording levels. I do not expect to see this, there should only be a very small difference.
Lumetri YC scope with XAVC S-Log2 on the left and XAVC Cinegamma 1 on the right.
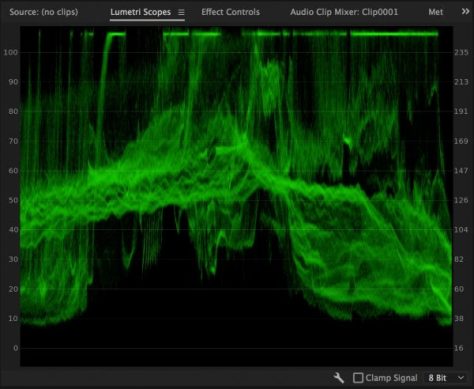
Now lets look at exactly the same clips in DaVinci Resolve. Note how much smaller the difference in the peak levels is. This is what I would expect to see as S-Log2 gets to around 107% and Cinegamma 1 reaches 109%, only a very small difference. Resolve is handling the files correctly, Premiere is not. For reference to convert 8 bit code values to 10 bit just multiply the 8 bit value by 4. So 100IRE which is CV235 in 8 bit is CV940 in 10 bit.
S-log2 on the left, Cinegamma 1 on the right. Notice the very small difference in peak levels. This is expected and correct.
So, until I get to the bottom of this all I can say is be very, very careful and don’t use the “Luma” scope, use the YC scope if you want to know your code values. It also appears that Premiere scales the code values of S-Log recordings differently to normal gammas.
Additionally: Record exactly the same S-Log2 or S-Log3 image using XAVC internally in the camera and at the same time record a ProRes version on an external recorder. Bring both of these clips, which are actually recorded using exactly the same levels into Premiere and Premiere handles them differently. The XAVC squashed into a reduced range while the ProRes fills the larger range.
Lumetri YC scope and a ProRes S-Log2 recording. Note how this goes all the way to 107%.
This has huge implications if you use LUT’s!!!!
The same LUT will result in a very different looking image from the XAVC and PRoRes material. There should not be a difference, but there is and it’s big. So this isn’t just a scopes issue, it’s an internal signal handling issue.
I’ve always preferred doing my color grading in a dedicated grading package with external scopes. It’s stuff like this that reminds me of why I prefer to work that way. I always end up with a better end result when I grade in Resolve compared to Premiere/Lumetri.
As I learn more about this I will post a new article. Use the subscribe button on the left to subscribe to the blog to be notified of new posts.
Here’s a little experiment for you to try if you have a PMW-F5, PMW-F55 or PMW-FS7. It should help you understand a few key things about the way these cameras behave, notably:
1: Why ISO does not actually reflect the sensitivity of the camera.
2: Why it is beneficial to expose S-Log2 or S-Log3 brighter than the Sony recommended levels.
3: How to get the best possible S-Log footage.
4: Why S-log may be a poor choice for low light.
Ideally you will want to use an external waveform monitor connected to the cameras SDI output, but it is possible to use the built in waveform display.
Start with the camera in Custom mode. Choose “STD” gamma and Rec-709. Set the gain/ISO settings so that the camera is showing ISO.
Set the ISO to the base ISO (800 ISO on F5/FS7, 500 ISO on F55).
Expose a 90% white card so that white is 90% on the waveform display. This doesn’t need to be 100% accurate, you can use a piece of paper if you don’t have a proper white card. Don’t change the ISO/Gain, light the white card if you need to. Make a note of the aperture.
Now change the gamma selection to S-Log2, do not change the exposure.
Note how white now drops down to about 70% and also note that the ISO becomes 2000 ISO on an F5 or FS7 and 1250 ISO on an F55.
Think about this for a moment: If the ISO has gone up, how can white and the bulk of my image become darker?
Now switch the camera to show dB gain instead of ISO, the gain should be showing 0dB. Repeat the above switching from Standard 709 gamma to S-Log2 and note that the gain remains at 0dB for both rec-709 and S-Log2.
Think about this: The gain is the same for both 709 and S-log2 but the S-Log2 image is darker. As the gain is NOT changing then the sensitivity is not actually changing, so why does the ISO change?
If you were to use a light meter and start off with the light meter set to 800 (500) ISO the light meter would tell you to set the aperture to whatever it is you currently have to give the correct exposure in rec-709 with white at 90%. If you had a light meter and you change the ISO setting on the light meter from 800(500)ISO to 2000(1250) ISO the light meter will tell you to close the aperture by 1.3 stops.
So, on your camera, while it is set to S-Log2 close the aperture from it’s original setting by 1.3 stops. Now you will find that white will be at the recording levels given by Sony for S-Log2 which is 59% for white and 32% for middle grey.
So what have we learnt from this? The gain is the same for both standard gamma and S-Log2, even though the ISO changes from 800(500) to 2000(1250) ISO. So the sensitivity and amount of noise coming from the sensor is the same in both cases. But the indicated ISO changes so that if you are using an external light meter, when you switch to S-Log the higher indicated ISO will make the light meter tell you to close the aperture. This means there is less light falling on the sensor. This means that the recorded image will have a worse signal to noise ratio (noise remains the same, but signal is smaller).
To solution of course to this poorer signal to noise ratio is simply to open the aperture back up again by 1.3 stops. When shooting S-Log2 or S-Log3 using the CineEI mode I always recommend using 800EI on an F5 or FS7 or 640EI on an F55. This means your aperture becomes the same as it would be when shooting in vanilla Rec-709, the end result is the same, improved, signal to noise ratio. If you are not using CineEI or LUT’s, then expose white at 70%.
This website uses cookies to improve your experience. We'll assume you're ok with this, but you can opt-out if you wish. Read More
Necessary cookies help make a website usable by enabling basic functions like page navigation and access to secure areas of the website. The website cannot function properly without these cookies.
Name
Domain
Purpose
Expiry
Type
wpl_user_preference
www.xdcam-user.com
WP GDPR Cookie Consent Preferences
1 year
HTTP
YSC
youtube.com
YouTube session cookie.
54 years
HTTP
Marketing cookies are used to track visitors across websites. The intention is to display ads that are relevant and engaging for the individual user and thereby more valuable for publishers and third party advertisers.
Name
Domain
Purpose
Expiry
Type
VISITOR_INFO1_LIVE
youtube.com
YouTube cookie.
6 months
HTTP
Analytics cookies help website owners to understand how visitors interact with websites by collecting and reporting information anonymously.
Name
Domain
Purpose
Expiry
Type
__utma
xdcam-user.com
Google Analytics long-term user and session tracking identifier.
2 years
HTTP
__utmc
xdcam-user.com
Legacy Google Analytics short-term technical cookie used along with __utmb to determine new users sessions.
54 years
HTTP
__utmz
xdcam-user.com
Google Analytics campaign and traffic source tracking cookie.
6 months
HTTP
__utmt
xdcam-user.com
Google Analytics technical cookie used to throttle request rate.
Session
HTTP
__utmb
xdcam-user.com
Google Analytics short-term functional cookie used to determine new users and sessions.
Session
HTTP
Preference cookies enable a website to remember information that changes the way the website behaves or looks, like your preferred language or the region that you are in.
Name
Domain
Purpose
Expiry
Type
__cf_bm
onesignal.com
Generic CloudFlare functional cookie.
Session
HTTP
NID
translate-pa.googleapis.com
Google unique id for preferences.
6 months
HTTP
Unclassified cookies are cookies that we are in the process of classifying, together with the providers of individual cookies.
Name
Domain
Purpose
Expiry
Type
_ir
api.pinterest.com
---
Session
---
Cookies are small text files that can be used by websites to make a user's experience more efficient. The law states that we can store cookies on your device if they are strictly necessary for the operation of this site. For all other types of cookies we need your permission. This site uses different types of cookies. Some cookies are placed by third party services that appear on our pages.