This seems to be a source of frustration for many people shooting raw or using S-Log2 or S-Log3 on a Sony camera. When shooting log and raw you should also be using a matching S-Gamut colour gamut if you want to get the best from the camera and this ties you into one of 3 preset white balances.
With a PXW-FS7, PMW-F5 or F55 it is possible to use custom mode to select a different colour space to mix with S-Log2 or S-Log3 and then have a variable white balance. With the Alpha cameras, PXW cameras such as the FS5 you can choose any Gamut you want in the picture profiles, but I don’t recommend this. For a start, if you don’t use one of the S-Gamuts you will be limited to Rec-709 Gamut, so you won’t be recording the cameras full colour range. Also in custom mode there are some other things like noise reduction that you really don’t want when shooting S-log2/3 (it can cause banding).
So why is the S-Gamut white balance fixed to the 3 presets for daylight, fluorescent and tungsten? The main reason is to ensure you get the cameras full dynamic range in each colour. White balance is a gain function, it adjusts the gain of the red, green and blue channels so that white objects appear white under differing light sources. So if the light source lacks blue light – making the pictures look excessively warm – you add extra gain to the blue channel to compensate.
But the problem with this is that gain affects dynamic range. When shooting log (or raw) the camera needs to operate the sensor at the optimum gain level to squeeze the highest possible dynamic range from the it. Changing the gain in just one colour channel to shift the white balance could result in a reduction of dynamic range in the channel. This could manifest itself as colours in one channel that clip sooner than the others. This can be really hard to deal with in post production and can show up as things like bright clouds with a colour cast that isn’t in the rest of the picture.
Another potential issue is that because of the way silicon sensors work the blue channel is almost always noisier than the red and green. So you want to keep the gain in the blue channel as low as possible to prevent the pictures getting too noisy. This is particularly important when shooting log as you won’t see your end result until after the images have been graded. So manually shifting the gain of the blue channel in camera to correct the white balance could lead to footage that ends up noisier than you would expect.
So – Sony chose to fix the white balance to 3 carefully tuned presets designed to avoid this situation and maximise the dynamic range. After all, when shooting log or raw it is expected that the footage will be graded anyway, so the white balance will normally be adjusted as part of the post production process.
There are some people that advocate adjusting the FS5’s white balance via the picture profile settings, personally I don’t recommend this or feel that it’s necessary. But yes, you can do this, but just keep a very close eye on your highlights and if you can use monitor with RGB parade to make sure you have equal recording levels for your whites without one colour channel clipping ahead of the others. Also apply a LUT in the monitor that is close to your desired output so that you can keep an eye on the noise levels.
In summary – the white balance is preset to ensure you don’t encounter problems later on. You should be able to fully adjust and fine tune your white balance in post production to a far greater degree than is possible in camera anyway, so don’t worry if the WB is a touch off when shooting.
The only exception to this is the new Sony Venice. Venice has enough dynamic range and enough internal processing power to allow you to make a wide range of white balance adjustments in camera. Hopefully we will see some of this flexibility trickle down to the next generations of lower cost Sony digital cinema cameras.
Normally when I travel up to arctic Norway for my annual Northern Lights expeditions I take a large sensor video camera. Last year it was the Sony FS5, which performed very well and gave me some great results. But this year I decided to down size and instead of taking a bulky camera I chose to take a pre-production sample of Sony’s diminutive new PXW-Z90 camcorder.
In Norway with the PXW-Z90.
On the outside the Z90 looks almost exactly the same as the older PXW-X70 camcorder. I’ve shot several videos with the X70 and it’s a great little camcorder that produces a very good image considering it’s small size. Being a new model I expected the Z90 to offer some small improvements over the X70, but what I didn’t expect was the very big improvements that the Z90 brings.
The Z90 is the first camcorder from Sony to incorporate a new design of sensor. It’s a 1″ type sensor, so like the X70, bigger than you used to find on small handycams, but not as big as the super 35mm sensor found in the FS5, FS7 etc. This is a nice size for this type of camera as it makes it possible to obtain a shallow depth of field by using the cameras built in ND filters (yes- it really does have ND filters built in) and a large aperture. Or if you need a deeper depth of field for easier focussing or run and gun then you can use a smaller aperture by switching out the ND filters. The maximum aperture of the zoom lens is f2.8 but it does stop down to f4 towards the telephoto end.
Sony’s new stacked CMOS EMOR RS sensor
This new sensor uses a new construction method that allows it to have several layers of electronics immediately below the imager pixels. The “stacked” sensor can as a result incorporate more image processing and a large memory area right under the pixels. This means that the sensor can be read out much more quickly than is normal for this type of camera and as a result rolling shutter is hugely reduced (I didn’t notice any in any of my footage).
As well as a reduction in rolling shutter compared to other similar sensors, the ability to do more on chip image processing appears to bring other advantages as the noise levels from this camera are very low indeed.
Frame grab from a night time snow scooter ride. Shot at +15dB gain the noise is still very minor. (click on the image to view a larger version.
The low noise levels mean that this camera performs surprisingly well in low light. Adding in +6dB was not a problem if needed. Even with +15dB of gin the images hold together very well. Clearly the camera is doing a fair bit of electronic noise reduction at higher gain levels and there is a slight increase in image smear as a result. Plus in certain circumstances the noise levels do rise, especially if you have large dark areas amongst in an otherwise brighter scene. In my sample footage during the night time snow scooter ride, which was shot at +15dB gain, you don’t see and noise over the snow, but you can see some grainy noise over the dark jacket of the snow scooter driver (see the frame grab above). The fact that you can push the camera up to +15dB and in most cases get a pretty good image is very nice.
Frame grab form a PXW-Z90 – Hybrid Log Gamma. Click on the image to see a larger version.
On top of good sensitivity you also have great dynamic range, more than the X70 and enough to make direct HDR shooting and log shooting possible with this tiny hand held camcorder. It doesn’t quite have the dynamic range of an FS5 or FS7, but there is still plenty of range to help deal with challenging lighting situations.
As well as bringing a nice improvement in image quality over the X70 (which is pretty good already) the new sensor brings a vastly improved autofocus system. There are 273 focus detection points which are combined with faster readout, faster on sensor processing and the same AF processing technology as used in the flagship Sony A9 stills camera. This brings a really remarkable autofocus system to this camera. The AF system is a newly developed hybrid system that combines phase detection AF with new algorithms created specifically for video rather than stills photography. At last this is an autofocus system that really works for a video camera. It is intelligent and responsive. There is no hunting for focus, it just seems to get on with the job.
Adjusting the AF response on the PXW-Z90.
Just about every aspect of the autofocus system can be customised in the camera menu. You can choose between using focus zones, the full image width or selectable focus spot areas. The cameras LCD screen is a touch screen so you tap the screen where you want to focus.
You can also tailor the AF’s response speed, you can adjust the size of the tracking range, using a wide range for occasions when you want the AF to follow an object through the shot, or use a narrow range to restrict the focus depth range.
The PXW-Z90’s variable AF drive speed.
You can customise how quickly the AF will move from one object to another, from staying locked on to a faster more responsive setting.
In addition it has that wonderful Sony face detection system that allows you to choose one face out of a crowd of people using the thumb stick on the hand grip or the touch screen. Once selected the camera will stay locked to that face.
Working with the PXW-X90 in Norway.
While I was up in Norway it was between -24c and -30c. In those temperatures you really don’t want to take your mittens off for more than a minute or so. Being able to rely on the cameras autofocus allowed me to keep my fingers warm. Not one shot out of all my rushes from the trip has incorrect focus. That is truly remarkable and made shooting with this camera a real pleasure. I’m not saying that you should always use autofocus. When possible I love to be able to pick and choose how I focus. But in many situations or for less experienced shooters this autofocus system will be a game changer.
For my test shoot in Norway I mostly used Picture Profile number 10 which gives an instant HDR workflow thanks to the use of Hybrid Log Gamma. Using HLG you can shoot as you would do with any other conventional camera. Then take the footage and play it back in HDR on an HDR TV without any grading or other post production work. I also shot at a couple of locations using S-Log2 to test how that worked (I was shooting in UHD and the camera is 8 bit in UHD. For 8 bit I prefer S-Log2 over S-Log3). The Z90 has 10 picture profiles that allow you to tailor how the image looks, including a crunchy DSLR type look. Some filmic looks using Sony’s cinegammas as well as profiles for shooting S-Log2, S-Log3 and Hybrid Log Gamma (HLG).
Dog sledding in the arctic (frame grab). Shot in HDR using HLG on the PXW-Z90.
The Z90 has Sony’s XAVC-L codec. This high quality codec offers 10 bit 4:2:2 broadcast quality recordings in HD and 8 bit 4:2:0 recordings in UHD (3840 x 2160). The camera records to SDXC cards, so media costs are very low. There are two card slots and you can record to each slot singly, record to one card after the other or dual record on to both cards at the same time for redundancy and an instant back. You can even use each of the cameras two record buttons to control the records on each card independently should you wish.
The PXW-X90 is very small, so carrying it around on the snow scooters was easy.The rear of the hand grip of the PXW-Z90.
The Z90 is a small camcorder and like all small camcorders this doesn’t leave much room for large buttons and switches. The menu system and many of the cameras functions can be controlled via the touch screen LCD or the small joystick/thumb stick on the hand grip. Iris, shutter speed and gain each have a dedicated access button that selects the function.
The Full Auto switch and ND filter control on the PXW-Z90.
Then you use the thumb stick to select the value you want, or you can set each item to Auto. In addition there is a switch to put the camera into full auto on the rear of the camera. Just below the full auto switch is the control switch for the ND filters.
The Sony PXW-Z90 compact 4K camcorder.
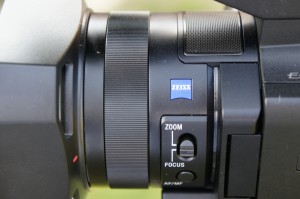
The lens is a Zeiss 12x optical zoom with built in optical image stabilisation. It is controlled by a single ring around the barrel of the lens which can be switched between focus control or zoom control. In addition there is the usual zoom rocker on the handgrip as well as a small zoom switch on the top handle. In addition to the optical stabilisation the camera also has Sony’s electronic “super steadyshot” stabilisation that can be used in addition to the optical stabilisation. Another very handy function is “Clear Image Zoom”. This is a form of electronic zoom function that makes use of a database of textures and object types. When using clear image zoom the camera uses this database to apply just the right amount of image processing during the electronic zoom process. In most cases you can’t see any degradation of the image when using clear image zoom. I left it on for all of the Norway shoot as it turns the 12x zoom into a very handy 18x zoom.
The wide end of the PXW-X90’s zoom range.The long end of the PXW-X90’s zoom lens.
After doing so much shooting on large sensor cameras with restricted zoom ranges getting back to a small camera with a big zoom range was fun. For future Norway trips I am very tempted to switch to a camera like the Z90.
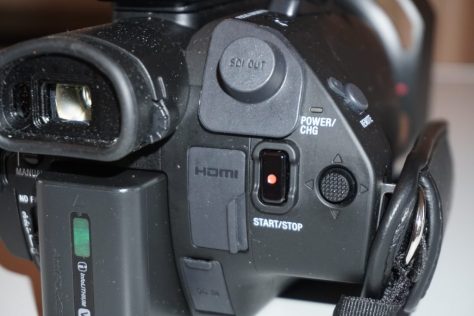
The right side of the PXW-Z90.
The Z90 body is almost exactly the same as the X70. The cameras top handle has 2x XLR connectors with the audio controls for the two channels on the opposite side of the handle.
The audio controls of the PXW-Z90.
If you want to make the camera more compact the handle can be removed, but when you do this you will no longer have any XLR connectors. Instead you will have an MI shoe on the top of the camera body that can be used to connect a Sony UWP-D radio mic or a n XLR adapter. There is also a stereo microphone built into the main body of the camera, so even with the hand grip removed there are plenty of audio options.
The PXW-Z90’s flip out LCD screen.
The flip out LCD panel acts as the cameras main viewfinder. Opening and closing the LCD screen turns the camera on and off. It starts up and shuts down very quickly. The resolution of the LCD is similar to most other modern camera LCD’s. It’s adequate for this type of camera, but it isn’t the highest resolution screen in the world. To check focus you have a button on the top of the hand grip to activate the image magnification function and the camera has a coloured peaking system to help pick out what is, and what is not in focus. I suspect that with this particular camera, many users will take advantage of the cameras excellent auto focus system and there is a lot of feedback to the user of how this is working including coloured boxes that indicate exactly what the camera is focussing on.
The rear of the Sony PXW-Z90.
As well as the side LCD panel there is also a small OLED electronic viewfinder on the rear of the camera. This is very useful for use in very bright sunlight, but it is rather small.
The cameras gain, shutter and iris functions each have a dedicated button on the side of the camera. One push of the appropriate button enables that function to be controlled by a small dial wheel just under the front of the lens.
Iris, gain and shutter speed controls on the side of the PXW-Z90.
Press the shutter button and the wheel controls the shutter. Press the gain button and the wheel controls the gain. Overall this system works well, but I would still prefer a separate gain switch and a shutter speed up/down switch. On the rear of the hand grip there is a small joystick that sits under your thumb. You can use this thumb-stick to set many of the cameras settings and to navigate through the cameras menu system. In addition you can use the LCD touchscreen to navigate through the menu as well as select your autofocus points etc.
The PXW-Z90 is a small camera that packs a very big punch. It’s never going to give the fine degree of image control that you get with most large sensor cameras and it won’t quite deliver the same image quality either (although it’s really, really close). If you need a small, discrete camera, perhaps you travel a lot, or you just need a “B” camera, then the Z90 offers a possible solution. I haven’t even touched on all the streaming, ftp and wifi capabilities of this camera. The auto focus system is a delight to use and it’s the best AF system I’ve ever come across on a video camera. The new sensor in the Z90 is clearly a fairly large step forwards from the sensor in the previous similar model the X70, it has more dynamic range, a lot less rolling shutter (not that it’s a big problem on the X70) and the final images look better as a result. I might just have to add one to my camera collection.
If you would like to join me on one of my adventures to arctic Norway please see take a look at this page. I’ve been running these trips for 11 years and EVERY tour has seen the Northern Lights. This year was no exception and we got to see some really great Auroras and had a great time dog sledding, ice fishing and exploring the Finnmarksvidda.
2018 was yet another great year for my Aurora tours. This picture taken on January 20th.
I’ve written about this many times before, but still it comes up again and again. Which is better? Which should I use? I hear all kinds of crazy comments and a lot of incorrect information, so first of all lets dispel a few myths:
S-Log2 captures more dynamic range than S-Log3, it goes to a higher level on the waveform, S-Log3 clips the highlights sooner.
On most of Sony’s current cameras S-Log2 and S-Log3 both currently record exactly the same dynamic range as this is limited by the sensors that Sony are using. The S-log3 curve could be used in a future camera to capture up to 16 stops and in fact the new Venice camera records over 15 stops. But as all of Sony’s other cameras sensors can only see 14 stops and the S-Log3 curve is designed to go beyond 14 stops, stop No. 14 is not recorded all the way at the top of the recording range. S-Log2 is a 14 stop maximum curve, so the peak level is recorded right at the top of the recording range. There is no space held in reserve for anything beyond 14 stops.
In Sonys current camera range (other than Venice) the limit is 14 stops whether it’s S-Log2 or S-Log3. The chart that Sony provide showing both S-Log2 and S-Log3 is a little confusing as it shows the entire gamma curve rather than what the camera can actually “see”. In their current implementations both curves stop at +6 stops over middle grey, both capture the same dynamic range, there is no difference.
S-Log2 is brighter than S-Log3 so it must be capturing highlights better.
No, not really, see above. Playback and on screen brightness comes from the levels chosen to record something at and is dependant on the shape and range of the gamma curve. But the actual captured range is dependant on what the sensor can cope with. As we are not changing the sensor, the captured dynamic range, brightness range and shadow range does not change between S-Log2 and S-log3, both of which take the entire sensor range (they just store that same range using slightly different levels or code values). After applying a LUT or other conversion to your normal viewing gamma both S-Log2 and S-log3 will have the same brightness, same highlight and same shadow range.
S-Log3 has noisy shadows.
No, not really. Shadows appear noisy with S-Log3 as the shadow part of the curve is stored using higher code values compared to S-Log2. So when you view S-Log3 uncorrected the shadows are raised and stretched on your conventional monitor and this gives the impression of a noisy picture. In reality once you restore the levels to normal there is no additional noise. See this article for a full explanation.
Chart showing S-Log2 and S-Log3 plotted against f-stops and code values. Note how little data there is for each of the darker stops, the best data is above middle grey. Note that current sensors only go to +6 stops over middle grey so S-Log2 and S-Log record to different peak levels.
S-Log3 is newer than S-Log2 so it must be better.
Newer, perhaps not. Better, no not really. S-Log3 is based on the industry standard Cineon log gamma curve. This curve was developed in the 1980’s to allow the digitising of film using 10 bit data. So S-Log3 matches a curve designed to work with negative film and is capable of storing more than the 14 stops that most of the current cameras sensors can see. In effect it is an old log gamma curve. As it is a curve designed for more than 14 stops, when used in a 14 stop camera some of the available recording data is empty and wasted.
S-Log2 was specifically designed by Sony to work with an electronic sensor with 14 stops of dynamic range and is optimised to match the performance characteristics of video sensors. By using a 14 stop curve with a 14 stop camera almost every bit of available data is utilised, there is no wastage. So S-Log2 makes better use of the data you have available to you,
BUT THERE ARE SOME OTHER FACTORS WE NEED TO CONSIDER.
S-Log2 and S-Gamut:
As well as the gamma curve we also have different Gamuts or color ranges. S-Log2 was originally designed for the F65 camera. The F65 sensor can capture a huge color range beyond the range that most conventional video sensors can see. So as well as S-Log2 Sony introduced S-Gamut which was matched to the very wide color range of the F65 sensor. S-Log2 is designed to be used with S-Gamut. But many of the cameras we use, like the FS7, F5, FS5 cannot see this color range (Sony’s F55 and Venice can). In addition this very large color range can be a little tricky to deal with in post production. Add to this the fact that S-Log2 is quite different to the quite common Cineon gamma curve and behaves differently to other curves in post. The end result was that in the early days of S-Log2 there were a number of complaints and comments that Sony’s S-log2 material was difficult to grade.
S-Log3 and S-Gamut3.
Because some people were struggling a bit with S-Gamut and S-Log2 in post production (Resolve and many of the other tools we have today were not as well developed 4 years ago), Sony introduced S-Gamut3 and S-log3 as well as a further Gamut called S–Gamut3.cine. S-Log3 was based on Cineon as that’s what people were familiar with. Arri’s Log-C is also based on Cineon as are many other log curves. This makes it a more “familiar” grading experience for many colorists. In addition Sony created a modified version of the super large S-Gamut to make it easier to grade. S-Gamut3 is just as big as S-Gamut but some tweaks inside make it easier to grade (fewer color shifts). At the same time Sony realised that most users were producing content for TV, the web or digital cinema that had little use for the huge color range of S-Gamut/S-Gamut3. So S-Gamut3.cine was developed as a smaller, more manageable version of S-Gamut3 and it incorporated a few tweaks to the color science to provide colors closer to those used by other manufacturers. S-Gamut3.cine is also a better match for cameras with sensors that cannot see the full S-Gamut range (like the FS5, FS7, F5, A7).
The end result is that in general most people prefer or find it easier to grade S-Log3/S-Gamut3.cine material than S-Log2/S-Gamut. Plus you can often use LUT’s designed for Log-C or Cineon with S-log3 material (this isn’t optimum, but it can work).
SGamuts Compared.
Getting the data from camera to post.
In terms of getting the data from your cameras sensor in to post production S-Log2 is the better choice (unless you have a Sony Venice which only has S-Log3). S-Log2 is optimised for the way an electronic sensor works. S-log3 is essentially a curve designed for negative film applications, not video and no matter how you look at it, these are electronic video cameras. However, if you are recording 10 bit or greater you have a lot of data whichever curve you use, so in practice it will be rare to see any difference in the final result.
So use the curve you find easiest to work with. It is true that S-Log 3 allocates a little more data to the shadows and less to the highlights than S-Log2, but don’t confuse data and code values with more range. S-Log3 has a few extra code values in it’s darkest stops, S-log2 has a few extra in the bright stops, but the dynamic range, highlight and shadow handling is governed by the sensor not the gamma curve. Overall S-Log3 has fewer code values than S-Log2, S-Log2 makes better use of the data available, but with 10 bit this really isn’t going to make a huge difference.
8 Bit Recording.
But if you are only recording with an 8 bit codec you are already at a disadvantage. When recording 8 bit you really need to maximise the way what little data you have is used. For that reason I will always recommend that S-Log2 is used when recording 8 bit on a camera like the FS5 in UHD or A7s or similar (FS5 is 10 bit in HD). By using S-Log2 you are using as many of the limited code values available as you can. This doesn’t mean you can’t use S-log3, it just wouldn’t be my choice.
The end result should be the same.
At the end of the day, if you were to use matching LUTs, S-log2 and S-log3 material should look more or less exactly the same after grading or application of the LUT, no matter what the scene you are shooting. If they do look significantly different then you are doing something wrong. So your choice of curve, other than for 8 bit recordings will most likely come down to ease of use rather than anything else.
If your camera doesn’t have LUT’s then S-Log2 can be easier to work with as it is more contrasty. This makes it a bit easier to focus and also makes it easier to gauge exposure. If your camera has LUT’s and you use them, then you may decide to use S-Log3 simply because you should find it a little easier to work with in post. Either way both curves capture the same range of picture information and both should give more or less the same end result.
There may be some very, very subtle differences due to the small differences in data distribution, but often these will be hard to really see in the final image.
Although it’s been on the market for a while now I have not yet had a chance to write a proper review of the PXW-Z150. I’ve played with it a few times and I’ve felt it offers good value (approx £3k/$4K). As it’s starting to gain some traction amongst corporate producers and those looking for a straight forward 4K camera with lot’s of bang for the buck I though it’s time to share my thoughts.
Cameras like the Z150 are often overlooked these days as they don’t have the “cool” factor that comes with the large sensor Super 35mm cameras that are all the rage, cameras like the PXW-FS5 or FS7.
Left side of the PXW-Z150
But not everyone wants shallow depth of field all of the time. In addition many people want zoom lenses that can zoom in to get a tight shot and zoom back out smoothly without a focus shift. If you add portability and ease of use into the mix then there is no Super 35mm camera that offers all of these. Want a big par focal zoom range – the lens gets big, heavy and very expensive.
This is where a one piece camera with a fixed zoom lens comes into it’s own. For a fraction of the the price of any of the 10 times or more par-focal S35m zoom lenses you can get a fully functioning camcorder. The PXW-Z150 has a 12x optical zoom that can be boosted up to 24x in HD (more on that later).
Right side of the PXW-Z150
So lets take a closer look at the Z150.
From the outside the PXW-Z150 resembles many other handycam style cameras and is almost identical to the HXR-NX100. But this is from the PXW product line, I’m lead to believe that stands for “Professional XAVC Writer”. So this means it will have the XAVC codec. It’s also an XDCAM camcorder and in this case that means it also includes the MPEG2 HD codec. In addition in case you haven’t spotted it there is also a big “4K” symbol on the side.
CODECS AND RECORD FORMATS
The PXW-Z150’s lens hood with built in shutter style lens cap.
So the camera can record UHD (3840 x 2160, the 4K standard for TV) at up to 30fps using Sony’s XAVC-L codec. This is the long GoP version of XAVC and comes in 60 and 100Mb/s versions in the Z150. It is worth considering that this codec does require a pretty good computer to work with it in post production, ideally a minimum of a 4 core i7 processor with 16GB of main ram plus a good NVIDIA or AMD graphics card with 2GB of dedicated video ram. In UHD XAVC-L is limited to 8 bit 4:2:0, this still produces a great looking image but is not considered good enough for main stream UHD broadcast.
The image below is a UHD frame grab from the Z150. Click on the image to see larger versions including the full 3840×2160 image. The grab is a jpeg so may have some compression artefacts not in the original frame.
UHD frame grab from the PXW-Z150. Click on the image to see a larger version or to view the full UHD frame.
If you are not shooting in UHD then you have lots of options. Again we have XAVC-L now at 25, 35 and 50Mb/s and up to 60fp. 35Mb/s and 50Mb/s XAVC-L is normally considered broadcast quality at 25/30fps. In HD XAVC-L is 10 bit 4:2:2.
As well as XAVC-L you also have two more 8 bit HD codecs, MPEG2HD and AVCHD. There are two versions of MPEG2HD, the regular HD version which is 4:2:0 at 35Mb/s as found in the older EX1 and EX3 camcorders as well as the 50Mb/s HD422 4:2:2 broadcast quality version as found in the PMW-200 and most of Sony broadcast camcorders. These older MPEG2 “XDCAM” codecs are still incredibly popular and accepted almost everywhere for broadcast HD. They are really easy to use and even though they are 8 bit still give great looking pictures. Finally if you just need something compact there is AVCHD, although frankly why you would want to use AVCHD when you have so many better options available I’m not sure. Perhaps those running older or consumer based edit software will benefit from the inclusion of AVCHD.
RECORDING MEDIA.
In order to be able to record all the different formats available you must use SDXC cards. These are readily available and low cost. Please remember though that SD cards are consumer media. It is normally very reliable (probably more reliable than tape used to be) but card failures can occur and a duff card could result in the loss of everything on the card. Fortunately Sony have considered this and the camera features two card slots.
The PXW-Z150 has two slots for SDXC cards.
The two card slots can be configured in a number of ways. To record long events you can use relay record where once the first card is full the camera will automatically switch to the second card. For security you can use simultaneous record where you record to both slots at the same time. This means you are creating an instant backup, so the failure of a single card should not be a drama. As a further option you can control the recording function of each card slot separately. You can use the record button on the hand grip to control one slot and the record button on the carry handle to control the other to give 2 independent recordings.
A further recording function is the ability to record a proxy file alongside the main recording. The proxy file can be used in a number of ways. One way is to provide an easier to handle 720p HD file for use as an edit proxy when shooting in UHD. Another is as a small compact file that can be uploaded to the internet via the cameras built in ftp function, perhaps for a breaking news story or remote editing and preview. As this is a proper video camera there are none of the overheating problems or limited record time issues that effect many DSLR type cameras.
One word of advice: Buy your cards from a reputable source. There is a lot of fake media out there that is almost indistinguishable from the real thing. The fake cards are often unreliable, so do make sure you only buy good quality genuine media from one of the main brands such as Transcend, Lexar, SanDisk etc.
1″ TYPE SENSOR.
The sensor that feeds all these different codecs is a “1 inch type” Exmor RS back illuminated CMOS sensor with 14.2 million effective pixels. What does all that mean?
“1 Inch Type” means the sensor size is bigger than the sensor on a 2/3″ broadcast camera but smaller than APS-C, Micro 4/3rds or Super 35mm (see this for more info on imperial type sensor sizes). So the depth of field will be deeper (more in focus) than a camera like Sony’s PXW-FS5 with it’s Super 35mm sensor, but shallower than most typical 2/3″ ENG broadcast shoulder cameras and other traditional handycams with 1/2″ or 1/3″ sensors.
Exmor RS is Sony’s latest generation of back illuminated sensor technology that gives better low light performance with small pixels compared to traditional front illuminated sensors. In addition RS stands for “Rear Stacked”. The stacking technology allows for a faster sensor readout among other things and this significantly reduces image skew and rolling shutter artefacts compared to the previous generation of these sensors. The faster readout also means that every pixel is used when shooting at up to 120 fps in HD using the cameras super slow motion function (note that this is 120fps interlace XAVC-L), so less aliasing and moire.
While RS does not eliminate rolling shutter artefacts from what I can see the Z150 offers a big improvement over cameras like the PXW-X70 and the A7S. You have to pan very fast before rolling shutter becomes a problem and in normal use skew and jello should not cause any significant problems.
12X OPTICAL ZOOM LENS.
PXW-Z150’s 12x “G” series optical zoom lens.
Light is fed to the sensor by a 12x optical zoom lens. On the side of the camera there is a big and bold “18X“. That’s there because this camera also has Sony’s clever “Clear Image Zoom” technology. In the past if you mentioned a digital zoom it used to make people cringe as it normally meant a drop in picture quality. But Clear Image Zoom really is very clever.
First of all remember that in HD you have a UHD sensor, so you can crop into this by 2 times with virtually no loss in image quality anyway. So in HD you have an additional 2x zoom on top of the optical zoom giving a combined total of 24x. In UHD the camera uses a database of textures to determine the best way to process the image. This allows for a virtually transparent extra 1.5x electronic zoom on top of the optical one. This gives you the 18x zoom range indicated on the camera body. In use, the clear image zoom function works seamlessly with the optical zoom. So as you zoom in or out the electronic zoom takes over where the optical one finishes.
PXW-Z100 full Wide.PXW-Z100 12 x optical zoom (click on image to see higher resolution versions)PXW-Z150 Full 18x zoom, 12x optical plus clear image zoom (click on the image to view higher resolution versions).
There is the very slightest of bumps in the zoom at the changeover point from optical to digital which I don’t think most audiences would spot. After shooting so much recently with Super 35mm cameras I really had forgotten just how much quicker it can be to shoot with a good par-focal zoom with a high zoom ratio (par focal – focus remains constant through the zoom range). The lens is reasonably wide at the equivalent of 29mm going all the way optically to a 348mm in full frame 35mm terms. The only downside really to the zoom is that the widest aperture ramps from f2.8 to f4.5 as you zoom in. This is one of the penalties you pay for having a larger sensor.
Another slight peculiarity of the aperture is that the minimum is f11. Most lenses go down to f16 or smaller, but this is limited to f11. I suspect this may be to prevent something called diffraction limiting. When light travels though a very small aperture it can become slightly defocussed. When you have very small pixels (like when you cram 4K’s worth of pixels onto a smallish sensor) this slight defocussing has a big impact and can lead to soft and blurry looking pictures. I suspect that Sony may be limiting the smallest aperture to f11 to prevent this and help ensure sharp pictures at all times. If you have too much light then don’t worry as you have a 4 way ND filter system where you can choose between clear, 1/4, 1/16th and 1/64 ND.
The zoom rocker.
The lens has three control rings. One for aperture, one for zoom and one for focus. Unfortunately none of these have any markings as they are all electronic controls with no direct connection to the mechanics of the lens. Fortunately though the lens is quite responsive. The iris ring works well with almost no lag. The zoom ring is the weakest link as you can turn the zoom ring faster than the lens can zoom and this can result in some lag as you wait for the zoom to catch up. The zoom speed range is pretty good, using the rocker on the hand grip you can go from a very slow creeping zoom to a respectable 2.5 seconds (approx) from fully wide to 12x.
There are 3 control rings on the PXW-Z150’s zoom lens.
The focus ring is big and chunky, easy to find and easy to grip. While you can’t crash focus with it the manual focus, it is nice and responsive and doesn’t exhibit any nasty overshoots or other surprises. So manual focussing is nice and easy. This is assisted by a good viewfinder peaking and a focus magnification system that helps you determine the sharpest parts of the image with ease. One observation though is that if you leave the peaking on the default “White” setting it can make some scenes appear over exposed as white sparkles appear across areas of fine detail. For this reason I normally use the Red or Blue peaking colors.
INPUT AND OUTPUT CONNECTIONS
The PXW-Z150’s built in stereo microphone.
For audio there is a built in stereo mic on the front of the handle that is adequate for background and ambient sound recording. You then have the usual 2x XLR connectors with switchable phantom power on the front of the hand grip plus Sony’s MI Shoe on the top. Using the MI Shoe you can connect Sony’s UWP-D radio microphones directly to the camera via a low cost mounting adapter (SMAD-P3) eliminating the need for wires or batteries in the microphone receiver. It’s a very neat system.
Video output options on the PXW-Z150
To output your pictures you have an HDSDI connector on the rear of the camera for HD plus an HDMI port that can deliver UHD. There is also a legacy standard definition composite video output, this is one of the few Sony professional cameras to still have this built in. There is of course also a headphone socket on the rear panel of the camera just above the DC in socket.
POWER AND BUILD QUALITY.
The PXW-Z150 runs off NPF-F type batteries.
The PXW-Z150 runs off readily available and incredibly common Sony NP-F series batteries. It’s a low power camera so a single battery lasts for ages. I got about 3.5 hours from one of the smaller F770 batteries. An F970 would give at least half a working day, so two of those is all that most people would need.
Build Quality:
When I first picked the camera up it felt good. Like most modern cameras it’s constructed from a mix of plastics and alloy. The plastics appear to be of good quality and it seems to be well constructed. Perhaps not quite as high quality as the PXW-FS5 or FS7 but this is a much cheaper camera.
Audio switches and controls on the PXW-Z150
Buttons and switches:
There are very few switches on this camera. Just the on/off switch and switches for the audio inputs. But there are plenty of buttons including 6 user assignable buttons. For exposure control you have push buttons that select the gain, white balance and shutter settings and work in conjunction with a small up/down rocker button on the front left of the body. The rocker is used to scroll though the selections available for each of these. In practice this works quite well except that once you select one of these functions, lets say the gain, it remains selected and the rocker switch active unless you press a different function. If you press gain again to try to deselect it, gain will switch to auto and you have to press it again to go back to manual. It’s a minor thing but did result in me ending up accidentally going to auto gain or shutter when I didn’t mean to. I’m sure if you were to use the camera regularly you would soon get used to this.
Iris(aperture) is switched between auto and manual via a dedicated button as is focus. Autofocus works surprisingly well even in low light. It’s not fast but hunting is minimal once it’s focussed and it was able to track moving objects quite well.
While a one inch sensor is bigger than 2/3″ or 1/2″ it’s still significantly smaller than the Super 35mm sensors that are all the range. The Z150 has a lot of pixels squeezed onto quite a small space, so don’t expect amazing low light performance, it’s not that kind of camera. However it’s low light performance is very good for this class of compact all-in-one UHD/4K camera. For all but the most critical applications you can add 12dB of gain without any major dramas to boost the low light performance. +24dB isn’t horrendous if you really have to push the camera and the top limit of +33dB is impressive but rather noisy. In low light the lens works best when it’s wide and at f2.8. Zoom in and it drops down to f4.5 and that does drop your brightness by over a stop or the equivalent of a little over 6dB of gain (1 f-stop = 6dB = Double/half the ISO).
So picture quality… that’s a pretty important factor.
Single small sensor cameras have come a long way in recent years and the Z150 is no exception. The picture quality is pretty good for a budget camera. The smallish sensor with it’s tightly packed and very small pixels does impose some limitations on just how good it can be, especially in dynamic range and sensitivity but it does produce a nice picture for what it is.
Colours are vibrant, noise levels are low and dynamic range perfectly useable. I estimate about 10 stops of dynamic range so it’s not in the same league as the super 35mm cameras, but respectable none the less. Noise levels are low enough that you can afford to slightly under expose the camera and tweak the pictures a little in post production if you need to. This can be useful if you notice the camera is struggling with bright highlights. I used the cameras built in Histogram to help judge exposure and found that if I had bright highlights such as the bright clouds in the sky as seen in the frame grabs here, that the best results were achieved when ensuring the highlights were below the grey 100% line on the histogram. If you expose the highlights all the way to the far right of the histogram (109%) the highlight areas are flattened by the cameras knee and they can look a bit odd. I felt it was best to expose just a little lower as this gives better looking highlights (about half to one stop). If using auto exposure, including a -0.5 to -1 EV offset to the auto exposure (in the camera menu) has the same effect. Chromatic aberration is very low, probably being hidden by in camera processing. and the sharpening/detail correction well balanced. The PXW-Z150 creates good looking images for a single smaller chip sensor out of the box.
But as well as the standard look the camera does include 6 picture profiles which can be found towards the bottom of the camera menu. Each profile gives a quite different look.
As you can see each of these looks is quite different (The Z150 also has several different scene settings that can be used for shooting in full auto under differing lighting conditions, these change the way the camera works out the auto exposure levels).
The dynamic range is no different in each profile. PP2, the DSLR look adds contrast by crushing the mid range and blacks, it’s also highly saturated to give stronger colors, particularly reds. The red flower in the frame grab was not that red.
Picture Profile 3 mixes Rec709 gamma with Sony’s “Pro” color matrix. I like the Pro color settings as it gives true to life colors and it grades quite well if you want to make tweaks in post production.
Picture Profile 4 is Rec709 (ITU709) gamma and color. To me the colors are not as accurate as they could be. The flower looks a little too “electric” compared to the real life color.
The Cinematone Gammas in picture profiles 5 and 6 flatten the image a little and bring up the shadows. This can help a little if you wish to tweak or adjust the images in post production. The Cinematone gammas are not the same as the Cinegammas found in the higher dynamic range cameras like the FS5 or A7.
Personally I did not like the colors associated with the Cinematone color settings. But one of the great things about the Picture Profiles is you can mix and match the various gamma curves and color matrix settings to create your own looks and styles. The “Pro” color matrix offers some very accurate colors and I quite like the look that you get when you combine Cinematone 2 gamma with the Pro color matrix. If you find the colors a little flat you can boost the saturation level a bit, I found that setting the saturation to +15 gave a great look straight from the camera. Don’t be afraid to go into the Picture Profile settings and experiment with different combinations of Gamma curve and Color matrix. Just don’t turn up the Saturation too high, I would not recommend going above +20.
The Z150’s only menu controls are on the top of the handle.
One small annoyance I found with the PXW-Z150 was that the only menu button is up on the top of the hand grip. As I like to fiddle around with the Picture Profile settings I did find it a little awkward to access the menu controls on the very top of the camera, especially if it was at shoulder height or above on a tripod. You can’t see them up there!
Like most modern cameras the PXW-Z150 has a full set of WiFi features including the ability to transfer files wirelessly via ftp to a remote server, to stream live or control the camera from a tablet or mobile phone. A future firmware update will add Sony’s QoS (Quality Of Service) streaming error correction that promises much improved image quality over poor network connections when streaming to a Sony QoS server. To remotely control the camera you need to install Content Browser Mobile on your Android or iOS device.
SUPER SLOW MOTION
One more trick that the PXW-Z150 has is the ability to shoot continuously at up to 120fps (100fps when the camera is set to 50i area). The image is full HD but more highly compressed than the regular HD recordings, plus it’s interlaced, not progressive. In addition the inevitable faster shutter speeds mean that you do need plenty of light to get the very best results. I could definitely see a small drop in image quality when shooting at 100 or 120 fps, but the footage is perfectly useable and it is great to be able to slow down motion by 4 or 5 times. You do need to be a little careful if using the interlaced footage within a progressive production as very fast moving objects that travel through the frame may exhibit the combing artefact common in regular interlace material when show progressively. To get the full 5x slow down the camera needs to be set to 60i area to allow the selection of 120fps.
Summary:
The PXW-Z150 is a compact jack of all trades camera that’s easy to work with, has a great zoom range and delivers a respectable looking image. The largeish 1″ sensor gives a greater degree of control over the depth of field than you will have with a camera with a 1/2″ or 1/3″ sensor. But it’s isn’t going to give you that super shallow film look unless you are using longer focal lengths.
I think the Z150 will find a home in many corporate and industrial production applications. The ability to shoot in 4K gives the flexibility to crop int the image to re-frame shots for HD productions. And the price is good too, you get a lot of camera for the money.
This is something that keeps coming up in my workshops. It’s very important if shooting with S-Log2 or S-Log3 not to under expose and in most cases it can be highly beneficial to over expose a bit. Especially if you are using a camera like the A7s or FS5 in 4K when you only have 8 bit data.
Take a look at this chart. It plots the S-Log2 and S-Log3 gamma curves on a log scale of f-stops against the amount of 10 bit or code values used to record each stop. The center line of the chart is middle grey. Both S-log2 and S-log3 provide 8 stops below middle grey and 6 stops above. Take a look at the darkest stop, the one that is -7 to -8 and look at how much data is allocated to that stop. With 10 bit recording you have according to this chart about 10 code values for S-Log2 and about 20 for S-Log3. That’s if you have 10 bit, and it’s not a lot of data. Admittedly there isn’t going to be a great deal of scene information in that darkest stop, deep in the shadows and the noise. But there’s part of the issue, the noise. If you have under exposed and you take this in to post and have to stretch out the shadows, the noise in these darkest shadows is going to look pretty coarse because it hasn’t been recorded with many shades/steps so stretching it out will make even “rougher” for want of a better term. If you are recording with 8 bit the problems is even worse. With 8 bit, S-Log2 will only have around 2 or 3 code values for that bottom stop, in effect the noise will have two values – black or +1 stop. Imagine how nasty that will look if you need to raise or stretch you blacks because you are under exposed, it will become very blocky and grainy.
The solution is to over expose a bit. By over exposing your footage by a stop when you go in to post production you will in most cases be bringing your levels down. So instead of stretching the noise out and making it worse you will be shrinking it down and reducing the negative impact it has on it’s image. Because cameras like the FS5, A7s etc have 14 stops of dynamic range this small bit of over exposure is going to make very little difference to your highlights in the vast majority of situations. Any slight over exposure you may have will likely look quite natural anyway, after all our own eyesight does also over expose, we don’t have unlimited dynamic range. On top of that the display technology does not exist to show a 14 stop range shot in it’s entirety and with natural contrast.
As an owner of both the A7s and AX100 and as someone that has shot with the PXW-X70, if I had to choose one which would it be? That’s tough because although they really are very different cameras they both have strengths that are nice to have. The A7s produces a prettier picture and can be used run and gun, with limitations. I use the kit 28-70mm f3.5-f5.6 and it works well, good auto focus, smooth aperture changes etc. BUT and it is a very big BUT you need a really good set of ND’s or a strong ND fader to use it outdoors due to the extreme sensitivity. Add to that the minimal 3x zoom and it’s pretty restrictive as to what you can shoot without switching lenses and fiddling around. Sure you can add something like the new Tamron 16-300mm f3.5-f6.3 but the autofocus tends to hunt a lot more, manual focus is fiddly and you still need to mess around with ND’s. I think you need to be a fairly competent cameraman and need to be very careful over lens choices etc to use the A7s for run and gun successfully. Plus don’t forget the cost of all the extra lenses, filters etc adds up and makes the kit bulkier.
The new Sony PXW-X70 XDCAM camcorder, the pro version of the AX100.
The AX100 (or PXW-X70) on the other hand really is a grab and go camera. Easy to use, great zoom range, built in ND’s. It’s quick and easy to use and may get you shots that you will miss with the A7s. But the pictures are not as pretty, primarily they lack the dynamic range of the A7s. But they are very easy to use, so well suited to those that are full auto shooters or rely heavily on auto functions to keep life simple. The X70 has much better ergonomics than the AX100 but is a bit more expensive. Both are very compact packages and as you don’t need to buy extra lenses or filters work out substantially cheaper than an A7s kit with a set of lenses to cover the same focal lengths at reasonable apertures.
Anyway, if I had to give up one of mine (A7s or AX100), for me it would be the AX100 that would go. I would be prepared to sacrifice the ease of use of the AX100 for the better images from the A7s. But I normally shoot manually anyway. I’m used to swapping lenses, working with ND filters etc. If you not used to shooting manually then the AX100 may be the better choice. Great images are of course important, but the best camera to own is a camera you will use. It’s all very well having fancy pictures and the ability to swap lenses etc. But if fiddling around means you don’t use it very often, then there is no point in having it. You would be better off with a camera that you will be comfortable with, that you will use regularly.
As the owner of a Sony AX100, which is a really great little 4K and HD camcorder I wasn’t really all that excited when I saw the first prototype of the X70 at Broadcast Asia back in June. You see in the past Sony have done this many times, taken a high end consumer camcorder, updated the firmware, added a handle and then sold it for a higher price as a pro camcorder. In the past, there has in reality been little difference between the cheaper consumer model and the more expensive pro version.
The handgrip on the Sony PXW-X70
The PXW-X70 is different. This is much more than an AX100 with new firmware. For a start the body of the camera is quite different. The right hand side of the X70 is quite different to the AX100. It has a much fatter hand grip. This makes the camera much easier to hold comfortably for long periods. It also makes space for a full size HDSDI output and a full size HDMI output. But the differences don’t stop there.
On the top of the hand grip there is a large assignable button that is normally set to act as a control for the focus magnification function. This button falls immediately under your index finger when your shooting. In front of this is a new larger and easier to use zoom rocker and then in front of that is another assignable button, this one set as a one push auto iris button – very nice!
The back of the handgrip and the small joystick.
At the back of the handle there is a small joystick that ends up under your thumb (just where it needs to be). This joystick can be used to navigate through the cameras menu system. So, without taking your hand out of the hand grip you can check focus, zoom in and out, set your exposure and go through the menu system. If only it was this easy on all of Sony’s cameras! Ergonomically this camera is really good, especially when you consider how small it is.
The camera has a nice 12x stabilised, optical zoom lens, behind which sits a 1 inch 20 megapixel sensor. In video mode about 14 million pixels are used, so even in 4K (there will be a paid 4K upgrade option next year) there are more pixels than needed for full resolution. Rather than let this extra resolution go to waste you can activate Sony’s “clear image zoom” function that works seamlessly with the optical zoom to give you a 24x zoom range in HD.
Frame grab from PXW-X70. Click on the image to see the full size frame.
The clear image zoom really is remarkably transparent. If you look hard enough at the image, on a big screen, when it’s zoomed all the way in you can just about discern a very slight softness to the image, but frankly I don’t think this is any worse than the softness you might see from a compact optical 24x zoom. It certainly doesn’t look electronic and unless you have side by side, with and without test clips I don’t think you would know that the clear image zoom has been used.
If 24x is not enough there is also a further digital extender, controlled by a button on the right side of the lens that doubles the digital zoom. This you can see, the image is a little degraded at 48x, but it’s not terrible, might be handy for a breaking news story where you can’t get close to the subject.
The left side of the PXW-X70
As well as the optical stabiliser in the lens the camera also has a switchable electronic stabiliser. The active steadyshot is very effective at smoothing out even the shakiest of hands. But it does tend to hang on or grab hold of the image a bit. So when you do deliberately move the camera it tends to try to stabilise the scene until it can no longer correct for the cameras movement at which point the scene is suddenly released and starts to move. If your using a tripod you definitely want to just use the standard steadyshot and not the active mode.
Dual SD card slots on the PXw-X70
The pictures are recorded using either XAVC, AVCHD or standard definition DV to SD cards. For XAVC you must use SDXC cards, but these are cheap and readily available these days. There are two card slots and you can choose between relay record where the camera will switch from slot A to slot B once A is full, or you can make two simultaneous recordings on both cards at the same time. This gives an instant backup if you need it.
XAVC HD RECORDING:
The XAVC HD recordings are 10 bit 422 long GoP at 50Mb/s, 35Mb/s or 25Mb/s. The quality of the 50Mb/s recordings is amazing with no compression artefacts that I can see (there must be some, I just can’t see them). Even the 25Mb/s recordings look really good. You can shoot at up to 60fps in 60i mode and 50fps in 50i mode. In 60i mode you also have 24fps.
Frame grab form the PXW-X70, click on the image to see full size.
Considering this is a highly compact, single chip camera the images it produces are really very good. They don’t have that typical small sensor camera look. The pictures are remarkably noise free at 0db and largely free of artefacts. I tend to find that small handycams often suffer from what I would describe as “busy” pictures. Pictures where perhaps there is a lot of added sharpening or where the pixels are read in special ways to make a sharp picture. This makes edges slightly flickery and gives the pictures a tell tale small sensor look. The X70 with it’s big sensor and abundance of pixels just doesn’t have this “busy” look.
Train sitting in station. Frame grab from PXW-X70
The pictures really look like they come from a pro camera. Occasionally very fine, high contrast details like white text on a black background can look a little busy, but this is very minor. Dynamic range is quite respectable, it’s not as good as a PMW-300, but not too bad for a compact handycam (I estimate about 10 to 11 stops of DR).
One thing I did find with this camera is that because there is so little noise and the codec is so good, you could quite comfortably shoot about a stop darker than you would normally and then just bring the image up a bit in post. Shooting a little darker helps the camera handle bright highlights and then in post you can just bring up the shadows and mid tones with a simple colour correction to give a nice exposure. I wish I had realised this when I shot the demo video. I would have exposed a little on the dark side and then tweaked the shots in post. There’s so little noise at 0db and so few artefacts that the image holds up to this really well. If your using auto exposure you can set an exposure offset to allow for this in the menu.
PXW-X70 without the top handle fitted.
The X70 is pretty sensitive and 9db of gain is quite useable, so shooting indoors in a typical home or at a wedding venue without extra lights should be no problem. Ramp it up to +33db and it see’s better in the dark than I do, but there is a fair bit of noise at +33db.
As well as being generally rather sensitive the PXW-X70 also has a nightshot mode that bypasses the cameras IR filter and includes a switchable infra-red light, so you can shoot in total darkness if you want.
To see what you are shooting there is a 3.5″ LCD panel. This panel is higher resolution than the one on the AX100 and gives a sharp and pretty accurate image. On the back of the camera there is a small OLED viewfinder. This little OLED is pretty good. It has great contrast and is pretty sharp for a small finder. It’s a great feature on bright sunny days when the LCD can become harder to see.
CRISP, SHARP IMAGES:
The HD images are crisp and sharp without any obvious sharpening, almost certainly a result of having a 4K ready sensor. The lack of obvious detail correction helps give the pictures a pleasing, more filmic look. The camera has picture profiles so if you want you can soften or sharpen the images if you choose. As well as detail and aperture controls there are also controls for gamma (standard, still, Cinematone1, Cinematone2, ITU709) and color. The color controls are similar to those on the FS700 where you can adjust the saturation as well as R, G, B, C, M, Y and K brightness. In addition there is a choice of 6 different preset color modes plus black and white.
PXW-X70 auto/manual switch.
The camera can be controlled either fully automatically or fully manual as well as various in between modes. There is a switch on the back of the camera to switch between auto and manual. In manual you can control the iris, shutter and gain by pressing one of three buttons along the bottom edge of the camera and the using a small wheel just below the lens to set what you have selected. In practice this actually works quite well. There is another button for white balance control on the side of the camera with the usual presets plus auto white balance. Just under the Manual/Auto switch there is a selector for the built in ND filters. I recently purchased a A7s DSLR type camera and I had forgotten what a fiddle it can be to use a camera that doesn’t have built in ND’s. So it’s really good to see proper ND filters on the PXW-X70 as they really help you manage your depth of field.
On the lens there is a single large control ring that can be used to focus the lens or to act as a manual zoom ring. The focus is responsive and although I don’t normally like round and round servo focus rings this one wasn’t too bad.
The zoom/focus ring on the PXW-X70.
There really is so much to this camera that it would take a small book to go through all the features. For example there’s the touch screen LCD that can be used for touch to focus or touch to expose where you just touch the part of the screen you want to expose or focus on. There’s a full set of exposure and focus aids including peaking, histogram, zebras etc.
On the top of the camera you have Sony’s new MI shoe (Multi-Interface) for connecting accessories like the supplied handle with XLR audio inputs. The supplied detachable handle is really well made and very secure when attached. One small note is that by default when you attach the handle to the MI-shoe the camera switches to XLR audio automatically by default. So if you don’t actually have a mic connected to the handle you won’t have any audio as the internal mic gets shut off. You have to go in to the audio section of the menu to enable the internal mic if you want to use the handle but want to use the built in mic.
If you want to do time-lapse or slow stuff down the camera has S&Q motion that goes from 1fps to 60fps at 1920×1080.
The camera has WiFi and NFC and allows remote control via Content Browser Mobile and simply touching an NFC enabled phone or tablet against the side of the camera will pair the camera with the phone or tablet. In the future following a firmware update you will be able to use the camera to stream your content live via U-stream.
Finally – build quality. It’s really well made. It feels nice and solid, it feels like it will really last. Don’t tell Sony, but I dropped the camera from waist hight while I was using it. It survived, no problem at all.
Sony’s new baby XDCAM camcorder, the PXW-X70.
In conclusion: This is a nice little camera. It’s very easy to operate. The picture quality is very good for such a compact camera, the only thing that lets it down just a bit is the highlight handling. But the camera is so clean that you can afford to expose a little lower to compensate for this. Since shooting the demo video I have been playing with the picture profiles to help with the highlight exposure and I found that bringing up the black gamma really helps as it lifts the mid range allowing you to expose slightly lower.
The large sensor, combined with the switchable built in ND filters gives you much greater control over the depth of field than normally possible with a compact handycam.
I think you have to remember that this is a small camera. It isn’t a PXW-X180 and it never will be, but if your budget is tight and you want an easy to use compact camera this could be the one for you. I think it would be a good fit as a “B” camera or for use in lower budget corporate productions. In addition the PXW-X70 would be a good camera to give to PA’s and producers or to hand off to inexperienced shooters for fly-on-the-wall productions.
Well I have set myself quite a challenge here as this is a tough one to describe and explain. Not so much perhaps because it’s difficult, but just because it’s hard to visualise, as you will see.
First of all the dictionary definition of Gamut is “The complete range or scope of something”.
In video terms what it means is normally the full range of colours and brightness that can be either captured or displayed.
I’m sure you have probably heard of the specification REC-709 before. Well REC-709, short for ITU-R Recommendation, Broadcast Television, number 709. This recommendation sets out the display of colours and brightness that a television set or monitor should be able to display. Note that it is a recommendation for display devices, not for cameras, it is a “display reference” and you might hear me talking about when things are “display referenced” ie meeting these display standards or “scene referenced” which would me shooting the light and colours in a scene as they really are, rather than what they will look like on a display.
Anyway…. Perhaps you have seen a chart or diagram that looks like the one below before.
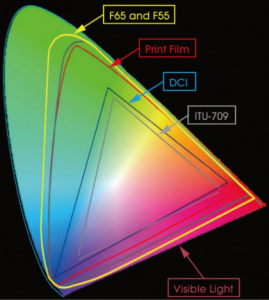
Sony colour gamuts.
Now this shows several things. The big outer oval shape is what is considered to be the equivalent to what we can see with our own eyes. Within that range are triangles that represent the boundaries of different colour gamuts or colour ranges. The grey coloured triangle for example is REC-709.
Something useful to know is that the 3 corners of each of the triangles are whats referred to as the “primaries”. You will hear this term a lot when people talk about colour spaces because if you know where the primaries (corners) are, by joining them together you can find the size of the colour space or Gamut and what the colour response will be.
Look closely at the chart. Look at the shades of red, green or blue shown at the primaries for the REC-709 triangle. Now compare these with the shades shown at the primaries for the much larger F65 and F55 primaries. Is there much difference? Well no, not really. Can you figure out why there is so little difference?
Think about it for a moment, what type of display device are you looking at this chart on? It’s most likely a computer display of some kind and the Gamut of most computer displays is the same size as that of REC-709. So given that the display device your looking at the chart on can’t actually show any of the extended colours outside of the grey triangle anyway, is it really any surprise that you can’t see much of a difference between the 709 primaries and the F65 and F55 primaries. That’s the problems with charts like this, they don’t really tell you everything that’s going on. It does however tell us some things. Lets have a look at another chart:
SGamuts Compared.
This chart is similar to the first one we looked at, but without the pretty colours. Blue is bottom left, Red is to the right and green top left.
What we are interested in here is the relationship between the different colour space triangles. Using the REC-709 triangle as our reference (as that’s the type of display most TV and video productions will be shown on) look at how S-Gamut and S-Gamut3 is much larger than 709. So S-Gamut will be able to record deeper, richer colours than 709 can ever hope to show. In addition, also note how S-Gamut isn’t just a bigger triangle, but it’s also twisted and distorted relative to 709. This is really important.
You may also want to refer to the top diagram as well as I do my best to explain this. The center of the overall gamut is white. As you draw a line out from the center towards the colour spaces primary the colour becomes more saturated (vivid). The position of the primary determines the exact hue or tone represented. Lets just consider green for the moment and lets pretend we are shooting a shot with 3 green apples. These apples have different amounts of green. The most vivid of the 3 apples has 8/10ths of what we can possibly see, the middle one 6/10ths and the least colourful one 4/10ths. The image below represents what the apples would look like to us if we saw them with our eyes.
The apples as we would see them with our own eyes.
If we were shooting with a camera designed to match the 709 display specification, which is often a good idea as we want the colours to look right on the TV, the the greenest, deepest green we can capture is the 709 green primary. lets consider the 709 green primary to be 6/10ths with 10/10ths being the greenest thing a human being can see. 6/10ths green will be recorded at our peak green recording level so that when we play back on a 709 TV it will display the greenest the most intense green that the display panel is capable of. So if we shoot the apples with a 709 compatible camera, 6/10ths green will be recorded at 100% as this is the richest green we can record (these are not real levels, I’m just using them to illustrate the principles involved) and this below is what the apples would look like on the TV screen.
6/10ths Green and above recorded at 100% (our imaginary rec-709)
So that’s rec-709, our 6/10ths green apple recorded at 100%. Everything above 6/10 will also be 100% so the 8/10th and 6/10ths green apples will look more or less the same.
What happens then if we record with a bigger Gamut. Lets say that the green primary for S-Gamut is 8/10ths of visible green. Now when recording this more vibrant 8/10ths green in S-Gamut it will be recorded at 100% because this is the most vibrant green that S-Gamut can record and everything less than 8/10 will be recorded at a lower percentage.
But what happens if we play back S-Gamut on a 709 display? Well when the 709 display sees that 100% signal it will show 6/10ths green, a paler less vibrant shade of green than the 8/10ths shade the camera captured because 6/10ths is the most vibrant green the display is capable of. All of our colours will be paler and less rich than they should be.
The apples recorded using a big gamut but displayed using 709 gamut.
So that’s the first issue when shooting with a larger colour Gamut than the Gamut of the display device, the saturation will be incorrect, a dark green apple will be pale green. OK, that doesn’t sound like too big a problem, why don’t we just boost the saturation of the image in post production? Well if the display is already showing our 100% green S-Gamut signal at the maximum it can show (6/10ths for Rec-709) then boosting the saturation won’t help colours that are already at the limit of what the display can show simply because it isn’t capable of showing them any greener than they already look. Boosting the saturation will make those colours not at the limit of the display technology richer, but those already at the limit won’t get any more colourful. So as we boost the saturation any pale green apples become greener while the deep green apples stay the same so we loose colour contrast between the pale and deep green apples. The end result is an image that doesn’t really look any different that it would have done if shot in Rec-709.
Saturation boosted S-Gamut looks little different to 709 original.Sony colour gamuts.
But, it’s even worse that just a difference to the saturation. Look at the triangles again and compare 709 with S-Gamut. Look at how much more green there is within the S-Gamut colour soace than the 709 colour space compared to red or blue. So what do you think will happen if we try to take that S-Gamut range and squeeze it in to the 709 range? Well there will be a distinct colour shift towards green as we have a greater percentage of green in S-Gamut than we should have in Rec-709 and that will generate a noticeable colour shift and the skewing of colours.
Squeezing S-Gamut into 709 will result in a colour shift.
This is where Sony have been very clever with S-Gamut3. If you do take S-Gamut and squeeze it in to 709 then you will see a colour shift (as well as the saturation shift discussed earlier). But with S-Gamut3 Sony have altered the colour sampling within the colour space so that there is a better match between 709 and S-Gamut3. This means that when you squeeze S-Gamut3 into 709 there is virtually no colour shift. However S-Gamut3 is still a very big colour space so to correctly use it in a 709 environment you really need to use a Look Up Table (LUT) to re-map it into the smaller space without an appreciable saturation loss, mapping the colours in such a way that a dark green apple will still look darker green than a light green apple but keeping within the boundaries of what a 709 display can show.
Taking this one step further, realising that there are very few, if any display devices that can actually show a gamut as large as S-Gamut or S-Gamut3, Sony have developed a smaller Gamut known as S-Gamut3.cine that is a subset of S-Gamut3.
The benefit of this smaller gamut is that the red green and blue ratios are very close to 709. If you look at the triangles you can see that S-Gamut3.cine is more or less just a larger version of the 709 triangle. This means that colours shifts are almost totally eliminated making this gammut much easier to work with in post production. It’s still a large gamut, bigger than the DCI-P3 specification for digital cinema, so it still has a bigger colour range than we can ever normally hope to see, but as it is better aligned to both P3 and rec-709 colourists will find it much easier to work with. For productions that will end up as DCI-P3 a slight saturation boost is all that will be needed in many cases.
So as you can see, having a huge Gamut may not always be beneficial as often we don’t have any way to show it and simply adding more saturation to a seemingly de-saturated big gamut image may actually reduce the colour contrast as our already fully saturated objects, limited by what a 709 display can show, can’t get any more saturated. In addition a gamut such as S-Gamut that has a very different ratio of R, G and B to that of 709 will introduce colour shifts if it isn’t correctly re-mapped. This is why Sony developed S-Gamut3.cine, a big but not excessively large colour space that lines up well with both DCI-P3 and Rec-709 and is thus easier to handle in post production.
I decided to review both of these cameras together. Why? Well because many of the people I have met recently have been looking at both of these cameras as possible options. The price of both of these cameras is very similar, yet both cameras are actually quite different. On the one hand the Z100 offers 4K and a 20x zoom lens while the PMW-300 offers broadcast quality HD in a sort of shoulder mount design. Which to choose?
Sony PMW-300
To start with both cameras are well built. They both feel very solid and well put together. I didn’t notice any creaks or flexing of either camera body. They both feel like professional pieces of kit that will withstand the bumps and knocks that they will almost certainly get. They are finished with a nice matt black finish. The Z100 appears to have a primarily plastic shell while the PMW-300 has a magnesium alloy shell. One small criticism here is that this has a slightly rough finish and is prone to marking from finger nails etc. But the marks can simply be wiped off. Of the two the PMW-300 feels just a little more substantial. Compared to the Sony PMW-200 I feel that both of these cameras feel more substantial and better built.
Sony PXW-Z100 4K/HD Camcorder.
The PXW-Z100 design is very conventional. A handheld camera with a flip out LCD on the top of the handle and a second small drumstick style view finder on the rear of the handle.
The PMW-300 is rather different. It’s a little larger than most handycam’s, a little heavier too at almost 4kg (9lbs) and instead of a flip out LCD display features a large colour monocular viewfinder. The viewfinder is on an articulated arm that slides fore and aft on a sliding rail. The rail can be adjusted left right by about 30mm to give a small degree of left/right adjustment.
The hard to get at release for the left/right viewfinder adjustment.
However I found it really fiddly and tricky to get at the release leaver for the left right adjustment. The viewfinder can easily be detached for travel or storage. The plug for the viewfinder goes into a recess in the cameras body and is then covered by a plastic plate that stops it pulling out.
Broken plastic cover for the viewfinder connector socket.
I used the camera for a dealer event. By the end of the day at the dealer event the little plastic cover had been broken off. It’s attached to the camera via a thumb screw and a very thin piece of plastic. I suspect a lot of these will get broken. It doesn’t really affect the operation of the camera, but without the cover there is nothing to prevent the viewfinder plug from being pulled out.
The other major design feature of the PMW-300 is that the lens in interchangeable. There are two kit lenses to choose from plus adapters that will allow the use of conventional 1/2″ and 2/3″ ENG style zoom lenses. More on the lenses in a bit.
THE VIEWFINDERS:
Te PXW-Z100 LCD screen.
The flip out viewfinder on the PXW-Z100 is sharp and clear. It’s a 3.5″ 852 x 480 pixel screen and the colour and contrast appears pretty accurate. In common with most cameras like this however it struggles in bright sunlight. On the back of the camera there is a small 0.45″ 852 x 480 pixel EVF. Now although both of the screens are supposed to be the same resolution, I felt that I could see more detail on the bigger flip out LCD. In addition if I blinked my eyes when looking at the EVF, I would see a rainbow colour effect. This is because the EVF display is shown one colour after the other, rather than all three RGB colours together. I also found that when I got the center of the EVF in focus using the diopter adjustment, the left side of the screen was out of focus. I don’t know whether this is a fault on the demo sample I had or whether they are all like this. To assist with focusing the camera has a coloured peaking system and via a button on the hand grip (Focus Mag) the ability to zoom into the image to check focus without effecting the recordings. The peaking also works in the Focus Mag mode, so you can both zoom in and have peaking at the same time. This is just as well as when shooting in 4K, focus is super critical.
The PMW-300 flipped up.
The viewfinder on the PMW-300 is a delight! It is a little bulky and this does tend to make the camera slightly lop-sided from a weight and balance point of view, but with it’s large 3.5″ high resolution 960 x 540 screen behind a monocular eyepiece it is sharp, accurate and very nice to use. It’s very similar to the viewfinder available for the F5 and F55 cameras. The monocular itself flips up to allow the LCD to be viewed easily from behind or above the camera and mirror assembly flip up so that you can view the LCD from the side. In addition you can remove the lens and mirror assemblies if you choose. There is a mirror switch on the finder so you can reverse the LCD image when using the mirror or have a normal image without the mirror. As well as the mirror switch there are controls for the brightness contrast and peaking as well as switches to turn the zebra and display overlays on and off. Like the Z100 there is a Focus Mag button on the hand grip that enlarges the viewfinder image to help with focus, but on the PMW-300 the peaking is disabled when Focus Mag is engaged which is a shame.
THE LENSES.
The Z100 has a 20x zoom lens and the PMW-300 is available with a choice of two lenses, a 14x and a 16x. Both lenses being very similar, the 16x having a little more telephoto reach (available early 2014).
The 20x zoom lens on the PXW-Z100
On the Z100 lens there are three rings, one each for focus, zoom and iris. All of these are of the electronic round and round, uncalibrated servo variety. I’m not a fan of these and this camera reminded me of why. The focus and iris control is a little sluggish so snap focus changes are almost impossible. When using the ring to change the aperture you have to go slowly to make sure you don’t overshoot. The zoom ring seemed pretty responsive and I found I could use the zoom ring to re-frame shots more accurately than the zoom rocker. The zoom rocker has quite a large dead band area where you push the rocker and nothing happens. Then you suddenly find the point when the zoom starts to move and if you’re not careful the zoom will start quite suddenly. It is possible to do slow creeping zooms, but finding the “bite” point where the zoom starts to move is tricky. Press the rocker further and you can have quite a quick zoom.
The PXW-Z100 fully wide and zoomed all the way in.
The big plus point of the lens though is the zoom range. Having been shooting with large sensor cameras and restricted zoom ranges for a few months it really was quite a revelation to get back to a camera with a big zoom range. I think I had forgotten how nice it is to be able to get a wide shot and a very long shot without changing lenses. In addition the lens is optically stabilised and this really helps with long shots on wobbly tripods or when using the camera hand held.
One thing I did note that was a little disappointing is that the aperture ramps as you zoom. If you start wide open at f1.6 as you zoom in the aperture slowly decreases to f3.2 when fully zoomed in. You can see this one stop exposure change in your shots. If you start at f3.2 or smaller then this does not happen, it only if you have the lens wide open.
The 14x lens on the PMW-300
The PMW-300’s lens is just like the lens on the PMW-200 and the EX1R before that. Except on the 300 the lens in removable, just like the EX3. There are two different lenses available. The one I tested was a 14x zoom and the other coming in early 2014 is a very similar 16x zoom with a slightly longer telephoto end. Again we have three rings, one for focus zoom and iris. Unlike the Z100 though these are all calibrated and have end stops. The focus ring has two distinct modes. Slide it forward and it’s a round and round servo controlled focus system. But in the forward mode the lens can be set to either manual or auto focus. Slide the ring back and it locks in to the calibrated focus scale and it is a responsive, accurate and snappy focus ring, just like a much more expensive broadcast lens. The zoom ring appears to act directly on the mechanics of the zoom lens and as a result in manual mode is beautifully fast making crash zooms really easy. In servo mode the zoom rocker has only the smallest of dead areas so finding the bite point and starting a slow zoom is easy. You can do a slow creeping zoom or a fast zoom and the control is easy. The iris ring is also fast, accurate and repeatable. For the money these are great lenses.
The PMW-300’s zoom range.
The lenses on both cameras exhibited similar amounts of chromatic aberration. This isn’t particularly bad, but it is there none the less. One issue when trying to make a lens sharper or higher resolution, then CA becomes harder to control. The Z100 lens is a good example of this. Remarkably sharp, but with some CA, especially out at the edges of the frame.
Image Quality.
Lets start by saying that the laws of physics and optics will almost always mean that a small sensor with small pixels will be less sensitive than a larger sensor with larger pixels. The PXW-Z100 is at quite a disadvantage here. For a start it has a single fairly small 1/2.3″ sensor (that’s smaller than 1/2″ but a little bigger than 1/3″). Packed in to this area are 8 million active pixels. That’s a lot of pixels in a small space, so they are very small. To help make up for the small pixel size Sony have used a back illuminated sensor. Back illuminated sensors have fewer obstructions in front of the pixels so are more efficient than conventional sensors, but this advantage only goes a small way towards making up for the very small pixel size.
On the other hand the PMW-300 has three 1/2″ sensors. Sony’s EX and now PMW range of half inch cameras have always performed well in low light thanks to the larger than average sensors used, most handycams use 1/3″ sensors. The PMW-300 is no exception, not only does it have the same 1/2″ sensors as the PMW-200, EX1 and EX3, but it also has a new and improved noise reduction system. As a result the PMW-300 tends to show a little less noise than it’s predecessors. Even with +9db of gain added the pictures are still pretty good.
So just what is the PXW-Z100 like in low light? First of all let’s look at what it’s like in good light. Below I’ve included two frame grabs. One from the PXW-Z100 and one from the PMW-300. The shots were done within a few minutes of each other in good daylight. The Z100 was set to HD. Both cameras were at 0db gain. Click on the images to see them larger or at the original resolution.
So what do I see in these images? Well first of all there is a saturation difference between the two camera. The PMW-300 looks richer because it has more colour saturation. This is easy to adjust with either camera via the paint or picture profile adjustments. The next is the difference in dynamic range. The PMW-300 has better dynamic range than the Z100. Look at the highlight on the back of the blue car, the top of the street lamp on the left and the widows of the distant houses. The PMW-300 is holding these highlights much better than the Z100. Also look at the deep shadow across the grass, both cameras are handling this similarly, so the PMW-300 has better dynamic range. This isn’t really a big surprise as the bigger the pixels the better the dynamic range and the 300 has significantly bigger pixels.
Colours: The Z100 produces some very pleasing and natural looking colours straight out of the box. The PMW-300 has that slight yellow/green look that most Sony cameras have. This can be corrected or altered with a few matrix tweaks in a picture profile if you don’t like it, but as it has this typical Sony look it will match quite closely with most other Sony broadcast cameras.
Both cameras show low noise levels at 0db. The z100 is marginally noisier than the PMW-300, you can see a little more noise in the sky in the Z100 shot but it’s not in my opinion a significant difference. Sony claim 60db for the PMW-300 but don’t give a noise figure for the Z100. The Z100’s noise is a little blotch when the camera is set to HD, I suspect the blotchy nature is a side effect of the cameras built in noise reduction. But, again, I don’t have an issue with the noise levels of either camera at 0db. The Z100 is using quite a bit of noise reduction at all gain levels. As a result there can be a little bit of a difference in noise levels from shot to shot.
Noise comparison between PMW-300 and PXW-Z100 at 0db.
So while the noise is not bad, just refer back to the settings noted in the full size frame grabs. The PMW-300 is at f8 with 1/16th(4 stops) of ND and the Z100 is f6.8 with 1/4 (2 stops) of ND. Even allowing for the Z100 possibly being fractionally over exposed compared to the PMW-300, that’s a not insignificant 2 stop sensitivity difference between the cameras. This difference becomes even more apparent when the light starts to fall off. I rate the PMW-300 at approx 340 ISO and the PXW-Z100 at about 75 ISO.
So I did some further tests to evaluate the low light performance of both cameras. The first test you can see below. This was shot in my living room using a ceiling light fixture with 3 x 40w household light bulbs. I would suggest this is a fairly typical light level for a lot of living rooms at night and the type of situation that might be encountered when shooting an observational or fly on the wall type documentary.
PXW-Z100 at 0db, f1.6 in a typical living room.PMW-300 at 0db, f1.9 in the same room as above.
As you can see the difference is quite striking. Just to be sure of my results I repeated the test using a chart as you can see below, both cameras at 0db and wide open.
PXW-Z100 at 0db, low light test.PMW-300 at 0db with same lighting as above.
So the Z100 is obviously around 2 stops less sensitive than the PMW-300. Can we make up for this lack of sensitivity by adding some gain? Take a look at the results below, the Z100 with +9db and +18db of gain:
PXW-Z100 with +9db gain.PXW-Z100 with +18db gain.
This test confirms the slightly over two stop sensitivity difference between the PMW-300 and PXW-Z100. You can see that at +18db the Z100 is marginally more sensitive than the PMW-300 at 0db. 18db is the equivalent to 3 stops. AT +12db the Z100 is less sensitive than the PMW-300 and 12db is two stops.
The key thing here is to note that in a low light situation where the PMW-300 is just about producing an acceptable image at 0db, your going to need 12 to 18db of gain to get the same brightness image out of the Z100. Looking closely at the noise levels from the Z100, I would be reasonably comfortable using +9db gain if I had to, but +12db from the Z100 is too noisy for me and 18db is getting pretty grim. In addition there is some loss of contrast at the higher gain settings.
Low light is where the PMW-200 and EX1 etc have always been good performers and the PMW-300 continues this. I also decided to take a look at how well the 300’s new noise reduction circuits work, so here are frame grabs from the PMW-300 at +9db and +18db.
PMW-300 at +9db.PMW-300 at +18db.
The noise reduction on the 300 is quite effective at +9db and if I had to, I wouldn’t be too uncomfortable using +9db of gain (I never want to use gain, but sometimes you just have to). Above about 12db however the noise reduction is less effective and also starts to reduce the contrast in the image quite noticeably.
So, the PXW-Z100 struggles a bit in low light compared to a camera with a larger sensor and fewer pixels. But then the Z100 is a 4K camera and can produce a much higher resolution image. Just how good is this 4K image as in many cases the Z100 will be used alongside cameras like the PMW-F5 or F55, both of which are capable of stunning 4K.
Well I think it does very well considering the small size sensor. The 4K images have nice contrast and plenty of detail. The deep depth of field that the small sensor provides really helps when you have street scenes like the ones below which were shot in Austin, Texas. Sometime’s you don’t want a shallow depth of field and for the kinds of applications I can see this camera being used for, I think a deeper DoF will be good.
6th Street, Austin Texas. HXR-Z100 frame grab. Click on the image to enlarge.
Both cameras have the ability to customise the way the pictures look. On the PMW-300 you have 6 picture profile memories that you can use to save 6 different camera setups. There are adjustments for the matrix, detail, white balance and gamma settings. As well as standard gammas including Rec-709 (STD 5) you have the same 4 Hypergammas as used by the PMW-200, 400, 500, 700 and also used in the F5 and F55. The Hypergammas extend the cameras dynamic range and provide a very pleasing highlight roll off that is closer to film and less video like (Hypergammas should be exposed a little lower than standard gammas for best results). The PMW-300 appears to have a very respectable 11.5 stops of dynamic range.
The Z100 only has a single set of paint settings. Most are very similar to the 300, but instead of Hypergammas the Z100 has two gamma curves called Cinematone 1 and Cinematone 2. It’s important to note that unlike the Cinegammas found in the EX series cameras or the Hypergammas in the PMW’s the Cinematone gammas do not extend the dynamic range. The Z100 appears to have around 10 stops of dynamic range when using the standard gamma and knee settings.
PXW-Z100 gamma choices.
The Cinematone gamma curves both tend to pull down the black and shadow areas of the picture increasing contrast. There is almost no change to the highlight handling. Personally I would not use these curves. I would rather shoot with the standard 709 gamma curve and then adjust my black levels in post production where I have more control. Having said that if you do want a contrasty look straight from the camera then the Cinematone gammas may prove useful.
Recording Codecs and Media.
The PMW-300’s SxS slots and output connections.
The PMW-300 like every other PMW camcorder is based around Sony’s SxS solid state recording media. This very robust professional media has been around for over 6 years now and is widely accepted in the pro video world. The cards are expensive when compared to consumer media, but they are very fast and very reliable. I’ve been using them for 6 years and never had any issues. The camera has two SxS slots and it will automatically switch from one card to the other as the cards fill up without any interruption to the recordings.
The 300 currently comes with Sony’s XDCAM HD codec as standard. Next year there will be a firmware update that will add the new XAVC codec to the camera. As it stands right now the 300 has two distinct modes. FAT mode and UDF mode. In FAT mode the camera records in standard definition DV, HDV and 35Mb/s 1920 x 1080 4:2:0 XDCAM. The XDCAM footage is wrapped in the .mp4 wrapper. The key benefit of FAT mode is the ability to use cheap SD cards via an equally low cost SxS to SD card adapter. The BBC use SD cards via adapters for some TV news applications. For those on a tight budget the SD cards are certainly an option, or they can be used as a backup for those times when perhaps you run out of the more expensive SxS cards. Just remember that SD cards are mass produced consumer products. In addition there is a lot of sub-standard fake media out there, so do be careful where you buy your media.
An SxS card and XQD card side by side.
To get the very best from the PMW-300 you want to use UDF mode. In UDF mode you cannot use SD cards, only SxS cards or via an adapter XQD cards (more about those in a bit). In UDF mode the camera can record XDCAM HD422. This is wrapped in the broadcast industry standard MXF wrapper, is 4:2:2 and has a bit rate of up to 50Mb/s so offers better image quality than the FAT modes and fully complies with most TV broadcast standards. One limitation however of the Mpeg 2 encoding used by XDCAM is that the maximum frame rate that can be recorded at 1920 x 1080 is 30fps. So if you want to shoot at 50p or 60p with the 300 you have to drop the resolution of the internal recordings to 720p.
At the moment (December 2014) it is unclear exactly what frame rates or modes will be available when the XAVC codec gets added to the PMW-300. I would hope that one of the things that will be added is the ability to shoot at 1920 x 1080 at 50p and 60p, but at the moment Sony are being quite tight lipped as to what will come.
The PXW-Z100’s card slots.
The PXW-Z100 records on to XQD cards. XQD is a new high end, very fast consumer flash media. At the moment only Sony and Nikon use them and you will only them in the Nikon D4 camera as well as the Z100, plus via adapters in most other PMW cameras. Cards are available from Sony and Lexar and to add to the confusion they come in different speed ratings with 3 different classes of card from Sony, N, H and S.
The entry level “N” series cards have a maximum write speed of 80MB/s (640Mb/s). The H series cards have a maximum write speed of 125MB/s (1Gb/s) while the faster (and more expensive) “S” series cards have a significantly maximum write speed of 180MB/s (1.4Gb/s). There are both USB3 and Thunderbolt card readers for the cards so read speeds are also very fast. To record all of the various modes that the PXW-Z100 is capable of you need the more expensive “S” series cards. If your only going to shoot in HD then you will be OK with the cheaper “N” series. In December 2014 amazon were selling a 32GB “S” series XQD card for £220 GBP ($350 USD). That’s about half the price of a similar SxS card.
The playback and menu buttons on the handle of the Z100
The Z100 comes with Sony’s XAVC codec. This is a 10 bit, 4:2:2 “I” frame only codec. In the future there will be a firmware update to add the more compact 4:2:0, long GOP XAVC-S codec. A further update will also add the ability to record AVCHD on to an SD card into the currently un-used SD card slot next to the two XQD slots.
XAVC is a great codec. It offers very high quality 10 bit recording at different resolutions and different frame rates. Unlike Mpeg 2 it is not restricted to 30fps and HD. It is the same codec as used in the PMW-F5 and F55 cinema cameras. It is almost certainly going to become standard on most Sony pro camcorders in the future. For post production it is already supported in FCP-X, Adobe Premiere, Avid, Edius, Resolve and of course Sony Vegas.
One thing to be aware of though is the data rates. These are higher than XDCAM. In HD the data rate, depending on frame rate is around 100Mb/s, that double the amount of data compared to XDCAM HD422 and almost 3 times as much data as XDCAM EX. So a 32GB XQD card will only last a around 30 minutes (depending on frame rate 24/25/30fps, 15 mins at 50/60p). If you want to shoot in 4K things get even worse, a 32GB card lasting between 12 and 14 minutes at 24/25/30fps and a mere 6 to 8 minutes at 50/50p. For most people a 32GB card will not be big enough and your going to need a couple of 64GB cards as a minimum. Once the XAVC-S codec becomes available as an option you will be back to similar data rates and storage requirements to XDCAM HD, but without the image quality benefits that the full XAVC codec brings.
The Z100 has two slots for the XQD cards and as one card fills up the camera will automatically switch to the next card without any interruption to the recording. As XAVC can shoot at full HD when you enter into the cameras S&Q mode you can choose any frame rate up to 60fps and the recording will be in full HD. The PMW-300’s S&Q mode is only full HD up to 30fps, above 30fps it is 720p.
Ergonomics:
The right side of the PXW-Z100.
The PXW-Z100 is pretty conventional in it’s layout. It’s comfortable to hold and the record button and Image Mag buttons are easy to access while shooting. In addition at the front of the hand grip there is a one push button to quickly set the auto iris, very useful when shooting run and gun. It has 6 assignable buttons on the top of the left side of the main body. Out of the factory 3 of these buttons are set to quickly turn on and off the zebras, peaking and thumbnail viewer for playback.
Focus Mag button on the handgrip of the PXW-Z100.
There are conventional 3 position switches for gain and white balance controls. The gain levels can be set in the cameras menus and the preset white balance can be selected between indoor and outdoor in the cameras single set of paint settings. Incidentally the menu look and structure in the Z100 is very similar to that of the PMW-F5/F55 and F65 cameras. Once you have made any changes to the cameras settings you can save an “all file” to an SD card in the utility SD card slot.
The right side of the PMW-300.
The PMW-300 is an interesting design. It isn’t a full size shoulder camera where the center of the camera sits over the top of your shoulder. Neither is it like most hand held handycam cameras. It’s designed to be used on your shoulder, but it isn’t a full shoulder camera. At the rear of the camera there is an extending shoulder pad that sits on your shoulder. As well as extending the pad has an additional flip out pad.
The release catch for the shoulder pad on the underside of the PMW-300 camera.
This is just as well because the release catch for the extending shoulder pad is on the underside of the camera. If you attach a tripod plate to the bottom of the camera you can no longer release the catch to extend or retract the shoulder pad. Not the cleverest bit of design! When I used the camera, I extended the shoulder pad before attaching my tripod plate and then used the flip out section when needed. Depending on how you adjust the viewfinder you’ll probably find that most of the time you don’t need the flip out part of the shoulder pad.
The PMW-300 tends to sit well back on your shoulder.
When using the 300 on your shoulder most of the weight is still carried through your arms. It’s not a heavy camera, so it’s not hard to hold for long periods. The big benefit of having it on your shoulder is stability. With your eye up against the eyepiece, you right hand though the hand grip and left hand on the lens it can be very stable. Shoulder hight is also better for interviews, I don’t like looking up at people from cameras held at chest hight. The 300 is still light enough to be used handycam style if you wish, although with the hand grip being quite well forward on the camera it’s not quite as easy to use as a handycam where the hand grip tends to be close to the cameras center of gravity.
The menu and playback controls on the handle of the PMW-300.
Like the EX and PMW-200 the 300 has Sony’s direct menu system where you can use the arrow keys on the handle to directly navigate around commonly used functions like gain, exposure offset, white balance and shutter speed, as displayed in the viewfinder, without having to enter into the cameras main menus. There are also 7 assignable buttons on the left side of the camera that can be used to control various functions. Don’t forget that peaking and zebra controls are on the viewfinder with this camera so there is an abundance of buttons for you to use.
Connectivity:
The output, remote and timecode connectors on the PMW-300.
Both cameras have HDSDI and HDMI. Both cameras two XLR connectors with phantom power for external audio sources and both have timecode in/out connectors (nice to see this on the Z100). They can both be connected to a computer via USB2 to off load media and they also have USB host connectors for connecting WiFi adapters and other similar accesories. In addition the PMW-300 has i-Link (firewire), genlock and an 8 pin remote control port for lens control (same as EX1/PMW-200) plus an 8 pin remote port for connection to an RMB type remote control panel.
One note about the pxw-z100. The HDSDI is HD only. The HDMI can do both SD and HD, but currently the HDMI support is only at HDMI 1.4, so there are some limitations over the frame rates that can be passed over the HDMI at 4K. There will be a firmware update in the future to bring the HDMI up to the 2.0 specifications that will allow 4K at up to 60fps. In addition the camera cannot output both 4K HDMI and HD HDSDI at the same time. You can have 4K over HDMI on it’s own or 4K down converted to HD over HDSDI and HDMI together.
Power and Batteries.
The PXW-Z100 is a 7.2V camera and uses the very common Sony NPF style batteries. An NPF970 will run the camera for a little over 2 hours. This is a lot less than many of Sonys 7.2V cameras. The XAVC codec and 4K image processing require more power and the Z100 consumes around 15W. More power means more heat and there as a fan inside the camera to aid cooling. The vent is at the rear of the camera and there are intakes at the bottom of the camera. The fan is barely audible.
The PMW-300 is a 12V camera and like most of the PMW range it requires Sony’s BP-U type batteries. A BP-U60 battery will run the camera for a little under 2 hours. Many of the third party batteries designed for the EX1, EX3 and PMW-200 will not work with this camera. I did find that the DSM U84 worked OK and this ran the camera for 2.5 hours. Once the XAVC codec gets activated it is possible that the power consumption may increase a little. One improvement over the PMW-200 is the placement of the external DC socket on the rear of the camera rather than inside the battery compartment.
Conclusions:
I like both of these cameras and would be pleased to own either. But of the two cameras, I think the PMW-300 is the better all round camera. I really like the 300, I think that Sony have really got this one right (with perhaps the exception of the release catch for the shoulder pad). The picture quality is once again best in class and rivals many much more expensive and larger cameras. It’s going to be a good all round camera that will find a home on corporate shoots, news and documentary shoots as well as in low budget studios. The new viewfinder is really delightful and is a big part of what makes this camera so good.
The PXW-Z100 is a bit of a mixed bag. There is nothing wrong with it as a camera, it is what it is… a small 4K camcorder. It does produce a pleasing image with good colours and the zoom range is impressive. But.. and it’s a big “but”, the fact that it is 4K and only has a small sensor hurts this cameras sensitivity quite significantly compared to a camera like the PMW-300. This isn’t a design fault, that’s just the laws of physics and optics at work. In addition the current limitation of XAVC only (XAVC-S will come later) means that your going to need two to three as much media for HD and six to ten times as much media for 4K compared to a 50Mb/s XDCAM camera. Even though XQD cards are cheaper than SxS that’s still a considerable investment in media that’s needed. If you’re coming from cameras with AVCHD and SD cards the media cost are probably quite frightening. If you are considering this camera you might want to hold off until the updates for AVCHD and XAVC-S become available. Having said that, if you need 4K in a small camera this is almost certainly the best there is at the moment (not that there is a great deal of choice). It will be a good run and gun companion camera to an F55 or F5 shooting 4K, provided you have enough light.
This website uses cookies to improve your experience. We'll assume you're ok with this, but you can opt-out if you wish. Read More
Necessary cookies help make a website usable by enabling basic functions like page navigation and access to secure areas of the website. The website cannot function properly without these cookies.
Name
Domain
Purpose
Expiry
Type
wpl_user_preference
www.xdcam-user.com
WP GDPR Cookie Consent Preferences
1 year
HTTP
YSC
youtube.com
YouTube session cookie.
54 years
HTTP
Marketing cookies are used to track visitors across websites. The intention is to display ads that are relevant and engaging for the individual user and thereby more valuable for publishers and third party advertisers.
Name
Domain
Purpose
Expiry
Type
VISITOR_INFO1_LIVE
youtube.com
YouTube cookie.
6 months
HTTP
Analytics cookies help website owners to understand how visitors interact with websites by collecting and reporting information anonymously.
Name
Domain
Purpose
Expiry
Type
__utma
xdcam-user.com
Google Analytics long-term user and session tracking identifier.
2 years
HTTP
__utmc
xdcam-user.com
Legacy Google Analytics short-term technical cookie used along with __utmb to determine new users sessions.
54 years
HTTP
__utmz
xdcam-user.com
Google Analytics campaign and traffic source tracking cookie.
6 months
HTTP
__utmt
xdcam-user.com
Google Analytics technical cookie used to throttle request rate.
Session
HTTP
__utmb
xdcam-user.com
Google Analytics short-term functional cookie used to determine new users and sessions.
Session
HTTP
Preference cookies enable a website to remember information that changes the way the website behaves or looks, like your preferred language or the region that you are in.
Name
Domain
Purpose
Expiry
Type
__cf_bm
onesignal.com
Generic CloudFlare functional cookie.
Session
HTTP
NID
translate-pa.googleapis.com
Google unique id for preferences.
6 months
HTTP
Unclassified cookies are cookies that we are in the process of classifying, together with the providers of individual cookies.
Name
Domain
Purpose
Expiry
Type
_ir
api.pinterest.com
---
Session
---
Cookies are small text files that can be used by websites to make a user's experience more efficient. The law states that we can store cookies on your device if they are strictly necessary for the operation of this site. For all other types of cookies we need your permission. This site uses different types of cookies. Some cookies are placed by third party services that appear on our pages.