I’ve been running my Aurora adventure tours for 11 years and so far every trip has seen the Northern Lights. This year I had a couple of guests that had already travelled to Iceland and Finland in search of the Aurora, but had not seen it. So it was wonderful to see their faces when the Northern Lights came out to play for us most nights.
2018 was yet another great year for my Aurora tours. This picture taken on January 20th.
For the last couple of years I have been basing the tours out of Alta in Northern Norway, travelling from Alta to some cabins far off the beaten track at very special place just outside of the very small town of Karasjok. We stay at the cabins for several reasons.
1: It’s very different – only accessible by snow scooter.
2: It’s truly beautiful – a chance to get back to a slower way of life for a few days.
3: Clear skies – this location seems to deliver clear skies when many other areas are cloud covered.
4: Adventure – where else can you stand on the top of a hill and not see anything else man made from horizon to horizon.
We always try to get up onto the plateaux at some point. This view taken from a drone shows how desolate yet beautiful it is. Nothing man made from horizon to horizon.Another Aurora picture from January 2018. This time Jan 19th.
So why not come and join me for an adventure you’ll remember forever? I’ll help you take your own photos or video of the Aurora if that’s what you want to do. Or just come and enjoy a bit of Sami culture as our host Oskar cooks traditional meals of reindeer, elk and salmon before we enjoy a traditional Sauna. During the day we go ice fishing, head out up on to the arctic plateaux by snow scooter or go dog sledding through the snow covered trees of the forest.
I’ve worked hard this winter to get the very best deals on the hotel and cabins that we stay at. As a result the cost of the tours is now lower than the past couple of years and I am even able to offer a really amazing early bird deal for those that book and pay 6 months before the tour. Full details here.
Normally when I travel up to arctic Norway for my annual Northern Lights expeditions I take a large sensor video camera. Last year it was the Sony FS5, which performed very well and gave me some great results. But this year I decided to down size and instead of taking a bulky camera I chose to take a pre-production sample of Sony’s diminutive new PXW-Z90 camcorder.
In Norway with the PXW-Z90.
On the outside the Z90 looks almost exactly the same as the older PXW-X70 camcorder. I’ve shot several videos with the X70 and it’s a great little camcorder that produces a very good image considering it’s small size. Being a new model I expected the Z90 to offer some small improvements over the X70, but what I didn’t expect was the very big improvements that the Z90 brings.
The Z90 is the first camcorder from Sony to incorporate a new design of sensor. It’s a 1″ type sensor, so like the X70, bigger than you used to find on small handycams, but not as big as the super 35mm sensor found in the FS5, FS7 etc. This is a nice size for this type of camera as it makes it possible to obtain a shallow depth of field by using the cameras built in ND filters (yes- it really does have ND filters built in) and a large aperture. Or if you need a deeper depth of field for easier focussing or run and gun then you can use a smaller aperture by switching out the ND filters. The maximum aperture of the zoom lens is f2.8 but it does stop down to f4 towards the telephoto end.
Sony’s new stacked CMOS EMOR RS sensor
This new sensor uses a new construction method that allows it to have several layers of electronics immediately below the imager pixels. The “stacked” sensor can as a result incorporate more image processing and a large memory area right under the pixels. This means that the sensor can be read out much more quickly than is normal for this type of camera and as a result rolling shutter is hugely reduced (I didn’t notice any in any of my footage).
As well as a reduction in rolling shutter compared to other similar sensors, the ability to do more on chip image processing appears to bring other advantages as the noise levels from this camera are very low indeed.
Frame grab from a night time snow scooter ride. Shot at +15dB gain the noise is still very minor. (click on the image to view a larger version.
The low noise levels mean that this camera performs surprisingly well in low light. Adding in +6dB was not a problem if needed. Even with +15dB of gin the images hold together very well. Clearly the camera is doing a fair bit of electronic noise reduction at higher gain levels and there is a slight increase in image smear as a result. Plus in certain circumstances the noise levels do rise, especially if you have large dark areas amongst in an otherwise brighter scene. In my sample footage during the night time snow scooter ride, which was shot at +15dB gain, you don’t see and noise over the snow, but you can see some grainy noise over the dark jacket of the snow scooter driver (see the frame grab above). The fact that you can push the camera up to +15dB and in most cases get a pretty good image is very nice.
Frame grab form a PXW-Z90 – Hybrid Log Gamma. Click on the image to see a larger version.
On top of good sensitivity you also have great dynamic range, more than the X70 and enough to make direct HDR shooting and log shooting possible with this tiny hand held camcorder. It doesn’t quite have the dynamic range of an FS5 or FS7, but there is still plenty of range to help deal with challenging lighting situations.
As well as bringing a nice improvement in image quality over the X70 (which is pretty good already) the new sensor brings a vastly improved autofocus system. There are 273 focus detection points which are combined with faster readout, faster on sensor processing and the same AF processing technology as used in the flagship Sony A9 stills camera. This brings a really remarkable autofocus system to this camera. The AF system is a newly developed hybrid system that combines phase detection AF with new algorithms created specifically for video rather than stills photography. At last this is an autofocus system that really works for a video camera. It is intelligent and responsive. There is no hunting for focus, it just seems to get on with the job.
Adjusting the AF response on the PXW-Z90.
Just about every aspect of the autofocus system can be customised in the camera menu. You can choose between using focus zones, the full image width or selectable focus spot areas. The cameras LCD screen is a touch screen so you tap the screen where you want to focus.
You can also tailor the AF’s response speed, you can adjust the size of the tracking range, using a wide range for occasions when you want the AF to follow an object through the shot, or use a narrow range to restrict the focus depth range.
The PXW-Z90’s variable AF drive speed.
You can customise how quickly the AF will move from one object to another, from staying locked on to a faster more responsive setting.
In addition it has that wonderful Sony face detection system that allows you to choose one face out of a crowd of people using the thumb stick on the hand grip or the touch screen. Once selected the camera will stay locked to that face.
Working with the PXW-X90 in Norway.
While I was up in Norway it was between -24c and -30c. In those temperatures you really don’t want to take your mittens off for more than a minute or so. Being able to rely on the cameras autofocus allowed me to keep my fingers warm. Not one shot out of all my rushes from the trip has incorrect focus. That is truly remarkable and made shooting with this camera a real pleasure. I’m not saying that you should always use autofocus. When possible I love to be able to pick and choose how I focus. But in many situations or for less experienced shooters this autofocus system will be a game changer.
For my test shoot in Norway I mostly used Picture Profile number 10 which gives an instant HDR workflow thanks to the use of Hybrid Log Gamma. Using HLG you can shoot as you would do with any other conventional camera. Then take the footage and play it back in HDR on an HDR TV without any grading or other post production work. I also shot at a couple of locations using S-Log2 to test how that worked (I was shooting in UHD and the camera is 8 bit in UHD. For 8 bit I prefer S-Log2 over S-Log3). The Z90 has 10 picture profiles that allow you to tailor how the image looks, including a crunchy DSLR type look. Some filmic looks using Sony’s cinegammas as well as profiles for shooting S-Log2, S-Log3 and Hybrid Log Gamma (HLG).
Dog sledding in the arctic (frame grab). Shot in HDR using HLG on the PXW-Z90.
The Z90 has Sony’s XAVC-L codec. This high quality codec offers 10 bit 4:2:2 broadcast quality recordings in HD and 8 bit 4:2:0 recordings in UHD (3840 x 2160). The camera records to SDXC cards, so media costs are very low. There are two card slots and you can record to each slot singly, record to one card after the other or dual record on to both cards at the same time for redundancy and an instant back. You can even use each of the cameras two record buttons to control the records on each card independently should you wish.
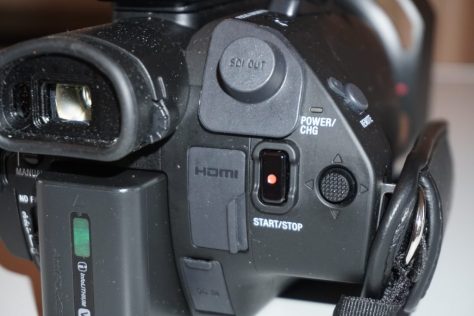
The PXW-X90 is very small, so carrying it around on the snow scooters was easy.The rear of the hand grip of the PXW-Z90.
The Z90 is a small camcorder and like all small camcorders this doesn’t leave much room for large buttons and switches. The menu system and many of the cameras functions can be controlled via the touch screen LCD or the small joystick/thumb stick on the hand grip. Iris, shutter speed and gain each have a dedicated access button that selects the function.
The Full Auto switch and ND filter control on the PXW-Z90.
Then you use the thumb stick to select the value you want, or you can set each item to Auto. In addition there is a switch to put the camera into full auto on the rear of the camera. Just below the full auto switch is the control switch for the ND filters.
The Sony PXW-Z90 compact 4K camcorder.
The lens is a Zeiss 12x optical zoom with built in optical image stabilisation. It is controlled by a single ring around the barrel of the lens which can be switched between focus control or zoom control. In addition there is the usual zoom rocker on the handgrip as well as a small zoom switch on the top handle. In addition to the optical stabilisation the camera also has Sony’s electronic “super steadyshot” stabilisation that can be used in addition to the optical stabilisation. Another very handy function is “Clear Image Zoom”. This is a form of electronic zoom function that makes use of a database of textures and object types. When using clear image zoom the camera uses this database to apply just the right amount of image processing during the electronic zoom process. In most cases you can’t see any degradation of the image when using clear image zoom. I left it on for all of the Norway shoot as it turns the 12x zoom into a very handy 18x zoom.
The wide end of the PXW-X90’s zoom range.The long end of the PXW-X90’s zoom lens.
After doing so much shooting on large sensor cameras with restricted zoom ranges getting back to a small camera with a big zoom range was fun. For future Norway trips I am very tempted to switch to a camera like the Z90.
The right side of the PXW-Z90.
The Z90 body is almost exactly the same as the X70. The cameras top handle has 2x XLR connectors with the audio controls for the two channels on the opposite side of the handle.
The audio controls of the PXW-Z90.
If you want to make the camera more compact the handle can be removed, but when you do this you will no longer have any XLR connectors. Instead you will have an MI shoe on the top of the camera body that can be used to connect a Sony UWP-D radio mic or a n XLR adapter. There is also a stereo microphone built into the main body of the camera, so even with the hand grip removed there are plenty of audio options.
The PXW-Z90’s flip out LCD screen.
The flip out LCD panel acts as the cameras main viewfinder. Opening and closing the LCD screen turns the camera on and off. It starts up and shuts down very quickly. The resolution of the LCD is similar to most other modern camera LCD’s. It’s adequate for this type of camera, but it isn’t the highest resolution screen in the world. To check focus you have a button on the top of the hand grip to activate the image magnification function and the camera has a coloured peaking system to help pick out what is, and what is not in focus. I suspect that with this particular camera, many users will take advantage of the cameras excellent auto focus system and there is a lot of feedback to the user of how this is working including coloured boxes that indicate exactly what the camera is focussing on.
The rear of the Sony PXW-Z90.
As well as the side LCD panel there is also a small OLED electronic viewfinder on the rear of the camera. This is very useful for use in very bright sunlight, but it is rather small.
The cameras gain, shutter and iris functions each have a dedicated button on the side of the camera. One push of the appropriate button enables that function to be controlled by a small dial wheel just under the front of the lens.
Iris, gain and shutter speed controls on the side of the PXW-Z90.
Press the shutter button and the wheel controls the shutter. Press the gain button and the wheel controls the gain. Overall this system works well, but I would still prefer a separate gain switch and a shutter speed up/down switch. On the rear of the hand grip there is a small joystick that sits under your thumb. You can use this thumb-stick to set many of the cameras settings and to navigate through the cameras menu system. In addition you can use the LCD touchscreen to navigate through the menu as well as select your autofocus points etc.
The PXW-Z90 is a small camera that packs a very big punch. It’s never going to give the fine degree of image control that you get with most large sensor cameras and it won’t quite deliver the same image quality either (although it’s really, really close). If you need a small, discrete camera, perhaps you travel a lot, or you just need a “B” camera, then the Z90 offers a possible solution. I haven’t even touched on all the streaming, ftp and wifi capabilities of this camera. The auto focus system is a delight to use and it’s the best AF system I’ve ever come across on a video camera. The new sensor in the Z90 is clearly a fairly large step forwards from the sensor in the previous similar model the X70, it has more dynamic range, a lot less rolling shutter (not that it’s a big problem on the X70) and the final images look better as a result. I might just have to add one to my camera collection.
If you would like to join me on one of my adventures to arctic Norway please see take a look at this page. I’ve been running these trips for 11 years and EVERY tour has seen the Northern Lights. This year was no exception and we got to see some really great Auroras and had a great time dog sledding, ice fishing and exploring the Finnmarksvidda.
2018 was yet another great year for my Aurora tours. This picture taken on January 20th.
Picture taken by Jan Helmer Olsen. One of the guides on the tour.
Due to the unexpected redundancy of one of my guests I am now looking to sell on a couple of places on my Northern Lights expedition in January on his behalf.
The trip starts and finishes in Alta, Norway. Food is included for most of the trip. We spend 4 days up on the Finnmarksvidda where we normally get amazing Northern Lights viewing opportunities. I can also help guide anyone that wants to learn how to photograph or video the Aurora.
This is a real adventure and a lot of fun. The only way up to the cabins by snow scooter, crossing frozen lakes along the way. We eat a campfire lunch in a Sami style tent, we go ice fishing, exploring by snow scooter and enjoy traditional sauna nights.
After a test run starting and finishing in Alta last year I have decided to run the trips from Alta again next year. The hotel is nicer and the itinerary more relaxed. Starting and finishing at Alta gives us more time at the cabins.
2017/2018 Northern Lights Expeditions to Norway, travelling by road and snow scooter, staying in mountain cabins. Including food for 4 days, ice fishing, snow scooter use and optional photo/video tuition. You must book your own flights to Alta, Norway.
2018 Tour 1: Arctic Dawn. On this tour we will see the very first sunrise of the year. The moon will be absent during the night, so best suited for shooting and viewing faint Aurora. Arrive Friday 12th January 2018, depart Thursday 18th January 2018. £1,350 per person. Max 8 people. (cost of flights NOT included). You must arrange your own transport to and from Alta, Norway.
2018 Tour 2: Moonrise Tour. On this tour we will have a rising moon (after new moon) The moon will start at 18% illumination and increase to 53% illumination over the course of the tour. This will provide interesting possibilities for moonlit landscapes, but if the Aurora is very, very faint it will be harder to see. The days will be longer during this tour than the first tour. Arrive Thursday 18th of January 2018, Depart Wednesday 24th of January 2018. £1350 per person max 8 guests.
These really are amazing adventures. Not just a chance to see the Northern Lights but also a chance to experience some of the most beautiful scenery on the planet. Full details can be found by clicking here.
I have just return from one of the most challenging shoots I have been involved in. The shoot took place over 5 days in and around Tromso in Norway. The aim was to gather footage to show off the capabilities of a new type of 4K TV from Phillips.
We shot the Northern Lights, we shot dog sledding , snow mobiles, shots of the city and sailing on the fjords. Each part of the shoot had many challenges and a lot of the shoot took place at night and at night the crew slept in cabins, tents and on the yachts. Shooting from the ice and snow covered deck of a yacht in temperatures well below zero is not something I enjoyed. And to top it all off the weather was pretty grim fro most of the shoot. Heavy snow showers, freezing temperatures and towards the end strong winds.
Because image quality is paramount for this project I choses to use the best lenses I could, but at the same time space and time constraints dictated that zoom lenses would be desirable. We were shooting 16 bit raw as well as XAVC class 480 on my PMW-F5 and some pick-up shots in UHD XAVC-L on a PXW-FS5. For the PMW-F5 the primary lens was the Fujinon Cabrio XK6x20, 20-120mm PL zoom and to ensure we had similar looking images from the FS5 I used the new Fujinon XF 18-55mm. I have to say that I’m quite in love with both of these lenses.
Fujinon Cabrio XK6x20 PL mount cinema zoom. A beautiful lens!
The Cabrio 20-120 is a beautiful lens and it’s really nice to have a servo zoom that is truly parfocal. The 20-120 produces really nice images even in the most challenging of conditions and at T3.5 it’s reasonably fast throughout the entire zoom range. This was the lens that I used for the majority of the shoot, in particular for the many night scenes we shot. The E-Mount 18-55 on the FS5 produces images that matched really well with the bigger lens and camera. This is a combination I would love to use on more shoots where the budget will allow.
One particular scene that we had to shoot was particularly challenging. It was a set up shot of a night time arrival of a couple of snowmobiles at a Sami camp site. The Sami people are the indigenous people of Northern Norway and they have a particular style of tent know as a Laavu which is similar to a teepee or wigwam. The idea behind the shot was to have the snow scooters arriving with headlights blazing and for the drivers to then enter the tent lit only by the light of a campfire inside the tent. At the time of the shoot it was snowing heavily and was totally dark. Turn off the lights of the snowmobiles and you could not see a thing.
Wide shot of the snowmobiles arriving at the camp in the dark.
While modern cameras like the F5 are very sensitive, the light of a campfire inside a tent will not adequately light a scene like this on it’s own. I didn’t want a totally dark background, so I decided that I would subtly light the trees of the forest that we were in to add some drama and give some depth to the background and a sense of being in a forest.
A slightly closer shot of the tent with backlit trees behind it.
As we were travelling continuously on this shoot there was no space for a large or complex lighting kit and the remote location meant we needed battery powered lights. In addition I knew before we left that there was a chance of bad weather so I needed lights that would work whatever mother nature decided to throw at us.
A snow scooter comes into the shot. You can see just how heavily it was snowing in this shot.
I decided to take a set of 3 Light & Motion Stella battery powered LED lights. It’s just as well I had the Stella lamps as on top of all the other difficulties of the shoot the weather decided it was not going to play ball. We had to shoot the scene (and much of the shoot) in the middle of a snow storm. Fortunately the Stella lights are completely waterproof, so I didn’t need to worry about rain or snow protection. Just set them up turn them on and use the built in dimmer to set the light output.
To light the scene I set up a Stella Pro 5000 in the woods behind the Sami tent, aimed through the trees and pointed directly towards the camera. I chose to backlight the trees to provide a sense of there being trees rather than lighting them. I felt this would look less lit than throwing a ton of light into the forest from the front and I’m pleased with the result.
A Light & Motion Stella Pro 5000 was used to back light the trees and tent. The heavy snow was no problem as the light is totally waterproof.
The Stella Pro 5000 is very bright for a compact battery operated light, it’s 5000 lumen 120 degree output that is pretty close to what you would get from a 200W HMI, it’s very bright. It has a very high CRI and gives out great quality daylight balanced light. It was positioned so that the light itself was behind the tent on a small bank, about 20m back in the woods. You couldn’t see it in the shot, but the light coming through the trees created shafts of light in the snow and the trees appeared as silhouettes. It added depth and interest to what would have otherwise been a near totally black background.
Light & Motion Stella 2000 used to light the forground, again the lamp is waterproof so bad weather is no problem.
Then to provide a small amount of light so that we could see the riders of the snow scooters as they walked to the tent I used a Stella 2000. I didn’t really want the light from this lamp to be too obvious as this would really make the scene look “lit”. I didn’t need the full 2000 lumen output so I used the built in dimmer to reduce the output to around 70%.
The third light was a small Stella 1000 and this was placed inside the tent with a scrunched up orange gel. The Stella 1000 would typically be used as a camera top light, but it’s full dimmable and produces a very high light quality, making it suitable for many applications. The creases and folds in the orange gel helped break up the light a little creating a less lit look sympathetic to the fire inside the tent.
A Stella 1000 with orange gel was used inside the tent to give the light from the fire a small boost.
It allowed me to increase the illumination in the tent, adding to the light from the fire without it being obvious that the tent interior was lit. For some of the shots I had an assistant sit in the tent, out of shot and slowly move the gel in front of the light to add a little movement to the light to mimic the firelight even better.
One particular shot on the storyboard was the silhouette of the drivers entering the tent. The Stella 1000 really helped punch trough the canvas sides of the tent.
At the moment I can’t show you the footage. That will have to wait until after the launch of the TV. But I’m really pleased with the way this scene came out. It’s challenging trying to shoot in the dark, in a blizzard, in temperatures well below freezing. Every aspect of getting this scene was hard. Opening a flight case to get out some kit meant getting snow on everything inside it. Just positioning the light up the woods was tough, the snow was up above my knees as I waded through it. Operating the camera is so much harder when it has a rain cover on it. The viewfinder was constantly misting up as snow fell on it non stop. Seeing the witness marks on the lens is difficult (although thankfully the marks on the Fujinon 20-120 are huge and easy to see).
The Fujinon Cabrio XK6X20 lens all iced up at the end of the day. After shooting out in sub zero temperatures don’t take the camera inside until you are sure you have wrapped for the day!
But sometimes it’s challenges like these that make the job interesting. I know I was cursing and swearing at times trying to make these shots work, but seeing the scene come to life in the grade is all the more rewarding.
I’ll be writing more about the Fujinon 20-120 very soon, so why not subscribe to my blog using the subscribe bottom on the left.
One of the cameras I used a lot in Norway is the new Sony FDR-X3000 action cam. What’s different about this POV camera is that the lens and sensor are actually mounted in an internal miniaturised gimbal. This really does work and helps stabilise the image.
There is also a tiny bluetooth monitor that you can wear on your wrist to view the pictures and control the camera. The image quality you get from these tiny cameras really is quite amazing. Take a look at the video to find out more and see some sample footage.
It’s that time of year again. After another simply amazing trip to northern Norway I am pleased to be able to share with you my latest Aurora video. It was shot with a Sony A7s and a Sony A6300. The lenses used were a Sigma 20mm f1.4 art lens. An older Sigma 20mm f1.8, a samyang 14mm f2.8 and a Sony 16mm f2.8 pancake lens. A Metabones Speedbooster Ultra was used on the A6300. For the slider shots I used a home built track (made so it fits my suitcase perfectly) and a Cinetics Cinemoco controller. Hope you enjoy it.
I produced 3 video blogs during my trip to Norway to shoot the northern lights. These blogs are now on youtube for you to watch. In the first video I take a look at some of the equipment that I took to Norway for the trip. I also look at how I like to lay everything out before I pack it and give some insight into some of the accessories that I like to take.
The second video looks back at the first week of the trip. You will see examples of the weather we had to deal with as well as some information on how some of the time lapse sequences of the aurora were shot.
The third video is about shooting a sunrise with 3 different cameras. The Sony a6300, FDR-AX3000 Action Cam and the PXW-FS5.
Packing for the shoot.
At the bottom of the page you’ll find a quick cut of a small selection of some of the Aurora footage shot on this trip.
Today I leave for my annual Northern Lights expeditions. So, I am off to the very north of Norway to shoot in the cold, long nights of the arctic winter. Currently sunrise is at 11am and sunset at about 12:30. You get golden hour all day and then a very long night (fully dark from about 3:30pm). If the weather gods are kind we will get clear skies and lots of opportunities to photograph and video the Northern Lights.
Over the next 3 weeks I will be releasing a number of video blogs about this adventure. They won’t be every day as I won’t always have internet access and the picture quality of the blogs may not be the best. But what I hope to cover are some of the practical aspects of a project like this. The first blog is about the equipment I’m taking, why I’ve chosen it and how I like to check what I’m packing.
There will be videos on shooting time-lapse, tips for shooting in the cold and more about the gear I’m using.
Here’s the first video: Packing.
This website uses cookies to improve your experience. We'll assume you're ok with this, but you can opt-out if you wish. Read More
Necessary cookies help make a website usable by enabling basic functions like page navigation and access to secure areas of the website. The website cannot function properly without these cookies.
Name
Domain
Purpose
Expiry
Type
wpl_user_preference
www.xdcam-user.com
WP GDPR Cookie Consent Preferences
1 year
HTTP
YSC
youtube.com
YouTube session cookie.
54 years
HTTP
Marketing cookies are used to track visitors across websites. The intention is to display ads that are relevant and engaging for the individual user and thereby more valuable for publishers and third party advertisers.
Name
Domain
Purpose
Expiry
Type
VISITOR_INFO1_LIVE
youtube.com
YouTube cookie.
6 months
HTTP
Analytics cookies help website owners to understand how visitors interact with websites by collecting and reporting information anonymously.
Name
Domain
Purpose
Expiry
Type
__utma
xdcam-user.com
Google Analytics long-term user and session tracking identifier.
2 years
HTTP
__utmc
xdcam-user.com
Legacy Google Analytics short-term technical cookie used along with __utmb to determine new users sessions.
54 years
HTTP
__utmz
xdcam-user.com
Google Analytics campaign and traffic source tracking cookie.
6 months
HTTP
__utmt
xdcam-user.com
Google Analytics technical cookie used to throttle request rate.
Session
HTTP
__utmb
xdcam-user.com
Google Analytics short-term functional cookie used to determine new users and sessions.
Session
HTTP
Preference cookies enable a website to remember information that changes the way the website behaves or looks, like your preferred language or the region that you are in.
Name
Domain
Purpose
Expiry
Type
__cf_bm
onesignal.com
Generic CloudFlare functional cookie.
Session
HTTP
NID
translate-pa.googleapis.com
Google unique id for preferences.
6 months
HTTP
Unclassified cookies are cookies that we are in the process of classifying, together with the providers of individual cookies.
Name
Domain
Purpose
Expiry
Type
_ir
api.pinterest.com
---
Session
---
Cookies are small text files that can be used by websites to make a user's experience more efficient. The law states that we can store cookies on your device if they are strictly necessary for the operation of this site. For all other types of cookies we need your permission. This site uses different types of cookies. Some cookies are placed by third party services that appear on our pages.


 After a test run starting and finishing in Alta last year I have decided to run the trips from Alta again next year. The hotel is nicer and the itinerary more relaxed. Starting and finishing at Alta gives us more time at the cabins.


