I had an interesting chat with Adobe about how they implemented the colour management of footage in Adobe Premiere at IBC. They seem to realise that the way it is implemented by default isn’t very popular, that it isn’t well documented and not particularly well implemented. So things will revert back to everything being handled as Rec-709 in a Rec-709 project by default in the near future. This will come very soon (it may already be in the public Beta but I haven’t checked). This does of course mean that once again your Log footage will look flat, which is actually incorrect, Log is not flat, you are just viewing it incorrectly. Those delivering in HDR will have to figure out how to best manage their footage so it isn’t unnecssarily restricted by passing through a Rec-709 project/timeline and most will end up using LUTs with all the restrictions that they impose once again. Perhaps Adobe will return to colour management in the future once they have figured out how to implement it in a more user friendly way.
Tag Archives: premiere
More on Adobe’s new color managed workflow.
I’ve written about this before, but the way Adobe have changed the way they manage colourspaces has changed, it hasn’t been well documented, and it’s causing a lot of confusion.
When importing Log footage into the latest versions of Adobe Premiere instead of the log footage looking flat and washed out as it used to, now it looks contrasty and well saturated. If it has been exposed correctly (according to the manufacturers specifications) then it will look like normal Rec-709 footage rather than the flat look that most people associate with log. This is confusing people, many assume Adbe is now adding a LUT to the footage by default, it isn’t. What is happening isd a fundamental change to the way Premiere handles different colorspaces.
NOT ADDING A LUT.
Premiere is NOT adding a LUT. It is transforming between the captured colorspace and the display colorspace so that the footage looks correct with the right contrast, colour and brightness on your display. Your footage remains in its native colorspace at all times (unless you force it into an alternate and possibly wrong colorspace by using the interpret footage function).
Your display could be 709, HDR10, HLG, SGamut3/S-log3 and in each case the footage would, within the limitations of the displays format have the same basic contrast and colour etc, the footage would look the same whether viewing in SDR, HDR or Log because Premiere maps it to the correct levels for the output colorspace you are using to view your content.
OLD BROKEN WORKFLOWS.
The issue is that previously we have been using very broken workflows that are normally incapable of showing capture colorspaces other than Rec-709 correctly. This has made people believe that log formats are supposed to look flat – They are not! When viewed correctly they should have the same contrast as 709 etc. Log is not flat, but we have been viewing it incorrectly because most workflows have been incapable of mapping different source colorspaces to our chosen working/viewing colorspace.
LUTs ARE A QUICK FIX – WITH LIMITATIONS.
Up to now to fix these broken workflows we have added LUT’s to convert our beautiful, high dynamic range, vast colorspace source formats into restricted, reduced dynamic range display formats. Once you add that 709 LUT to you S-Log3 footage it is no longer SGamut3/Slog3 it is now Rec-709 with all the restrictions that 709 has such as limited dynamic range, limited colorspace etc and that may limit what you can do with it in the grade. Plus it limits you to only ever outputting in SDR 709.
But what we have now in a colour managed workflow is our big range log being displayed correctly on a 709 display or any other type of display, including HDR or DCI-P3 etc. Because the footage is still in its native colorspace you will have much greater grading latitude, there’s no knee added to the highlights, no shadow roll off, no artificial restriction to the source colorspace. So you can more easily push and pull the material far further during adjustment and grading (raw workflows have always been color managed out of necessity as the raw footage can’t be viewed correctly without first being converted into a viewable colorspace).
HERE’s THE RUB!
But the rub is – you are not now adding someone else’s carefully crafted LUT, which is a combination of creative and artistic corrections that give a pleasing look combined with the Log to Rec 709 conversion.
So – you’re going to have to learn how to grade for yourself – but you will have a much bigger colour and contrast range to work with as your footage will remain in it’s full native capture range.
And – if you need to deliver in multiple formats, which you will need to start doing very soon if you are not already, it is all so much easier as in a colour managed workflow all you do is switch the output format to change from 709 to HDR10 or HLG or DCI-P3 to get whatever format you want without having to re-grade everything or use different LUT’s for each format.
HOW LONG CAN YOU STAY JUST IN REC-709?
And when you consider that almost all new TV’s, the majority of new Phones and Tablets all have HDR screens and this is all now supported on YouTube and Vimeo etc how much longer do you think you will be able to cling on to only delivering in SDR Rec-709 using off-the-shelf SDR LUTs? If you ever want to do stuff for Netflix, Amazon etc you will need to figure out how to work in both SDR and HDR.
IT’S HERE TO STAY
Adobe have done a shockingly bad job of documenting and explaining this new workflow, but it is the future and once you learn how to use it properly it should improve the quality of what you deliver and at the same time expand the range of what you can deliver.
I have to deliver both SDR and HDR for most of my clients and I’ve been using colour managed workflows for around 6 years now (mostly ACES in Resolve). I could not go back to the restrictions of a workflow that doesn’t allow you to output in multiple colorspaces or requires you to perform completely separate grades for SDR and HDR. The great thing about ACES is that it is a standardised and well documented workflow so you can use ACES LUT’s designed for the ACES workflow if you wish. But until Adobe better document their own colour managed workflow it is difficult to design LUT’s for use in the Adobe workflow. Plus LUT’s that work with the Adobe workflow, probably won’t work elsewhere. So – it’s never been a better time to learn how to grade properly or think about what workflow you will use to do your grading.
The bottom line is the days of using LUT’s that add both an artistic look and convert your footage from its source colorspace to a single delivery colorspace are numbered. Color managed offer far greater flexibility for multi format delivery. Plus they retain the full range and quality of your source material, no matter what colorspace you shot it in or work in.
Premiere Pro 2022 and Issues With S-Log3 – It’s Not A Bug, It’s A Feature!
This keeps cropping up more and more as users of Adobe Premiere Pro upgrade to the 2022 version.
What people are finding is that when they place S-Log3 (or almost any other log format such as Panasonic V-Log or Canon C-Log) into a project, instead of looking flat and washed as it would have done in previus versions of Premiere, the log footage looks more like Rec-709 with normal looking contrast and normal looking color. Then when they apply their favorite LUT to the S-Log3 it looks completely wrong, or at least very different to the way it looked in previous versions.
So, what’s going on?
This isn’t a bug, this is a deliberate change. Rec-709 is no longer the only colourspace that people need to work in and more and more new computers and monitors support other colourspaces such as P3 or Rec2020. The Macbook Pro I am writing this on has a wonderful HDR screen that supports Rec2020 or DCI P3 and it looks wonderful when working with HDR content!
Color Management and Colorspace Transforms.
Premiere 2022 isn’t adding a LUT to the log footage, it is doing a colorspace transform so that the footage you shot in one colorspace (S-Log3/SGamut3.cine/V-Log/C-Log/Log-C etc) gets displayed correctly in the colorspace you are working in.
S-Log3 is NOT flat.
S-Log3 is NOT flat.
A common misconception is that S-log3 is flat or washed out. This is not true. S-log3 has normal contrast and normal colour.
The only reason it appears flat is because more often than not people use it in a miss matched color space and the miss match that you get when you display material shot using the S-log3/SGamut3 colorspace using the Rec-709 colorspace causes it to be displayed incorrectly and the result is images that appear to be flat, lack contrast and colour when in fact your S-Log3 footage isn’t flat, it has lots of contrast and lots of colour. You are just viewing it incorrectly in the incorrect colorspace.
So, what is Premiere 2022 doing to my log footage?
So, what is Premiere 2022 doing to my log footage?
What is now happening in Premiere is that Premiere 2022 reads the clips metadata to determine its native colorspace and it then adds a colorspace transform to convert it to the display colourspace determined by your project settings.
The footage is still S-Log3, but now you are seeing it as it is actually supposed to look, albeit within the limitations of the display gamma. S-log3 isn’t flat, it just that previously you were viewing it incorrectly, but now with the correct colorspace being added to match the project settings and the type of monitor you are using the S-Log3 is being displayed correctly having been transformed fro S-Log3/SGamut3 to Rec-709 or whatever your project is set to.
If your project is an HDR project, perhaps HDR10 to be compatible with most HDR TV’s or for a Netflix commission then the S-log3 would be transformed to HDR10 and would be seen as HDR on an HDR screen without any grading being necessary. If you then changed you project settings to DCI-P3 then everything in your project will be transformed to P3 and will look correct without grading on a P3 screen. Then change to Rec709 and again it all looks correct without grading – the S-Log3 doesn’t look flat, because in fact it isn’t.
Color Managed Workflows will be the new “normal”.
Color Managed Workflows will be the new “normal”.
Colour managed workflows such as this are now normal in most high end edit and grading applications and it is something we need to get used to because Rec709 is no longer the only colorspace that people need to deliver in. It won’t be long before delivery in HDR (which may mean one of several different gamma and gamut combinations) becomes normal. This isn’t a bug, this is Premiere catching up and getting ready for a future that won’t be stuck in SDR Rec-709.
A color managed workflow means that you no longer need to use LUT’s to convert your Log footage to Rec-709, you simply grade you clips within the colorspace you will be delivering in. A big benefit of this comes when working with multiple sources. For example S-Log3 and Rec-709 material in the same project will now look very similar. If you mix log footage from different cameras they will all look quite similar and you won’t need separate LUT’s for each type of footage or for each final output colorspace.
The workaround if you don’t want to change.
If you don’t want to adapt to this new more flexible way of working then you can force Premiere to ignore the clips metadata by right clicking on your clips and going to “Modify” and “Interpret Footage” and then selecting “Colorspace Override” and setting this to Rec-709. When you use the interpret footage function on an S-Log3 clip to set the colorspace to Rec709 what you are doing is forcing Premiere to ignore the clips metadata and to treat the S-Log3 as though it is a standard dynamic range Rec-709 clip. In a Rec-709 project his re-introduces the gamut miss-match that most are used to and results in the S-Log3 appearing flat and washed out. You can then apply your favourite LUTs to the S-Log3 and the LUT then transforms the S-Log3 to the projects Rec-709 colorspace and you are back to where you were previously.
This is fine, but you do need to consider that it is likely that at some point you will need to learn how to work across multiple colorspaces and using LUTs as colorspace transforms is very inefficient as you will need separate LUTs and separate grades for every colorspace and every different type of source material that you wish to work in. Colour managed workflows such as this new one in Premiere or ACES etc are the way forwards as LUTs are no longer needed for colorspace transforms, the edit and grading software looks after this for you. Arri Log-C will look like S-Log3 which will look like V-Log and then the same grade can be applied no matter what camera or colorspace was used. It will greatly simplify workflows once you understand what is happening under the hood and allows you to output both SDR and HDR versions without having to completely re-grade everything.
Unfortunately I don’t think the way Adobe are implementing their version of a colour managed workflow is very clear. There are too many automatic assumptions about what you want to do and how you want to handle your footage. On top of this there are insufficient controls for the user to force everything into a known set of settings. Instead different things are in different places and it’s not always obvious exactly what is going on under the hood. The color management tools are all small addons here and there and there is no single place where you can go for an overview of the start to finish pipeline and settings as there is in DaVinci Resolve for example. This makes it quite confusing at times and it’s easy to make mistakes or get an unexpected result. There is more information about what Premiere 2022 is doing here: https://community.adobe.com/t5/premiere-pro-discussions/faq-premiere-pro-2022-color-management-for-log-raw-media/
Unfortunately I don’t think the way Adobe are implementing their version of a colour managed workflow is very clear. There are too many automatic assumptions about what you want to do and how you want to handle your footage. On top of this there are insufficient controls for the user to force everything into a known set of settings. Instead different things are in different places and it’s not always obvious exactly what is going on under the hood. The color management tools are all small addons here and there and there is no single place where you can go for an overview of the start to finish pipeline and settings as there is in DaVinci Resolve for example. This makes it quite confusing at times and it’s easy to make mistakes or get an unexpected result. There is more information about what Premiere 2022 is doing here: https://community.adobe.com/t5/premiere-pro-discussions/faq-premiere-pro-2022-color-management-for-log-raw-media/
Can DaVinci Resolve steal the edit market from Adobe and Apple.
I have been editing with Adobe Premiere since around 1994. I took a rather long break from Premiere between 2001 and 2011 and switched over to Apple and Final Cut Pro which in many ways used to be very similar to Premiere (I think some of the same software writers were used for FCP as Premiere). My FCP edit stations were always muti-core Mac Towers. The old G5’s first then later on the Intel Towers. Then along came FCP-X. I just didn’t get along with FCP-X when it first came out. I’m still not a huge fan of it now, but will happily concede that FCP-X is a very capable, professional edit platform.
So in 2011 I switch back to Adobe Premiere as my edit platform of choice. Along the way I have also used various versions of Avid’s software, which is another capable platform.
But right now I’m really not happy with Premiere. Over the last couple of years it has become less stable than it used to be. I run it on a MacBook Pro which is a well defined hardware platform, yet I still get stability issues. I’m also experiencing problems with gamma and level shifts that just shouldn’t be there. In addition Premiere is not very good with many long GOP codecs. FCP-X seems to make light work of XAVC-L compared to Premiere. Furthermore Adobe’s Media encoder which once used to be one of the first encoders to get new codecs or features is now lagging behind, Apples Compressor now has the ability to do at he full range of HDR files. Media Compressor can only do HDR10. If you don’t know, it is possible to buy Compressor on it’s own.
Meanwhile DaVinci Resolve has been my grading platform of choice for a few years now. I have always found it much easier to get the results and looks that I want from Resolve than from any edit software – this isn’t really a surprise as after all that’s what Resolve was originally designed for.

The last few versions of Resolve have become much faster thanks to some major processing changes under the hood and in addition there has been a huge amount of work on Resolves edit capabilities. It can now be used as a fully featured edit platform. I recently used Resolve to edit some simpler projects that were going to be graded as this way I could stay in the same software for both processes, and you know what it’s a pretty good editor. There are however a few things that I find a bit funky and frustrating in the edit section of Resolve at the moment. Some of that may simply be because I am less familiar with it for editing than I am Premiere.
Anyway, on to my point. Resolve is getting to be a pretty good edit platform and it’s only going to get better. We all know that it’s a really good and very powerful grading platform and with the recent inclusion of the Fairlight audio suite within Resolve it’s pretty good at handling audio too. Given that the free version of Resolve can do all of the edit, sound and grading functions that most people need, why continue to subscribe to Adobe or pay for FCP-X?
With the cost of the latest generations of Apple computers expanding the price gap between them and similar spec Windows machines – as well as the new Macbooks lacking built in ports like HDMI, USB3 that we all use every day (you now have to use adapters and dongles). The Apple eco system is just not as attractive as it used to be. Resolve is cross platform, so an Mac user can stay with Apple if they wish, or move over to Windows or Linux whenever they want with Resolve. You can even switch platforms mid project if you want. I could start an edit on my MacBook and the do the grade on a PC workstation staying with Resolve through the complete process.
Even if you need the extra features of the full version like very good noise reduction, facial recognition, 4K DCI output or HDR scopes then it’s still good value as it currently only costs $299/£229 which is less than a years subscription to Premiere CC.
But what about the rest of the Adobe Creative suite? Well you don’t have to subscribe to the whole suite. You can just get Photoshop or After Effects. But there are also many alternatives. Again Blackmagic Design have Fusion 9 which is a very impressive VFX package used for many Hollywood movies and like Resolve there is also a free version with a very comprehensive tools set or again for just $299/£229 you get the full version with all it’s retiming tools etc.

For a Photoshop replacement you have GIMP which can do almost everything that Photoshop can do. You can even use Photoshop filters within GIMP. The best part is that GIMP is free and works on both Mac’s and PC’s.
So there you have it – It looks like Blackmagic Design are really serious about taking a big chunk of Adobe Premiere’s users. Resolve and Fusion are cross platform so, like Adobe’s products it doesn’t matter whether you want to use a Mac or a PC. But for me the big thing is you own the software. You are not going to be paying out rather a lot of money month on month for something that right now is in my opinion somewhat flakey.
I’m not quite ready to cut my Creative Cloud subscription yet, maybe on the next version of Resolve. But it won’t be long before I do.
2020 Color Clips from the PXW-FS5 Crash Adobe Premiere CC 2017-1
This is not good. Unfortunately any clips recorded in the FS5 using the Rec2020 color option in the new Picture Profile 10 cause Adobe Premiere CC 2017.1.2 to crash as soon as you try to play them back. The clips play back fine in Resolve or in earlier versions of Premiere CC, but with the latest version of Premiere CC you get a near instant crash no matter what your playback settings.
If you are running an earlier version of CC then stay with that for now if you want to work with the new HLG clips and 2020 color. Rec 709 color works just fine so you can shoot HLG with Rec709 color and edit that in Premiere CC, but HLG + 2020 color will crash Premiere CC 2017.1.2. Hopefully this will get resolved soon by Adobe/Sony.
Incorrect Lumetri Scope Scales and incorrect S-Log range scaling in Adobe Premiere.
UPDATE: It appears that Adobe may have now addressed this. Luma and YC scopes now show the same levels, not different ones and the scaling of S-Log XAVC. signals now appears to be correct.
This came up as the result of a discussion on the FS5 shooters group on Facebook. An FS5 user shooting S-log2 was very confused by what he was seeing on the scopes in Adobe Premiere. Having looked into this further myself, I’m not surprised he was confused because it’s also confused me as there is some very strange behaviour with S-Log2 XAVC material.
First: BE WARNED THE “LUMA” SCOPE APPEARS TO BE A RELATIVE LUMINANCE SCOPE AND NOT A “LUMA” SCOPE.
THIS IS THE “LUMA” Scope, I suggest you don’t use it! Look at the scale on the left side of the scope, it appears to be a % scale, not unlike the % scale we are all used to working with in the video world. In the video world 100% would be the maximum limit for broadcast TV, 90% would be white and the absoulte maximum recording level would be 109%. These % (IRE) levels have very specific data or code values. For luma, 100IRE has a code value of 940 in 10 bit or 235 in 8 bit. Then look at the scale on the right side of the luma scope. This appears to be an 8 bit code value scale, after all it has those key values of 128, 255 etc.

Now look again at the above screen grab of the lumetri luma scope in Premiere 2017 – V11. On the left is what appears to be that familiar % scale. But go to 100% and follow the line across to where the code values are. It appears that on these scopes 100% means code value 255, this is not what anyone working in broadcast or TV would expect because normally code value 255 means 109.5%.
I suggest you use the YC waveform display instead.

The YC waveform shown on the above screen capture is of an S-Log2 frame. If you go by the % scale it suggests that this recording has a peak level of only 98% when in fact the recording actually goes to 107%.
But here’s where it gets even stranger. Look at the below screen capture of another waveform display.

So what is going on here? The above is a screen grab of Cinegamma 1 recorded in UHD using 8 bit XAVC-L. It goes all the way up to 109% which is the correct peak level for Cinegamma 1. So why does the S-Log2 recording only reach 98% but the Cinegamma recording, recorded moments later using the same codec reach 109%. This is a value 10% higher than S-Log2 and I know that the Cinegammas cannot record at a level 10% greater than S-Log2 (the true difference is only about 2%).
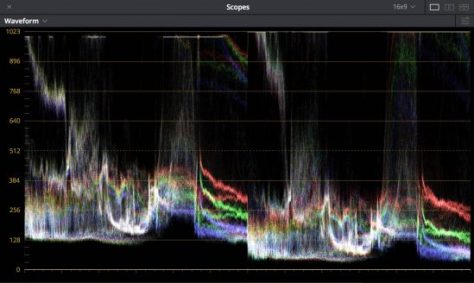
Lets now compare the difference between how Premiere and Resolve handle these clips. The screen grab below shows the S-Log2 and Cinegamma 1 recordings side by side as handled in Adobe Premiere. On the left is the S-Log2, right Cinegamma1. Look at the very large difference in the peak recording levels. I do not expect to see this, there should only be a very small difference.

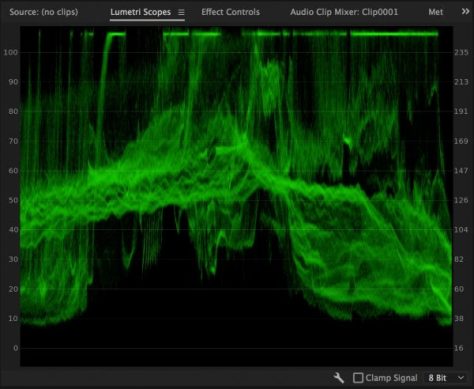
Now lets look at exactly the same clips in DaVinci Resolve. Note how much smaller the difference in the peak levels is. This is what I would expect to see as S-Log2 gets to around 107% and Cinegamma 1 reaches 109%, only a very small difference. Resolve is handling the files correctly, Premiere is not. For reference to convert 8 bit code values to 10 bit just multiply the 8 bit value by 4. So 100IRE which is CV235 in 8 bit is CV940 in 10 bit.
So, until I get to the bottom of this all I can say is be very, very careful and don’t use the “Luma” scope, use the YC scope if you want to know your code values. It also appears that Premiere scales the code values of S-Log recordings differently to normal gammas.
Additionally: Record exactly the same S-Log2 or S-Log3 image using XAVC internally in the camera and at the same time record a ProRes version on an external recorder. Bring both of these clips, which are actually recorded using exactly the same levels into Premiere and Premiere handles them differently. The XAVC squashed into a reduced range while the ProRes fills the larger range.
This has huge implications if you use LUT’s!!!!
The same LUT will result in a very different looking image from the XAVC and PRoRes material. There should not be a difference, but there is and it’s big. So this isn’t just a scopes issue, it’s an internal signal handling issue.
I’ve always preferred doing my color grading in a dedicated grading package with external scopes. It’s stuff like this that reminds me of why I prefer to work that way. I always end up with a better end result when I grade in Resolve compared to Premiere/Lumetri.
As I learn more about this I will post a new article. Use the subscribe button on the left to subscribe to the blog to be notified of new posts.
XAVC Class 480 – What is it?
Has anyone else noticed that Adobe now include XAVC Class 480 in the codec options for exporting XAVC from Adobe Premiere via Media Encoder?
In case you don’t know what it is, class 480 is the 480Mb/s version of 4K XAVC. This gives a bit rate of…… drum roll……. 480Mb/s at 24/25/30fps. At 50 and 60fps it runs at a whopping 960Mb/s, this is the top limit for XAVC in it’s current form.
Sony’s PMW-F5/F55 and the FS7 currently record XAVC using Class 300 which is up to 300Mb/s at 24/25/30fps or 600Mb/s at 50/60p. So as you can see Class 480 has the potential to improve the compressed image quality from these cameras still further should it ever make it into a camera. Looking at what the cameras can currently do I’m not sure that this is possible with existing SxS or XQD media. 960Mb/s is the same data rate as Sonys 16 bit 24fps raw and it’s not possible to record that to SxS cards.
Coming back to Premier: Some interesting things happen in Premiere if you try to export an XAVC originated project out using Class 480. If the clips in your timeline are not adjusted in any way, in other words; exactly as shot, then if you export and choose Class 480 nothing happens to the footage. Premiere will “smart” export them exactly as they are as Class 300. This means that there will be absolutely no loss of image quality as the clip is not re-compressed. However if the original clip has been adjusted, for example graded, re-sized, a caption added etc then the clip will be encoded at 480Mb/s. From what I can tell where you have a mix of treated and untreated clips in a project Premiere is smart enough to pass through the untreated clips while bumping up any treated clips to 480.
Class 480 is seen as a mastering format by Sony. The extra data and lower compression makes it particularly suited to HDR productions.