Tag Archives: scene

Scene files for the Sony PXW-FS7M2.

Here are some scene files for the PXW-FS7-II and original PXW-FS7. The first 5 scene files I published a couple of years ago but never got around to converting them over to the PXW-FS7-II. You can download the files in their correct folder structure to put on to an SD card so you can load them directly in to an FS7 or FS7-II. Or you can manually copy the settings from here. If copying the settings in manually I recommend you start by going to the “Files” section of the cameras menu and “Scene File” and import a “standard” default scene file from the cameras internal memory first to ensure you paint settings are at the original factory defaults prior to entering the settings by hand. The easiest way is to load the files linked at the bottom of the page onto an SD card and then go to the files section of the menu to load the scene files into the camera from the SD card.

If you find this LUT useful please consider buying me a cocktail or other beverage. Thank you! It does take a while to develop these LUT’s and contributions are a good incentive for me to create more!


Your choice:


The paint settings in for each of these setups are standard except for the items listed in each profile.

Scene File 1: AC-Neutral-HG4.

Designed as a pleasing general purpose look for medium to high contrast scenes. Provides a neutral look with slightly less yellow than the standard Sony settings. I recommend setting zebras to 60% for skin tones or exposing a white card at 75-80% for the best results.

Black: Master Black: -3.  Gamma: HG4 .  White Clip: OFF.  Aperture : OFF

Matrix: ON. Adaptive Matrix: Off. Preset Matrix: ON. Preset Select: Standard. User Matrix: ON. Level: 0. Phase: 0.

R-G: +10. R-B: +8. G-R: -12. G-B: -9. B-R: -5. B-G: -15.

Scene File 2: AC-Neutral-HG3

Similar to the above except better suited to lower contrast scenes or lower light levels. Provides a neutral look with slightly less yellow than the standard Sony settings. I recommend setting zebras to 60% for skin tones or exposing a white card at 75-80% for the best results.

Black: Master Black: -3.  Gamma: HG3 .  White Clip: OFF.  Aperture : OFF

Matrix: ON. Adaptive Matrix: Off. Preset Matrix: ON. Preset Select: Standard. User Matrix: ON. Level: 0. Phase: 0.

R-G: +10. R-B: +8. G-R: -12. G-B: -9. B-R: -5. B-G: -15.

Scene File 3: AC-FILMLIKE1

A high dynamic range look with film like color. Will produce a slightly flat looking image. Colours are tuned to be more film like with a very slight warm tint. I recommend settings zebras to 57% for skin tones and recording white at 70-75% for the most “filmic” look.

Black: Master Black: -3.  Gamma: HG7 .  White Clip: OFF.  Aperture : OFF

Matrix: ON. Adaptive Matrix: Off. Preset Matrix: ON. Preset Select: Cinema. User Matrix: ON. Level: -3. Phase: 0.

R-G: +11. R-B: +8. G-R: -12. G-B: -9. B-R: -3. B-G: -12.

Scene File 4: AC-FILMLIKE2

A high dynamic range look with film like color. Will produce a n image with more contrast than Filmlike1. Colours are tuned to be more film like with a very slight warm tint. I recommend settings zebras to 57% for skin tones and recording white at 70-75% for the most “filmic” look.

Black: Master Black: -3.  Gamma: HG8.  White Clip: OFF.  Aperture : OFF

Matrix: ON. Adaptive Matrix: Off. Preset Matrix: ON. Preset Select: Cinema. User Matrix: ON. Level: -3. Phase: 0.

R-G: +11. R-B: +8. G-R: -12. G-B: -9. B-R: -3. B-G: -12.

Scene File 5: AC-VIBRANT-HG3

These setting increase dynamic range over the standard settings but also increase the colour and vibrance. Designed to be used for when a good dynamic range and strong colours are needed direct from the camera. Suggested zebra level for skin tones is 63% and white at approx 75-80%.

Black: Master Black: -3.  Gamma: HG3.  White Clip: OFF.  Aperture : OFF

Matrix: ON. Adaptive Matrix: Off. Preset Matrix: ON. Preset Select: Standard. User Matrix: ON. Level: +23. Phase: -5.

R-G: +12. R-B: +8. G-R: -11. G-B: -6. B-R: -6. B-G: -17.

Scene File 6: AC-VIBRANT-HG4

These setting increase dynamic range over the standard settings but also increase the colour and vibrance. HG4 has greater dynamic range than HG3 but is less bright, so this variation is best for brighter high dynamic range scenes. Designed to be used for when a good dynamic range and strong colours are needed direct from the camera. Suggested zebra level for skin tones is 60% and white at approx 72-78%.Black: Master Black: -3.  Gamma: HG3.  White Clip: OFF.  Aperture : OFF

Matrix: ON. Adaptive Matrix: Off. Preset Matrix: ON. Preset Select: Standard. User Matrix: ON. Level: +23. Phase: -5.

R-G: +12. R-B: +8. G-R: -11. G-B: -6. B-R: -6. B-G: -17.

Scene File 7: AC-KODAKISH3200K (Include “Scene White Data – ON” when loading from the SD card).

This is a highly experimental scene file that uses a heavily tweaked matrix along with extensive colour adjustments via the multi-matrix. The aim being to reproduce a look reminiscent of Kodak film stock. The white balance is deliberately skewed very slightly bue/teal and then skin tones and orange shades boosted. When loading this scene file from an SD card you must also set “White Data” to ON to import the offset color preset. You can then either use the preset white balance or white balance using memory A/B and a white card. Do NOT use ATW.  This version is intended for use under TUNGSTEN lighting where the white balance would normally be 3200K. Please test that this profile produces a result you like before you start shooting with it as the look is quite strong and may be difficult to change later if you don’t like it. I recommend settings zebras to 57% for skin tones and recording white at 70-75% for the most “filmic” look.

White: Preset White 2800K

Offset White A: ON.  Warm Cool A: -25. Warm Cool Balance A: +10

Offset White B: ON.  Warm Cool B: -25. Warm Cool Balance A: +10

Black: Master Black: -3.  Gamma: HG4 .  White Clip: OFF.  Aperture : OFF

Matrix: ON. Adaptive Matrix: Off. Preset Matrix: ON. Preset Select: Cinema. User Matrix: ON. Level: -10. Phase: 0.

R-G: +61. R-B: +29. G-R: -6. G-B: -35. B-R: +21. B-G: -5.

MultiMatrix: ON

B: Hue -18, Saturation 0.

B+: Hue +5, Saturation 0.

MG-: Hue +5, Saturation 0.

MG: Hue +5 Saturation -7.

MG+: Hue 0, Saturation -3.

R: Hue -21, Saturation +65.

R+: Hue +0, Saturation +99.

YL-: Hue +39, Saturation +44

YL: Hue 0, Saturation 0.

YL+ Hue +20, Saturation -10.

G-: Hue -71, Saturation 0.

G: Hue -61, Saturation +10.

G+: Hue -23, Saturation +11

CY: Hue -40, Saturation +9.

CY+:Hue -22, Saturation +54.

B-:Hue +20, Saturation -5.

Scene File 8: AC-KODAKISH5600K (Include “Scene White Data – ON” when loading from the SD card).

This is a highly experimental scene file that uses a heavily tweaked matrix along with extensive colour adjustments via the multi-matrix. The aim being to reproduce a look reminiscent of Kodak film stock. The white balance is deliberately skewed very slightly bue/teal and then skin tones and orange shades boosted. When loading this scene file from an SD card you must also set “White Data” to ON to import the offset color preset. You can then either use the preset white balance or white balance using memory A/B and a white card. Do NOT use ATW.  This version is intended for use under daylight lighting where the white balance would normally be 5600K/6000K. Please test that this profile produces a result you like before you start shooting with it as the look is quite strong and may be difficult to change later if you don’t like it. I recommend settings zebras to 57% for skin tones and recording white at 70-75% for the most “filmic” look.

White: Preset White 4900K

Offset White A: ON.  Warm Cool A: -25. Warm Cool Balance A: +10

Offset White B: ON.  Warm Cool B: -25. Warm Cool Balance A: +10

Black: Master Black: -3.  Gamma: HG4 .  White Clip: OFF.  Aperture : OFF

Matrix: ON. Adaptive Matrix: Off. Preset Matrix: ON. Preset Select: Cinema. User Matrix: ON. Level: -10. Phase: 0.

R-G: +61. R-B: +29. G-R: -6. G-B: -35. B-R: +21. B-G: -5.

MultiMatrix: ON

B: Hue -18, Saturation 0.

B+: Hue +5, Saturation 0.

MG-: Hue +5, Saturation 0.

MG: Hue +5 Saturation -7.

MG+: Hue 0, Saturation -3.

R: Hue -21, Saturation +65.

R+: Hue +0, Saturation +99.

YL-: Hue +39, Saturation +44

YL: Hue 0, Saturation 0.

YL+ Hue +20, Saturation -10.

G-: Hue -71, Saturation 0.

G: Hue -61, Saturation +10.

G+: Hue -23, Saturation +11

CY: Hue -40, Saturation +9.

CY+:Hue -22, Saturation +54.

B-:Hue +20, Saturation -5.

Scene File 9: AC-Minus-G1

A hand scene file to have for shooting under mixed lights or low quality lights where there is too much green. By using a combination of the FL-Light colour matrix and a custom preset matrix this profile reduces the some problematic green colour cast that can be present. It uses Hypergamma 3 to give a more pleasing highlight roll off and increased dynamic range without reducing the low light performance. Great for office interviews! I recommend setting zebras to 62% for skin tones and recording white (white card) at between 75 and 80% for the best results.

Black: Master Black: -3.  Gamma: HG3 .  White Clip: OFF.  Aperture : OFF

Matrix: ON. Adaptive Matrix: Off. Preset Matrix: ON. Preset Select: FL Light. User Matrix: ON. Level: 0. Phase: 0.

R-G: +10. R-B: +8. G-R: -12. G-B: -9. B-R: -5. B-G: -15.

Here are the files ready to load into you own FS7 or FS7II. Click on the link below to get to the download page where you can download a zip file with all of the scene files already in the correct folder structure to place on an SD card. Simply unzip the download and copy the “private” folder to the root of an empty SD card. These scene files have taken a lot of time and effort to develop. I offer them without charge for your own use. If you find them useful please consider buying me a coffee or other drink.


Type


If you already have scen files on your own SD card then you can copy my files from either:

PRIVATE/SONY/PRO/CAMERA/PXW-FS7/

or

PRIVATE/SONY/PRO/CAMERA/PXW-FS7M2

To the same folder your own SD card. You can re-number the if you need to. Once the files are on an SD card insert the SD card in to the camera. Go to the “File” menu and “Scene File” and choose “Load from SD Card”.

FS7 – FS7M2 Scene Files

Want to know more – why not come to a workshop:

Anatomy of a shot. Night Scene in Arctic Norway – Fujinon lenses, Stella Lights.

I have just return from one of the most challenging shoots I have been involved in. The shoot took place over 5 days in and around Tromso in Norway. The aim was to gather footage to show off the capabilities of a new type of 4K TV from Phillips.

We shot the Northern Lights, we shot dog sledding , snow mobiles, shots of the city and sailing on the fjords. Each part of the shoot had many challenges and a lot of the shoot took place at night and at night the crew slept in cabins, tents and on the yachts. Shooting from the ice and snow covered deck of a yacht in temperatures well below zero is not something I enjoyed. And to top it all off the weather was pretty grim fro most of the shoot. Heavy snow showers, freezing temperatures and towards the end strong winds.

Because image quality is paramount for this project I choses to use the best lenses I could, but at the same time space and time constraints dictated that zoom lenses would be desirable. We were shooting 16 bit raw as well as XAVC class 480 on my PMW-F5 and some pick-up shots in UHD XAVC-L on a PXW-FS5. For the PMW-F5 the primary lens was the Fujinon Cabrio XK6x20, 20-120mm PL zoom and to ensure we had similar looking images from the FS5 I used the new Fujinon XF 18-55mm. I have to say that I’m quite in love with both of these lenses.

Fujinon Cabrio XK6x20 PL mount cinema zoom. A beautiful lens!

The Cabrio 20-120 is a beautiful lens and it’s really nice to have a servo zoom that is truly parfocal. The 20-120 produces really nice images even in the most challenging of conditions and at T3.5 it’s reasonably fast throughout the entire zoom range. This was the lens that I used for the majority of the shoot, in particular for the many night scenes we shot. The E-Mount 18-55 on the FS5 produces images that matched really well with the bigger lens and camera. This is a combination I would love to use on more shoots where the budget will allow.

One particular scene that we had to shoot was particularly challenging. It was a set up shot of a night time arrival of a couple of snowmobiles at a Sami camp site. The Sami people are the indigenous people of Northern Norway and they have a particular style of tent know as a Laavu which is similar to a teepee or wigwam. The idea behind the shot was to have the snow scooters arriving with headlights blazing and for the drivers to then enter the tent lit only by the light of a campfire inside the tent. At the time of the shoot it was snowing heavily and was totally dark. Turn off the lights of the snowmobiles and you could not see a thing.

Wide shot of the snowmobiles arriving at the camp in the dark.

While modern cameras like the F5 are very sensitive, the light of a campfire inside a tent will not adequately light a scene like this on it’s own. I didn’t want a totally dark background, so I decided that I would subtly light the trees of the forest that we were in to add some drama and give some depth to the background and a sense of being in a forest.

A slightly closer shot of the tent with backlit trees behind it.

As we were travelling continuously on this shoot there was no space for a large or complex lighting kit and the remote location meant we needed battery powered lights. In addition I knew before we left that there was a chance of bad weather so I needed lights that would work whatever mother nature decided to throw at us.

A snow scooter comes into the shot. You can see just how heavily it was snowing in this shot.

I decided to take a set of 3 Light & Motion Stella battery powered LED lights. It’s just as well I had the Stella lamps as on top of all the other difficulties of the shoot the weather decided it was not going to play ball. We had to shoot the scene (and much of the shoot) in the middle of a snow storm. Fortunately the Stella lights are completely waterproof, so I didn’t need to worry about rain or snow protection. Just set them up turn them on and use the built in dimmer to set the light output.

To light the scene I set up a Stella Pro 5000 in the woods behind the Sami tent, aimed through the trees and pointed directly towards the camera. I chose to backlight the trees to provide a sense of there being trees rather than lighting them. I felt this would look less lit than throwing a ton of light into the forest from the front and I’m pleased with the result.

A Light & Motion Stella Pro 5000 was used to back light the trees and tent. The heavy snow was no problem as the light is totally waterproof.

The Stella Pro 5000 is very bright for a compact battery operated light, it’s 5000 lumen 120 degree output that is pretty close to what you would get from a 200W HMI, it’s very bright. It has a very high CRI and gives out great quality daylight balanced light.  It was positioned so that the light itself was behind the tent on a small bank, about 20m back in the woods. You couldn’t see it in the shot, but the light coming through the trees created shafts of light in the snow and the trees appeared as silhouettes. It added depth and interest to what would have otherwise been a near totally black background.

Light & Motion Stella 2000 used to light the forground, again the lamp is waterproof so bad weather is no problem.

Then to provide a small amount of light so that we could see the riders of the snow scooters as they walked to the tent I used a Stella 2000. I didn’t really want the light from this lamp to be too obvious as this would really make the scene look “lit”. I didn’t need the full 2000 lumen output so I used the built in dimmer to reduce the output to around 70%.

The third light was a small Stella 1000 and this was placed inside the tent with a scrunched up orange gel. The Stella 1000 would typically be used as a camera top light, but it’s full dimmable and produces a very high light quality, making it suitable for many applications. The creases and folds in the orange gel helped break up the light a little creating a less lit look sympathetic to the fire inside the tent.

A Stella 1000 with orange gel was used inside the tent to give the light from the fire a small boost.

It allowed me to increase the illumination in the tent, adding to the light from the fire without it being obvious that the tent interior was lit. For some of the shots I had an assistant sit in the tent, out of shot and slowly move the gel in front of the light to add a little movement to the light to mimic the firelight even better.

One particular shot on the storyboard was the silhouette of the drivers entering the tent. The Stella 1000 really helped punch trough the canvas sides of the tent.

At the moment I can’t show you the footage. That will have to wait until after the launch of the TV. But I’m really pleased with the way this scene came out. It’s challenging trying to shoot in the dark, in a blizzard, in temperatures well below freezing. Every aspect of getting this scene was hard. Opening a flight case to get out some kit meant getting snow on everything inside it. Just positioning the light up the woods was tough, the snow was up above my knees as I waded through it. Operating the camera is so much harder when it has a rain cover on it. The viewfinder was constantly misting up as snow fell on it non stop. Seeing the witness marks on the lens is difficult (although thankfully the marks on the Fujinon 20-120 are huge and easy to see).

The Fujinon Cabrio XK6X20 lens all iced up at the end of the day. After shooting out in sub zero temperatures don’t take the camera inside until you are sure you have wrapped for the day!

But sometimes it’s challenges like these that make the job interesting. I know I was cursing and swearing at times trying to make these shots work, but seeing the scene come to life in the grade is all the more rewarding.

I’ll be writing more about the Fujinon 20-120 very soon, so why not subscribe to my blog using the subscribe bottom on the left.

Picture Profiles – Scene Files – Crispeneing. How to clean up your image.

I promised I would re-visit some of my Picture Profile stuff. I thought I would start with this one as it is one of the least well understood settings. It’s effects are quite subtle, but it can mean the difference between a noisy picture and a clean image, but also between a sharp image and a soft image, in particular in areas of subtle detail or low contrast detail such as foliage, grass and textures.

Crispening is a part of the detail correction circuit. It does not in itself, as it’s name suggests (at least on an EX of F3) make the image “crisper”. What it does is control the contrast range over which the detail circuit operates. Basically it sets the threshold at which detail correction is applied to the image, which in turn can make the image look a little sharper or less sharp. The apparent sharpness itself is controlled by the Detail Level and Frequency controls.

Why is this useful? Well it allows the user to choose whether to opt for a cleaner looking image or a sharper looking image. An important consideration is that this adjustment does not change the actual resolution of the image or the noise level of the camera, but it does make subtle details in the image more or less enhanced and as noise is also a subtle, even if unwanted detail within the image it will also make noise more or less enhanced, thus more or less visible.

Imaginary waveform showing real picture information plus noise.

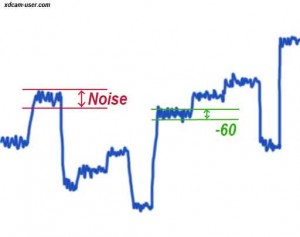
In the first illustration I have drawn an imaginary video waveform signal coming from the camera that contains a mixture of noise and both subtle and more obvious picture information. The bigger the up/down change in the waveform the more obvious the change in brightness (and thus contrast) on the monitor or TV would be. Throughout the image there is some noise. I have indicated the noise level for the camera with a pair of red lines. The EX1 and EX3 is a moderately noisy camera, not the worst, nor the best for an HD camera, but pretty good in it’s price range. So if we can do something to make the noise less obvious that would be desirable in many cases. Crispening can help us do that. Crispening ONLY has an effect when you are applying detail correction to the image. It sets the threshold at which detail correction is applied. The default setting on an EX is zero.

Crispening threshold set to -60 indicated by green lines.If we reduce the crispening setting, lets say to -60, it REDUCES the threshold at which detail is applied which generally makes the pictures look sharper. Looking at the second and third illustrations you can see how if you reduce the threshold too much then detail correction will be applied to even the most subtle changes in the image, including the image noise. The little black spikes I have added to the diagram illustrate the way the detail “enhancement” will be added to both noise and subtle contrast changes as well as larger contrast changes.

Black spikes represent detail correction being added to real picture information and noise when crisping set to -60.

This will make the pictures look more noisy, but… and this is important… it will also help bring out subtle low contrast textures in foliage, skin, fabrics etc. A area where perhaps the EX1 and EX3 don’t do terribly well.

If you want a clean image however where noise is less visible, then raising the crispening level to a high positive value, lets say +60 will increase the threshold at which detail correction is added, so signal changes will need to be bigger before detail correction is applied.

Much higher crisping threshold when set to +60

With a high positive number the image will look cleaner and less noisy, but you will loose some enhancement in textures and low contrast areas as these will no longer have detail correction applied to them. This can lead to a slightly muddy or textureless look to tress, grass, skin and fabric.

The real problem areas are the subtle textures and low contrast areas (circled in orange) where the true image detail is barely above the noise level. It’s very difficult to bring these out without increasing the appearance of noise. With Crispening at +60 detail correction is only applied to larger brightness or contrast changes within the image, so noise becomes less obvious.Unfortunately there is no clear answer to how to set the crispening level as it will depend on what you are shooting and how much noise you can tolerate. I tend to have crisping set between +10 and +30 for most things as I do tend to do a fair amount of grading work on my footage. When you grade noise is often the limiting factor as to how far you can push the image, so I like to keep noise under control as much as possible. For green screen and chroma key work I push crispening up to +40 to +60 as this helps me get a cleaner key, especially around subtle edges and hair.

Problem areas circled, subtle textures get lost if detail level set too high, although image looks much cleaner.

If I am shooting exteriors and scenics with lots of foliage, grass etc then I will sometimes go down to -30 as this helps bring out the subtle textures in the leaves and plants, but this can make noise a little more pronounced, so it’s a trade off. And that’s what Crispening is all about, trading off subtle textures and detail against more visible noise. Ultimately only you can make the choice as to which is more important, but the Crispening level control gives you that choice.

Why do my pictures go soft when I pan? Camera Detail Correction in depth.

Why do my pictures go soft when I pan? Camera Detail Correction in depth.

This article is my Christmas present for my readers. When your trying to set up a camera or brew up a picture profile it really helps if you understand the ramifications of each of the settings. I hope this helps explain how detail correction works and how it effects your image.
I am often asked to explain why someones images are going soft when they pan the camera or when there is a lot of movement in the scene. Well this can be down to many things including poor compression or too low a bit rate for the recording, but the two main issues are shutter speed (which is tied in to your frame rate) and detail correction. I’ll cover frame rates and shutter speeds in the near future, but today I’m going to look at Detail Correction.
First of all what is detail correction for? Well originally it was used to compensate for the low resolution of domestic cathode ray tube TV’s and the limited speed at which a CRT TV could go from light to dark. Modern LCD, Plasma and OLED displays handle this much better, but still detail correction remains important to this day to as a way of adding the appearance of additional sharpness to a video image. You’ll often see extreme examples of it on SD TV shows as a dark halo around objects.

Perfect Greyscale

The image above is of an imaginary perfect greyscale chart. Looking at it you can see on your screen that each grey bar is quite distinct from the next and the edge between the two is sharp and clear. You computer screen should be quite capable of showing an instant switch from one grey level to the next.

Grey Scale with Waveform

Now if we add the waveform that the “perfect” greyscale would give we can see that the transition from each bar to the next is represented by a nice crisp instant step down, the transition from one bar to the next happening over a single pixel.

Grey Scale as seen by camera

The image above represents what a typical video camera might reproduce if it shot the greyscale chart without any form of detail correction or sharpening. Due to the need to avoid aliasing, lens performance and other factors it is impossible to get perfect optical performance so there is some inevitable blurring of the edges between the grey bars. Note that these images are for illustration only, so I have exaggerated the effect. I would expect a good HD camera to still produce a reasonably sharp image.

Camera Waveform

Looking at the cameras waveform you can see that the nice square edges we saw in on the perfect greyscale waveform have gone and instead the transition from bar to bar is more rounded. Now there are two things that camera manufactures commonly do to correct or compensate for this. One is called aperture correction which is a high frequency signal boost (I’ll explain that another time) but the one were going to look at in this case is called detail correction often simply referred to as “Detail”.

Detail Correction sampling

So what happens in the camera? Well the camera constantly compares the video luminance (brightness) levels of the image over a set time period. This time period is incredibly short and in the example given here is the time it takes for the cameras line scan to go left to right from point A to point B. If the  difference in the brightness or luminance of the two samples is greater than the threshold set for the application of detail correction (known as crispening on Sony cameras) then the detail circuit kicks in and adds a light or dark enhancement to the brightness change.

Camera image with Detail Correction added

With an HD video camera the light or dark edges added by the detail correction circuit are typically only a few pixels wide. On an SD camera they are often much wider. On a Sony camera the detail frequency setting will make the edges thicker (negative value) or thinner (positive value). The Black and White limit settings will limit how bright or how dark the added correction will be and the detail level control determines just how much correction is added  to the image overall.

One important thing to consider is that as the amount of detail correction that is applied to the image is dependant on differences in the image luminance  measured over time, so you have to consider what happens when the scene is moving or the camera pans.  Two things happen when you pan the camera, one is that the image will blur a little due to things moving through the frame while the shutter is open and from line to line objects will be in a slightly different position.

Blur due to camera pan softens the image.

So looking at the waveform we can see that the waveform slope from one grey bar to the next becomes shallower due to the blur induced through the motion of the camera. If we now sample the this slightly blurred image using the same timescale as before we can see that the difference in amplitude (brightness) between the new blue samples at A and B is significantly smaller than the difference between the original red sample points.

Smaller Luma difference due to pan blur

What this means in practice is that if the difference between the A and B sample drops below the threshold set for the application of detail correction then it is not applied. So what happens is that as you pan (or there is motion in the scene) the slight image softening due to motion blur will decrease the amount of detail correction being applied to the image so the picture appears to noticeably soften, especially if you are using a high detail correction level.

Detail correction is applied to both horizontal image differences as outlined above and also to vertical differences. As the vertical sampling is taken over 2 or 3 image lines there is much longer time gap between the samples. So when you pan, an object that was in one position on one line may have moved significantly enough by the time the frame scan has progressed 2 more lines that it is in a different position so the detail sampling will be wrong and detail may not be applied at all.

If you are finding that you are seeing an annoying amount of image softening when you pan or move your camera then you may want to consider backing off your detail settings as this will reduce the difference between the detail “on” look and detail “off” look during the pan or movement. If this softens your images too much for your liking then you can compensate by using Aperture Correction (if your camera has this) to boost the sharpness of your image. I’ll explain sharpness in more depth in a later article.

Merry Christmas!

Shooting Snow and other bright scenes.

Well winter is upon us. The north of the UK is seeing some pretty heavy snow fall and it’s due to spread south through the week. I regularly make trips to Norway and Iceland in the winter to shoot the Northern Lights (email me if you want to come) so I am used to shooting in the snow. It can be very difficult. Not only do you have to deal with the cold but also difficult exposure.

First off it’s vital to protect your equipment and investment from the cold weather. A good camera cover is essential, I use Kata covers on my cameras. If you don’t have a proper cover at the very least use a bin liner or other bag to wrap up your camera. If you have a sewing machine you could always use some fleece or waterproof material to make your own cover. If snow is actually falling, it will end up on your lens and probably melt. Most regular lens cloths just smear any water around the lens, leaving you with a blurred image. I find that the best cloth to use in wet conditions is a chamois (shammy) leather. Normally available in car accessory shops these are soft, absorbent leather cloths. Buy a large one, cut it into a couple of smaller pieces, then give it a good wash and you have a couple of excellent lens cloths that will work when wet and won’t damage your lens.

Exposing for snow is tricky. You want it to look bright, but you don’t want to overexpose. If your camera has zebras set them to 95 to 100%. This way you will get a zebra pattern on the snow as it starts to over expose. You also want your snow to look white, so do a manual white balance using clean snow as your white. Don’t however do this at dawn or near sunset as this will remove the orange light normally found at the ends of the day. In these cases it is best to use preset white set to around 5,600k. Don’t use cinegammas or hypergammas with bright snow scenes. They are OK for dull or overcast days, provided you do some grading in post, but on bright days because large areas of your snow scene will be up over 70 to 80% exposure you will end up with a very flat looking image as your snow will be in the compressed part of the exposure curve. You may want to consider using a little bit of negative black gamma to put a bit more contrast into the image.

If the sun is shining, yes I know this may not happen often in the UK, but if it is then the overall brightness of your scene may be very high. Remember to try to avoid stopping down your lens with the iris too far. With 1/3? sensor cameras you should aim to stay more open than f5.6, with 1/2? more than f8 and 2/3? more than f11. You may need to use the cameras built in ND filters or external ND filters to achieve this. Perhaps even a variable ND like the Genus ND Fader. You need to do this to avoid diffraction limiting, which softens the image if the iris is stopped down too much and is particulary noticeable with HD camcorders.

Finally at the end of your day of shooting remember that your camera will be cold. If you take it in to a warm environment (car, house, office) condensation will form both on the outside and on the inside. This moisture can damage the delicate electronics in a camcorder so leave the camera turned off until it has warmed up and ensure it is completely dry before packing it away. This is particularly important if you store your camera in any kind of waterproof case as moisture may remain trapped inside the case leading to long term damage. It is a good idea to keep sachets of silica gel in your camera case to absorb any such moisture. In the arctic and very cold environments the condensation may freeze covering the camera in ice and making it un-useable. In these extreme situations sometimes it is better to leave the camera in the cold rather than repeatedly warming it up and cooling it down.

Have fun, don’t get too cold, oh…  and keep some chemical hand warmers handy to help stop the lens fogging and to keep your fingers from freezing.

PMW-350 Scene Files for Download

PMW-350 Scene Files for Download

Alister-350-Scene-flies1

Click on the link above to download a set of my latest scene files. Un-zip and copy to the root of an SxS card, the in the file menu load the files.

These are mainly matrix tweeks. neut2 is one I like that gives rich primary colours while still reasonably true to life. Cine1 is a sudo filmic look Film1 is meant to emulate well saturated film stock DSC-1 is based on Chroma-Du-Monde chart for accurate daylight color Neut is my first matrix tweak for a less green look and warmer skin tones.

Brewing up a Scene File: Gamma and Knee

Brewing up a Scene File: Gamma and Knee

Before anyone complains that I have missed stuff out or that some technical detail is not quite right, one of the things I’m trying to do here is simplify the hows and why’s to try and make it easier for the less technical people out there. Lets face it this is an art form, not a science (well actually a bit of both really).
So what is a gamma curve anyway? Well the good old fashioned cathode ray tube television was a very non-linear device. You put 1 unit of power in and get one unit of light out. You put 2 units in and get 1.5 units out, put 3 in and get 2 out… and so on. So in order to get a natural picture the output of the camera also has to be modified to compensate for this. This compensation is the gamma curve, an artificial modification of the output signal from the camera to make it match TV’s and monitors around the world. See Wikipedia for a fuller explaination:   http://en.wikipedia.org/wiki/Gamma_correction
So, all video cameras will have a gamma curve, whether you can adjust it or not is another matter. Certainly most pro level cameras allow you some form of gamma adjustment.
The PMW-350 has 6 standard gamma curves, these are all pretty similar, they have to be otherwise the pictures wouldn’t look right, but small changes in the curve effect the relationship between dark and bright parts of the pictures. Todays modern cameras have a far greater dynamic range (range of dark to bright) than older cameras. This means that the full dynamic range of the sensor no longer fits within the gamma curves used for TV’s and monitors. In broadcast television any signal that goes over 100% gets clipped off and is discarded, so the cameras entire brightness range has to be squeezed into 0 to 100%. The PMW-350 sensors are capable of far more than this (at least 600%) so what can you do?
The older and simpler solution is called the “Knee”. The knee works because in most cases the brightest parts of a scene contains little detail and is generally ignored by our brains. We humans tend to focus on mid-tone faces, animals and plants rather than the bright sky. Because of this you can compress the highlights (bright) parts of the picture quite heavily without it looking hugely un-natural (most of the time at least). What the knee does is takes a standard gamma curve and up near it’s top, bends it over. This has the effect of compressing the brighter parts of the image, squashing a broad range of highlights (clouds for example) into a narrow range of brightness. While this works fairly well, it does tend to look rather “electronic” as the picture is either natural (below the knee) or compressed (above the knee).
The answer to this electronic video look is to replace the hard knee with gentle bend to the gamma curve. This bend starts some way down the gamma curve, very gentle at first but getting harder and harder as you go up the gamma curve. This has the effect of compressing the image gently at first with the compression getting stronger and stronger as you go up the curve. This looks a lot more natural than a hard knee and is far closer to the way film handles highlights. The downside is that because the compression starts earlier a wider tonal range is compressed. This makes the pictures look flat and uninteresting. You have to watch exposure on faces as these can creep into the compressed part of the curve. The plus point is that it’s possible to squeeze large amounts of latitude into the 100% video range. This video can then be worked on in post production by the editor or colorist who can pull out the tonal range that best suits the production.
These compressed gamma curves are given different names on different products. Panasonic call them “Film Rec”, on the EX1 they are “Cinegammas” on the PMW-350 they are “Hypergammas”. The 350 has four Hypergammas. The first is 3250. this takes a brightness range the equivalent to 325% and compresses it down to 100%. HG 4600 takes 460% and squeezes that down to 100%. Both of these Hypergammas are “broadcast safe” and the recordings made with them can be broadcast straight from the camera without any issues. The next Hypergamma is 3259. This takes a 325% range and squeezes this down to a 109% range, likewise 4609 takes 460% down to 109%. But why 109%? well the extra 9% gives you almost 10% more data to work with in post production compared to broadcast safe 100%. It also gives you the peak white level you need for display on the internet. Of course if you are doing a broadcast show you will need to ensure that the video levels in the finished programme don’t exceed 100%.
My preferred gamma is Hypergamma 4 (4609) as this gives the maximum dynamic range and gives a natural look, however the pictures can look a little flat so if I’m going direct from the camera to finished video without grading I use either a standard gamma or use the Black Gamma function to modify the curve. I’ll explain the Black Gamma in my next post.
There are 6 standard gammas to choose from. I like to stick with gamma 5 which is the ITU-709 HD standard gamma. To increase the dynamic range I use the Knee. The default knee point setting is 90, this is a reasonable setting, but if your shooting with clipping set to 100% you are not getting all the cameras latitude (the Knee at 90 works very well with clipping at 108%). Lowering the knee down to 83 gives you almost another stop of latitude, but you have to be careful as skin tones and faces can creep up towards 83%. It’s very noticeable if skin becomes compressed so you need to watch your exposure. This is also true of the Hypergammas and with them you may need to underexpose faces very slightly. The other option is to set the knee point to 88 and then also adjust the knee slope. The slope is the compression amount. A positive value is more compressed, negative less compressed. With the knee at 88 and slope set to +20 you get good latitude, albeit with quite highly compressed highlights.
If you want to play with the gammas and knee and see how they work one method you can use is to use a paint package on your PC (such as photoshop) to create a full screen left to right graduated image going from Black to white. Then shoot this with the camera (slightly out of focus) while making adjustments to the curves or knee and record the results along with a vocal description of each setting. Import the clips into your favorite editing package and use the waveform monitor or scopes you should be able to see a reasonable representation of the shape of the gamma curve and knee.
So my Gamma Choices are:
For material that will be post produced: Hypergamma 4609 (HG4)
For material that will be used straight from the camera: Standard Gamma 5 Knee at 90 with clip at 108% for non broadcast or Knee at 88 with slope +20 with white clip at 100% for direct to broadcast.

PMW-350 Aperture Correction what is it doing?

PMW-350 Aperture Correction

After completing the multi camera shootout at Visual Impact, one thing was bothering me about the pictures from the PMW-350 and that was the way the specular highlights in the tin foil were artificially enhanced. During the test the camera was set to factory defaults, which IMHO are too sharp, but the foil in particular looked nasty. Since then I have been further refining my paint settings for the 350 and looking at detail and aperture. Today I was replicating the tin foil test and looking at the aperture settings (not the knee aperture) and I noticed that turning aperture on and off had a very pronounced effect on highlights but a much smaller effect elsewhere in the image. Normally I would expect the aperture setting to act as a high frequency boost making subtle textures more or less enhanced, which it does, but the amount of enhancement appears to vary with the brightness of the image with specular highlights getting a really big hit of correction. If you look at the images to the left at the top you have aperture correction on at +99. There are big ugly black lines around the highlights on the foil and the texture of the carpet has been enhanced. To some degree this is the expected behaviour although I am surprised by how thick the edges around the highlights are, this looks more like detail correction (it could be “ringing”). The middle images are aperture off, not zero but actually off and you can see that the edges on the foil have gone and the carpet is no longer enhanced. The bottom picture though with aperture on at -99 though is very interesting as the carpet appears slightly softer than OFF, which is not unexpected while the foils is sharper than OFF and this is not expected. I don’t like this behaviour I’m afraid to say as a typical way to get a filmic look from a video camera is to turn the detail correction off to give a natural picture and then use Aperture correction to boost high frequencies to retain a sharp image. On the PMW-350 you can’t do this as this as a high Aperture setting will give you those nasty edges on highlights. So what can you do? Well the 350?s native, un-enhanced resolution is very high anyway so it doesn’t need a lot of correction or boosting. The default Detail and Aperture settings will give some really nasty highlight edges so you need to back things off. If your going for a filmic look I would turn OFF aperture correction altogether, for video work with pictures that have some subtle enhancement I would use Aperture at around -20, certainly never higher than -15 unless you like black lines around specular highlights.

My current prefered detail, aimed at giving a very slight, not obvious enhancement are are as follows:

Detail Level -12, H-V Ratio +15, Crispening 0, Frequency +30, White Limit +30, Black Limit +40 (all other detail settings at default)

Aperture OFF for filmic look, Aperture -20 for video look.

I have also made some changes to the Matrix settings. I have been finding the pictures from Sony cameras to be a little on the Green/Yellow side so I have tweaked things a little to remove the yellow cast and put in a bit of red, this is a subtle change but really helps with skin tones, stopping on screen talent from looking ill! These settings work in the PMW-350, EX1/3 and PDW-700.

On an EX1/EX3 this works best with the Standard Matrix, On a PMW-350 or PDW-700 you can use it on it’s own or mix it with one of the preset matrices as a modifier. User Matrix On, R-G 0, R-B +5, G-R -6, G-B +8, B-R -15, B-G -9

Have Fun!

What is “Crispening” and how does it effect the picture?

What is “Crispening” and how does it effect the picture?

Crispening is one of the adjustments you can make in many of Sony’s video cameras that adjusts the way the image is sharpened via the detail correction circuit. On an EX1 or EX3 it is in the Picture Profiles section. If use wisely Crispening can be used to help deal with camera noise by making it less visible, thus giving a cleaner image. Crispening works across the entire luma (brightness) range. It’s really difficult to explain how the level adjustment works, it is a threshold adjustment for the detail circuit, but I’ll have a go anyway.

First off lets consider how the detail circuit works. The camera uses delay circuits to compare how the brightness (luma) levels of adjacent pixels are changing, both from left to right and line by line. If the circuit sees a rapid change from light to dark or dark to light (or light to lighter, dark to darker etc) the circuit regards this as an edge and detail correction is applied by brightening or darkening the transition, exaggerating the edge. This is seen in extreme cases as a black or white halo around edges.

On the EX cameras crispening works by adjusting the threshold at which the light to dark transition between pixels triggers the application of detail correction. So when you set a negative number, say -99 even the slightest luma difference between pixels will have detail correction applied. Set it to +99 and it takes a much greater luma change to trigger the detail circuit.

What you need to understand is that if you set crispening such that the threshold before detail is applied is 100mV (for example) then between 0v (black) and 99mV little to no detail correction will be applied, keeping blacks clean by not applying detail correction to any noise with an amplitude less than 100mV. But if there are subtle textures in the image, going say from 500mV to 599mV (mid tones) then no detail correction will be applied here either, so the image will appear a little softer, only larger luma changes of more than 100mV will have detail correction applied. These small luma changes can be anywhere within the full luma range and it is not confined just to the darker parts of the image.

Raising the crispening level setting to a positive number raises the threshold at which detail is applied to the image, so a high number prevents detail correction from being added to small luma changes. A negative number means that detail correction will be applied to smaller luma changes, this increases the appearance of noise but also makes textures appear sharper.

One thing to consider is that the noise the camera produces is not only in the blacks. If the noise amplitude (level) is for example 5mV, then if you have a subject at 500mV (mid tones) it will still have random 5mV noise added to it. It just tends to be that noise is most visible in the blacks as 5mV of noise on a 5mV (very dark) signal is modulating (varying) the signal by 100% so it’s quite obvious, however 5mV on top of 500mV is only 1% so less obvious, but still there and still visible.

You should remember that the cleaner you can make the recorded image the less stress there is on the codec. This in turn means less mosquito noise and macro blocking giving an image that looks cleaner still and grades better. I struggle to see the difference between crispening at 0 and at +20 in most normally exposed shots, but if I look closely I do see less noise in shadow and low contrast areas. Low contrast areas tend to have little detail anyway, so being able to clean these up a little helps in post production.

Sony have a PDF about it here:?http://www.sony.co.uk/res/attachment…6605183226.pdf

Brewing up a scene file: Black Gamma


In the posts above I looked at how the gamma curves effect the contrast range within the picture and highlight handling. I also noted that while I like the latitude (range) offered by using the Hypergammas that they produce a very flat looking picture. One of the adjustments that you can make to the Gamma curves is the Black Gamma. Adjusting the Black Gamma stretches or compresses the bottom part of the gamma curve, this makes the darker parts of the picture darker (negative setting) or brighter (positive setting). When setting the Black Gamma you will find 4 different ranges to choose from. Low, Low-Mid, Hi-Mid and High. These settings determine the range over which the black gamma works. Low only effects the darkest 10% of the image, L-Mid the bottom 20%(approx), H-Mid the lowest 30%(approx) and Hi the lower 35% (approx). So if you just want to make your deep shadows and blacks darker you would use Low. If you want to make the overall image more contrasty you would use H-Mid or Hi. I like to give my images a bit more impact so I often use H-Mid at -30. If the pictures are to be graded I would not use any negative black gamma.