Looking forward to the KitPlus event in Manchester next Tuesday the 10th of November. I’ll be there to talk about large sensor cameras in general, the FS5 and to offer help and advice to those that visit including some guided tours around the Sony booth. Geoff Boyle will be giving lighting workshops. HaZ Dulall will be talking about budget VFX (his talks are fascinating). Plus of course there will be lots of kit on show from all the major players. http://www.kitplus.com/tour/
Want to learn more about the FS5?
Want to know more about the FS5? check out my 2 hour seminar held at Vocas in the Netherlands. Primarily about the FS5 but from about 1 hour in I go into a lot of detail about gamma curves, log and exposure in general.
Why It’s Helpful To Over Expose S-Log, Especially If You Only Have 8 Bit Recording.
This is something that keeps coming up in my workshops. It’s very important if shooting with S-Log2 or S-Log3 not to under expose and in most cases it can be highly beneficial to over expose a bit. Especially if you are using a camera like the A7s or FS5 in 4K when you only have 8 bit data.

Take a look at this chart. It plots the S-Log2 and S-Log3 gamma curves on a log scale of f-stops against the amount of 10 bit or code values used to record each stop. The center line of the chart is middle grey. Both S-log2 and S-log3 provide 8 stops below middle grey and 6 stops above. Take a look at the darkest stop, the one that is -7 to -8 and look at how much data is allocated to that stop. With 10 bit recording you have according to this chart about 10 code values for S-Log2 and about 20 for S-Log3. That’s if you have 10 bit, and it’s not a lot of data. Admittedly there isn’t going to be a great deal of scene information in that darkest stop, deep in the shadows and the noise. But there’s part of the issue, the noise. If you have under exposed and you take this in to post and have to stretch out the shadows, the noise in these darkest shadows is going to look pretty coarse because it hasn’t been recorded with many shades/steps so stretching it out will make even “rougher” for want of a better term. If you are recording with 8 bit the problems is even worse. With 8 bit, S-Log2 will only have around 2 or 3 code values for that bottom stop, in effect the noise will have two values – black or +1 stop. Imagine how nasty that will look if you need to raise or stretch you blacks because you are under exposed, it will become very blocky and grainy.
The solution is to over expose a bit. By over exposing your footage by a stop when you go in to post production you will in most cases be bringing your levels down. So instead of stretching the noise out and making it worse you will be shrinking it down and reducing the negative impact it has on it’s image. Because cameras like the FS5, A7s etc have 14 stops of dynamic range this small bit of over exposure is going to make very little difference to your highlights in the vast majority of situations. Any slight over exposure you may have will likely look quite natural anyway, after all our own eyesight does also over expose, we don’t have unlimited dynamic range. On top of that the display technology does not exist to show a 14 stop range shot in it’s entirety and with natural contrast.
Northern Lights 2016

Don’t forget about my Northern Lights tours. I still have places for the 7th of Feb to 13th of Feb 2016. It’s always an incredible and unforgettable experience. A chance to find out how the Sami people live in up on the Finnmarksvidda in the arctic winter. As well as the Aurora or Northern Lights there’s snowmobiling, dog sled driving, ice fishing, camp fire cooking, traditional log fired sauna and so much more. Full details are here.

Metabones Sony FZ to Canon EF adapter launched.

So finally, here it is! First seen at IBC over a year ago and eagerly awaited ever since, the Metabones Sony FZ to Canon EF lens adapter. This adapter fits the Sony PMW-F3, F5 and F55 cameras. It replaces the supplied PL mount with a very high quality, locking Canon EF mount that electronically controls the Canon lens aperture.
The adapter takes it’s power directly from the camera, to make it work correctly you need to go in to the camera menu and select the TypeA+12 or TypeC+12 lens adapter type. Once the menu has been set and the adapter fitted to the camera you will get a direct readout of the lenses aperture and focus distance in the viewfinder with the vast majority of electronically controlled Canon EF lenses.

In addition on the adapter itself there is a large aperture ring and a window where the aperture number is clearly displayed. The aperture ring has a standard 0.8 pitch gear so you can remotely drive it with a follow focus motor if you need remote aperture control. One point to note is that the aperture ring indications go all the way down to f1. If your lens has a largest aperture of say f4, if you turn the ring past f4 the aperture will not magically open any wider than it can, so it is possible to have f2.8 or even f1 indicated in the window on the aperture ring while the lens may be at it’s actual maximum aperture. However don’t worry too much as if you look in the viewfinder the correct actual aperture of the lens is displayed. Also remember that if you are using an entirely mechanical lens such as a Samyang prime that the aperture control on the adapter will have no effect on the lens, you would use the aperture ring on the lens to adjust the aperture and you may not get the aperture and focus information in the viewfinder.

Mounting lenses on the adapter is easy. To attach a lens simply align the red dot on the lens with the red mark on the adapter and insert the lens into the lens mount. Then, instead of twisting the lens as you would do on a Canon camera you twist the large silver locking ring anti-clockwise and this clamps the lens very securely in place. This system ensures the lens is very secure so it won’t twist or wobble. This is very important if you’re using a lens with pitch gears and a follow focus as it stops the lens shifting against the force of the follow focus.
If your lens has image stabilisation then this will work so you can benefit from this when shooting on the move or with very long focal lengths.

On the side of the adapter there are two push buttons marked as FN1 and FN2. These currently appear to have no effect. The lens adapter firmware can be updated by the end user via a micro USB port, so perhaps in the future there will be extra functions for these buttons. Just above the buttons is a 3 way switch. This switches the adapter between manual, locked and auto. In manual the aperture ring controls the lenses aperture. Switch the switch to lock and the aperture is locked at the last set position. In Auto the camera controls the aperture automatically. For auto aperture the camera must be in Custom Mode and not using S-Log. Auto Exposure must also be turned on in the cameras menu. Once activated you can include an exposure offset via the camera menu to help deal with different lighting situations. It is worth remembering though that electronic Canon lens apertures operate in 1/8th of a stop steps. So any exposure changes mid shot will often be seen as small stepped brightness changes. Also in some situations you may find that the exposure the camera wants is right between two steps and in this instance the aperture will flicker between the two steps. This isn’t a fault or problem with the camera or the adapter, it’s just a characteristic of the way Canon EF lenses work and there’s nothing that Sony or Metabones can do about this.

The build quality is very good. The adapter is made mainly from aluminium alloy, machined to a very high standard and nicely anodised. The internal parts of the adapter are flocked with a high quality black flocking material that looks like it should be very good at reducing any internal reflections.
I really do think this is one of, if not the best FZ to EF adapter on the market. There are no wires or cables. Aperture is control by an aperture ring just as on a cine lens and you have an aperture indication right on the side of the adapter as well as focus distance and aperture indications in the viewfinder. The lens locks in to place securely and the build quality is excellent. So just on the features alone I would recommend this adapter, but then when you consider that it’s also the cheapest electronic FZ to EF adapter on the market it becomes a real no-brainer. If you need or want to use Canon EF lenses on your PMW-F5 or PMW-F55 then this adapter ticks all the right boxes.
NORTHERN LIGHTS 2016.
Don’t forget I run storm chasing and Northern Lights expeditions every year. I still have some places on the second Northern Lights tour in Feb 2016. These are amazing expeditions by snowmobile up on to the Finnmarksvidda. We go ice fishing, dog sledding, exploring, cook a meal in a tent and enjoy traditional Norwegian saunas.

If shooting in low light don’t use Log!
One common question I am often asked is how to use Log or CineEI in low light situations. After all in the Sony CineEI mode or with a log camera such as the Alexa that use EI the actual recording gain is fixed, so often the recorded pictures are very dark. So what should you do?
My answer in many cases is simply not to use Log or EI. It’ really important to remember that the primary reason why log recording was developed was to make it possible to record a very large dynamic range using existing recording technologies. In order to do this lots of compromises are made. The main one being allocating less recording data to each stop of dynamic range. If you’re recording using 10 bit you typically have about 970 useable code values or shades. Use a gamma curve with 6 stop range and you have about 160 shades per stop, record using a log or other extended range gamma with a 14 stop range and you have just 70 shades per stop.
Lets think about a couple of different scenes for a moment. Scene one is a daytime scene that’s nice and bright with an 8 stop dynamic range. Scene 2 is a night time scene that is fairly dark and only has a 5 stop dynamic range. What happens if we shoot using log?
With the daytime scene things are pretty straight forward. You just expose as per the manufacturers recommendation. Assuming your camera is set to log and capable of a 14 stop dynamic range, if exposed at the base, recommended exposure levels you will be using a little under 60% of your available recording range, so a fair bit of data will be going to waste. But as the scene is bright you can always open up the aperture a bit and deliberately over expose by a stop or two so that now your using around 75% of the available data. You don’t normally want to over expose too much as grading becomes trickier, but at least when you have a bright scene you can open up the aperture to expand the recording range a bit to make better use of the data.
In low light however it get’s trickier as your aperture may already be wide open. In the second dark scene it’s quite possible that the 5 stops of light coming back from the scene aren’t bright enough to allow you to expose at the recommended levels. So instead of filling the zero to 5 stop recording range you might only be filling the zero to 4 stop range. Even if you can expose correctly with a 14 stop recording bucket like log you are only using a little over 35% of the available data and that’s a terrible waste. You won’t have much data to help you separate out any noise from the desired picture information in post production and because your recorded signal is small any compression noise will be relatively big in comparison to the picture information.
This is when it’s time to abandon log and go back to a conventional gamma curve. You don’t need log when the scene only has a limited dynamic range. If you use Rec-709, which has a 6 stop range (without any knee) instead of log, at the same ISO, then now instead of recording using only 35% of the available data you will be using almost 85% of the available data and that’s going to give you much more real picture information to work with in post production. You will get a much better end result by not using log.
If you need a bit more than a 6 stop range then there are plenty of other gamma curves to choose from that sit between 709 and log. Gamma curves such as Sony’s cinegammas or hypergammas which have dynamic ranges between 10 and 11 stops.
So remember, when you don’t need a 14 stop recording range, then consider using an alternate gamma curve. It’s not just in low light but also in other controlled lighting situations such as green screen work.
Win a PXW-FS5 or A7s. Free to enter competition.
Want to win a PXW-FS5 or A7s? Sony are running a free to enter worldwide competition to win a PXW-FS5. All you have to do is create a 2 min short film with the theme “No More Limits” upload it to YouTube and enter via the entry form by 31st October. The videos which receive the most YouTube ‘likes’ from the 1st-15th November will form regional shortlists, an Independent expert from each region will select their favourite. These regional finalists will each win a Sony A7S (or equivalent), and will be entered into the global final to win the PXW-FS5. The global winner and regional winners will be announced during a webinar on 17th December. Click here for the full details.
Metabones FZ to Canon Mount.

There was one of these at IBC last year. A new version appeared again this year at IBC and it’s really nice. I so hope that this becomes a real product. It fits the Sony PMW-F5 and PMW-F55 cameras (and I must assume the PMW-F3 too). It takes it’s power from the camera and will control a Canon EF lens. Aperture is controlled by a large aperture ring which has clear aperture marking visible at the side of the adapter. No fiddly knobs or dials, no power cable and a real aperture scale. In addition I believe you will get an aperture display in the viewfinder. The EF Lens mount features a large locking ring so the lens won’t twist or rotate once mounted, something essential if you are going to use a follow focus. This version was much nicer than the one shown last year. I really hope it becomes a real product as I’d like one for my F5.

Which to buy F5, FS7 or FS5?
I’m only going to look at these 3 cameras in this article. Of course there are also many others to choose from these days, so do remember to look at other options from other manufacturers too.
I like Sony cameras and I’m not going to pretend otherwise. But I have to say that I really think Sony are on a roll right now. The PMW-F55, F5, FS7 and the FS5 are all great cameras. Sure there are cameras with more pixels and maybe more resolution that may or may not need full frame lenses. There are cheaper cameras and all kinds of other options, but these cameras are all good workhorse cameras that should prove reliable in the field and give years of good service (although with technology moving so fast you might not keep it for that many years).
So which to choose?
First of all YOU need to decided exactly what you need or want from your camera. It’s also good to separate out “What You Need” from “What You Would Like”. For example if you are on an extrmely tight budget you will need affordable media while you might also like the idea of being able to shoot continuously at 180fps. Sometimes the two are not compatible with each other, so you should go with the need rather than the like.
If you’re running a business then you should also ask yourself that all important question: Will the more expensive camera make me more money?
Yeah, yeah, I know…. for some of us they are our babies, our toys and it is nice to have the best toys. But don’t bankrupt yourself buying something you can’t afford or don’t really need.
I’ve included a table of differences between these cameras below which I suggest you take a look at.
The FS5 is clearly exceptional value for the money. It does 80-90% of what the other cameras can do. If you’re only ever going to shoot in HD and don’t want to use Cine EI or LUT’s then really the FS5 is probably all you’ll ever need. It’s small, compact, lightweight and has some great features for shooting on the move like the variable ND filter and face tracking autofocus (with a Sony lens). What it lacks however is 10 bit 422 recording in UHD (even the output is only 8 bit in 4K). So if you want to shoot in UHD (3840 x 2160 TV type 4K) then the amount of grading you can do will be a little restricted. It’s also unlikely to meet broadcast standards as a main camera for UHD production. Further more it also lacks a proper CineEI mode for S-log2/S-Log3 with LUT’s on the outputs. This isn’t the end of the world for occasional log shoots but if you plan on shooting a lot of log then all of the other cameras will be easier to use and it will be easier to get the best results without having to mess about with external monitors with LUT’s, grey cards or light meters. It’s not so much the lack of LUT’s (there are viewfinder only gamma LUT’s) but the inability to monitor at anything other than the native ISO which makes it tougher to offset your exposure in the way you can with CineEI. One final and very important note about the PXW-FS5 is that the XAVC-L codec is very processor intensive. You will need a really good computer to do anything more than cuts only editing. The XAVC-I codec in the FS7, F5 and F55 is much easier to work with, but the files are bigger. SO while the FS5 may save you a lot in terms of media costs, you will need to spend money on a high spec, up to date PC or Mac if you don’t already have one.
The FS5 can be upgraded with a raw option that outputs 12 bit linear raw. This raw output can be recorded on an external recorder and in doing so bypasses many of the FS5’s internal limitations such as only being able to have a single video out OR monitoring signal when recording internally. The raw files are very, very big but you can convert the raw to 10 bit ProRes before recording on the external recorder and this does provide image quality close to the 10 bit internal recordings of the other cameras. But, by the time you add on the cost of the raw option, a raw recorder plus mounting, batteries and media, the price difference between the FS5 and FS7 is very small.
The FS7 really does sit in the middle of this bunch, both in terms of cost and features. It’s a bigger camera that’s tough to hand hold for long, really it’s a shoulder camera. It can do 95% of what the F5 and F55 can do and some things the F5 and F55 can’t. The use of the Sony E-Mount means you can add low cost Sony power zoom lenses or control Canon lens apertures via low cost and compact adapters, this is much harder (and more expensive) on the F5 and F55. Adapters for Canon lenses for the FS5 and FS7 start at $50 while for an F5/F55 adapter prices start at $800. In addition on the E-Mount cameras you can add speedbooster adapters for use with full frame lenses giving a wider field of view and 1 stop faster aperture.
The FS7 has a true CineEI mode for log shooting and can take custom LUT’s. It’s even possible to add the XDCA-FS7 adapter to get internal ProRes recording and a 12 bit raw output, but it is only 12 bit raw which although very nice, is a lot different to the far superior 16 bit raw from the F5 and F55. When using the XDCA-FS7 extension unit it’s also worth remembering that you need to use bulkier and generally more expensive V-Mount batteries.
The FS7 II adds an improved locking E-Mount for greater lens security and stability. The locking mount is also stronger than the standard mount so it will cope better with heavier lenses. In addition the FS7 II also has a variable ND filter. The variable ND allows you to do your fine exposure adjustments with the ND filter allowing the aperture to be used as a depth of field control.
The FS7 is great for short film production, it offers image quality that is good enough for a feature film (I don’t think a movie viewer would detect any deficiency in the pictures from a well setup and well used FS7, even on a big screen). The XQD media while not as cheap as the SDXC cards used by the FS5 is reasonably affordable. There are a few things that might frustrate some users, in particular it is a very sophisticated camera with lots of options and there is no easy way to see exactly how the camera is configured without interrupting the live image in the viewfinder either by going into the menus or using the status pages. If you do use a lot of the cameras features and modes, you will spend a lot of time in the menu system.
One of the great things about the F5 or the more expensive PMW-F55 is the side display panel as this allows you to see how the camera is setup, which LUT you’re using, frame rates, audio levels and so much more without having to resort to the menus. You can also control most of the day to day functions that you will use from this side panel using the option menu and that makes the camera far easier and faster to use than the FS7. The F5/F55 lens mount is much stronger than the E-mount on the other cameras, so it’s better suited to heavy cinema lenses and large super 35mm zoom lenses. You can also adjust the back focus so that it works well with large cinema zooms. For exceptionally good HD images you have the extremely high quality SStP (HDCAM SR) codec. On top of that there is also a higher quality version of XAVC called XAVC Class 480. This brings some respectable improvements in image quality with only a small increase in file size, whether shooting in HD, UHD or 4K. For the very best 4K you have a full 16 bit linear raw option when you dock the R5 raw recorder or with the R7 raw recorder you can choose between raw or 16 bit linear X-OCN. The R7 can shoot record in 4K at upto 120fps with the F55 for amazing slow motion. X-OCN offers images with quality comparable to 16 bit raw but with file sizes smaller than ProRes and not much bigger than XAVC.
Because the recorder docks directly to the camera it is much easier to use than the external cabled option for the FS7 or FS5. In addition the R5 and R7 recorders use special visually loss less processes to considerably reduce the file sizes and make the files very easy to handle. So if you want to shoot a lot of raw for the ultimate in post production flexibility the the F5/F55 are the obvious choice, although this comes at a price.
So, in summary I would suggest:
Buy the PXW-FS5, unless:
You need to shoot 4K DCI (4096×2160). You are going to shoot primarily using S-Log2/3 or do a lot of grading to your UHD footage or are planning to make broadcast ready UHD programs. Unless you need to shoot continuously in UHD faster than 30fps or faster than 60fps in HD. Need timecode in/out or genlock (needs XDCA-FS7 adapter on FS7). In this case I suggest you buy the FS7 unless:
You are going to shoot primarily in raw or need the convenience of the side status display (don’t underestimate how useful this can be). Unless you need to shoot anamorphic, with SStP (HDCAM SR) or need a 4K HDSDI output. Want integrated Genlock and Timecode In/Out. In this case buy the PMW-F5 (with 4K option?) unless:
You need an extra wide colour gamut and a global shutter, in which case the PMW-F55 is king of the hill.
[table id=1 /]
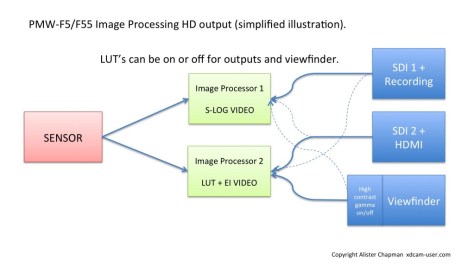
Why can’t I have LUT’s in S&Q on the F5, F55 and FS7?
This is an often asked question about the Sony PMW-F55, F5 and FS7 cameras.
There are several modes and options where the LUT’s are not available or restricted to either all on or all off. That is to say that you can’t have LUT’s on for just the viewfinder or just the SDI output, you can only have the LUT’s applied everywhere, including the internal recordings which isn’t normally desirable.
The problem appears to stem from a limitation on the number of video processing units within the cameras. Certain functions within the camera require a video processor. Functions such as adding LUT’s, reading the sensor at high speed for S&Q, providing a 4K output on the SDI or HDMI each appear to require dedicated processing and as there are on so many processors available this limits some of the options we have. I don’t know of the exact architecture of the cameras but the diagrams below represent what I think is going on and why we have limited LUT options in certain modes. Please note that there are a lot of other video processes going on in the camera and this is a very simplified overview of what I think is more or less going on.


One way around the problem of not having LUT’s in S&Q is to use the viewfinders high contrast mode (F5/F55 only). To enable this mode you must assign it to one of the assignable buttons. The high contrast mode applies a rec-709 like gamma curve to the viewfinder image so you will have almost exactly the same contrast and brightness as you would using the 709(800) LUT. As it’s only a gamma correction it will be less saturated than the LUT, but it’s still very useful for judging exposure. Remember if you are not using or unable to use the LUT’s, the waveform and zebras will be measuring the S-log signal, even if you have the VF High Contrast mode enabled.
Another way around this issue is to use a 3rd party viewfinder that can add it’s own LUT’s. Then simply leave the LUT’s off in the camera and use the VF to apply a LUT. The Zacuto Gratical is great for this as you can not only add the LUT in the VF but also send the LUT out over the VF’s SDI or HDMI output. If you want EI then you will need to load some exposure compensated LUT’s directly to the VF and use the appropriate LUT for each EI.