I’ve been running a lot of workshops recently looking at creating LUT’s and scene files for the FS7, F5 and F55. One interesting observation is that when creating a stylised look, almost always the way the footage looks before you grade can have a very big impact on who far you are prepared to push your grade to create a stylised look.
What do I mean by this? Well if you start off in your grading suite looking at some nicely exposed footage with accurate color and a realistic representation of the original scene, when you start to push and pull the colors in the image the pictures start to look a little “wrong” and this might restrict how far you are prepared to push things as it goes against human nature to make things look wrong.
If on the other hand you were to bring all your footage in to the grading suite with a highly stylised look straight from the camera, because it’s already unlike the real world, you are probably going to be more inclined to further stylise the look as you have never seen the material accurately represent the real world so don’t notice that it doesn’t look “right”.
An interesting test to try is to bring in some footage into the grade and apply a very stylised look via a LUT and then grade the footage. Try to avoid viewing the footage with a vanilla true to life LUT if you can.
Then bring in the same or similar footage with a vanilla true to life LUT and see how far you are prepared to push the material before you star getting concerned that it no longer looks right. You will probably find that you will push the stylised footage further than the normal looking material.
As another example if you take almost any recent blockbuster movie and start to analyse the look of the images you will find that most use a very narrow palette of orange skin tones along with blue/green and teal. Imagine what you would think if your TV news was graded this way, I’m sure most people would think that the camera was broken. If a movie was to intercut the stylised “look” images with nicely exposed, naturally colored images I think the stylised images would be the ones that most people would find objectionable as they just wouldn’t look right. But when you watch a movie and everything has the same coherent stylised look it works and it can look really great.
In my workshops when I introduce some of my film style LUT’s for the first time (after looking at normal images), sometimes people really don’t like them as they look wrong. The colors are off, it’s all a bit blue, it’s too contrasty, are all common comments. But if you show someone a video that uses the same stylised look throughout the film then most people like the look. So when assessing a look or style try to look at it in the right context and try to look at it without seeing a “normal” picture. I find it helps to go and make a coffee between viewing the normal footage and then viewing the same material with a stylised look.
Another thing that happens is the longer you view a stylised look the more “normal” it becomes as your brain adapts to the new look.
In fact while typing this I have the TV on. In the commercial break that’s just been on most of the ads used a natural color palette. Then one ad came on that used a film style palette (orange/teal). The film style palette looked really, really odd in the middle of the normal looking ads. But on it’s own that ad does have a very film like quality too it. It’s just that when surrounded by normal looking footage it really stands out and as a result looks wrong.
I have some more LUT’s to share in the coming days, so check back soon for some film like LUT’s for the FS7/F5/F55 and A7s.
I had the pleasure of listening to Pablo Garcia Soriano the resident DiT/Colorist at the Sony Digital Motion Picture Center at Pinewood Studios last week talk about grading modern digital cinema video cameras during the WTS event .
The thrust of his talk was about exposure and how getting the exposure right during the shoot makes a huge difference in how much you can grade the footage in post. His main observation was that many people are under exposing the camera and this leads to excessive noise which makes the pictures hard to grade.
There isn’t really any real way to reduce the noise in a video camera because nothing you normally do can change the sensitivity of the sensor or the amount of noise it produces. Sure, noise reduction can mask noise, but it doesn’t really get rid of it and it often introduces other artefacts. So the only way to change the all important signal to noise ratio, if you can’t change the noise, is to change the signal.
In a video camera that means opening the aperture and letting in more light. More light means a bigger video signal and as the noise remains more or less constant that means a better signal to noise ratio.
If you are shooting log or raw then you do have a fair amount of leeway with your exposure. You can’t go completely crazy with log, but you can often over expose by a stop or two with no major issues. You know, I really don’t like using the term “over-expose” in these situations. But that’s what you might want to do, to let in up to 2 stops more light than you would normally.
In photography, photographers shooting raw have been using a technique called exposing to the right (ETTR) for a long time. The term comes from the use of a histogram to gauge exposure and then exposing so the the signal goes as far to the right on the histogram as possible (the right being the “bright” side of the scale). If you really wanted to have the best possible signal to noise ratio you could use this method for video too. But ETTR means setting your exposure based on your brightest highlights and as highlights will be different from shot to shot this means the mid range of you shot will go up and down in exposure depending on how bright the highlights are. This is a nightmare for the colorist as it’s the mid-tones and mid range that is the most important, this is what the viewer notices more than anything else. If these are all over the place the colorist has to work very hard to normalise the levels and it can lead to a lot of variability in the footage. So while ETTR might be the best way to get the very best signal to noise ratio (SNR), you still need to be consistent from shot to shot so really you need to expose for mid range consistency, but shift that mid range a little brighter to get a better SNR.
Pablo told his audience that just about any modern digital cinema camera will happily tolerate at least 3/4 of a stop of over exposure and he would always prefer footage with very slightly clipped highlights rather than deep shadows lost in the noise. He showed a lovely example of a dark red car that was “correctly” exposed. The deep red body panels of the car were full of noise and this made grading the shot really tough even though it had been exposed by the book.
When I shoot with my F5 or FS7 I always rate them a stop slower that the native ISO of 2000. So I set my EI to 1000 or even 800 and this gives me great results. With the F55 I rate that at 800 or even 640EI. The F65 at 400EI.
If you ever get offered a chance to see one of Pablo’s demos at the DMPCE go and have a listen. He’s very good.
What do we really mean when we talk about exposure?
If you come from a film background you will know that exposure is the measure of how much light is allowed to fall on the film. This is controlled by two things, the shutter speed and the aperture of the lens. How you set these is determined by how sensitive the film stock is to light.
But what about in the video world? Well exposure means exactly the same thing, it’s how much light we allow our video sensor to capture. Controlled by shutter speed and aperture. The amount of light we need to allow to fall on the sensor is dependant on the sensitivity of the sensor, much like film. But with video there is another variable and that is the gamma curve…. or is it????
This is an area where a lot of video camera operators have trouble, especially when you start dealing with more exotic gamma curves such as log. The reason for the problem is down to the fact that most video camera operators are taught or have learnt to expose their footage at specific video levels. For example if you’re shooting for TV it’s quite normal to shoot so that white is around 90%, skin tones are around 70% and middle grey is in the middle, somewhere around the 45% mark. And that’s been the way it’s been done for decades. It’s certainly how I was taught to expose a video camera.
If you have a video camera with different gamma curves try a simple test. Set the camera to its standard TV gamma (rec-709 or similar). Expose the shot so that it looks right, then change the gamma curve without changing the aperture or shutter speed. What happens? Well the pictures will get brighter or darker, there will be brightness differences between the different gamma curves. This isn’t an exposure change, after all you haven’t changed the amount of light falling on the sensor, this is a change in the gamma curve and the values at which it records different brightnesses.
An example of this would be setting a camera to Rec-709 and exposing white at 90% then switching to S-log3 (keeping the same ISO for both) and white would drop down to 61%. The exposure hasn’t changed, just the recording levels.
It’s really important to understand that different gammas are supposed to have different recording levels. Rec-709 has a 6 stop dynamic range (without adding a knee). So between 0% and around 100% we fit 6 stops with white falling at 85-90%. So if we want to record 14 stops where do we fit in the extra 8 stops that S-Log3 offers when we are already using 0 to 100% for 6 stops with 709?? The answer is we shift the range. By putting the 6 stops that 709 can record between around 15% and 68% with white falling at 61% we make room above and below the original 709 range to fit in another 8 stops.
So a difference in image brightness when changing gamma curves does not represent a change in exposure, it represents a change in recording range. The only way to really change the exposure is to change the aperture and shutter speed. It’s really, really important to understand this.
Furthermore your exposure will only ever look visibly correct when the gamma curve of the display device is the same as the capture gamma curve. So if shooting log and viewing on a normal TV or viewfinder that typically has 709 gamma the picture will not look right. So not only are the levels different to those we have become used to with traditional video but the picture looks wrong too.
As more and more exotic (or at least non-standard) gamma curves become common place it’s very important that we learn to think about what exposure really is. It isn’t how bright the image is (although this is related to exposure) it is about letting the appropriate amount of light fall on the sensor. How do we determine the correct amount of light? Well we need to measure it using a waveform scope, zebras etc, BUT you must also know the correct reference levels for the gamma you are using for a white or middle grey target.
A very useful feature not well documented on the FS7, F5 and F55 cameras (and the F65 too) is the High/Low Key feature.
The High/Low Key function works by changing the brightness range of the image displayed in the viewfinder, this is very useful when shooting in the Cine-EI Mode and using a LUT to help judge your exposure.
My preferred LUT for exposure assessment is the 709(800) LUT. As this LUT is compatible with the gamma curve used in most TV’s and monitors it provides a nice contrasty image with what I would call “normal” brightness levels (middle grey at 42%, white at 90%, skin tones around 60-70%). So if you expose via the 709(800) LUT so that the pictures look right on the screen or in the viewfinder then your S-Log recordings will also be correctly exposed.
But the 709(800) LUT, like most LUT’s cannot show the full 14 stop capture range of the the S-Log recordings. So sometimes you might see an image via the LUT that looks correctly exposed but the highlights might look clipped or blown out as they are beyond the range of what the LUT can show as in the image below where the sky looks blown out. This is where the High/Low Key function comes in to play.
Normal range 709(800) as seen in the viewfinder. Is the sky over exposed or not in the Slog recording? It’s hard to tell.
To access the function you have to assign High/Low Key to one of the cameras assignable buttons. Once assigned to a button on the first press of the button the viewfinder or monitor image will show the High Key parts of the shot. To do this the VF or monitor picture is made darker so that you can “see” into the full highlight capture range. “High Key” will be displayed in the top left hand corner of the viewfinder. As you can see in the image below we can now see that the sky is not blown out, so we know the S-log recording will be OK.
The High Key function darkens the LUT image so we can view the High Key range of the Slog recordings . We can see that the sky is not over exposed so the Slog recording will be not be clipped or over exposed.
The second press of the button shows the Low Key (darker) parts of the scene. This is done by making the image much brighter so you can “see” into the shadows better and the entire under exposure range of what is being recorded is shown. “Low Key” is displayed in the top left of the viewfinder screen.
The Low Key function brightens the LUT image so we can see whats going on in the deepest shadows and dark areas (Low Key areas) of the Slog capture range.
The third press of the button returns the image to the normal range that the LUT can show.
So by using the High / Low Key function you can see the entire range that the camera is capturing, check for over exposure or under exposure issues without having to turn the LUT on or off. This is a really useful function that I recommend you take advantage of when shooting with CineEI and LUT’s. However do remember to make sure you are back to the standard view range when setting your exposure level.
Bit of a rant here as one of the roles I perform on some shoots is that of DIT or Digital Imaging Technician.
What does a good DIT do? Well lots of things. One of the key roles of the DIT is to work with both the camera department and post production to ensure that the shoots proposed workflow will work. Some DIT’s may even oversee some parts of the post process, ensuring the footage is correctly handled all the way through the production chain. On set the DIT may be responsible for camera setup including any paint settings, gamma curve and gamut choices. The DIT will work with the DP to create LUT’s for use in the camera, on set as well as in post production. Then the DIT may (but often not) be responsible for gathering the media and rushes from the camera and copying it or backing it up. Next the DIT will look at the footage checking for issues, not just file corruption but any other technical aspects that may trip up post production, possibly apply a first pass grade on set so that the production team can get an idea of how the footage will end up looking.
A good DIT will have a sound technical knowledge of the way a video camera works, how to set it up, how to best handle the footage plus how to ensure the footage passes through the post production chain. It is not an easy role as a good DIT can make or break a production.
But often the term DIT is used to refer to a person tasked with copying footage from the camera. This role is more normally referred to as “Data Wrangler”. A good Data Wrangler will manage the backup of the rushes from the camera. All backups will have their data integrity checked and log sheets with checksums and details of the contents of the files will be produced. As footage is passed from the shoot to post the data wrangler should keep a log of who has received what and track all copies of the footage. Sometimes a Data Wrangler will also perform some roles similar to a DIT such as producing footage with a first pass grade applied or viewing copies of footage. The role of the Data Wrangler is extremely important. But a Data Wrangler will not normally be asked to produce LUT’s, setup a camera or oversea any part of the post production process.
Finally the term DIT gets most abused when it is used to refer to a runner or other production assistant who is simply tasked with copying the footage from the camera to a hard drive or other backup. Sadly this incredibly important job is often given to the least skilled or cheapest person on the set. It’s often perceived as an easy job that anyone can do. But it really needs to be done with great care, lots of checks followed by lots more checks because a mistake at this stage could put the entire production at risk. Checksums should be used, log sheets made and you want to use a reliable person that won’t be distracted and will treat this highly responsible role with the respect it deserves. Not use some spotty faced kid that spends his time on facebook waiting for the copies to finish when he could be playing back and checking clips for problems.
For the past 18 months almost everything I have shot has been shot at 4K. I have to say that I am addicted to the extra resolution and the quality of the images I am getting these days from my PMW-F5 and R5 raw recorder. In addition, the flexibility I get in post from shooting in 4K to crop and re-frame my shots is fantastic.
BUT: I have a Sony A7s on order. Us European buyers won’t get them until late July as the European model is different to the US model, in the US the cameras are based on the NTSC system, so do 24, 30 and 60fps while the European models are based on PAL, so do 25 and 50fps but with the addition of 24fps as well. Right now there are no realistic portable 4K recording option for the A7s, these will come later. So this means that for a now if I want to shoot with the A7s it will have to be HD.
Is that really such a bad thing? Well, no not really. It’s a sideways step not a backwards one, as I’m getting the A7s for a very specific roll.
Image quality is a combination of factors. Resolution is just one part of the image quality equation. Dynamic range, contrast, noise, colour etc all contribute in more or less equal parts to getting a great image. The A7s delivers all of these very well. If I am delivering in HD then most of the time I don’t NEED 4K. 4K is nice to have and if I can have 4K then I will take advantage of it, but for an HD production it is definitely not essential in most cases.
The reason for getting the A7s is that I want a pocket sized camera that I can use for grab and go shooting. It offers amazing low light performance and great dynamic range thanks to it’s use of S-Log2. I’m really excited about the prospect of having a camera as sensitive as the A7s for next years Northern Lights trips. I should be able to get shots that have not been possible before, so even at “only” HD the A7s will get used along side my 4K F5/R5.
In the future there will of course be external 4K recording options for the A7s making it even more versatile. I probably won’t always use them with the A7s but the option will be there when I NEED 4K.
Given the choice, if I can shoot in 4K I almost always will. I want to shoot in 4K whenever I can. It really does give me much greater post production flexibility, for example I can shoot a wide shot of an interview in 4K and then crop in for a mid shot or close up if I’m delivering in HD. So 4K will always be very high on my priority list when choosing a camera. But if you can’t afford 4K and are still delivering in HD then worry not. It’s probably better to have a well optimised HD camera than a cheap, poor quality less than perfect 4K camera. Don’t let 4K trick you into buying a lesser camera just because the lesser camera has 4K.
Well shot HD still looks fantastic, even on a big screen. Most movies are shown at 2K and few people complain about the quality of most blockbusters. So, HD is still good enough, 4K has not made HD obsolete or degraded the quality of existing HD cameras.
But is good enough? Good enough for you and your clients? I am passionate about getting great images, so I don’t just want good enough, I want the best I can get, so I’m a 4K convert, as are some of my clients. I’m actually delivering content in 4K for many of my customers. But sometimes, 4K isn’t practical, so in these cases I’ll just get the very best HD I can (hence the A7s for very portable and ultra low light shooting).
The bottom line is that right now, maybe you don’t need 4K, but it’s OK to want 4K. You may need 4K very soon as it becomes more mainstream (some nice Samsung and LG 4K TV’s are now available in the $1.5K/£1K price range). 4K might bring you many benefits in post production, but that doesn’t mean you need it, not yet at least. But once you do start to shoot in 4K there is no going back and while you might still not need 4K, you’ll probably find that you do actually need 4K. 🙂
Video sensor size measurement originates from the first tube cameras where the size designation would have related to the outside diameter of the glass tube. The area of the face of the tube used to create the actual image would have been much smaller, typically about 2/3rds of the tubes outside diameter. So a 1″ tube would give a 2/3″ diameter active area, within which you would have a 4:3 frame with a 16mm diagonal.
An old 2/3″ Tube camera would have had a 4:3 active area of about 8.8mm x 6.6mm giving an 11mm diagonal. This 4:3 11mm diagonal is the size now used to denote a modern 2/3″ sensor. A 1/2″ sensor has a 8mm diagonal and a 1″ sensor a 16mm diagonal.
Yes, it’s confusing, but the same 2/3″ lenses as designed for tube cameras in the 1950’s can still be used today on a modern 2/3″ video camera and will give the same field of view today as they did back then. So the sizes have stuck, even though they have little relationship with the physical size of a modern sensor. A modern 2/3″ sensor is nowhere near 2/3 of an inch across the diagonal.
This is why some manufacturers are now using the term “1 inch type”, as this is the active area that would be the equivalent to the active area of an old 1″ diameter Vidicon/Saticon/Plumbicon Tube from the 1950’s.
Well I have set myself quite a challenge here as this is a tough one to describe and explain. Not so much perhaps because it’s difficult, but just because it’s hard to visualise, as you will see.
First of all the dictionary definition of Gamut is “The complete range or scope of something”.
In video terms what it means is normally the full range of colours and brightness that can be either captured or displayed.
I’m sure you have probably heard of the specification REC-709 before. Well REC-709, short for ITU-R Recommendation, Broadcast Television, number 709. This recommendation sets out the display of colours and brightness that a television set or monitor should be able to display. Note that it is a recommendation for display devices, not for cameras, it is a “display reference” and you might hear me talking about when things are “display referenced” ie meeting these display standards or “scene referenced” which would me shooting the light and colours in a scene as they really are, rather than what they will look like on a display.
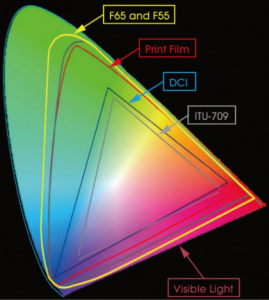
Anyway…. Perhaps you have seen a chart or diagram that looks like the one below before.
Sony colour gamuts.
Now this shows several things. The big outer oval shape is what is considered to be the equivalent to what we can see with our own eyes. Within that range are triangles that represent the boundaries of different colour gamuts or colour ranges. The grey coloured triangle for example is REC-709.
Something useful to know is that the 3 corners of each of the triangles are whats referred to as the “primaries”. You will hear this term a lot when people talk about colour spaces because if you know where the primaries (corners) are, by joining them together you can find the size of the colour space or Gamut and what the colour response will be.
Look closely at the chart. Look at the shades of red, green or blue shown at the primaries for the REC-709 triangle. Now compare these with the shades shown at the primaries for the much larger F65 and F55 primaries. Is there much difference? Well no, not really. Can you figure out why there is so little difference?
Think about it for a moment, what type of display device are you looking at this chart on? It’s most likely a computer display of some kind and the Gamut of most computer displays is the same size as that of REC-709. So given that the display device your looking at the chart on can’t actually show any of the extended colours outside of the grey triangle anyway, is it really any surprise that you can’t see much of a difference between the 709 primaries and the F65 and F55 primaries. That’s the problems with charts like this, they don’t really tell you everything that’s going on. It does however tell us some things. Lets have a look at another chart:
SGamuts Compared.
This chart is similar to the first one we looked at, but without the pretty colours. Blue is bottom left, Red is to the right and green top left.
What we are interested in here is the relationship between the different colour space triangles. Using the REC-709 triangle as our reference (as that’s the type of display most TV and video productions will be shown on) look at how S-Gamut and S-Gamut3 is much larger than 709. So S-Gamut will be able to record deeper, richer colours than 709 can ever hope to show. In addition, also note how S-Gamut isn’t just a bigger triangle, but it’s also twisted and distorted relative to 709. This is really important.
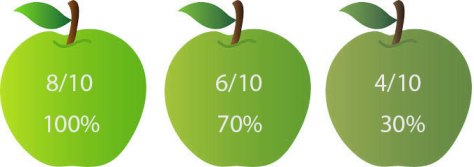
You may also want to refer to the top diagram as well as I do my best to explain this. The center of the overall gamut is white. As you draw a line out from the center towards the colour spaces primary the colour becomes more saturated (vivid). The position of the primary determines the exact hue or tone represented. Lets just consider green for the moment and lets pretend we are shooting a shot with 3 green apples. These apples have different amounts of green. The most vivid of the 3 apples has 8/10ths of what we can possibly see, the middle one 6/10ths and the least colourful one 4/10ths. The image below represents what the apples would look like to us if we saw them with our eyes.
The apples as we would see them with our own eyes.
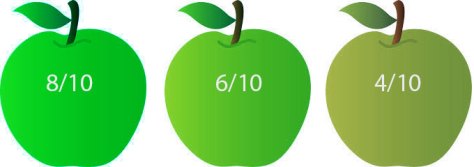
If we were shooting with a camera designed to match the 709 display specification, which is often a good idea as we want the colours to look right on the TV, the the greenest, deepest green we can capture is the 709 green primary. lets consider the 709 green primary to be 6/10ths with 10/10ths being the greenest thing a human being can see. 6/10ths green will be recorded at our peak green recording level so that when we play back on a 709 TV it will display the greenest the most intense green that the display panel is capable of. So if we shoot the apples with a 709 compatible camera, 6/10ths green will be recorded at 100% as this is the richest green we can record (these are not real levels, I’m just using them to illustrate the principles involved) and this below is what the apples would look like on the TV screen.
6/10ths Green and above recorded at 100% (our imaginary rec-709)
So that’s rec-709, our 6/10ths green apple recorded at 100%. Everything above 6/10 will also be 100% so the 8/10th and 6/10ths green apples will look more or less the same.
What happens then if we record with a bigger Gamut. Lets say that the green primary for S-Gamut is 8/10ths of visible green. Now when recording this more vibrant 8/10ths green in S-Gamut it will be recorded at 100% because this is the most vibrant green that S-Gamut can record and everything less than 8/10 will be recorded at a lower percentage.
But what happens if we play back S-Gamut on a 709 display? Well when the 709 display sees that 100% signal it will show 6/10ths green, a paler less vibrant shade of green than the 8/10ths shade the camera captured because 6/10ths is the most vibrant green the display is capable of. All of our colours will be paler and less rich than they should be.
The apples recorded using a big gamut but displayed using 709 gamut.
So that’s the first issue when shooting with a larger colour Gamut than the Gamut of the display device, the saturation will be incorrect, a dark green apple will be pale green. OK, that doesn’t sound like too big a problem, why don’t we just boost the saturation of the image in post production? Well if the display is already showing our 100% green S-Gamut signal at the maximum it can show (6/10ths for Rec-709) then boosting the saturation won’t help colours that are already at the limit of what the display can show simply because it isn’t capable of showing them any greener than they already look. Boosting the saturation will make those colours not at the limit of the display technology richer, but those already at the limit won’t get any more colourful. So as we boost the saturation any pale green apples become greener while the deep green apples stay the same so we loose colour contrast between the pale and deep green apples. The end result is an image that doesn’t really look any different that it would have done if shot in Rec-709.
Saturation boosted S-Gamut looks little different to 709 original.Sony colour gamuts.
But, it’s even worse that just a difference to the saturation. Look at the triangles again and compare 709 with S-Gamut. Look at how much more green there is within the S-Gamut colour soace than the 709 colour space compared to red or blue. So what do you think will happen if we try to take that S-Gamut range and squeeze it in to the 709 range? Well there will be a distinct colour shift towards green as we have a greater percentage of green in S-Gamut than we should have in Rec-709 and that will generate a noticeable colour shift and the skewing of colours.
Squeezing S-Gamut into 709 will result in a colour shift.
This is where Sony have been very clever with S-Gamut3. If you do take S-Gamut and squeeze it in to 709 then you will see a colour shift (as well as the saturation shift discussed earlier). But with S-Gamut3 Sony have altered the colour sampling within the colour space so that there is a better match between 709 and S-Gamut3. This means that when you squeeze S-Gamut3 into 709 there is virtually no colour shift. However S-Gamut3 is still a very big colour space so to correctly use it in a 709 environment you really need to use a Look Up Table (LUT) to re-map it into the smaller space without an appreciable saturation loss, mapping the colours in such a way that a dark green apple will still look darker green than a light green apple but keeping within the boundaries of what a 709 display can show.
Taking this one step further, realising that there are very few, if any display devices that can actually show a gamut as large as S-Gamut or S-Gamut3, Sony have developed a smaller Gamut known as S-Gamut3.cine that is a subset of S-Gamut3.
The benefit of this smaller gamut is that the red green and blue ratios are very close to 709. If you look at the triangles you can see that S-Gamut3.cine is more or less just a larger version of the 709 triangle. This means that colours shifts are almost totally eliminated making this gammut much easier to work with in post production. It’s still a large gamut, bigger than the DCI-P3 specification for digital cinema, so it still has a bigger colour range than we can ever normally hope to see, but as it is better aligned to both P3 and rec-709 colourists will find it much easier to work with. For productions that will end up as DCI-P3 a slight saturation boost is all that will be needed in many cases.
So as you can see, having a huge Gamut may not always be beneficial as often we don’t have any way to show it and simply adding more saturation to a seemingly de-saturated big gamut image may actually reduce the colour contrast as our already fully saturated objects, limited by what a 709 display can show, can’t get any more saturated. In addition a gamut such as S-Gamut that has a very different ratio of R, G and B to that of 709 will introduce colour shifts if it isn’t correctly re-mapped. This is why Sony developed S-Gamut3.cine, a big but not excessively large colour space that lines up well with both DCI-P3 and Rec-709 and is thus easier to handle in post production.
Blue and purple fringes around edges in photos and videos are nothing new. Its a problem we have always had. telescopes and binoculars can also suffer. It’s normally called chromatic aberration or CA. When we were all shooting in standard definition it wasn’t something that created too many issues, but with HD cameras and 4K cameras it’s a much bigger issue because as you increase the resolution of the system (camera + lens) generally speaking, CA becomes much worse.
As light passes through a glass lens the different wavelengths that result in the different colours we see are diffracted and bet by different amounts. So the point behind the lens where the light comes into sharp focus will be different for red light to blue light.
A simple glass lens will bend red, green and blue wavelengths by different amounts, so the focus point will be slightly different for each.
The larger the pixels on your sensor the less of an issue this will be. Lets say for example that on an SD sensor with big pixels, when the blue light is brought to best focus the red light is out of focus by 1/2 a pixel width. All you will see is the very slightest red tint to edges as a small bit of out of focus red spills on to the adjacent pixel. Now consider what happens if you increase the resolution of the sensor. If you go from SD to HD the pixels need to made much smaller to fit them all on to the same size sensor. HD pixels are around half the size of SD pixels (for the same size sensor). So now that out of focus red light that was only half the width of an SD pixel will completely fill the adjacent pixels so the CA becomes more noticeable.
In addition as you increase the resolution of the lens you need to make the focus of the light “tighter” and less blurred to increase the lenses resolving power. This has the effect of making the difference between the focus points of the red and blue light more distinct, there is less blurring of each colour, so less bleed of one colour into the other and as a result more CA as the focus point for each wavelength becomes more distinct. When each focus point is more distinct the difference between the in focus and out of focus light becomes more obvious, so the colour fringing becomes more obvious.
This is why SD lenses very often show less CA than HD lenses, a softer more blurry SD lens will have less distinct CA. Lens manufacturers will use exotic types of glass to try to combat CA. Some types of glass have a negative index so blue may focus closer than red and then other types of glass may have a positive index so red may focus closer than blue. By mixing positive and negative glass elements within the lens you can cancel out some of the colour shift. But this is very difficult to get right across all focal lengths in zoom lenses so some CA almost always remains. The exotic glass used in some of the lens elements can be incredibly expensive to produce and is one of the reasons why good lenses don’t come cheap.
Rather than trying to eliminate every last bit of CA optically the other approach is to electronically reduce the CA by either shifting the R G B channels in the camera electronically or reducing the saturation around high contrast edges. This is what ALAC or CAC does. It’s easier to get a better result from these systems when the lens is precisely matched to the camera and I think this is why the CA correction on the Sony kit lenses tends to be more effective than that of the 3rd party lenses.
Sony recently released firmware updates for the PMW200 and PMW300 cameras that improves the performance of the electronic CA reduction of these cameras when using the supplied kit lenses.
One way to reduce the noise in a video camera image is to reduce the cameras gain. One way to increase the brightness of the image is to add gain.
We all know that increasing the gain to lets say +6db will increase noise and generally the reverse holds true when you reduce the gain, the noise typically reduces and this may be helpful if you are going to do a lot of effects work, or just want a clean image.
However in most cases adding or removing gain reduces the cameras dynamic range as it will artificially clip or limit your low key or high key parts of the image. The maximum illumination level that a camera can capture is limited by the sensor or the gamma curves that the camera has. The black level or darkest part of the image is the point where the actual image signal compared to the sensor noise level is high enough to allow you to see some actual picture information (also known as noise floor). So the dynamic range of the camera is normally the range between the sensors noise floor and recording or sensor clipping point.
To maximise the cameras dynamic range the designers will have carefully set the nominal zero db gain point (native ISO) so that the noise floor is at or very close to black and the peak recording level is reached at the point where the sensor itself starts to clip.
The gain of the camera controls the video output and recording level, relative to the sensors signal level. If you use -3db gain you attenuate (reduce) the relative output signal. The highlight handling doesn’t change (governed by the sensor clipping or gamma curve mapping) but your entire image output level gets shifted down in brightness and as a result you will clip off or loose some of your shadow and dark information, so your overall dynamic range is also reduced as you can’t “see” so far into the shadows. Dynamic range is not just highlight handling, it is the entire range from dark to light. 3db is half a stop (6db = 1 stop) so -3db gain reduces the dynamic range by half a stop, reducing the cameras underexposure range without (in most cases) any change to the over exposure range, so overall the total dynamic range is reduced.
When you add gain the reverse happens. Generally how far the sensor can see into the shadows is limited by the sensors noise floor. Add 6db of gain and you will make the darkest parts of the image brighter by 6db, but you will also raise the noise level by the same amount. So while you do end up with brighter shadow details you can’t actually see any more picture information because the noise level has increased by the same amount. At the top end as the brightest sensor output is mapped to the maximum recording level at 0db, when you add gain this pushes the recording level beyond what can be recorded, so you loose 6db off the top end of your recordings because the recordings and output clips 6db earlier. So positive gain maintains the same shadow range but reduces the highlight recording range by 6db.
However you use it gain tends to reduce your dynamic range. Adding gain to cope with poor lighting tends to be the lesser of the two evils as generally if your struggling for light then overexposure and blown out highlights is often the last of your worries.
Negative gain is sometimes used in camera to try to reduce noise, but the reality is that you are loosing dynamic range. Really a better solution would be to expose just a tiny bit brighter and then bring your levels down a bit in post production.
Manage your privacy
To provide the best experiences, we use technologies like cookies to store and/or access device information. Consenting to these technologies will allow us to process data such as browsing behavior or unique IDs on this site. Not consenting or withdrawing consent, may adversely affect certain features and functions.
Functional
Always active
The technical storage or access is strictly necessary for the legitimate purpose of enabling the use of a specific service explicitly requested by the subscriber or user, or for the sole purpose of carrying out the transmission of a communication over an electronic communications network.
Preferences
The technical storage or access is necessary for the legitimate purpose of storing preferences that are not requested by the subscriber or user.
Statistics
The technical storage or access that is used exclusively for statistical purposes.The technical storage or access that is used exclusively for anonymous statistical purposes. Without a subpoena, voluntary compliance on the part of your Internet Service Provider, or additional records from a third party, information stored or retrieved for this purpose alone cannot usually be used to identify you.
Marketing
The technical storage or access is required to create user profiles to send advertising, or to track the user on a website or across several websites for similar marketing purposes.