IMPORTANT UPDATE: There are two different speeds of S series cards. You should only use the faster E stream cards. You can tell which is which by the part number. QDS64E and QDS32E are second generation fast S series. Any other S series is a slower first generation S card and should be treated as H Class cards.
DO NOT USE THE NEWER 2933x CARDS THESE DO NOT WORK WITH THE FS7.
It was brought to my attention at the BVE show last week that Sony XQD cards were in short supply. This is probably due to the run away success of the PXW-FS7. More cameras sold means more media required.
So I decided to test out a Lexar XQD card in my PXW-FS7 and in my PMW-F5 (via a QDA-EX1 SxS to XQD adapter).
The good news is that it appears to work just fine, which shouldn’t really be a surprise as the Lexar cards are bonafide XQD cards. It’s also worth noting at this point that you don’t have to use the latest and greatest, extremely fast “G” series XQD cards from Sony. You can also use the slower H, N and S series cards. Although I personally would stick to just the faster G and S series cards as these can be used for all modes and frame sizes.
G Series – 400MB/S OK All Frame Rates/Modes.
S Series (QDS64E and QDS32E only) – 180MB/S OK All Frame Rates/Modes.
N Series – 125MB/S OK for XAVC-L all frame sizes/rate. XAVC-I HD up to 30fps plus 24fps 3840×2160. OK for Mpeg2, No S&Q, No ProRes or DNxHD.
H Series – 125MB/S OK for XAVC-L HD up to 60fps. No XAVC-I, No 4k/UHD, No S&Q. No ProRes/DNxHD
Lexar 1100x -168MB/S – Not tested, but should be OK, as Sony H series, maybe N series.
Lexar 1333x – 200MB/S – Tested all modes and frame rates.
Lexar have two classes of card a slower 1100x – 168MB/s card and a faster 1333x – 200MB/s card. For my tests I chose the faster 1333x card as this wasn’t much more expensive than the slower card and on paper at least matches or betters the Sony S series cards which can be used for all modes and frame rates. The 1100x card should also work just at least as well as an H series card, maybe N series, but I have not tested one and would recommend testing before use.
I tested the card across a large range of frame rates and resolutions going all the way up to UHD 60fps on the FS7 and SStP on the F5 as well as S&Q all the way to 180fps. I had no errors or other major problems. I did notice in the F5 that the it takes a little longer for the red light above the record slot to return to green at the end of a recording. While the slot light is red you cannot start a new recording so you do need to be aware that you may have a momentary delay before you can record the next clip.
I purchased the Lexar 1333x card via Amazon in the UK and it cost me £127 inc VAT for a 64GB card, which is quite a bit cheaper than a Sony G series card (currently around £220 in VAT). So the Lexar cards offer a perfectly good alternative to the Sony cards at a lower cost with only a slight decrease in off-load speed. As well as the PMW-F5/F55 and PXW-FS7 I see no reason why these cards should not also work in the PMW-Z100, FDR-AX1 or via the QDA-EX1 adapter in the PMW-200, PXW-X160, X180 and X200, but I have not tested this.
I can’t comment on long term reliability as I’ve only had the card a couple of days. I see no reason why the Lexar cards should last as long as the Sony cards. Heck looking at a Sony G series card and the Lexar card side by side the materials appear to be identical, it looks to be exactly the same plastic (even the texturing is the same) and the same brushed metal. The Sony card is marked as made in Japan and the Lexar card as a product of Taiwan.
CARD READERS.
The new Sony G series cards have a different interface to the older Sony XQD cards and the Lexar cards. Currently when you buy a G series card it comes with a USB3 card reader. This reader will ONLY read G series XQD cards.
You can buy USB3 card readers for the other XQD cards for around £25.00. These readers will normally work with any XQD card, including the G series. But when you use a G series card in the non G series readers you get a reduced read speed of up to 168MB/s, which is fast, but not as fast as the dedicated G Series reader.
I was lucky enough to get a chance to go out and shoot with a pre-production PXW-FS7 in Amsterdam during IBC. Guess what? It makes some very nice pictures!
In case you’ve had your head in the sand the last couple of weeks the PXW-FS7 is a new super35mm camcorder from Sony. It uses the same sensor as the Sony PMW-F5 and a lot of the camera is, I am sure, shared with the F5. Even the menu’s are almost exactly the same. It can record 4K internally on XQD cards using Sony’s XAVC codec. When the cameras start shipping next month you will be able to record 3840×2160 UHD/QuadHD as well as HD. Next year there will be an update to add 4096×2160 at up to 60fps.
Want to shoot slow motion? That’s no problem as the camera can go up to 180fps internally in HD and if you add an external raw recorder you can stretch that out to 240fps.
The XAVC codec options are great. You can choose between I frame for easy editing or long GoP which gives a smaller file size but needs more processing power to decode. The 10 bit 422 image quality is very similar in both cases, so choose which to use based on how much recording media you have and how powerful your edit machine is. If you still need the legacy HD XDCAM Mpeg codec then you have that too.
Extension Unit:
By adding the optional extension box to the rear of the camera you can even record ProRes HQ to the XQD cards (after a firmware update early next year). The extension box also adds the raw output needed to record raw to an external recorder such as The Odyssey 7Q or Sony R5 recorder. On top of that you also gain Timecode in and out plus genlock. To power all of this (and the camera) the extension box has a V-Mount battery plate on it’s rear. When not using the extension box the camera runs off BP-U type batteries, the same 12V batteries as used by an EX1 or PMW200 etc.
The right side of the FS7 showing the XLR connectors.
The FS7 has two different shooting modes. In custom mode the camera behaves pretty much like any other conventional camera where what you see in the viewfinder is what’s recorded on the cards. You can alter the cameras gamma curve, matrix and other settings, but basically what you see is what you get. The other mode is the CineEI mode (just like an F5 or F55) and in this mode the camera records using SGamut3.cine and S-Log3. The aim being to capture the maximum possible dynamic range and in this mode the cameras sensitivity is locked to it’s native ISO of 2000. As S-Log3 results in a very flat picture (that’s great for grading and post work) the camera includes the ability to add a range of Look Up Tables (LUT’s) to the viewfinder or HDSDI output. LUT’s help you better judge exposure and give a more pleasing image prior to grading. You can even generate your own LUT’s in software such as Resolve and load them in to the camera. For exposure assistance the camera has a range of tools including a waveform, vectorscope or histogram display as well as zebras.
The FS7’s handgrip and control unit.
Ergonomically the camera is very interesting. It has Sony’s E-Mount lens mount so you can use just about any lens you want simply by adding a lens adapter. Using a metabones or Commlite adapter you can use Canon EF lenses with ease. Likewise PL or Nikon lenses with the appropriate adapters.
Designed to sit on the front of your shoulder and supplied with a handgrip on an adjustable arm (attached via a standard Arri type rosette) the camera is easy to use. There are a couple of assignable buttons on the hand grip as well as a small joystick for navigating through the cameras menu system. A large zoom rocker will control any E-Mount zoom lenses used such as the new 28-135mm f4 lens and a further assignable dial wheel can be used to control the lenses aperture or other functions. The hand grip uses the LanC protcol so it should be possible to use other LanC devices with this camera.
The PXW-FS7 with the extension unit fitted, a V-Mount battery and a Vocas base plate.
The camera is a little front heavy as it sits on the front of your shoulder. When you add the extension box and a V-mount battery the balance is much better as the weight is now set much further back. With a 3rd party shoulder mount such as the new Vocas one or the dedicated Sony VCT-FS7 mount the camera can be turned into a true shoulder mount camera.
The LCD viewfinder is mounted on a thin arm that gives it forwards and backwards adjustment as well as up and down adjustment, but there is no left right adjustment.
The viewfinder on the PXW-FS7
Overall I think the viewfinder is the weakest part of this camera. The images in the VF are quite reasonable (its 940×560 resolution) but the mounting mechanism and loupe are not the best. Maybe this will be improved before the camera ships. I made a lot of use of one of the hand grip assignable buttons to provide focus magnification while shooting to ensure focus was spot on and it’s nice to have the focus mag function so easily accessible.
One issue I did find with the arm for the hand grip was that unless you fold it up out of the way you can’t slide the camera on and off a tripod. If you are using a base plate this is less of a problem but with a bare camera it’s a bit of a pain.
The XQD card slots on the PXW-FS7, also there is an SD card slot for loading LUT’s, user files and setup information.
I found the operation of the camera almost identical to the PMW-F5. There are some differences however. The FS7 does not have a 2K center scan mode for the sensor. This is used on the F5/F55 to eliminate aliasing problems when shooting above 60fps where the 4K sensor is read out as a 2K sensor. On the F5/F55 if you don’t want to use the 2K center scan mode you can fit a special 2K low pass optical filter to eliminate aliasing above 60fps, but again this is not possible on the FS7.
Another thing the FS7 doesn’t have is the large side display of the F5 and F55. For conventional shooting this is not really a big deal. But if you are using the CineEI mode where you may be using LUT’s on different outputs not having this information clearly displayed is a bit of a nuisance. In fact during the shoot with the FS7 at one point I though I was shooting with a LUT when in fact I was not. The only way to be sure of how everything is set is to go into the cameras menu system.
The PXW-FS7 fitted with the 28-135mm f4 servo zoom lens.
But what about the image quality? Frankly it’s amazing! For the money the images this camera produces are remarkable. It is using the F5’s sensor and it does have 14 stops of dynamic range. S-log3 is a great gamma curve and the camera is very low noise, even at it’s native 2000 ISO. It was hard to tell as most of the shooting took place at night, but initially it doesn’t look like there is any difference between the quality of the footage from the FS7 and the PMW-F5. Great colours, low noise, high dynamic range with very pleasing roll off what more can you want? One area where there will be a difference is with raw. The PMW-F5 takes the Sony R5 directly docked on it’s back. The raw form the F5 is 16 bit while the raw from the FS7 is going to be recorded on an external recorder at only 12 bits. 12 bit linear raw is really pushing the limits of what is needed for linear raw. However we do already know that the 12 bit raw from Sony’s FS700 works well, so this should be no different.
Where this camera will be really good is when combined with the new 28-135mm f4 servo zoom lens. Typically par-focal lenses with this kind aperture and zoom ratio cost in excess of $30K. This lens will be around $2.7K. Being able to zoom in and out on a large sensor camera smoothly really increases the cameras flexibility making it much easier to use in run and gun type situations. The lens is never going to be an incredible performer at this price and when wide open I did find it a little soft, but for shear ease of use it’s really remarkable. The FS7 combined with this lens will be a killer combination and that’s why I have ordered one. It’s NOT replacing my F5, I love my F5 and I think that the F5 is a much better camera for drama or studio type shoots. But the FS7 will be very handy for fast and fluid productions. In addition, for the money this camera is an absolute bargain.
When you think of cine lenses then there are several brands that immediately come to mind. Zeiss, Arri, Cooke and Angenieux are probably the most familiar names but there are many others too. One brand I have been looking at more and more recently is Schneider.
Schneider Kreuznach have been making lenses since 1913. Based in Kreuznach in Germany they have long been know for their innovative designs and they won an Oscar in 2001 for Technical Achievement for their Super-Cinelux motion picture lenses.
A few years ago I met one of their lens engineers at NAB. I don’t think I have ever met a man as passionate about a lens design before or since. Every Schneider lens that I have ever used has been brilliant. They always seem to have near zero breathing, are always extremely solidly built and produce great images. So when I got a call from Manfrotto, the UK distributor to see if I would like a chance to play with some of the new Xenon FF (Full Frame) lenses I grabbed the opportunity.
Another view of the 50mm Schneider Xenon FF lens.
The Xenon FF lenses are cine style lenses available with either Canon, Nikon or PL mounts. The mounts can be changed should you need to switch mounts at a later date. They are priced to directly compete with the Zeiss compact primes. At the moment there are only 3 lenses available, a 35mm, 50mm and 75mm, all are T2.1. In the near future there will also be a 25mm and 100mm T2.1 as well as an 18mm T2.4 Yum Yum! I’d love to have one of those for my Northern Lights or Storm Chasing expeditions. They are all the same size, have a 100mm front diameter, all have a 95mm lens thread. This means that swapping lenses during a shoot is straight forward as you don’t have to change Matte Box donuts or re-position the follow focus if you’re using one. Being Full Frame lenses and rated for 4K these should be a great match with the Sony A7s.
I got to play with a 35mm and 50mm with EF mount and decided to try them on my full frame A7s shooting in HD as well as taking a few still photos (which are the equivalent to 4.5K) on a cloudy and rainy day.
14 blade iris and EF mount on the 35mm Xenon FF.
Straight out of the box you cannot help but be impressed by the build quality. These are substantial lenses, weighing in at around 1.25kg each with the EF mount. I could not find any plastic on these lenses, they look built to last.
The focus scale is large and easy to read, each lens being individually calibrated. Focus travel is a full 300 degrees. Even as you get to the far end of the focus ring the distances are still nicely spaced. From 9ft(3m) to infinity is around 100 degrees. Compare that to most DSLR lenses where the same focus range might be compressed into just 5 or 10 degrees and you can see that precise focus is much easier. Although sometimes a very large focus travel can make focus pulls a little harder simply because or the large distance the focus ring has to be turned. But I’ll take a big focus throw lens over small throw any day.
The lenses have 14 curved iris blades giving a very round aperture even when stopped right down. I love peering into these lenses at the aperture blades as they are a work of art (but really hard to take a photo of). You can also see in the photo that the coatings of the lens are a distinct orange colour.
Photo taken with the 50mm Xenon FF. Click on the image to enlarge or view at original resolution.
In practice the lenses did not disappoint. It did seem a bit odd to have such a large and heavy lens on the diminutive A7s, but as image quality starts with the lens a good lens can make all the difference. I shot at various apertures from wide open at T2.1 down to about T8 and didn’t notice any significant change in resolution across the range (I took photos as well as video to check the lens performance).
The lenses do tend to flare a little bit, the 35mm more than the 50mm, but I thought the flares were quite pleasing, others may disagree. Take a look at the video to get an idea of what they are like. There was a bit more flare at T2.1 compared to T2.8 or T4 on both lenses.
I did some big focus pulls to see how much breathing there was and as with all the Schneider lenses I’ve used breathing was very minimal. There is some breathing, these are not like the Cine-Xenars which have virtually zero breathing, but the breathing really is small.
Frame grab, shooting through trees. 35mm Xenon FF and A7s.
Another test shot was to shoot some tree branches silhouetted against the sky to check for CA and colour fringing. Basically I can’t see any. Maybe right out in the very corners of the frame there is the tiniest bit of CA, but you really have to hunt for it.
Shopping basket frame grab. 35mm Xenon FF. I love the smoothness to the highlights.
Colour wise there is no obvious colour shift, if anything perhaps very, very slightly warm. As expected the lenses are very sharp and crisp, from corner to corner, but not excessively so. I found that the images contained a lot of detail but had a pleasing roundness too them that I really like. I shot a chrome shopping basket and the reflections of the bright chrome look really nice. I think this is a combination of a little bit of flare without excessive sharpness. I think it’s a very nice natural look. This can be one of the benefits of a video lens over a stills lens. Stills lenses must be incredibly sharp to work with 24 or 36 mega pixel sensors. Sometimes this results is a super sharp image that lacks character. Arguably if you start with a very sharp image you can always soften it a bit in post, but sometimes it’s nice to start off with a more rounded image. Look at how popular Cooke lenses are, they are well known for their rounded rather than super sharp images.
As expected from a 14 blade iris the bokeh is very creamy and smooth. Both near and far out of focus areas look very good indeed. Out of focus edges are smooth and don’t show any obvious double edges or other distortions.
It’s really easy to get a very shallow DoF with a full frame sensor. Xenon FF 50mm and A7s.
Take a look at the video for a better idea of the lens flares and the overall image quality. I really like the look you get from these lenses and wouldn’t mind a set of them for myself. I feel they have a lot in common with Cooke lenses, but at a much more affordable price. I hope to test them further in the near future and to a wider variety of scenes. I suspect they will be very good on skin tones and faces.
So I have had my A7s for 10 days now. I took it on holiday with me shooting both stills and video, getting a feel for the camera in a wide range of situations from brilliant sunshine to shooting under candlelight.
It has been an absolute delight using it, with one small caveat: No ND filters built in and boy, does this camera need ND filters! I see that there are now some lens adapters with ND faders built in from Fotodiox and HolyManta. I hope to test these soon, but these ND adapters are dumb adapters so only for fully manual lenses. So a set of front of lens ND’s or a good ND fader is essential to get the best from the A7s.
Lens wise I don’t have the greatest range of full frame lenses. I have my Samyang 24, 35 and 85mm full frame primes which work really well with the camera and the Sony 28-70mm f3.5-f5.6 kit lens and some old f1.4 nikkors. Actually the kit lens has really surprised me, for what it is, it does give a nice image. Almost all my lenses are Canon EF mount so I have been using an adapter. The one I have is the Commlite Full frame E to EF smart adapter, which has worked perfectly (it supports a wider range of lenses than my early model metabones adapter). For some longer focal lengths I’ve been playing with the new Tamron 16-300mm APS-C lens. One side note is that if you use an APS-C lens with a 1.4x teleconverter, in most cases the image circle will then fill the full frame sensor. I will be testing this further and posting some sample images soon. This might be handy for 4K video when you really need to use the full sensor.
Anyway, back to the camera. I had forgotten how nice full frame can be to work with. For photo’s the shallow DoF is a delight. For video you have much greater control over your DoF. As the camera is 3200 ISO you can shoot in the dark with ease and get very natural looking images without having to add extra light. SLog2 is great for capturing a huge dynamic range video. Today and tomorrow I am pushing the Slog2 though some torture and exposure tests to find the exposure sweet spot for Slog2 and 8 bit recordings. I’m also developing some LUT’s to use with the camera and I’ll have a full workflow guide to slog2 on the A7s in the next couple of weeks.
I really love that this little camera can shoot video that is of really remarkably good quality. Most people don’t realise your shooting video with it. It’s really quite scary just how good the video is, it’s starts you thinking… do I need an F5 when the video from the A7s is so good? But then when I started to set up the A7s for my Slog2 torture tests and added a monitor, the battery to power the monitor, rods, matte box, external recorder etc it soon turned into a frankenstien monster of a camera rig. The F5 is so much nicer to use in this respect. For casual shooting, covert filming or as a grab camera the A7s is pretty incredible and I will use it for a lot of things, but it’s not a replacement for my F5/R5.
One very nice feature of the A7s is the silent shutter stills mode. In this mode the camera makes use of the sensors electronic shutter rather that the cameras mechanical curtain shutter. This is great for time-lapse as you won’t wear out the mechanical shutter. The only down side is that when I use a DSLR for time-lapse I often make use of the large frame size from a 24MP or more sensor to re-frame or pan and scan the shot in post. The A7s is only 12.2MP or 4,240 x 2,832 pixels so very little room for re-framing in a 4K production, although not too bad for an HD programme. I wish the vanilla A7 had this feature, it would make it a great time-lapse camera. One application I’m very excited about is using the A7s to shoot the northern lights in both time-lapse and real time next year during my Northern Lights expeditions and workshops.
Keep an eye out for my Slog2 guide in the next week or so where I’ll document my findings on how to get the very best from the A7s. It’s an amazing little camera. Can’t wait for the 4K recording options for the camera to become a reality. Maybe we will find out more at IBC.
As the owner of a Sony AX100, which is a really great little 4K and HD camcorder I wasn’t really all that excited when I saw the first prototype of the X70 at Broadcast Asia back in June. You see in the past Sony have done this many times, taken a high end consumer camcorder, updated the firmware, added a handle and then sold it for a higher price as a pro camcorder. In the past, there has in reality been little difference between the cheaper consumer model and the more expensive pro version.
The handgrip on the Sony PXW-X70
The PXW-X70 is different. This is much more than an AX100 with new firmware. For a start the body of the camera is quite different. The right hand side of the X70 is quite different to the AX100. It has a much fatter hand grip. This makes the camera much easier to hold comfortably for long periods. It also makes space for a full size HDSDI output and a full size HDMI output. But the differences don’t stop there.
On the top of the hand grip there is a large assignable button that is normally set to act as a control for the focus magnification function. This button falls immediately under your index finger when your shooting. In front of this is a new larger and easier to use zoom rocker and then in front of that is another assignable button, this one set as a one push auto iris button – very nice!
The back of the handgrip and the small joystick.
At the back of the handle there is a small joystick that ends up under your thumb (just where it needs to be). This joystick can be used to navigate through the cameras menu system. So, without taking your hand out of the hand grip you can check focus, zoom in and out, set your exposure and go through the menu system. If only it was this easy on all of Sony’s cameras! Ergonomically this camera is really good, especially when you consider how small it is.
The camera has a nice 12x stabilised, optical zoom lens, behind which sits a 1 inch 20 megapixel sensor. In video mode about 14 million pixels are used, so even in 4K (there will be a paid 4K upgrade option next year) there are more pixels than needed for full resolution. Rather than let this extra resolution go to waste you can activate Sony’s “clear image zoom” function that works seamlessly with the optical zoom to give you a 24x zoom range in HD.
Frame grab from PXW-X70. Click on the image to see the full size frame.
The clear image zoom really is remarkably transparent. If you look hard enough at the image, on a big screen, when it’s zoomed all the way in you can just about discern a very slight softness to the image, but frankly I don’t think this is any worse than the softness you might see from a compact optical 24x zoom. It certainly doesn’t look electronic and unless you have side by side, with and without test clips I don’t think you would know that the clear image zoom has been used.
If 24x is not enough there is also a further digital extender, controlled by a button on the right side of the lens that doubles the digital zoom. This you can see, the image is a little degraded at 48x, but it’s not terrible, might be handy for a breaking news story where you can’t get close to the subject.
The left side of the PXW-X70
As well as the optical stabiliser in the lens the camera also has a switchable electronic stabiliser. The active steadyshot is very effective at smoothing out even the shakiest of hands. But it does tend to hang on or grab hold of the image a bit. So when you do deliberately move the camera it tends to try to stabilise the scene until it can no longer correct for the cameras movement at which point the scene is suddenly released and starts to move. If your using a tripod you definitely want to just use the standard steadyshot and not the active mode.
Dual SD card slots on the PXw-X70
The pictures are recorded using either XAVC, AVCHD or standard definition DV to SD cards. For XAVC you must use SDXC cards, but these are cheap and readily available these days. There are two card slots and you can choose between relay record where the camera will switch from slot A to slot B once A is full, or you can make two simultaneous recordings on both cards at the same time. This gives an instant backup if you need it.
XAVC HD RECORDING:
The XAVC HD recordings are 10 bit 422 long GoP at 50Mb/s, 35Mb/s or 25Mb/s. The quality of the 50Mb/s recordings is amazing with no compression artefacts that I can see (there must be some, I just can’t see them). Even the 25Mb/s recordings look really good. You can shoot at up to 60fps in 60i mode and 50fps in 50i mode. In 60i mode you also have 24fps.
Frame grab form the PXW-X70, click on the image to see full size.
Considering this is a highly compact, single chip camera the images it produces are really very good. They don’t have that typical small sensor camera look. The pictures are remarkably noise free at 0db and largely free of artefacts. I tend to find that small handycams often suffer from what I would describe as “busy” pictures. Pictures where perhaps there is a lot of added sharpening or where the pixels are read in special ways to make a sharp picture. This makes edges slightly flickery and gives the pictures a tell tale small sensor look. The X70 with it’s big sensor and abundance of pixels just doesn’t have this “busy” look.
Train sitting in station. Frame grab from PXW-X70
The pictures really look like they come from a pro camera. Occasionally very fine, high contrast details like white text on a black background can look a little busy, but this is very minor. Dynamic range is quite respectable, it’s not as good as a PMW-300, but not too bad for a compact handycam (I estimate about 10 to 11 stops of DR).
One thing I did find with this camera is that because there is so little noise and the codec is so good, you could quite comfortably shoot about a stop darker than you would normally and then just bring the image up a bit in post. Shooting a little darker helps the camera handle bright highlights and then in post you can just bring up the shadows and mid tones with a simple colour correction to give a nice exposure. I wish I had realised this when I shot the demo video. I would have exposed a little on the dark side and then tweaked the shots in post. There’s so little noise at 0db and so few artefacts that the image holds up to this really well. If your using auto exposure you can set an exposure offset to allow for this in the menu.
PXW-X70 without the top handle fitted.
The X70 is pretty sensitive and 9db of gain is quite useable, so shooting indoors in a typical home or at a wedding venue without extra lights should be no problem. Ramp it up to +33db and it see’s better in the dark than I do, but there is a fair bit of noise at +33db.
As well as being generally rather sensitive the PXW-X70 also has a nightshot mode that bypasses the cameras IR filter and includes a switchable infra-red light, so you can shoot in total darkness if you want.
To see what you are shooting there is a 3.5″ LCD panel. This panel is higher resolution than the one on the AX100 and gives a sharp and pretty accurate image. On the back of the camera there is a small OLED viewfinder. This little OLED is pretty good. It has great contrast and is pretty sharp for a small finder. It’s a great feature on bright sunny days when the LCD can become harder to see.
CRISP, SHARP IMAGES:
The HD images are crisp and sharp without any obvious sharpening, almost certainly a result of having a 4K ready sensor. The lack of obvious detail correction helps give the pictures a pleasing, more filmic look. The camera has picture profiles so if you want you can soften or sharpen the images if you choose. As well as detail and aperture controls there are also controls for gamma (standard, still, Cinematone1, Cinematone2, ITU709) and color. The color controls are similar to those on the FS700 where you can adjust the saturation as well as R, G, B, C, M, Y and K brightness. In addition there is a choice of 6 different preset color modes plus black and white.
PXW-X70 auto/manual switch.
The camera can be controlled either fully automatically or fully manual as well as various in between modes. There is a switch on the back of the camera to switch between auto and manual. In manual you can control the iris, shutter and gain by pressing one of three buttons along the bottom edge of the camera and the using a small wheel just below the lens to set what you have selected. In practice this actually works quite well. There is another button for white balance control on the side of the camera with the usual presets plus auto white balance. Just under the Manual/Auto switch there is a selector for the built in ND filters. I recently purchased a A7s DSLR type camera and I had forgotten what a fiddle it can be to use a camera that doesn’t have built in ND’s. So it’s really good to see proper ND filters on the PXW-X70 as they really help you manage your depth of field.
On the lens there is a single large control ring that can be used to focus the lens or to act as a manual zoom ring. The focus is responsive and although I don’t normally like round and round servo focus rings this one wasn’t too bad.
The zoom/focus ring on the PXW-X70.
There really is so much to this camera that it would take a small book to go through all the features. For example there’s the touch screen LCD that can be used for touch to focus or touch to expose where you just touch the part of the screen you want to expose or focus on. There’s a full set of exposure and focus aids including peaking, histogram, zebras etc.
On the top of the camera you have Sony’s new MI shoe (Multi-Interface) for connecting accessories like the supplied handle with XLR audio inputs. The supplied detachable handle is really well made and very secure when attached. One small note is that by default when you attach the handle to the MI-shoe the camera switches to XLR audio automatically by default. So if you don’t actually have a mic connected to the handle you won’t have any audio as the internal mic gets shut off. You have to go in to the audio section of the menu to enable the internal mic if you want to use the handle but want to use the built in mic.
If you want to do time-lapse or slow stuff down the camera has S&Q motion that goes from 1fps to 60fps at 1920×1080.
The camera has WiFi and NFC and allows remote control via Content Browser Mobile and simply touching an NFC enabled phone or tablet against the side of the camera will pair the camera with the phone or tablet. In the future following a firmware update you will be able to use the camera to stream your content live via U-stream.
Finally – build quality. It’s really well made. It feels nice and solid, it feels like it will really last. Don’t tell Sony, but I dropped the camera from waist hight while I was using it. It survived, no problem at all.
Sony’s new baby XDCAM camcorder, the PXW-X70.
In conclusion: This is a nice little camera. It’s very easy to operate. The picture quality is very good for such a compact camera, the only thing that lets it down just a bit is the highlight handling. But the camera is so clean that you can afford to expose a little lower to compensate for this. Since shooting the demo video I have been playing with the picture profiles to help with the highlight exposure and I found that bringing up the black gamma really helps as it lifts the mid range allowing you to expose slightly lower.
The large sensor, combined with the switchable built in ND filters gives you much greater control over the depth of field than normally possible with a compact handycam.
I think you have to remember that this is a small camera. It isn’t a PXW-X180 and it never will be, but if your budget is tight and you want an easy to use compact camera this could be the one for you. I think it would be a good fit as a “B” camera or for use in lower budget corporate productions. In addition the PXW-X70 would be a good camera to give to PA’s and producers or to hand off to inexperienced shooters for fly-on-the-wall productions.
I’ve been playing with an SLR Magic Anamorphot. This is a high quality lens adapter that allows you to shoot in the 2.35:1 aspect ratio with a conventional 16:9 camera. The adapter screws on to the front of existing lenses and squashes the scene horizontally by 33% as you shoot. Then in post you squash the image vertically by the same amount and the end result is 2.35:1 aspect ratio footage.
There are some limitations and these are covered in the video, so please watch the video for a full explanation as well as some sample footage. For the money it’s a great way to get low cost anamorphic shots. As well as the aspect ratio change you get really nice horizontal blue lens flares giving you that JJ Abrams look to your productions. Really looking forward to trying it on my A7S once that arrives.
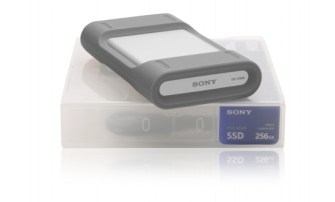
Hard drives are boring! But they are now a very important part of life in the world of TV production. I get through dozens and dozens of hard drives every year and as the drives I am using may hold footage that can never be replaced it’s important that they are as reliable as possible. For a while now I have been using a number of Sony hard drives and SSD’s. These drives are built for portable video applications and my drives have been all over the world from hot, humid Asia to the bitter cold of Arctic Norway. They have never let me down. Each drive comes in a nice case that resembles a video cassette case so that you can stack them neatly on a shelf. No more tatty, crumpling cardboard boxes. In addition the outer case protects the drive in transit, plus each case contains a USB3 lead and a firewire 800 cable, so you don’t need to search around for the cables.
The drives themselves are built in to a tough but very lightweight enclosure with soft rubber bumpers at each end. There are little notches and bumps in the bumpers that interlock if you stack the drives one on top of another, say on the desk of your edit suite. Not only do the rubber bumpers protect the drives from knocks and bumps, but they also incorporate flaps that cover the USB3 and Firewire 800 sockets. The drives meet the MIL-STD-810G standard and when the connector covers are closed are dust proof to IP5X and splash proof to IP4X. The HDD is built to withstand being dropped from 2m and the SSD from 2.3m. I have to say that my 256GB SSD has been dropped a few times now and is still going strong.
Sony are so confident of the quality of their drives that they offer a 3 year warranty and after almost a year on the market, I have been told that so far not one single drive has had to be replaced!
USB3 is backwards compatible with USB2, so if you don’t have USB3 you can just treat the drive as a USB2 drive. If you are a Mac user with an older Mac then you are well catered for with a pair of Firewire 800 ports on the rear of each drive.
The 256GB SSD is extremely fast and this drive has become my go-to drive for on the road use as I can easily edit 4K material stored on this drive and it appears to be really tough. I often ship my SSD along with my hold baggage when I’m flying, it’s been bashed about on snow scooters and used to edit from while bouncing down dirt track roads. I use the 500GB and 1TB Hard drives for general purpose storage and HD editing.
Fed up with carrying large or bulky grey cards that get bent and creased or get dirty and fade? Why not try one of the great Lastolite pop up grey cards? I have the 30cm 18% grey pop-up grey card and it works really well. When folded it’s only about 12cm across so takes no space at all. It comes in a handy zip up case. This is so much easier to carry and transport than traditional ridged cards. The back of the target is 90% white. Both the grey and white targets appear to be very accurate and the matte surface of the grey card helps eliminate hot spots and reflections. There is a cross hair style focussing target in the center of each side if you need to check focus. They come in different sizes, if you want a larger one there are also 50cm and 75cm versions plus there is even an underwater version. Do note that they come in both 18% and 12% shades of grey. Really handy if shooting with SLog or for setting white balance. If you are working with a video camera you want the 18% grey version, but you may need the 12% version if calibrating a light meter etc. Simple, low cost item that works really well. Recommended!
My old Metabones MK1 adapter is not suitable for full frame lenses on the new Sony A7s. So in anticipation of the arrival of my A7s I ordered a cheap CommLite full frame autofocus ready adapter on ebay. This adapter (CN-EF-NEX) was only $90 USD so I thought I would give it a try, much cheaper than the metabones.
To be honest I wasn’t expecting much, but now I have the adapter in my hands I am pleasantly surprised. It appears well made and very solid. It even carries a CE mark. It works just fine on my NEX5N and FS700. On the NEX5N I have working autofocus. If the lens has image stabilisation this works too. I have tried a wide variety of Sigma and Tamron Canon EF lenses with it and they all work. Even my new Tamron 16-300mm works with this adapter, this lens doesn’t work with a number of other adapter.
Autofocus is a little slow, especially if the light is bad. Having not used the MK3 Metabones I don’t know how this compares but certainly this adapter works and is quite useable. It’s said to be compatible with full frame lenses on the A7, but as yet I have not been able to test this. The little mounting post is easily and quickly removable, but a real boon on the NEX5N with bigger lenses. For the price, you can’t go far wrong, really quite impressed considering how little it cost.
I was lucky enough to get to spend some time with a pre-production Sony PXW-X180 here in Singapore. I put it through it’s paces shooting around the botanical gardens, China town and Clarke Quay.
For a 1/3″ camcorder it produces a remarkably good image. Really low noise, very clean images, much better than anything I have seen from any other 1/3″ camcorder. The 25x zoom is impressive, the variable ND filter is very clever and it might seem trivial but the rear viewfinder was very nice. It’s a very high resolution OLED, much, much better than the LCOS EVF’s found on many other models.
The zoom lens has proper manual calibrated controls with end stops, much like a PMW-200. The ability to use a multitude of codecs is fantastic and perhaps better still is the fact that you can use SDXC cards for XDACM or XAVC at up to 50Mb/s, so even XDCAM HD422 can be recorded on this low cost media. This will be great for news or other situations where you need to hand off your media at the end of the shoot.
A more in depth review will follow soon, but for now here’s the video. Un-graded, un touched, straight from the camera footage. Looks very nice if you ask me.
Manage your privacy
To provide the best experiences, we use technologies like cookies to store and/or access device information. Consenting to these technologies will allow us to process data such as browsing behavior or unique IDs on this site. Not consenting or withdrawing consent, may adversely affect certain features and functions.
Functional
Always active
The technical storage or access is strictly necessary for the legitimate purpose of enabling the use of a specific service explicitly requested by the subscriber or user, or for the sole purpose of carrying out the transmission of a communication over an electronic communications network.
Preferences
The technical storage or access is necessary for the legitimate purpose of storing preferences that are not requested by the subscriber or user.
Statistics
The technical storage or access that is used exclusively for statistical purposes.The technical storage or access that is used exclusively for anonymous statistical purposes. Without a subpoena, voluntary compliance on the part of your Internet Service Provider, or additional records from a third party, information stored or retrieved for this purpose alone cannot usually be used to identify you.
Marketing
The technical storage or access is required to create user profiles to send advertising, or to track the user on a website or across several websites for similar marketing purposes.