There is an ongoing and much heated debate on another forum about the practicalities of using the LUT’s or Looks built in to the PMW-F5 and PMW-F55 for setting the correct exposure of your SLog or Raw footage. In response to this I put together a very rough video demonstrating how this actually works.
Before watching the video, do please understand the following notes:
Correct exposure is normally determined by the level at which middle grey is recorded. This is true of both video and film production. Light meters are calibrated using middle grey. Expose with a light meter and you will find middle grey at the levels indicated below.
Different gamma curves may use different middle grey levels depending on the contrast required and the dynamic range of the gamma curve. Generally speaking, the greater the dynamic range, the lower middle grey must be set in order to leave room above middle grey for the extra dynamic range. This means that the relationship between middle grey and white will be different from curve to curve. Don’t always expect white to be some fixed value above middle grey. Some of the Sony looks for example LC709TypeA are very low contrast and while middle grey still sits at around 42% (The ITU standard for Rec-709 is 41.7%), because it is a low contrast, high dynamic range curve white is at a lower level, around 70%. The Hypergamma LUT grey points are given by the “G40″ or G33” number – G40 meaning middle grey at 40%.
When you take Slog or raw in to post production it is expected that the middle grey of the recordings will be at the correct nominal level (see chart below). If it is not, when you apply a post production Slog or raw LUT then the footage may appear incorrectly exposed. If you try to bring Slog or raw into an ACES workflow then ACES expects middle grey to be at the correct values. So it is important that your Slog or raw is exposed correctly if you want it to work as expected in post.
Correct exposure levels for Sony’s Slog.
Having said all of the above… If you are using CineEI and lowering or raising the EI gain from the native ISO then your Slog or raw will be exposed brighter or darker than the levels above. But I must assume that this is what you want as you are probably looking to adjust the levels in post to reduce noise or cope with an over exposure issue. You may need to use a correction LUT to bring your Slog levels back to the nominal correct levels prior to adding a post production LUT.
So we all like to dress our cameras up with all kinds of accessories. One of the most common being a Matte Box. So, what’s a matte box for? Well the obvious thing is to hold filters for creating an artistic look, for colour correction or light level reduction. But the other very important role is to block unwanted light. I’ll take a brief look at filters later in the article.
We all know that if you shoot into the sun or a bright light source you might get a lens flare in the shot. You know, those sometimes pretty rings of light that can look cool on a good day or ruin a shot on another. But the other thing you can get is lens flare. So whats the difference between “a lens flare” and “lens flare”.
Well, lens flare is when light bounces around inside the lens between the glass elements in an uncontrolled way, some of this unfocussed light making it’s way to the sensor where it spills and bleeds into darker parts of the image reducing contrast and raising the black level. Whenever you reduce the contrast in an image it will appear softer, so to get the sharpest and highest resolution images, we really want to keep as much unwanted light out of the lens as possible. In addition some cameras can suffer from other image artefacts when off-axis light finds it’s way to the edges of the sensor. So anything we can do to stop this happening is obviously a good thing.
Higher end cameras will often have an electronic flare adjustment that pulls down the cameras black level when the overall scene light level gets high. The idea is that this helps compensate for the almost inevitable flare that will occur in the lens when a lot of light enters the lens. This flare setting is normally adjusted on a lens by lens basis as different lenses will flare by different amounts. As lenses get older, very often vapour from the oils and materials used in the construction of the lens will coat the internal glass surfaces with a very fine haze that increases flare. This can make an older lens more prone to flare and is one reason why getting an older but expensive lenses professionally cleaned is often worth the expense. The other thing you can do is to make be sure to use a good matte box or lens shade to prevent excess light from entering the lens.
A flexible donut or “nun’s Knikers” on the rear of the Matte Box keeps out light from the rear of the Matte Box.
Don’t use a matte box that is excessively large. You want a Matte Box big enough to fit your lenses and hold the size of filters you need. It also needs to be wide enough to allow you to use the aspect ratios you want to shoot in, but no larger. If it’s too big, the shade/hood will be less effective. Make use of an adjustable top flag and side flags to keep out as much light as possible. Looking through the cameras viewfinder bring the flags in close to the lens until they start to creep into the edges of your shot, then back them off just a little bit.
A quick release catch on the Alphatron Matte Box allows you to quickly and easily change the donut or nun’s knickers.
Also make sure your rear donut or other light seal is doing it’s job and keeping out the light. A flexible bellows or “nun’s knickers” can be used to allow you to move the matte box forwards so that the lens sits deeper in the nice dark recess of the matte box. Light entering the Matte box from the rear will cause reflections off the back of any filters used, especially any ND filters or glimmer glass filters and this can easily spoil a shot.
A Matte Box can be attached to the lens directly via a clamp ring that clamps around the end of the lens or more commonly attached to rods or bars connected to the bottom of the camera. If you only ever use one lens then a lens clamp might work well for you, but if you swap and change lenses regularly then a rod or rail mount is often easier as a flexible donut will fit a multitude of lenses. The donut on the Alphatron Matte Box will fit a wide range of lenses and the neoprene insert can easily be exchanged or replaced simply by unscrewing the two halves of the donut holder. The neoprene is sandwiched between the two halves and just drops out once released.
Eyebrows on the Alphatron Matte box keeping the sun out of the lens.
Some Matte Boxes like the Alphatron one shown here have small extra “eyebrows”. These are like mini flags that can be adjusted to provide extra shade for the lens. In the picture you can see how the shadow from the top eyebrow is keeping stray and unwanted light from falling on the lens. This will help minimise flare and preserve contrast in the images. It’s a small thing but it can make a big difference. Eyebrows and flags also keep light out of the matte box itself and help prevent reflections between any filters that you might use and the lens itself.
The Alphatron Matte Box can be fitted with a quick release swing away adapter to make lens changes quick and easy.
If you’re using prime lenses then you will probably need to change lenses regularly. A great time saver is the use of a swing-away adapter. The Alphatron Matte Box that I use has an optional quick release swing away mount option. By twisting a single lever the Matte Box opens up and swings away from the lens. This gives you easy access to the lens for cleaning or for a quick lens change without having to remove the Matte Box. When shooting out on location this is a big deal as there’s never anywhere clean to put your Matte Box when you want to do a lens swap.
The Alphatron Matte Box has one fixed filter tray and one rotating tray.
Matte boxes can have both fixed and rotating filter trays or a combination of the two. Fixed trays are fine for ND filters and most diffusion filters. For graduated filters a rotating tray is preferable and for polarising filters a rotating tray is essential. The Alphatron Matte Box here has one fixed tray and one rotating tray. So I can use the fixed tray for any ND filters and then the rotating tray for grads or polarisers. I very nice feature of the Alphatron is a little recess in the very front of the sun shade and a little locking tab that allows you to put a safety glass in place in front of any filters to protect you filters and lens. This is very handy especially if your shooting something that could possibly splash on your expensive filters and damage the coatings.
So what filters should you get for your nice new Matte Box? First of all do be prepared to spend a little bit of money to get good quality filters. Filters can be plastic, resin or glass. Optical grade plastics and resins can make very good filters, but they tend to be prone to collecting dust through static electricity and they scratch easily. In addition if left in a hot car they can distort and warp. But, plastic and resin filters are light weight and normally a lot cheaper than the glass equivalent. Better quality filters will have anti-reflective coatings. A good quick test of the quality of any filter is to use a long focal length lens or zoomed-in zoom lens to check for distortions or focus issues introduced by the filter. You might not notice this at wide angles or zoomed out. So do check at longer focal lengths.
Good brands include Tiffen, Formatt and Schneider. These won’t be the cheapest on the market, but the quality is consistently good. Filters come in different sizes, the most common is the 4×4 or 4″ by 4″. For longer focal lengths these are fine, but if you want to shoot at wider angles you may find that 4×4’s are not wide enough. The next size up is the 4″x 5″ but the next commonly used size is the 4″ x 5.65″ which is close to the old 4:3 TV aspect ratio. The extra width really helps when shooting wider shots in 16:9.
My most commonly used filters are ND filters. These help manage light when it’s too bright allowing you to use a smaller aperture to gain a shallower depth of field. If your using a CMOS camera you should use IR ND filters that cut not only the visible light but also infra red light that most CMOS cameras are sensitive to.
Next is a polarising filter. A circular polariser is great for reducing or controlling reflections from windows, cars etc, it’s also good for enhancing the contrast in clouds and the sky making the sky a richer, deeper blue. When using a polariser it needs to go in a rotating tray so you can turn it when composing your shot to alter the polarising effect.
Graduated ND filters are also useful to help deal with excessively bright sky. The top of the filter is a ND filter or coloured filter and the bottom is normally clear. By sliding the filter up and down within the matte box you can alter level where the brightness reduction takes place. A tobacco or orange coloured graduated filter can be used to create or enhance a sunset type look. Just watch for the graduation crossing through foreground objects in the scene which can give the game away and look odd.
Sony have released firmware updates for the PMW-300 and PMW-400 that include the 10 bit 4:2:2 I frame XAVC codec at 100MB/s. Now you can have great quality 10 bit recordings on these cameras for no extra charge. To comply with the XAVC standard the cameras also gain the ability to format the recording media using ExFat.
Hi all. I’m off to Austin Texas to run a workshop at Omega Broadcast on the 22nd and 23rd of May. This should be an informative and fun workshop where I will be teaching how to shoot and light interviews, green screen. How to set up cameras with picture profiles or scene files as well as looking at shooting log, raw and in 4K. For more info take a look at the Omega Broadcast Web Site.
I kind of feel like we have been here once before. That’s probably because we have and I wrote about it first time around.
A typical video camera has a special filter in it called an optical low pass filter (OLPF). This filter deliberately reduces the contrast of fine details in the image that comes from the cameras lens and hits the sensor to prevent aliasing, jagged edges and moiré rainbow patterns. It’s a very important part of the cameras design. An HD camera will have a filter designed with a significant contrast reduction on parts of the image that approach the limits of HD resolution. So very fine HD details will be low contrast and slightly soft.
When you shoot with a 4K camera, the camera will have an OLPF that operates at 4K. So the camera captures lots of very fine, very high contrast HD information that would be filtered out by an HD OLPF. There are pro’s and con’s to this. It does mean that if you down convert from 4K or UHD to HD you will have an incredibly sharp image with lots of very fine high contrast detail. But that fine detail might cause aliasing or moiré if you are not careful.
The biggest issue will be with consumer or lower cost 4K cameras that add some image sharpening so that when viewed on a 4K screen the 4K footage really “pops”. When these sharpened and very crisp images are scaled down to HD the image can appear to flicker or “buzz”. This will be especially noticeable if the sharpening on the HD TV is set too high.
So what can you do? The most important thing is to include some form of anti-aliasing to the image when you down scale from 4K to HD. You do need to use a scaling process that will perform good quality pixel blending, image re-sampling or another form of anti-aliasing. A straight re-size will result in aliasing which can appear as either flicker, moire or a combination of both. Another alternative is to apply a 2 or 3 pixel blur to the 4K footage BEFORE re-sizing the image to HD. This seems a drastic measure but is very effective and has little impact on the sharpness of the final HD image. Also make sure that the sharpening on your TV is set reasonably low.
I previously wrote about this very same subject when HD cameras were being introduced and many people were using them for SD productions. The same issues occurred then. Here are the original articles:
Video sensor size measurement originates from the first tube cameras where the size designation would have related to the outside diameter of the glass tube. The area of the face of the tube used to create the actual image would have been much smaller, typically about 2/3rds of the tubes outside diameter. So a 1″ tube would give a 2/3″ diameter active area, within which you would have a 4:3 frame with a 16mm diagonal.
An old 2/3″ Tube camera would have had a 4:3 active area of about 8.8mm x 6.6mm giving an 11mm diagonal. This 4:3 11mm diagonal is the size now used to denote a modern 2/3″ sensor. A 1/2″ sensor has a 8mm diagonal and a 1″ sensor a 16mm diagonal.
Yes, it’s confusing, but the same 2/3″ lenses as designed for tube cameras in the 1950’s can still be used today on a modern 2/3″ video camera and will give the same field of view today as they did back then. So the sizes have stuck, even though they have little relationship with the physical size of a modern sensor. A modern 2/3″ sensor is nowhere near 2/3 of an inch across the diagonal.
This is why some manufacturers are now using the term “1 inch type”, as this is the active area that would be the equivalent to the active area of an old 1″ diameter Vidicon/Saticon/Plumbicon Tube from the 1950’s.
Well I have set myself quite a challenge here as this is a tough one to describe and explain. Not so much perhaps because it’s difficult, but just because it’s hard to visualise, as you will see.
First of all the dictionary definition of Gamut is “The complete range or scope of something”.
In video terms what it means is normally the full range of colours and brightness that can be either captured or displayed.
I’m sure you have probably heard of the specification REC-709 before. Well REC-709, short for ITU-R Recommendation, Broadcast Television, number 709. This recommendation sets out the display of colours and brightness that a television set or monitor should be able to display. Note that it is a recommendation for display devices, not for cameras, it is a “display reference” and you might hear me talking about when things are “display referenced” ie meeting these display standards or “scene referenced” which would me shooting the light and colours in a scene as they really are, rather than what they will look like on a display.
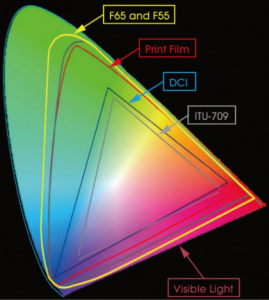
Anyway…. Perhaps you have seen a chart or diagram that looks like the one below before.
Sony colour gamuts.
Now this shows several things. The big outer oval shape is what is considered to be the equivalent to what we can see with our own eyes. Within that range are triangles that represent the boundaries of different colour gamuts or colour ranges. The grey coloured triangle for example is REC-709.
Something useful to know is that the 3 corners of each of the triangles are whats referred to as the “primaries”. You will hear this term a lot when people talk about colour spaces because if you know where the primaries (corners) are, by joining them together you can find the size of the colour space or Gamut and what the colour response will be.
Look closely at the chart. Look at the shades of red, green or blue shown at the primaries for the REC-709 triangle. Now compare these with the shades shown at the primaries for the much larger F65 and F55 primaries. Is there much difference? Well no, not really. Can you figure out why there is so little difference?
Think about it for a moment, what type of display device are you looking at this chart on? It’s most likely a computer display of some kind and the Gamut of most computer displays is the same size as that of REC-709. So given that the display device your looking at the chart on can’t actually show any of the extended colours outside of the grey triangle anyway, is it really any surprise that you can’t see much of a difference between the 709 primaries and the F65 and F55 primaries. That’s the problems with charts like this, they don’t really tell you everything that’s going on. It does however tell us some things. Lets have a look at another chart:
SGamuts Compared.
This chart is similar to the first one we looked at, but without the pretty colours. Blue is bottom left, Red is to the right and green top left.
What we are interested in here is the relationship between the different colour space triangles. Using the REC-709 triangle as our reference (as that’s the type of display most TV and video productions will be shown on) look at how S-Gamut and S-Gamut3 is much larger than 709. So S-Gamut will be able to record deeper, richer colours than 709 can ever hope to show. In addition, also note how S-Gamut isn’t just a bigger triangle, but it’s also twisted and distorted relative to 709. This is really important.
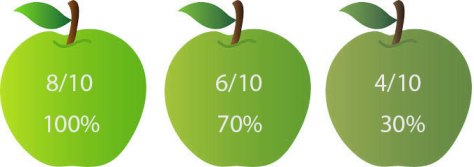
You may also want to refer to the top diagram as well as I do my best to explain this. The center of the overall gamut is white. As you draw a line out from the center towards the colour spaces primary the colour becomes more saturated (vivid). The position of the primary determines the exact hue or tone represented. Lets just consider green for the moment and lets pretend we are shooting a shot with 3 green apples. These apples have different amounts of green. The most vivid of the 3 apples has 8/10ths of what we can possibly see, the middle one 6/10ths and the least colourful one 4/10ths. The image below represents what the apples would look like to us if we saw them with our eyes.
The apples as we would see them with our own eyes.
If we were shooting with a camera designed to match the 709 display specification, which is often a good idea as we want the colours to look right on the TV, the the greenest, deepest green we can capture is the 709 green primary. lets consider the 709 green primary to be 6/10ths with 10/10ths being the greenest thing a human being can see. 6/10ths green will be recorded at our peak green recording level so that when we play back on a 709 TV it will display the greenest the most intense green that the display panel is capable of. So if we shoot the apples with a 709 compatible camera, 6/10ths green will be recorded at 100% as this is the richest green we can record (these are not real levels, I’m just using them to illustrate the principles involved) and this below is what the apples would look like on the TV screen.
6/10ths Green and above recorded at 100% (our imaginary rec-709)
So that’s rec-709, our 6/10ths green apple recorded at 100%. Everything above 6/10 will also be 100% so the 8/10th and 6/10ths green apples will look more or less the same.
What happens then if we record with a bigger Gamut. Lets say that the green primary for S-Gamut is 8/10ths of visible green. Now when recording this more vibrant 8/10ths green in S-Gamut it will be recorded at 100% because this is the most vibrant green that S-Gamut can record and everything less than 8/10 will be recorded at a lower percentage.
But what happens if we play back S-Gamut on a 709 display? Well when the 709 display sees that 100% signal it will show 6/10ths green, a paler less vibrant shade of green than the 8/10ths shade the camera captured because 6/10ths is the most vibrant green the display is capable of. All of our colours will be paler and less rich than they should be.
The apples recorded using a big gamut but displayed using 709 gamut.
So that’s the first issue when shooting with a larger colour Gamut than the Gamut of the display device, the saturation will be incorrect, a dark green apple will be pale green. OK, that doesn’t sound like too big a problem, why don’t we just boost the saturation of the image in post production? Well if the display is already showing our 100% green S-Gamut signal at the maximum it can show (6/10ths for Rec-709) then boosting the saturation won’t help colours that are already at the limit of what the display can show simply because it isn’t capable of showing them any greener than they already look. Boosting the saturation will make those colours not at the limit of the display technology richer, but those already at the limit won’t get any more colourful. So as we boost the saturation any pale green apples become greener while the deep green apples stay the same so we loose colour contrast between the pale and deep green apples. The end result is an image that doesn’t really look any different that it would have done if shot in Rec-709.
Saturation boosted S-Gamut looks little different to 709 original.Sony colour gamuts.
But, it’s even worse that just a difference to the saturation. Look at the triangles again and compare 709 with S-Gamut. Look at how much more green there is within the S-Gamut colour soace than the 709 colour space compared to red or blue. So what do you think will happen if we try to take that S-Gamut range and squeeze it in to the 709 range? Well there will be a distinct colour shift towards green as we have a greater percentage of green in S-Gamut than we should have in Rec-709 and that will generate a noticeable colour shift and the skewing of colours.
Squeezing S-Gamut into 709 will result in a colour shift.
This is where Sony have been very clever with S-Gamut3. If you do take S-Gamut and squeeze it in to 709 then you will see a colour shift (as well as the saturation shift discussed earlier). But with S-Gamut3 Sony have altered the colour sampling within the colour space so that there is a better match between 709 and S-Gamut3. This means that when you squeeze S-Gamut3 into 709 there is virtually no colour shift. However S-Gamut3 is still a very big colour space so to correctly use it in a 709 environment you really need to use a Look Up Table (LUT) to re-map it into the smaller space without an appreciable saturation loss, mapping the colours in such a way that a dark green apple will still look darker green than a light green apple but keeping within the boundaries of what a 709 display can show.
Taking this one step further, realising that there are very few, if any display devices that can actually show a gamut as large as S-Gamut or S-Gamut3, Sony have developed a smaller Gamut known as S-Gamut3.cine that is a subset of S-Gamut3.
The benefit of this smaller gamut is that the red green and blue ratios are very close to 709. If you look at the triangles you can see that S-Gamut3.cine is more or less just a larger version of the 709 triangle. This means that colours shifts are almost totally eliminated making this gammut much easier to work with in post production. It’s still a large gamut, bigger than the DCI-P3 specification for digital cinema, so it still has a bigger colour range than we can ever normally hope to see, but as it is better aligned to both P3 and rec-709 colourists will find it much easier to work with. For productions that will end up as DCI-P3 a slight saturation boost is all that will be needed in many cases.
So as you can see, having a huge Gamut may not always be beneficial as often we don’t have any way to show it and simply adding more saturation to a seemingly de-saturated big gamut image may actually reduce the colour contrast as our already fully saturated objects, limited by what a 709 display can show, can’t get any more saturated. In addition a gamut such as S-Gamut that has a very different ratio of R, G and B to that of 709 will introduce colour shifts if it isn’t correctly re-mapped. This is why Sony developed S-Gamut3.cine, a big but not excessively large colour space that lines up well with both DCI-P3 and Rec-709 and is thus easier to handle in post production.
Bit of a rant this I’m afraid, but since the decline of the traditional shoulder mount camera there has been an annoying (to me at least) shift of the standard shot shooting angle from eye height to chest hight. The upshot of this is that once upon a time the majority of shots looked directly into the talents eyes from a normal eye level, so it mimicked what most of us see with our own eyes, day in day out. But now with more and more cameras being used hand-held at chest or even waist height a very large percentage of shots end up looking up peoples noses rather than straight into their faces.
Don’t get me wrong, when the shot benefits for creative reasons from being shot at a low angle I have no objections whatsoever. But I really don’t like looking up someones nose just because its harder to hold the camera at eye level. What’s more I’m starting to see this phenomenon creep in to ever more shots as tripods get used at lower levels because camera operators are used to, or find it easier to look down at their LCD screens.
Camera gimbals and stabilisers are also helping this trend as the camera is often used hung below the handles, handles held at chest height, so now we have cameras at waist level or even groin level. One of the great things about the original stedicam is that the camera ended up at around eye level, so during a walking-talking shot you had the impression that you were walking with the subject, not grovelling along on your hands and knees.
So, please everyone, consider this when your setting up your shots, which looks better, eye level or lower than eye level and then adjust your shooting height to get the best shot. Consider getting a monopod to help you hand hold your camera a bit higher or one of the many other contraptions available today that will help you support your camera at eye level.
A little while back I took the opportunity to run some tests during the CML camera assessments at UWE Bristol with the Sony PMW-F55 and both the 4K and 2K Optical Low Pass Filters. The results were largely as expected, but I didn’t have the time until now to share those results, so here they are.
I shot two different series of test shots. The first series are of a resolution test chart, the second set of the model that was on set, in order to asses the impact on skin tones etc. It should be noted that the resolution chart did not have patterns that can show 4K resolution, really what I was looking for was aliasing and other image undesirable artefacts.
What’s the 2K OLPF filter for?
When the PMW-F5 and PMW-F55 are shooting at high speeds above 70fps the camera sensor is read as a 2K sensor instead of the normal 4K. There are two ways that this can occur. 2K Full Sensor Scan and Center Crop 2K.
Full Scan 2K uses the entire sensor but now the sensor is read as a 2K sensor instead of a 4K sensor. The camera is fitted with a 4K optical low pass filter (OLPF) at the factory. However when shooting using 2K full scan the 4K filter is ineffective and needs to be replaced with a 2K OLPF. Fortunately Sony made the OLPF on the F5/F55 interchangeable and an optional 2K filter can be purchased from Sony. It takes just a couple of minutes to swap the filters.
The 2K OLPF is also required when shooting in 2K raw when the Sensor Scan in the cameras “Base Settings” is set to 2K Full Frame (2KFF).
Another possible application for the 2K OLPF is to soften the pictures a bit when shooting in 4K. If you find the 4K images with the 4K OLPF too sharp you can use the 2K OLPF to provide a softer, creamier look. Unlike a soft effect filter in front of the camera lens a filter behind the lens is not effected by changes in aperture of focal length, so the results are highly consistent.
On to the tests.
Click on any of the images to enlarge them and see the full size 4K images. NOTE THAT YOU MAY SEE ALIASING THAT ISN”T IN THE TRUE IMAGE WHEN VIEWING A SCALED IMAGE ON YOUR COMPUTER SCREEN, SO PLEASE VIEW WITH 1:1 PIXELS.
4K OLPF, shooting 2K Full Frame.
The first test was to see what happens when you shoot using 2K Full Frame with the standard 4K filter. Really there is no surprise here. Because the factory fitted 4K OLPF is ineffective at 2K you will get a lot of aliasing and moiré as can be seen by the rainbow patterns on the test chart.
So what happens if you swap the 4K OLPF for the 2K OLPF while shooting in 2K Full Frame? Well all the unwanted aliasing simply goes away and you have a nice artefact free image.
2K OLPF, 2K Full Frame
So it’s easy enough to see that if you want to shoot 2K Full Frame, whether for slow motion or for 2K raw you really do need the 2K OLPF option.
But what about when shooting 4K Full Frame, how does the OLPF effect the sharpness of the image. Below are both the full frame, frame grabs plus a couple of crops of the girl so you can see how skin tones are effected.
4K OLPF shooting 4K Full Frame (crop)2K OLPF shooting 4K Full Frame (crop of original).
Notice how the shot done with the 2K OLPF is noticeably softer, the texture in her hair is softer, her skin looks smoother, yet the difference between the two images is not really that great. The 2K OLPF does not excessively blur the image, but it does give it a pleasing softness. This could be beneficial for cosmetics or fashion shoots, dream sequences etc. However it is also possible to soften footage in post production to produce a similar effect. Below are the full frame originals if you want to see the entire shot.
4K OLPF shooting 4K Full Frame.2K OLPF shooting 4K Full Frame.
One thing that you definitely don’t want to do is to accidentally use the 2K OLPF when you are shooting in any of the center scan modes. Remember that in center scan mode the sensor is still in effect a 4K sensor, just now you are only reading out a smaller 2K section from the center of the 4K sensor. As a result the 4K OLPF is still optimum. Below are some further crops from the whole image just shown the center of the test chart. Starting with 4K full frame scan using the 4K OLPF, which is beautifully sharp and clear.
4K OLPF shooting 4K Full Frame.
Next is with the 4K OLPF in 2K crop mode. The lens was changed to give a similar field of view.
4K OLPF Shooting 2K center scan mode.
It’s not really that surprising that the image is a little softer, the first image is part of a 4K image while this is from a 2K image, so it is lower resolution. There is some coloured moiré in this image, probably a result of changing the the lens, perhaps this lens is slightly sharper than the original lens so has greater resolving power. It is almost impossible to entirely eliminate coloured moiré with a bayer sensor and a chart like this will show it up, it’s a very tough test for a sensor. But compare this to a similar section of the shot done with the 4K OLPF with the camera shooting in 2K full frame scan mode and you can see that actually the moiré isn’t actually all that bad. In most real world applications you are not going to see the aliasing above unless you have a very very fine, in focus, repeating pattern similar to the one on the chart:
4K OLPF shooting 2K full frame scan mode. Really bad aliasing!
But what about using the 2K OLPF in 2K center scan mode, well take a look at how soft the image is. It just looks completely blurred and soft.
2K OLPF in 2K center scan mode. Very, very soft and blurry.
You really don’t want to shoot like this your pictures will look very soft indeed.
So there you have it. The 2K OLPF really is needed if you want to avoid heavy aliasing and moiré when shooting in any of the 2K Full Scan modes. You can also use it if you want to soften your 4K images a little for a smoother creamier look. But you definately don’t want to use the 2K OLPF in combination with any of the sensor center scan modes.
Here is the latest version of my PMW-F5 and PMW-F55 quick reference PDF guide. This will be updated and exapnded on a regular basis so please bookmark this page: https://www.xdcam-user.com/2014/04/pmw-f5-and-pmw…eference-guide/ so you can come back to download the latest version.
Please do let me know of any errors or omissions and anything else you would like to see added. Feel free to share and distribute the document, but note that a lot of work has gone into this and it is copyright, so hand it out, give it away, but don’t sell it and don’t remove the copyright notices or links.
To provide the best experiences, we use technologies like cookies to store and/or access device information. Consenting to these technologies will allow us to process data such as browsing behavior or unique IDs on this site. Not consenting or withdrawing consent, may adversely affect certain features and functions.
Functional
Always active
The technical storage or access is strictly necessary for the legitimate purpose of enabling the use of a specific service explicitly requested by the subscriber or user, or for the sole purpose of carrying out the transmission of a communication over an electronic communications network.
Preferences
The technical storage or access is necessary for the legitimate purpose of storing preferences that are not requested by the subscriber or user.
Statistics
The technical storage or access that is used exclusively for statistical purposes.The technical storage or access that is used exclusively for anonymous statistical purposes. Without a subpoena, voluntary compliance on the part of your Internet Service Provider, or additional records from a third party, information stored or retrieved for this purpose alone cannot usually be used to identify you.
Marketing
The technical storage or access is required to create user profiles to send advertising, or to track the user on a website or across several websites for similar marketing purposes.