More good news for Sony PMW-F55 owners. A rather obscure announcement over on the official Sony user group states that the PMW-F55 will gain the ability to record 4K raw at up to 120fps via an optional future accessory.
This is great news for F55 owners. We can hope that perhaps this option will get extended to the F5 as well (after all the FS700 and can do it for short bursts and possibly the FS5 will be able to do it too using their internal memory caches to cache 4 seconds of the 4K HFR before copying it to the R5 or Odyssey). I do hope that the F55 4K raw isn’t limited to a 4 second burst and that it’s the full 16 bit raw that you get at up to 60fps.
Quite what the optional accessory will be I don’t know, but my guess would be a new raw recorder or new faster AXS media, but it could also be an internal upgrade allow the high speed raw to be passed to the existing R5 and AXS media.
I have been given an official statement from Sony about the image artefacts that some people are seeing from the PXW-FS5:
“Sony has investigated the PXW-FS5 image artifact issues reported by users. Our engineers have been able to duplicate these issues and identify their root cause. Sony plans to provide a firmware update. Our goal is to issue this revised firmware toward February/end.
To ensure that users achieve the best results from the FS5, Sony is also preparing guidelines to help professional shooters take full advantage of the FS5’s features, including S-Log and S-Gamut.”
My understanding is that this primarily relates to the edge tearing issue as well as the blocking type artefacts that can be seen, particularly at higher gain levels. It’s great to see solid proof that Sony do listen to us. They always have done, but often simply went away and investigated and fixed the issue without actually saying anything.
It does still need to be remembered that in UHD the camera is an 8 bit camera and this firmware update will not change that. Nor will it change the recording bit rate. I also do not expect to see a change of the cameras base ISO, so don’t expect to see any significant difference to the cameras noise levels. So while I am sure the firmware will bring a useful and welcome improvement to the image quality, you will still need to be careful how you shoot with the camera, especially in low light or with S-log in UHD. The user guides that are being prepared will hopefully address these areas.
Sony are making a very big effort to become more customer focussed. On Monday I was asked by Sony Europe to present a free webinar for customers that have registered their cameras with Sony Prime Support. Over the coming weeks and months there is going to be a lot of new content in the form of user guides, webinars, tutorials, videos etc on the Sony website. So if you haven’t bothered to register your camera with Sony Prime Support, now is the time to do it as this will give you free access to all this new content as it becomes available.
I love my Convergent Design Odyssey 7Q! It’s a fantastic piece of kit. A first rate monitor, highly capable video recorder and a toolbox full of useful tools for the digital cinematographer. I can use it simply as a high grade OLED monitor to check my pictures or I can use it to record at higher quality levels than many internal recorders and then add LUT’s, cross convert from HDMI/SDI, down convert, superimpose a waveform display or zebras on the output and much more. One of my favourite functions is being able to connect it to both the A & B SDI outputs on the FS7 or F5/F55 and view BOTH the LUT’d output from the camera as well as the clean S-Log signal via the picture in picture function.
Right now Convergent Design are offering $500 off the base price and throwing in a free 256GB SSD. Thats really an impressive deal for a really great piece of kit.
UPDATE: Following much debate and discussion in the comments section and on my Facebook feed I think one thing that has become clear is an important factor in this subject is the required end contrast. If you take S-Log3 which has a raised shadow range and shoot with it in low light you will gain a low contrast image. If you choose to keep the image low contrast then there is no accentuation of the recorded noise in post and this can bring an acceptable and useable result. However if you need to grade the S-log3 to gain the same contrast as a dedicated high contrast gamma such as 709, then the lack of recorded data can make the image become coarser than it would be if recorded by a narrow range gamma. Furthermore many other factors come into play such as how noisy the camera is, the codec used, bit depth etc. So at the end of the day my recommendation is to not assume log will be better, but to test both log and standard gammas in similar conditions to those you will be shooting in.
Log gamma curves are designed for one thing and one thing only, to extend the dynamic range that can be recorded. In order to be able to record that greater dynamic range all kinds of compromises are being made.
Lets look at a few facts.
Amount of picture information: The amount of picture information that you can record, i.e. the amount of image samples, shades or data points is not determined by the gamma curve. It is determined by the recording format or recording codec. For example a 10 bit codec can store up to 1023 shades or code values while an 8 bit codec can record up to 255 shades or code values (in practice this is a maximum of 235 shades as 16 are used for sync). It doesn’t matter which gamma curve you use, the 10 bit codec will contain more usable picture information than the 8 bit codec. The 10 bit picture will have over 1000 shades while the 8 bit one less than 255. For low light more “bits” is always going to be better than less as noise can be recorded more faithfully. If noise is recorded with only a few shades or code values it will look coarse and ugly compared to noise recorded with lots more levels which will look smoother.
Bottom line though is that no matter what gamma curve, the maximum amount of picture information is determined by the codec or recording format. It’s a bit of a myth that log gives you more data for post, it does not, it gives you a broader range.
Log extends the dynamic range: This is the one thing that log is best know for. Extending the dynamic range, but this does not mean we have more picture information, all it means is we have a broader range. So instead of say a 6 or 7 stop range we have a 14 stop range. That range increase is not just an increase in highlight range but also a corresponding increase in shadow range. A typical rec-709 camera can “see” about 3 or 4 stops below middle grey before the image is deemed to be too noisy and any shades or tone blend into one. An S-log2 or S-log3 camera can see about 8 stops below middle grey before there is nothing else to see but noise. However the lower 2 or 3 stops of this extended range really are very noisy and it’s questionable as to how useful they really are.
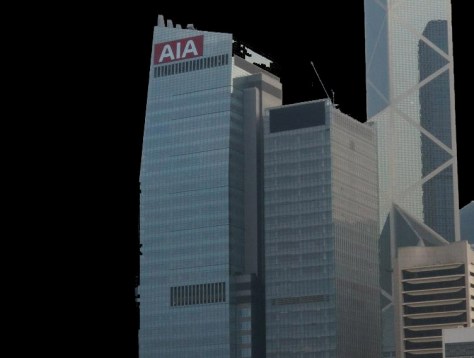
Imagine you are shooting a row of buildings (each building representing a few stops of dynamic range). Think of standard gammas as a standard 50mm lens. It will give you a great image but it won’t be very wide, you might only get one or two buildings into the shot, but you will have a ton of detail of those buildings.
Shot of buildings taken with standard lens, think “standard gamma”
Think of a wide dynamic range gamma such as S-log as a wide angle lens. It will give you a much wider image taking in several buildings and assuming the lens is of similar quality to the 50mm lens, the captured pictures will appear to be of similar quality. But although you have a wider view the level of detail for each building will be reduced. You have a wider range, but each individual building has less detail
Buildings shot with 20 mm wide lens. Think “wide gamma” or log gamma.
But what if in your final scene you are only going to show one or two buildings and they need to fill the frame? If you shoot with the wide lens you will need to blow the image up in post to the show just the buildings you want. Blowing an image up like this results in a lower quality image. The standard lens image however won’t need to be blown up, so it will look better. Log is just the same. While you do start off with a wider range (which may indeed be highly beneficial) each element or range of shades within that range has less data than if we had shot with a narrower gamma.
Wide lens (think wide gamma) cropped to match standard lens (think standard gamma). Note the loss of quality compared to starting with standard.
Using log in low light is the equivalent of using a wide angle lens to shoot a row of buildings where you can actually only see a few of the buildings, the others being invisible and then blowing up that image to fill the frame. The reality is you would be better off using the standard lens and filing the frame with the few visible building, thus saving the need to blow up the image.
Shooting a scene where most of it is dark with wide lens (wide gamma/log) wastes a lot of data.Using a narrower lens (narrow or standard gamma) wastes less data and the information that is captured is of higher quality.
S-Log2/3 has a higher base ISO: On a Sony camera this higher ISO value is actually very miss-leading because the camera isn’t actually any more sensitive in log. The camera is still at 0dB gain, even though it is being rated at a higher ISO. The higher ISO rating is there to offset an external light meter to give you the darker recording levels normally used for log. Remember a white card is recorded at 90% with standard gammas, but only 60% with log. When you change the ISO setting upwards on a light meter it will tell you to close down the aperture on the camera, that then results in the correct darker log exposure.
S-Log3 may appear at first brighter than standard gammas when you switch to it. This is because it raises the very bottom of the log curve and puts more data into the shadows. But the brighter parts of the image will be no brighter than with a camera with standard gammas at 0db gain. This extra shadow data may be beneficial for some low light situations, so if you are going to use log in low light S-Log3 is superior to S-Log2.
If you can’t get the correct exposure with log, don’t use it! Basically if you can’t get the correct exposure without adding gain or increasing the ISO don’t use log. If you can’t get your midrange up where it’s supposed to be then you are wasting data. You are not filling your codec or recording format so a lot of data available for picture information is being wasted. Also consider that because each stop is recorded with less data with log not only is the picture information a bit coarser but so too is any noise. If you really are struggling for light, your image is likely to be a bit dark and thus have a lot of noisy and coarse noise is not nice. Log has very little data allocated to the shadows in order to free up data for the highlights because one of the key features of log is the excellent way it handles highlights as a result an under exposed log image is going to lack even more data. So never under expose log.
Chart showing S-Log2 and S-Log3 plotted against f-stops and code values. Note how little data there is for each of the darker stops, the best data is above middle grey.
Think of log as the opposite of standard gammas. With standard gammas you always try never to over expose and often being very slightly under exposed is good. But log must never be under exposed, there is not enough data in the shadows to cope with under exposure. Meanwhile log has more data in the highlights, so is very happy to be a little over exposed.
My rule of thumb is quite simple. If I can’t fully expose log at the base sensitivity I don’t use it. I will drop down to a cinegamma or hypergamma. If I can’t correctly expose the hypergamma or cinegamma then I drop down to standard gamma, rec-709.
One thing that’s becoming very clear with the on-going FS5 discussions is that the use of ISO with video camera is confusing the hell out of people. ISO is an almost meaningless sensitivity measure for a video camera. Especially with a video camera that uses different types of gamma curves. The ISO rating is there so that when you use an external light meter you will get the correct exposure, but it doesn’t necessarily tell you a great deal about the cameras actual sensitivity.
Take a Sony S-log camera. If you set the camera to 0dB gain and expose white card or piece of paper using standard gamma correctly (white at 90%), then still at 0dB gain switch to S-log does the piece of paper get brighter? The answer is NO it does not. White will drop to about 70% depending on the log curve chosen. That should be telling you that the actual sensitivity of the camera is NOT changing. If you set the camera to ISO, the ISO indication will change from 1000 ISO to 3200 ISO when you switch between standard gamma and log on an FS5 for example, but these are both 0dB gain and the picture brightness does not significantly change when you switch between standard gamma and log (the picture does become flatter, don’t confuse this for “brighter”. Use a waveform or histogram and measure the levels of a fully exposed scene).
If in both cases, S-Log and Standard Gamma, the gain is 0dB, even thought the ISO rating is changing, the actual sensitivity of the camera is not changing, the only thing that’s changing is the shape of the gamma curve.
The ISO rating changes because for normal gammas you would expose white at 90% while for log it is exposed darker at 60%. So if using an external light meter you want the light meter to tell you to close the aperture relative to standard gammas so that white ends up at 60% (the lower white level makes space for more dynamic range above white).
When you change your external light meter from 1000 ISO to 3200 ISO the light meter will tell you to close the aperture by a stop and a half and that will give you that correct and now darker log exposure.
This is why I hate the use of ISO in video cameras because it is miss-leading people. The FS5 (and the same applies to the FS7, F5, F55 etc) isn’t actually any more sensitive to light in log than in standard gammas (video camera sensitivity is governed by the sensors efficiency at converting light into electrons and we cannot change the sensor). Neither does it have any more gain at 3200 ISO in log compared to 1000 ISO in standard gammas. Both are 0dB. That’s why when you shoot at 3200 ISO in Log you don’t get any more noise and you don’t get any additional NR artefacts…. because the camera isn’t actually becoming any more sensitive and it’s not adding any extra gain, it’s just a rating change to make sure an external light meter would give you the correct log exposure. If people actually went back and used the correct and appropriate terms for video cameras: ie: dB we wouldn’t have all this stupid confusion, it would be obvious that 0dB = 0dB. The gain and thus sensitivity in standard gammas with 0dB is actually the same as in Log at 0dB. If people actually took the time to look at their monitors it would also be pretty obvious that the sensitivity does not change.
Sadly all this is resulting in some pretty ridiculous statements like: I use log in low light because it’s the only way I can get 3200 ISO without adding extra noise. The reality is that the only thing that’s really changing is the little number on the viewfinder overlay, in standard gamma it says 1000, in log it says 3200. But the sensitivity and noise levels are not changing. S-Log3 does give raised shadows, but those raised shadows will show more noise due to the raised shadow levels, but for a like-for-like brightness they are no more noisy than any other gamma. Using the wrong terminology or miss-understanding how a video camera works is resulting in very silly mistakes. Once upon a time video camera operators used to rely on monitors and waveform displays to get exposure and gain levels right. But this isn’t cool anymore because we are all now “Directors of Photography” and DP’s don’t use gain or shutter speeds they use ISO and angles. This is nonsense and the desire to sound hip and cool is resulting in poor or miss-guided camera operation.
Following on from the ongoing discussions about the way the noise reduction on the PXW-FS5 works I’d like to try to answer a few points that have been raised.
Noise reduction is incorporated in to almost every single video camera on the market today. Without it cameras would not be achieving the sensitivity levels that we are becoming accustomed to. Big sensors have helped increase sensitivity, but noise reduction also plays a major part. 4 years ago the typical sensitivity of a video camera was around the equivalent of 300 ISO. Today 1000 ISO is common. The laws of physics have not changed but image processing has.
However image processing has limitations. Noise reduction is a trade off as it typically introduces other artefacts including blurring or softening of the image, smearing of the image when there is motion, posterisation, blockiness or banding.
The more noise you introduce into the image the harder the NR has to work and as a result the worse, or more noticeable the artefacts will become.
Every time you add 6dB of gain (or double the ISO) of a sensor you will also double the underlying noise level, that is a very significant noise increase.
Different sensors will exhibit different noise characteristics. A sensor with a very high pixel count may exhibit finer grain, but may be less sensitive, have aliasing issues, skew issues or heat problems. A sensor with fewer pixels may have coarser grain but be more sensitive have fewer aliasing issues, fewer skew issues and be less prone to overheating. A sensor with an excess of pixels compared to the final image resolution may be easier to noise reduce as the excess sensor resolution can be used during the NR process without degrading the end image, but the high pixel count may introduce some of the other issues listed above.
So to get an image with an acceptable noise level, low skew, a desirable level of sensitivity without overheating is a very fine balancing act. Different cameras will perform differently and each will have strength’s and weaknesses. A Sony A7S has big pixels, so it’s very sensitive and only needs low levels of NR at the base sensitivity compared to say an FS7 with it’s smaller pixels. But the A7S suffers from a lot of image skew that is unacceptable for many types of video production plus there are heat issues when shooting for long periods. Meanwhile the FS7, while less sensitive has very, very low skew levels and no overheating.
But what about the new PXW-FS5? There is much discussion about the noise reduction in this camera. First of all it is a different camera to any other. So it will not perform the same as any other. It uses a different combination of sensor and processing to any other camera on the market.
Does it perform as well as an A7R in low light? Actually it’s not all that different in terms of base sensitivity. What about if you add gain? Well the image quality of both cameras deteriorates when you add gain. Both become noisier and both have more NR artefacts. The A7RII is possibly a better performer in terms of noise and artefacts, maybe due to the higher pixel count allowing the use of a lot of pixel binning. Does this mean that the FS5 is somehow broken or defective? No, it just means that the A7RII has the edge in low light. Do remember that the A7RII suffers from a lot of image skew, really appalling flash band issues and overheats on long shots. Does that mean the A7RII is broken, because after all the FS5 doesn’t have these issues problems. Of course not, these are just limitations of these two very different cameras.
Anyway coming back to the noise reduction. As we can’t actually turn off the NR on the FS5 it’s hard to understand exactly how beneficial it is, even though it does introduce some inevitable artefacts (NR will always have undesirable side effects), especially when you add more than 6dB of gain. But we can get some clues. The edge tearing artefact that can be see on vertical motion at high gain levels appears to simply be noise leaking through the temporal NR when there is a lot of vertical motion, and it’s pretty obvious that there’s actually a lot of noise being hidden.
Why does this only occur in 4K? Well that’s probably because in HD the camera has a surplus of sensor resolution, so different noise reduction processes that soften the image can be used instead of temporal NR as the softening won’t be noticed in HD.
Another clue as to how well the NR works is that if you quickly switch the gain switch from one gain level to another it takes a couple of frames for the temporal NR to catch up so for one or two frames the temporal NR level is reduced (not eliminated just reduced a bit). If you look at these frames it gives some insight into how amazingly effective the temporal NR is and as well as temporal NR the FS5 is also employing spatial NR, so this is only part of the story.
I have a couple of frame grabs. One is a frame where the temporal NR is stabilised and doing it’s thing reducing the noise in the picture. This is with +12 dB of gain applied and to be honest it’s a pretty clean looking image for a 4000 ISO shot, imagine adding +24dB gain to an EX1 or PMW-500 to get up to 4000 ISO and what that would look like! The other frame is a frame grabbed as the camera is switching between +6dB to +12dB, so what you are seeing is about 6dB’s worth of temporal noise reduction. Just look at all that very nasty looking noise. Notice the very blocky areas in the shadows, in motion these can be seen to be fluttering from frame to frame as the NR kicks in, it’s really nasty. The noise is having a serious impact on the image resolution. On the far left table leg in the close up you can no longer see the wood grain. Now imagine what at least double if not 3 times that would look like because if you were to shoot at 3200 ISO with the standard gammas without NR, that’s what it’s going to look like. It would almost certainly overload the internal coded resulting in compression artefacts that you won’t see while shooting, only when you play the footage back when quite possibly it’s too late to do anything about it.
So next time you look at a noise reduction artefact do think about just how dreadful the image would look without any NR. We are not talking about seeing a little bit more noise and grain with reduced NR but a blizzard of noise and grain. It’s also worth remembering that all the camera manufacturers are doing this. Also consider what a typical 1/2″ or 2/3″ broadcast camera would look like with +24dB of gain added, it really would be unusable, yet the FS5 can deliver an image at 4000ISO that is really not all that bad. It’s not perfect, it does have some artefacts but really it’s quite remarkable what a camera like this can do thanks to modern noise reduction processes and large sensors.
Stable noise reduction at +12dB gain.Frame grab between +6dB and +12dB gain before the temporal noise reduction has fully kicked in.FS5 at +12dB gain.Single frame during the transition from +6dB gain to +12dB gain before the noise reduction has fully kicked in. Notice all the extra noise, now at least double this if you want an idea of how much noise the NR is dealing with when shooting at 3200 ISO with a standard gamma.
Temporal NR: Temporal noise reduction works by taking a single pixel and measuring it’s average output over several frames. Using this average value a correction can be applied to the current frame that helps reduce the instantaneous brightness fluctuations that are seen as noise. However if there is motion in that area this can create nasty local blurring or smearing effects. On option is to include a process that detects motion and locally reduces or eliminates the noise reduction during motion to counter the smear or blurring. Either way motion in the image introduces undesirable artefacts.
It’s amazing how poorly this is understood. I’m also rather surprised at some peoples expectations when it comes to noise in shadow areas of video images.
First of all, all video camera sensors produce noise. There will always be noise to some degree and this is typically most visible in the darker parts of the image because if your actual image brightness is 5% and your noise is 5% the noise is as big as the desired signal. In the highlights the same noise is still there, but when the brightness is 80% and the noise is 5% the noise is much, much less obvious.
ISO: What is ISO with a video camera? On it’s own it’s actually a fairly meaningless term. Why? Well because a camera manufacturer can declare more or less any ISO they choose as the cameras sensitivity. There is no set standard. It’s up to the camera manufacturer to pick an ISO number that gives a reasonably bright image with an acceptable amount of noise. But what is acceptable noise? Again there is no standard, so ISO ratings should be ignored unless you also know what the signal to noise ratio is at that ISO. For decades video camera sensitivity was rated in db. The sensitivity is measured at 0db in terms of the aperture needed to correctly expose a 90% white card at 2000 lux. This is very precise and easily repeatable. The signal to noise ratio is then also measured at the unity (0db) gain point and from this you can actually get a really good understanding of how that camera will perform, not just sensitivity, but more importantly how much noise at the nominal native sensitivity.
But now, because it’s fashionable and makes us sound like film camera operators it’s all about ISO. But ISO on it’s own doesn’t really tell us anything useful. Take a Sony FS7 or F5. In standard gamma at 0db the ISO rating is 800 ISO. But when you switch to S-Log it becomes 2000 ISO (but you are still at 0db). Have you ever noticed that the image doesn’t get brighter even though you are increasing the ISO? The ISO is increased because what is actually happens is that you gain the ability to record a little over 1 stop further into the shadows as you are now using more of the sensors low range (which is normally well below the black level chosen for 709) with the side effect of also seeing a little more than twice as much more noise (1 stop = 6db = double). The camera isn’t actually becoming any noisier, but because your using a lower sensor range you will see more noise in the shadows, noise that in normal gammas goes unseen. It’s really important that you understand this as it explains why S-log looks very noisy in the deepest shadows compared to standard gammas.
Native sensitivity… again this is open to a bit of wriggle room by the camera manufacturer. With a camera shooting log, generally it is a case of mapping the entire sensor capture range from black to white to the zero to 100% recording range. Normally this is done using as little gain as possible as gain adds noise. But as noise reduction processes get better, including on sensor noise reduction, camera manufacturers have some space to move the mapping of the sensor to the recording up and down a bit. Sadly or us, high ISO’s sell cameras. So camera manufacturer’s like to have cameras with high ISO’s because people look at the ISO rating, but ignore the signal to noise figure. The end result is cameras with high ISO’s (because it sounds cool) but with less than optimum signal to noise ratios. It would probably be better for all of us if we started paying much more attention to the signal to noise ratios of cameras, not just the ISO. That may help prevent manufacturers from bring out cameras with ridiculously high native ISO’s that are noisy and frankly far from what we need, which is a good low noise base sensitivity.
The next issue is that people appear to expect to be able to magically pull something out of nothing. If you have areas of deep shadow in your image you can’t magically pull out details and textures from those areas without significantly increasing the noise in those parts of the picture. You can’t do it and you shouldn’t be trying to do it. If you have an 8 bit camera the noise in the shadows will be really coarse, you try to stretch those levels, even by a tiny bit, it’s going to get ugly fast (the same with 12 bit linear raw too). What’s the answer…. LIGHT IT PROPERLY OR EXPOSE IT BRIGHTER.
We appear to have lost the ability to light or expose properly. If you want detail in your shadows either expose them brighter or throw some light in there, then take the levels down in post. Remember it’s all about contrast ratios. Faces are normally 1.5 stops above middle grey and 3.5 stops above our dark shadow range. So if you want a lot of textures in your deep shadows expose the entire scene brighter, not just the foreground but the background and shadows too. If you expose faces at +4.5 above black. Mid grey will still be -1.5 stops below those skin tones and your shadows will still be 3.5 stops below your faces. the contrast ratio remains the same if you increase the overall light level, so now everything will be 1 stop brighter. Then take the levels down by 1 stop in post and bingo, you noise levels are cut in half and your shadows look so much better and might actually now contain some useable picture information.
I started writing this as an explanation of why I often choose not to use log for low light. But instead it’s ended up as an experiment you can try for yourself if you have a waveform monitor that will hopefully allow you to better understand the differences between log and standard gamma. Get a waveform display hooked up to your log camera and try this for yourself.
S-Log and other log gammas are wonderful things, but they are not the be-all and end-all of video gammas. They are designed for one specific purpose and that is to give cameras using conventional YCbCr or RGB recording methods the ability to record the greatest possible dynamic range with a limited amount of data, as a result there are some compromises made when using log. Unlike conventional gammas with a knee or gammas such as hypergammas and cinegammas, log gammas do not normally have any highlight roll off, but do have a shadow roll-off. Once you get above middle grey log gammas normally record every stop with almost exactly the same amount of data, right up to the clipping point where they hard clip. Below middle grey there is a roll off of data per stop as you go down towards the black clip point (as there is naturally less information in the shadows this is expected). So in many respects log gammas are almost the reverse of standard gammas. The highlight roll off that you may believe that you see with log is often just the natural way that real world highlights roll off anyway, after all there isn’t an infinite amount of light floating around (thank goodness). Or that apparent roll off is simply a display or LUT limitation.
An experiment for you to try.
Click on the chart to go to larger versions that you can download. Display it full screen on your computer and use it as a test chart. You may need to de-focus the camera slightly to avoid aliasing from the screens pixels.
If you have a waveform display and a grey scale chart you can actually see this behaviour. If you don’t have a chart use the grey scale posted here full screen on your computer monitor. Start with a conventional gamma, preferably REC-709. Point the camera at the chart and gradually open up the aperture. With normal gammas as you open the aperture you will see the steps between each grey bar open up and the steps spread apart until you reach the knee point, typically at 90% (assuming the knee is ON which is the default for most cameras). Once you hit the knee all those steps rapidly squash back together again.
What you are seeing on the waveform is conventional gamma behaviour where for each stop you go up in exposure you almost double the amount of data recorded, thus capturing the real world very accurately (although only within a limited range). Once you hit the knee everything is compressed together to increase the dynamic range using only a very small recording range, leaving the shadows and all important mid range well recorded. It’s this highlight compression that gives video the “video look”, washed out highlights with no contrast that look electronic.
If you repeat the same exercise with a hypergamma or cinegamma once again in the lower and mid range you will see the steps stretch apart on the waveform as you increase the exposure. But once you get to about 65-70% they stop stretching apart and now start to squeeze together. This is the highlight roll off of the hypergamma/cinegamma doing it’s thing. Once again compressing the highlights to get a greater dynamic range but doing this in a progressive gradual manner that tends to look much nicer than the hard knee. Even though this does look better than 709 + Knee in the vast majority of cases, we are still compressing the highlights, still throwing away a lot of data or highlight picture information that can never be recovered in post production no matter what you do.
Conventional video = Protect Your Highlights.
So in the conventional video world we are taught as cameramen to “protect the highlights”. Never overexpose because it looks bad and even grading won’t help a lot. If anything we will often err on the side of caution and expose a little low to avoid highlight issues. If you are using a Hypergamma or Cinegamma you really need to be careful with skin tones to keep them below that 65-70% beginning of the highlight roll off.
Now repeat the same experiment with Slog2 or S-log3. S-log2 is best for the experiment as it shows what is going on most clearly. Before you do it though mark middle grey on your waveform display with a piece of tape or similar. Middle grey for S-log2 is 32% (41% for S-log3).
Now open up the aperture and watch those steps between the grey scale bars. Below middle grey, as with the standard gammas you will see the gap between each bar open up. But take careful note of what happens above middle grey. Once you get above middle grey and all the way to the clip point the gap between each step remains the same.
So what’s happening now?
Well this is the S-log curve recording each stop above middle grey with the same amount of data. In addition there is NO highlight roll off. Even the very brightest step just below clipping will be same size as the one just above middle grey. In practice what this means is that it doesn’t make a great deal of difference where you expose for example skin tones, provided they are above middle grey and below clipping. After grading it will look more or less the same. In addition it means that that very brightest stop contains a lot of great, useable picture information. Compare that to Rec-709 or the Cinegammas/Hypergammas where the brightest stops are all squashed together and contain almost no contrast or picture information.
Now add in to the equation what is going on in the shadows. Log has less data in the shadows than standard gammas because you are recording a greater overall dynamic range, so each stop is recorded with overall less data.
Standard Gammas = More shadow data per stop, much less highlight data = Need to protect highlights.
Log= Less shadow data per stop, much more highlight data = Need to protect shadows.
Hopefully now you can see that with S-log we need to flip the way we shoot from protecting highlights to protecting shadows. When you shoot with conventional gammas most people expose so the mid range is OK, then take a look at the highlights to make sure they are not too bright and largely ignore whats going on in the shadows. With Log you need to do the opposite. Expose the mid range and then check the shadows to make sure they are not too dark. You can ignore the highlights.
Yes, thats’ right, when shooting log: IGNORE the highlights!
Cinegamma highlight roll off. Note how the tree branches in the highlights look strangled and ugly due to the lack of highlight data, hence “protect your highlights”.Graded S-Log2. Note how nice the same tree branches look because there is a lot of data in the highlights, but the shadows are a little crunchy. Hence: protect your shadows.
For a start you monitor or viewfinder isn’t going to be able to accurately reproduce the highlights as bright as they are . So typically they will look a lot more over exposed than they really are. In addition there is a ton of data in those highlights that you will be able to extract in the grade. But most importantly if you do underexpose your mid range will suffer, it will get noisy and your shadows will look terrible because there will be no data to work with.
When I shoot with log I always over expose by at least 1 stop above the manufacturer recommended levels. If you are using S-log2 or S-log3 that can be achieved by setting zebras to 70% and then checking that you are JUST starting to see zebras on something white in your shot such as a white shirt or piece of paper. If your camera has CineEI use an EI that is half of the cameras native ISO (I use 1000 or 800 EI for my FS7 or F5).
I hope these experiments with a grey scale and waveform help you understand what is going on with you gamma curves. One thing I will add is that while controlled over exposure is beneficial it can lead to some issues with grading. That’s because most LUT’s are designed for “correct” exposure so will typically look over exposed. Another issue is that if you simply reduce the gain level in post to compensate than the graded footage looks flat and washed out. This is because you are applying a linear correction to log footage. Fo a long tome I struggled to get pleasing results from over exposed log footage. The secret is to either use LUT’s that are offset to compensate for over exposure or to de-log the footage prior to grading using an S-Curve. I’ll cover both of these in a later article.
Chart showing S-Log2 and S-Log3 plotted against f-stops and code values.
What about shooting in low light?
OK, now lets imagine we are shooting a dark or low light scene. It’s dark enough that even if we open the aperture all the way the brightest parts of the scene (ignoring things like street lights) do not reach clipping (92% with S-Log3 or 109% with S-Log2). This means two things. 1: The scene has a dynamic range less than 14 stops and 2: We are not utilising all of the recording data available to us. We are wasting data.
Log exposed so that the scene fills the entire curve puts around 100 code values (or luma shades) per stop above middle grey for S-log2 and 75 code values for S-Log3 with a 10 bit codec. If your codec is only 8 bit then that becomes 25 for S-log2 and 19 code values for S-Log3. And that’s ONLY if you are recording a signal that fills the full range from black clip to white clip.
3 stops below middle grey there is very little data, about thirty 10 bit code values for S-Log2 and about 45 for S-log3. Once again if the codec is 8 bit you have much less, about 7 for S-Log2 and about 11 for S-log2. As a result the darker parts of your recorded scene will be recorded with very little data and very few shades. This impacts how much you can grade the image in post as there is very little picture information in the darker parts of the shot and noise tends to look quite coarse as it is only recorded with a limited number of steps or levels (this is particularly true of 8 bit codecs and an area where 8 bit recordings can be problematic).
So what happens if we use a standard gamma curve?
Lets say we now shoot the same scene with a standard gamma curve, perhaps REC-709. One point to note with Sony cameras like the FS5, FS7, F5/F55 etc is that the standard gammas normally have a native ISO one to two stops lower than S-Log. That’s because the standard gammas ignore the darkest couple of stops that are recorded when in log. After all there is very little really useable picture information down there in all the noise.
Now our limited dynamic range scene will be filling much more of our recording range. So straight away we have more data per stop because we are utilising a bigger portion of the recording range. In addition because our recorded levels will be higher in our recording range there will be more data per stop, typically double the data especially in the darker parts of the recorded image. This means than any noise is recorded more accurately which results in smoother looking noise. It also means there is more data available for any post production manipulation.
But what about those dark scenes with problem highlights such as street lights?
This an area where Cinegammas or Hypergammas are very useful. The problem highlights like strret lights normally only make up a very small part of your your overall scene. So unless you are shooting for HDR display it’s a huge waste to use S-log just to bring some highlights into range as you make big compromises to the rest of the image and you’ll never be able to show them accurately in the finished image anyway as they will exceed the dynamic range of the TV display. Instead for these situations a Hypergamma or Cinegamma works well because below about 70% exposure Hypergammas and cinegammas are very similar to Rec-709 so you will have lots of data in the shadows and mid range where you really need it. The highlights will be up in the highlight roll off area where the data levels or number of recorded shades are rolled off. So the highlights still get recorded, perhaps without clipping, but you are only giving away a small amount of data to do this. The highlights possibly won’t look quite as nice as if recorded with log, but they are typically only a small part of the scene and the rest of the scene especially the shadows and mid tones will end up looking much better as the noise will be smoother and there will be more data in that all important mid-range.
This is something that keeps coming up in my workshops. It’s very important if shooting with S-Log2 or S-Log3 not to under expose and in most cases it can be highly beneficial to over expose a bit. Especially if you are using a camera like the A7s or FS5 in 4K when you only have 8 bit data.
Take a look at this chart. It plots the S-Log2 and S-Log3 gamma curves on a log scale of f-stops against the amount of 10 bit or code values used to record each stop. The center line of the chart is middle grey. Both S-log2 and S-log3 provide 8 stops below middle grey and 6 stops above. Take a look at the darkest stop, the one that is -7 to -8 and look at how much data is allocated to that stop. With 10 bit recording you have according to this chart about 10 code values for S-Log2 and about 20 for S-Log3. That’s if you have 10 bit, and it’s not a lot of data. Admittedly there isn’t going to be a great deal of scene information in that darkest stop, deep in the shadows and the noise. But there’s part of the issue, the noise. If you have under exposed and you take this in to post and have to stretch out the shadows, the noise in these darkest shadows is going to look pretty coarse because it hasn’t been recorded with many shades/steps so stretching it out will make even “rougher” for want of a better term. If you are recording with 8 bit the problems is even worse. With 8 bit, S-Log2 will only have around 2 or 3 code values for that bottom stop, in effect the noise will have two values – black or +1 stop. Imagine how nasty that will look if you need to raise or stretch you blacks because you are under exposed, it will become very blocky and grainy.
The solution is to over expose a bit. By over exposing your footage by a stop when you go in to post production you will in most cases be bringing your levels down. So instead of stretching the noise out and making it worse you will be shrinking it down and reducing the negative impact it has on it’s image. Because cameras like the FS5, A7s etc have 14 stops of dynamic range this small bit of over exposure is going to make very little difference to your highlights in the vast majority of situations. Any slight over exposure you may have will likely look quite natural anyway, after all our own eyesight does also over expose, we don’t have unlimited dynamic range. On top of that the display technology does not exist to show a 14 stop range shot in it’s entirety and with natural contrast.
OK, my hands are high in the air. I’m as guilty of this as everyone else. I test cameras, present results here and elsewhere and I report on my observations. Typically providing frame grabs of what I have shot, maybe some nice scenic shots, maybe people shots, but not often shots of test charts. I use them all the time in my workshops and when setting up cameras for myself so why don’t I shoot test charts for my reviews? Well because they are boring and often don’t reflect the real world that we shoot.
But here’s the problem. In my previous post I commented about how some footage of Panasonic’s V-Log from the GH4 looked. The shooter, like me, had chosen to shoot some random shots and then grade them. But here’s the problem. I don’t know what those scenes actually looked like when they were shot and I don’t know what look the reviewer was trying to achieve. Plus there is always the issue that a look that one person finds pleasing may be the next persons least attractive look.
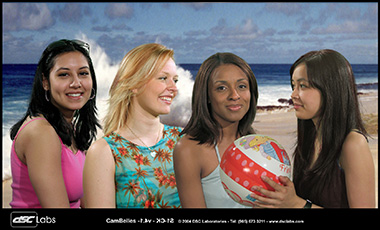
This is where charts should be used. If you shoot a known test chart you eliminate a lot of variables. One of my all time favourite charts is the DSC labs Cambelles.
It’s not a chart in the traditional sense, it’s just a picture of some attractive young ladies on a beach. But it’s a very clever image as it contains some very useful markers. It has very deep shadows and bright highlights (with a 5 stop dynamic range). It has a very broad range of skin tones and the skin tones have the same shade as the industry standard Chroma Du Monde charts. It has all the colors that you are going to encounter in normal shooting, blues, green. reds, they are all there. But here’s one of the key things – repeatability. Every one of these charts that you buy from DSC is exactly the same. So Fred in Australia could get a new camera, shoot his copy of the chart and straight away I know exactly what it should look like here on the other side of the world. Also because it’s a picture of people on a beach, we all know what that looks like and when it isn’t right we notice it. How many of you right now without looking it up can tell me exactly what color the 3rd bar from the left on an SMPTE color bars chart should be?
The use of a decent chart also becomes especially important when looking at cameras where the final image isn’t derived in the camera but in post production. By shooting a known chart and providing a frame grab of that unprocessed image those reading the review can make their own assessment of how easily the footage will grade and how it will respond to different lookup tables. Also when providing ready graded examples of footage, by including a chart in a corner of the shot the reader can see exactly what you have done to the footage. Maybe the reviewer likes strong reds, if there is a chart or other known color reference in the shot then the person reading the review will be able to see this from the strong reds on the chart in the graded footage.
Of course test charts do only show a part of the story about how a camera will behave in the real world. Real shots of real scenes are still incredibly important. But well designed charts brings a known reference and helps both the reviewer and those reading the review see through a lot of the variables that creep into creative shooting of real world scenes.
So: Note to self: Try to include charts in your test shots more often.
Manage your privacy
To provide the best experiences, we use technologies like cookies to store and/or access device information. Consenting to these technologies will allow us to process data such as browsing behavior or unique IDs on this site. Not consenting or withdrawing consent, may adversely affect certain features and functions.
Functional
Always active
The technical storage or access is strictly necessary for the legitimate purpose of enabling the use of a specific service explicitly requested by the subscriber or user, or for the sole purpose of carrying out the transmission of a communication over an electronic communications network.
Preferences
The technical storage or access is necessary for the legitimate purpose of storing preferences that are not requested by the subscriber or user.
Statistics
The technical storage or access that is used exclusively for statistical purposes.The technical storage or access that is used exclusively for anonymous statistical purposes. Without a subpoena, voluntary compliance on the part of your Internet Service Provider, or additional records from a third party, information stored or retrieved for this purpose alone cannot usually be used to identify you.
Marketing
The technical storage or access is required to create user profiles to send advertising, or to track the user on a website or across several websites for similar marketing purposes.
 More good news for Sony PMW-F55 owners. A rather obscure announcement over on the official Sony user group states that the PMW-F55 will gain the ability to record 4K raw at up to 120fps via an optional future accessory.