Due to some unexpected cancellations I do have a few spaces available for next January’s expedition to Northern Norway.
These are not workshops or training trips, but I will be on hand to help with photography and video. These trips are an adventure to a very remote, very special location, only accessible by snow scooter in the winter. You will experience a very different way of life as our hosts are Sami people. There are different activities each day from Ice Fishing to Dog Sledding. I have many guests that come back again and again.
On my last storm chasing trip I was joined by Bright Tangerine’s Josh Cooper who made a short film about our adventure. We drove around 6,000 miles in 10 days crossing many states including Texas, New Mexico, Kansas, Oklahoma, Nebraska, Wyoming and South Dakota. We encountered violent supercell thunderstorms with frequent lightning and giant hail. There were a couple of distant tornadoes and all in all it was quite an adventure.
You can see the film here: https://www.brighttangerine.com/storm-chasing-with-alister-chapman/
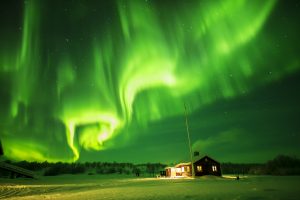
Next week I head out to Norway for my annual trip in search of the Northern lights. Like last year I will try to stream the Aurora live from Norway. Of course this does depend on the weather and whether the Aurora comes out to play.
The plan is to stream each evening from around 6pm CET Central European time starting from February 2nd. I will stream for as long as I can when the Aurora is visible. I have scheduled 5 YouTube live streams but there will likely be more added depending on the weather and many other variables that are out of my control. These streams may start later than planned or get interrupted if I need to move the camera position or if I run out of power. As well as the scheduled streams I intend to include additional streams where I will go over the equipment used and things like that.
To stream the Aurora I will be using various pieces of kit including my Sony FX3 camera connected to an Accsoon Seemo or an Accsson CineView. The Seemo connects to an iPhone directly via a cable and I can then stream the output of the FX3 from the phone. However the area where I will be doesn’t have the best cell phone signal so I might need to use the CineView. With the Cineview connected to the camera I can send the pictures to my phone and then stream from the phone. This way I can put the phone in a location where there is a better signal.
In a few days I will be heading off to the north of Norway for my annual trip to shoot the Northern Lights. This year I really do hope to stream the Aurora live.
Aurora captured by my FX3 in 2022.
I’ve tried to livestream the Aurora before, but not really been successful. We go to a very remote location to get away from city lights and light pollution. But that means the cellphone connection isn’t great. And then I have had issues with getting the streaming hardware to work correctly in the extreme cold, it’s often well below -20c. I really want to stream the output of my FX3 rather than shooting the back of the camera with a phone as I have done before. Hopefully I will actually succeed this time. There have been some major updates to the software on my Xperia Pro phone and now the HDMI input app includes rtmp streaming direct from the app, so now I can stream from the FX3 via HDMI and the Xperia Pro more easily than before.
The next big unknown is when will the Aurora be visible. To see the Aurora I need clear skies and then the Aurora has to actually be present. There is no guarantee that it will be visible and I certainly can’t predict exactly when. So – I can’t tell you when I will be live. Most likely it will be sometime between January 12th and January 22nd, after 16:00 GMT and before 02:00 GMT. I may be live many times on different nights.
I will also be on facebook and this would be a good way to keep updated as I will try to post on facebook prior to going live on YouTube.
As well as the FX3 I’m taking an FX30 and it will be interesting to see how this performs trying to shoot the Aurora. Main lenses for the Aurora will be the Sony 24mm f1.4 GM, 20mm f1.8 G but I will also have a Sigma 20mm f1.4 with metabones speedbooster for the FX30.
Every January I run tours to northern Norway in the hope of seeing the Northern Lights. Over the years I have been incredibly lucky and to date, every single tour I have run has seen the Northern lights. I’ve taken all sorts of cameras on these tours, everything from optical disc camcorders (PDW-700), solid state camcorders including the original Sony EX1 and most of Sony’s large sensor video cameras from FS100 to the FX9.
All of these cameras are fairly bulky and require larger tripods and battery systems. In addition, I have always taken a stills camera to shoot timelapse of the Aurora. This year I decided to downsize the equipment I was taking, so instead of taking a full-size video camera I decided to take 2 small cameras.
I already have an FX3, which is a great camera and extremely good in low light. Being part of the Sony Cinema line, it has Sony’s very nice looking Venice based colour science as well, can shoot using S-Log3 as well as the handy what you see is what you get S-Cinetone gamma curve. I know this camera well and I knew it would be a good choice for the challenges I would encounter in Norway. To compliment the FX3 I also decided to take a Sony A1. The A1 (or Alpha 1) is Sony’s flagship compact mirrorless stills camera. As well as amazing photo performance the A1 also promises much as a video camera. It’s 50.1 megapixel sensor allows it to shoot high quality video at 8K. Like the FX3 the A1 can record using S-Log3 and offers similar dynamic range to the FX3.
Sony Alpha A1
Need for Speed – fast lenses.
For many years my main lens for shooting the Northern Lights has been the Sigma 20mm f1.4. This is a great lens, but it is quite heavy and I’ve never found the autofocus on this lens to be all that good. I already have Sony’s 20mm f1.8 and this is a great lens for the money. But for the Northern Lights you really want your lenses to be as fast as possible.So for this trip I decided to take Sony’s 24mm f1.4 GM lens to see how that performed.
Sony 24mm f1.4 G Master lens – I really like this lens.
The other lens that I use extensively on trips like this is the much-underrated Sony 24-240mm zoom lens. This is a 10x zoom giving a huge range of focal lengths from pretty wide to nice and long. The aperture does ramp, going from f3.5 to f6.3 as you zoom in. But for the kinds of shoots I use this lens on this is rarely an issue. Todays cameras are so sensitive that f6.3 is plenty fast enough for all daytime applications. In northern Norway in the winter the temperature is typically -20c, often getting down as low an -35c. Changing lenses is not something you want to do unless you really must when it’s this cold, so a zoom lens is what I like to use when I’m out and about on the show scooters.
Shooting 8K with the A1.
Wherever I could I shot with the A1 in 8K. I recorded internally to CFExpress type A cards using the XAVC-HS codec. When shooting 8K at 24fps the file size is 7860×4320. It is 10 bit 4:2:0 and the bit rate is 400Mb/s. When you shoot 24p at 4K using the XAVC-SI codec the bit rate is 240MB/s, so you might wonder how it’s possible to record frames that in 8K are 4 times larger than 4K with a codec only half the size. The XAVC-HS codec is based on the latest H265 codec. H265 is an ultra efficient long GoP codec. Long GoP codecs can be very efficient as they record a master frame called an “I” frame and then for the next group of frames they only record the differences between the first “I” frame and the next “I” frame. The GoP (group of pictures) can be anywhere up to 180 frames long (but is typically 24 to 60 frames long). This method of compressing moving images is very effective and very efficient. But it can sometimes struggle with very complex images where there is a lot of random motion. Random motion cause issues for the motion prediction algorithms in the codec. In my own footage from Norway, I did notice some minor artefacts in the rippling water within shots across the Fjords.
Filming water can be a real challenge for long GoP codecs, but the A1 did very well.
Moving water is always going to be tough for a Long GoP codec, But I suspect that unless you were actually looking for the artefacts most people wouldn’t notice them. When I graded the A1 footage I also found other very minor artefacts if I pushed the footage hard during the grade. But having said all of that, overall, I think the footage from the A1 looks pretty amazing.
One thing you really do need to consider if you are thinking of using the A1 to shoot 8K is that the XAVC-HS HEVC codec requires a lot of extra processing power to decode. So, your computer needs to be a fast one. Preferably one made in the last couple of years as the most recent processors and graphics cards now include special optimisations for the HEVC codec that will really help.
The sensor in the A1 uses Sony’s latest multi-layer stacked technologies. It is surprisingly sensitive and very low noise. It has excellent dynamic range, around 14 stops which is typical of most current large sensor cameras and very pleasing colour response.
Frame grab from the Alpha A1.
The camera performed better than I expected in low light and while for me at least the A7SIII/FX3 and FX6 remain the kings of low light, the A1 isn’t actually all that far behind. This is particularly impressive when you consider that the pixels in the A1 are much smaller than the pixels in the A7SIII. Having said that, it does appear that the A7S3/FX3/FX6 sensor combines 4 photosites under a single colour filter to create a single “pixel” – could they both be based on a very similar sensor? The A1 sensor is 8640 x 5760 while the A7S3 sensor is 4240 x 2832, the numbers are close enough to believe the underlying sensor could be the same.
For a camera with so many pixels the A1 has a very low level of rolling shutter, you are highly unlikely to encounter any significant rolling shutter issues thanks to the 16ms readout time at 8K. Again, it is interesting to note that the 8.7ms readout of A7S3/FX3/FX6 at 4K is almost exactly half that of the A1 – further pointing to sensor similarities.
Golden Hour = Golden Day.
One of the great things about Norway in the winter is that when the skies are clear the very low sun means that you get golden hour light almost all day. The A1 did an excellent job of capturing the rich colours and deep shadows, especially that deep orange light that seems to make objects glow. Rather than going for a film style grade I chose to use a high contrast and vibrant grade for the sample video. I edited the footage in DaVinci Resolve using ACES colour management. The initial grading was done in HDR and I have uploaded an 8K HDR version for those of you that have an HDR TV or monitor.
Beautiful golden hour colours captured by the Sony A1
The days in northern Norway in January are very short and brutally cold. You only have to look at the shots of the dog sled driver to see how well wrapped up he is. It got down to -34c the day we went dog sledding. Even without a cover the A1 performed very well in the cold. There was some loss of battery life but this is to be expected. If you do find yourself shooting somewhere very cold, try to keep your batteries in an inside pocket until you need them to keep them warm.
At night I decided to use the A1 to shoot time-lapse of the Aurora while using the FX3 to video the Aurora. The A1 has a built in intervalometer so it’s very easy to shoot timelapse with it.
The 24mm f1.4 GM lens.
A frame of the Aurora taken with the A1
Shooting stars at night with a wide angle lens is very challenging. You have to be very careful to ensure that your stars and in good focus. I use the cameras built in image magnification to check and double check my focus. One thing that many wide lenses suffer from is an optical defect called “coma”. Often stars that should be a tiny round point of light will take on a slightly elongated appearance, looking like a comma sign or comet rather than a dot, especially towards the edges and corners of the frame. My Sigma 20mm has very little coma and it’s one of the reasons why I like it so much. But the Sony 24mm f1.4 has even less, in fact it is almost completely non-existent. The 24mm is also very, very sharp even wide open, there is no need to stop down to sharpen the image as with some other lenses. It is also a very compact lens and yet despite its small size and low weight it manages to fit in a proper iris ring as well as the large focus ring. Like most of Sony’s most recent lenses the 24mm GM has a linear focus ring. Linear focus means that the amount you turn the focus ring for any given focus change remains completely constant. As a result, you can manually pull focus from one object to another very easily as each time you shift the focus back to your starting point the focus ring will return to exactly the same position each time.
While not quite as wide as my 20mm the clarity and lack of distortions in the images from the 24mm GM means that this lens is now easily my favourite lens for shooting the Aurora or star fields. Of course, it is also very competent for shooting during the day as well. The autofocus is very fast and completely silent due to the use of linear focus motors. The extra assignable button on the lens body is also very handy.
Together the A1 and the 24mm GM were a delight to use. I have to admit that I am wondering whether an A1 could replace my FX3 or FX6. The richness of the 8K images from the A1 are impressive to say the least. I have done a few 8K projects for clients already, But I am not yet regularly delivering in 8K and I don’t think it will be something that I will be asked for regularly for a couple years yet. Besides, most of my clients that do want 8K are really going to want me to shoot on a Venice 2 rather than the A1. I also don’t think I can push the A1 8K images in post quite as much as I can the XAVC-S-I or XAVC-I from the FX3/FX6. Plus, when you do start to do any heavy image manipulation at 8K even my MacBook M1 Max starts to bog down (I actually find it easier to work with the 8K XOCN from Venice 2 than the 8K XAVC-HS from the A1). The FX3 will remain my main camera for my Aurora shoots for the next couple of year but perhaps I will need to start saving some pennies to add an A1 to my camera collection, it certainly impressed me and it would be nice to start shooting some of my stock footage in 8K.
NOTE: To watch the video in 8K you will need a monitor, TV or device capable of 8K playback. To view in HDR you will need to be using an HDR TV or HDR monitor. If you do not have an 8K or HDR TV/Monitor then YouTube will detect this and instead send you a standard dynamic range verison of the video at the highest resolution that your device can support. For the best viewing experience please watch using a HDR device that supports HDR10 ST2084/Rec2020.
I’ve just got back from my latest Northern Lights expedition to Norway and thought I would share some real time footage of the Northern Lights shot with the Sony FX3 and a Sony 24mm f1.4 GM lens. The 24mm f1.4 is a lovely lens and brilliant for shooting star fields etc as it is pin sharp right into the corners. It also has near zero comma distortion so stars remain nice and round. It was -27c when this was shot and my tripods fluid head was starting to get very stiff, so that’s my excuse for the bumps on a couple of the camera moves. What you see in this video is pretty much exactly as it appeared to my own eyes. This is not time-lapse and the colours while slightly boosted are as they really are. I shot using a range of ISO’s using S-Log3. Starting at 12,800 ISO but going all the way up to 128000 ISO. I perhaps didn’t need to go that high as the Aurora was pretty bright but when an Aurora like this may only last a few minutes you don’t want to stop and change your settings unless you have to for fear of missing something. The low light performance of the FX3 really is quite phenomenal.
Captured on the first night at the cabins in 2018.
After having to skip a year my Northern Lights tours are back on again starting January 2022. These trips are made for those that appreciate the beauty of nature. The arctic is a spectacular place in so many ways. Especially in winter when the low arctic sun skims along the horizon providing golden hour light all day.
During the long nights when the sky is clear the Northern Lights come out to play. The cold air provides very clear viewing and most guests are blown away by the numbers of stars visible. It’s a photographers paradise.
For more information take a look at the tour page. If you are interested, send me a message.
I’m sitting here in the UK, Its February and it almost 20c (68f). Very nice indeed for the UK this time of year. Just a couple of weeks ago I was in Northern Norway, up above the arctic circle running one of my annual Northern Lights adventure tours. The weather there was very different. At no time did the temperature get above -15c(5f) and for most of the trip it was around -24c(-11f) both during the day and during the night.
Now, you might consider me a sadist when I say this, but for my Northern Lights trips I normally want it to be -20c or colder. The reason being that when it’s very cold like this we normally get beautifully clear skies. And we need clear skies to see the Aurora.
Everyone all wrapped up for the hour long ride by snow scooter and sledge to the cabins that we stay at.
After many years of taking a full size video camera up to Norway I decided to go light this year and just take my trusty A7S and A6300 cameras. We get around on snow scooters and on sledges towed behind the snow scooters. This can make lugging around a larger camera tricky and there are times when you just can’t take a big camera. But in order to get the very best from these cameras I also decided to take an Atomos Ninja V.
Out and about on the snow scooter. It really is a very beautiful place in the winter.
The Ninja V is the first of a new generation of recorders and monitors from Atomos. It’s much smaller than the Shogun range of recorders making it a better size and weight match for smaller cameras and DSLR’s. It has a very, very nice 5″ screen with a maximum brightness of 1000 Nits. The 1000 Nit output and Atomos’s clever way of driving it means it can display both SDR and HDR images depending on how it is set up. A key difference between the Shogun and the Ninja devices is that the Shoguns have both SDI inputs and HDMI inputs while the Ninja only has an HDMI input. But if your using this with a DSLR than only has an HDMI output, as I was, the lack of SDI connectors is not a problem.
Shooting a sunset with the Ninja V on my A6300. We were way up on the Finnmarksvidda when this image was taken, absolutely in the middle of nowhere and it was -27c!
The build quality of the Ninja V is really good. Most of the body is made of aluminium. The rear part where the slots for the SSD and battery are is made from plastic, but it appears to be a good high quality and tough plastic. A new feature is an “AtomX” expansion port tucked inside the battery compartment. The expansion port allow different modules to be attached to the Ninja V to add functionality such a video over IP (ethernet) using the Newtek NDI protocol for live streaming or to turn the Ninja V into an IP connected monitor. There is also an AtomX sync module that allows you to wirelessly synchronise timecode and control multiple Ninja V”s on a single network and to use Bluetooth remote control. You can find out more about the AtomX modules here https://www.atomos.com/AtomX
Anyway – back to Norway. We were very lucky with the weather, and with the Northern Lights. On the first night at the cabins we stay at the Aurora put on a pretty good display. I was shooting with my Sony A7S with a Sigma Art 20mm f1.4 lens. I was shooting a mix of time-lapse, in which case I simply record the raw frames in the camera on it’s internal SD cards as well as real time video.
The Aurora put on a great display for us on several nights.
The Northern Lights are only rarely very bright. Most of the time they are fairly dim. So I was using the Sigma lens wide open, shooting at 24fps and with the shutter at 1/24th. The adjusting the cameras ISO to get a nice bright image. At times this did mean I was using some very high ISO’s with a lot of gain. Shooting like this is going to put a lot of strain on any codec. But the Long GOP XAVC-S codec used in the A7S is going to be very hard pushed to not introduce a lot of additional artefacts. In addition my older original A7S can only record HD internally.
By using the Ninja V I was able to record video of the Northern Lights in 4K using the ProRes codec. I used ProRes HQ and ProResHQ uses much less compression than XAVC-S. So even though both the internal recordings and the external recordings are limited to 8 bit (due to the cameras HDMI output limitations rather than any limitation of the Ninja) the ProRes recordings are far more robust and will noise reduce in post much better than the XAVC-S.
Just to prove it really was -27c!!
When you’re working outside for extended periods and it’s -27c(-17f) it’s tough on the gear and tough on you. When shooting the Aurora my camera are outside all night, exposed to the cold. Typical problems include frost and ice on the front element of the lens. The moisture from your own body can easily freeze onto the lens if you stand close to the camera. If you look at the lens to check it for frost and breath out you will leave it coated in ice.
Wires and cables that are soft and flexible in normal temperatures become as stiff as steel rods and can crack and fracture if you try to bend them. All batteries will loose some of their capacity. Very small batteries are worst affected. Larger batteries tend to fair a bit better, but there is a tremendous difference between the way most cheap budget batteries behave in the cold to good quality brand name batteries. For this reason I power my complete setup from a single PAG PAGLink V-Mount battery. The PAGlink batteries are great for all sorts of different applications, but for these trips a big benefit is that a small plug type charger can be used to charge many PAGlink batteries by stacking the batteries together. Then to power multiple devices I use the clip-on PAG Power hub plate to provide 5V for the camera battery adapters that I use, 12V for the lens heaters I use and another 12V feed for the Ninja V.
This is what the kit looks like when you bring it into the warm after many hours out in the cold. The thing with the yellow strap on the lens is a lens heater to prevent frost from building up on the lens. The lens is a sigma 20mm f1.4, the camera is an A7S and the recorder is the Atomos Ninja V.
After more than a few minutes outside the camera kit itself will have become extremely cold. If you then take that kit inside into a nice warm cabin the warm moist air in the cabin will condense onto the cold camera body. Because the camera body will be extremely cold this will then freeze. Before you know it the camera kit is covered in ice. What you can’t see is that it’s likely that there will also be some ice and moisture inside the camera. It can take hours to warm the camera back up again and get it dried out properly. Bagging the camera before you take it indoors can help, but taking the camera in and out many times over the coarse of a shoot like this can cause a lot of damage. So I prefer to leave all the camera kit outside for the duration of the trip.
Another view of the frozen Ninja V after a night shooting the Aurora. Don’t worry, the screen isn’t damaged, that’s just frost and ice on the screens surface.
This means that when you come to fire it up you are often trying to switch on an absolutely frozen camera. In the past I have had problems with cold recorders that wouldn’t start up. But I’m pleased to report that the Ninja V always came to life no matter how cold it was. Whenever I pressed the record button it went into record. Operating the touch screen in the cold was not an issue. In fact using touch screen gloves, the Ninja was really easy to use. Pressing small fiddly buttons isn’t easy, even with thin gloves, but the touch screen turned out really easy to work with.
A big change on the Ninja V over previous models is the operating system. The new operating system looks really good and is quite logically laid out. Gone is the old AtomHDR slider that changes the brightness of the screen when in HDR. This is replaced with dedicated viewing modes for Native, 709, PQ HDR and HLG HDR and viewing via a LUT. I prefer the new fixed HDR modes over the Atom HDR slider modes as it eliminates the uncertainty that can sometimes creep in when you use a slider to change the brightness of the display. In my case, when shooting during the day using S-Log2 I would simply select S-Log2 as the source and then use PQ to display an HDR image on the screen. At night when shooting the Aurora I used Rec-709.
You can see how the normal size 2.5″ SSD sticks out a bit from the side of the Ninja V. The SSDMini’s don’t stick out in the same way. Also note that even though I am shooting using S-Log2 on the A6300 the Ninja V is showing a nice contrasty image thanks to the PQ HDR display option.
The Ninja V can take the same size 2.5″ SSD caddies as the current Shogun recorders. So I was able to use the SSD’s that I already own. However to keep the size of the recorder down it has been designed around a new slightly shorty SSD form factor called SSDMini. When you use a standard size 2.5″ SSD it does stick out from the side of the recorder by about 25mm. If you use an SSDMini it doesn’t stick out at all. SSDMini’s are currently being manufactured by Angelbird and Sony. They have the same sata connector as regular 2.5″ SSD’s and the SSDMini’s can also be used on the larger Atomos Shoguns.
A basic lightweight but effective setup. Atomos Ninja V, Sony A6300, Miller Compass 15 head and Solo tripod.
By the time we were ready to leave Norway we had seen the Northern Lights on 3 different nights. By day we had seen some beautiful sunrises as well as other optical effects like sun dogs caused by the light from the sun being refracted by ice crystals in the air. The Atomos Ninja V had impressed me hugely. It just worked perfectly despite the extreme cold. It allowed me to record at higher quality than would have been possible without it and turned out to be easy to operate. What more can you want really?
In February 2019 I am running 2 Aurora hunting trips to the north of Norway. One of these has just sold out so that means that places are now only available on the first tour.
Captured on the first night at the cabins in 2018.
These are very different to the normal Aurora hunting trips to a big city. We start in the town of Alta in Northern Norway, staying in a nice hotel close to the amazing looking Northern Lights Cathedral. From there we travel inland to the capital town of the Sami people – Karasjok.
As we get near to Karasjok we exchange our mini-bus for snow scooters and sleighs and journey way off the beaten track, up above the tree line and across frozen lakes to a small lodge used by cross country skiers and dog sled teams. This group of cabins becomes our base to explore the Finnmarksvidda for 4 days as well as being a near perfect location for watching, photographing and filming the Northern Lights.
We always try to get up onto the plateaux at some point. This view taken from a drone shows how desolate yet beautiful it is. Nothing man made from horizon to horizon.
It is stunningly beautiful around the cabins, it’s also amazingly peaceful and quiet. We are looked after by a couple of Sami people who cook meals for us, take us ice fishing and help us explore this spectacular and unspoilt winter wilderness.
If you want to know more please take a look at the main page for the tours: https://www.xdcam-user.com/northern-lights-expeditions-to-norway/
Manage your privacy
To provide the best experiences, we use technologies like cookies to store and/or access device information. Consenting to these technologies will allow us to process data such as browsing behavior or unique IDs on this site. Not consenting or withdrawing consent, may adversely affect certain features and functions.
Functional
Always active
The technical storage or access is strictly necessary for the legitimate purpose of enabling the use of a specific service explicitly requested by the subscriber or user, or for the sole purpose of carrying out the transmission of a communication over an electronic communications network.
Preferences
The technical storage or access is necessary for the legitimate purpose of storing preferences that are not requested by the subscriber or user.
Statistics
The technical storage or access that is used exclusively for statistical purposes.The technical storage or access that is used exclusively for anonymous statistical purposes. Without a subpoena, voluntary compliance on the part of your Internet Service Provider, or additional records from a third party, information stored or retrieved for this purpose alone cannot usually be used to identify you.
Marketing
The technical storage or access is required to create user profiles to send advertising, or to track the user on a website or across several websites for similar marketing purposes.


 Next week I head out to Norway for my annual trip in search of the Northern lights. Like last year I will try to stream the Aurora live from Norway. Of course this does depend on the weather and whether the Aurora comes out to play.