There was one of these at IBC last year. A new version appeared again this year at IBC and it’s really nice. I so hope that this becomes a real product. It fits the Sony PMW-F5 and PMW-F55 cameras (and I must assume the PMW-F3 too). It takes it’s power from the camera and will control a Canon EF lens. Aperture is controlled by a large aperture ring which has clear aperture marking visible at the side of the adapter. No fiddly knobs or dials, no power cable and a real aperture scale. In addition I believe you will get an aperture display in the viewfinder. The EF Lens mount features a large locking ring so the lens won’t twist or rotate once mounted, something essential if you are going to use a follow focus. This version was much nicer than the one shown last year. I really hope it becomes a real product as I’d like one for my F5.
Metabones FZ to Canon EF adapter showing the locking mount system.
I’m only going to look at these 3 cameras in this article. Of course there are also many others to choose from these days, so do remember to look at other options from other manufacturers too.
I like Sony cameras and I’m not going to pretend otherwise. But I have to say that I really think Sony are on a roll right now. The PMW-F55, F5, FS7 and the FS5 are all great cameras. Sure there are cameras with more pixels and maybe more resolution that may or may not need full frame lenses. There are cheaper cameras and all kinds of other options, but these cameras are all good workhorse cameras that should prove reliable in the field and give years of good service (although with technology moving so fast you might not keep it for that many years).
So which to choose?
First of all YOU need to decided exactly what you need or want from your camera. It’s also good to separate out “What You Need” from “What You Would Like”. For example if you are on an extrmely tight budget you will need affordable media while you might also like the idea of being able to shoot continuously at 180fps. Sometimes the two are not compatible with each other, so you should go with the need rather than the like.
If you’re running a business then you should also ask yourself that all important question: Will the more expensive camera make me more money?
Yeah, yeah, I know…. for some of us they are our babies, our toys and it is nice to have the best toys. But don’t bankrupt yourself buying something you can’t afford or don’t really need.
I’ve included a table of differences between these cameras below which I suggest you take a look at.
The FS5 is clearly exceptional value for the money. It does 80-90% of what the other cameras can do. If you’re only ever going to shoot in HD and don’t want to use Cine EI or LUT’s then really the FS5 is probably all you’ll ever need. It’s small, compact, lightweight and has some great features for shooting on the move like the variable ND filter and face tracking autofocus (with a Sony lens). What it lacks however is 10 bit 422 recording in UHD (even the output is only 8 bit in 4K). So if you want to shoot in UHD (3840 x 2160 TV type 4K) then the amount of grading you can do will be a little restricted. It’s also unlikely to meet broadcast standards as a main camera for UHD production. Further more it also lacks a proper CineEI mode for S-log2/S-Log3 with LUT’s on the outputs. This isn’t the end of the world for occasional log shoots but if you plan on shooting a lot of log then all of the other cameras will be easier to use and it will be easier to get the best results without having to mess about with external monitors with LUT’s, grey cards or light meters. It’s not so much the lack of LUT’s (there are viewfinder only gamma LUT’s) but the inability to monitor at anything other than the native ISO which makes it tougher to offset your exposure in the way you can with CineEI. One final and very important note about the PXW-FS5 is that the XAVC-L codec is very processor intensive. You will need a really good computer to do anything more than cuts only editing. The XAVC-I codec in the FS7, F5 and F55 is much easier to work with, but the files are bigger. SO while the FS5 may save you a lot in terms of media costs, you will need to spend money on a high spec, up to date PC or Mac if you don’t already have one.
The FS5 can be upgraded with a raw option that outputs 12 bit linear raw. This raw output can be recorded on an external recorder and in doing so bypasses many of the FS5’s internal limitations such as only being able to have a single video out OR monitoring signal when recording internally. The raw files are very, very big but you can convert the raw to 10 bit ProRes before recording on the external recorder and this does provide image quality close to the 10 bit internal recordings of the other cameras. But, by the time you add on the cost of the raw option, a raw recorder plus mounting, batteries and media, the price difference between the FS5 and FS7 is very small.
The FS7 really does sit in the middle of this bunch, both in terms of cost and features. It’s a bigger camera that’s tough to hand hold for long, really it’s a shoulder camera. It can do 95% of what the F5 and F55 can do and some things the F5 and F55 can’t. The use of the Sony E-Mount means you can add low cost Sony power zoom lenses or control Canon lens apertures via low cost and compact adapters, this is much harder (and more expensive) on the F5 and F55. Adapters for Canon lenses for the FS5 and FS7 start at $50 while for an F5/F55 adapter prices start at $800. In addition on the E-Mount cameras you can add speedbooster adapters for use with full frame lenses giving a wider field of view and 1 stop faster aperture.
The FS7 has a true CineEI mode for log shooting and can take custom LUT’s. It’s even possible to add the XDCA-FS7 adapter to get internal ProRes recording and a 12 bit raw output, but it is only 12 bit raw which although very nice, is a lot different to the far superior 16 bit raw from the F5 and F55. When using the XDCA-FS7 extension unit it’s also worth remembering that you need to use bulkier and generally more expensive V-Mount batteries.
The FS7 II adds an improved locking E-Mount for greater lens security and stability. The locking mount is also stronger than the standard mount so it will cope better with heavier lenses. In addition the FS7 II also has a variable ND filter. The variable ND allows you to do your fine exposure adjustments with the ND filter allowing the aperture to be used as a depth of field control.
The FS7 is great for short film production, it offers image quality that is good enough for a feature film (I don’t think a movie viewer would detect any deficiency in the pictures from a well setup and well used FS7, even on a big screen). The XQD media while not as cheap as the SDXC cards used by the FS5 is reasonably affordable. There are a few things that might frustrate some users, in particular it is a very sophisticated camera with lots of options and there is no easy way to see exactly how the camera is configured without interrupting the live image in the viewfinder either by going into the menus or using the status pages. If you do use a lot of the cameras features and modes, you will spend a lot of time in the menu system.
One of the great things about the F5 or the more expensive PMW-F55 is the side display panel as this allows you to see how the camera is setup, which LUT you’re using, frame rates, audio levels and so much more without having to resort to the menus. You can also control most of the day to day functions that you will use from this side panel using the option menu and that makes the camera far easier and faster to use than the FS7. The F5/F55 lens mount is much stronger than the E-mount on the other cameras, so it’s better suited to heavy cinema lenses and large super 35mm zoom lenses. You can also adjust the back focus so that it works well with large cinema zooms. For exceptionally good HD images you have the extremely high quality SStP (HDCAM SR) codec. On top of that there is also a higher quality version of XAVC called XAVC Class 480. This brings some respectable improvements in image quality with only a small increase in file size, whether shooting in HD, UHD or 4K. For the very best 4K you have a full 16 bit linear raw option when you dock the R5 raw recorder or with the R7 raw recorder you can choose between raw or 16 bit linear X-OCN. The R7 can shoot record in 4K at upto 120fps with the F55 for amazing slow motion. X-OCN offers images with quality comparable to 16 bit raw but with file sizes smaller than ProRes and not much bigger than XAVC.
Because the recorder docks directly to the camera it is much easier to use than the external cabled option for the FS7 or FS5. In addition the R5 and R7 recorders use special visually loss less processes to considerably reduce the file sizes and make the files very easy to handle. So if you want to shoot a lot of raw for the ultimate in post production flexibility the the F5/F55 are the obvious choice, although this comes at a price.
So, in summary I would suggest:
Buy the PXW-FS5, unless:
You need to shoot 4K DCI (4096×2160). You are going to shoot primarily using S-Log2/3 or do a lot of grading to your UHD footage or are planning to make broadcast ready UHD programs. Unless you need to shoot continuously in UHD faster than 30fps or faster than 60fps in HD. Need timecode in/out or genlock (needs XDCA-FS7 adapter on FS7). In this case I suggest you buy the FS7 unless:
You are going to shoot primarily in raw or need the convenience of the side status display (don’t underestimate how useful this can be). Unless you need to shoot anamorphic, with SStP (HDCAM SR) or need a 4K HDSDI output. Want integrated Genlock and Timecode In/Out. In this case buy the PMW-F5 (with 4K option?) unless:
You need an extra wide colour gamut and a global shutter, in which case the PMW-F55 is king of the hill.
This is an often asked question about the Sony PMW-F55, F5 and FS7 cameras.
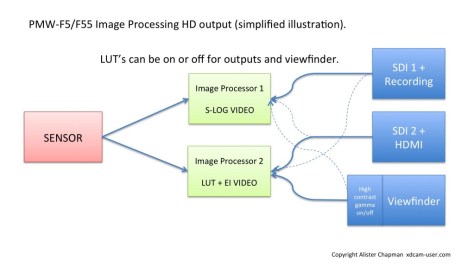
There are several modes and options where the LUT’s are not available or restricted to either all on or all off. That is to say that you can’t have LUT’s on for just the viewfinder or just the SDI output, you can only have the LUT’s applied everywhere, including the internal recordings which isn’t normally desirable.
The problem appears to stem from a limitation on the number of video processing units within the cameras. Certain functions within the camera require a video processor. Functions such as adding LUT’s, reading the sensor at high speed for S&Q, providing a 4K output on the SDI or HDMI each appear to require dedicated processing and as there are on so many processors available this limits some of the options we have. I don’t know of the exact architecture of the cameras but the diagrams below represent what I think is going on and why we have limited LUT options in certain modes. Please note that there are a lot of other video processes going on in the camera and this is a very simplified overview of what I think is more or less going on.
Normal operation, each output can choose between the S-Log signal path or the separate LUT + EI signal path.S&Q Motion: As there are only enough processors for a single path you have to choose between S-log only or LUT + EI only.When outputting 4K a video processor is needed to split the output signal across multiple HDSDI’s or drive the 4K HDMI. So again, you can only have S-Log or LUT’s, you can’t have both.
One way around the problem of not having LUT’s in S&Q is to use the viewfinders high contrast mode (F5/F55 only). To enable this mode you must assign it to one of the assignable buttons. The high contrast mode applies a rec-709 like gamma curve to the viewfinder image so you will have almost exactly the same contrast and brightness as you would using the 709(800) LUT. As it’s only a gamma correction it will be less saturated than the LUT, but it’s still very useful for judging exposure. Remember if you are not using or unable to use the LUT’s, the waveform and zebras will be measuring the S-log signal, even if you have the VF High Contrast mode enabled.
Another way around this issue is to use a 3rd party viewfinder that can add it’s own LUT’s. Then simply leave the LUT’s off in the camera and use the VF to apply a LUT. The Zacuto Gratical is great for this as you can not only add the LUT in the VF but also send the LUT out over the VF’s SDI or HDMI output. If you want EI then you will need to load some exposure compensated LUT’s directly to the VF and use the appropriate LUT for each EI.
I was lucky enough to get some hands on time with a prototype FS5 in Amsterdam at IBC. In case you haven’t heard about it, the PXW-FS5 is a compact interchangeable lens, super 35mm camcorder from Sony that can record in HD or UHD 4K. It shares many of the features of the already incredibly popular PXW-FS7 but in a much smaller body. As well as being similar to the FS7 it also has many similarities with the lower cost FS700, more on that later.
SMALL AND VERY LIGHT.
The first thing that struck me about this camera is just how small and light it is. The top handle and handgrip can be removed making it even smaller and the body alone weighs just 800 grams. It really is very small and very light, so perfect for drones, gimbals or simply for those of us that want something compact for travel.
REMOVABLE HANDGRIP
On the right side of the camera there is a chunky handgrip with a host of assignable buttons, a zoom rocker, an assignable dial (ideal for exposure control) and a joystick for navigating through the cameras menus and controlling various functions. The handgrip is comfortable to hold and gives you a very secure grip of the camera. It can be rotated and locked into an wide range of positions so you can adjust it to suit your shooting style and how you’re using the camera. My only criticism of the hand grip is that for me and my big hands the record button was a little too recessed and could be tricky to press. Perhaps before the cameras are released this may be addressed. The handgrip can be quickly detached via a quick release mechanism. The mounting system is very secure and I couldn’t find any play or wobble. Like the handgrip on the FS7 it uses the LANC protocol to control the camera and is connected via a 2.5mm plug. So this means that the majority of other existing LANC controllers can be used with the camera for remote control. Once the handgrip has been removed you can add a standard Arri rosette (not supplied, but available from Sony as a spare part) to attach the arm and controller from the FS7 or any other arms or attachments that use the Arri rosette standard.
Details of the detachable handgrip.
THE LEFT SIDE AND BUILD QUALITY
The left side of the camera is like a miniaturised FS7. There are several assignable buttons as well as the always familiar ENG style switches for gain and white balance. Above the switches there are push buttons for iris, shutter and gain control. There’s a dial and buttons for navigating the menu system (similar menu structure to FS700) and two large dials for setting the audio recording levels. On top of all that there is a large dial to control the iris/aperture or the electronic variable ND filter. Yes, that’s right an electronic variable ND… more on that later.
Top of the PXW-FS5 with the handle removed.
This camera is incredibly well built, it even has both 1/4″ and 3/8″ threads on the base as well as eight 1/4″ threads on the top of the body for multiple mounting options on tripods as well as for attaching accessories such as lights or monitors. The body is lightweight magnesium alloy and to me it feels extremely well constructed. When I shot with it in Amsterdam it was raining heavily and it did get quite wet but that didn’t cause any problems. I would always recommend a rain cover, but sometimes you do get caught in unexpected rain showers.
POWER AND CONNECTIVITY, WIFI AND LAN
This is a 12v camera so for power the camera uses the now common BP-U type batteries as used on the EX1, PMW-200 etc. Or you can power it via a DC socket on the rear of the camera. Thanks to the low power electronics (approx 12 watts) a BP-U60 will run the camera for an incredible 4 hours. That’s almost double the run time of the already low powered FS7. So with one battery in the camera and a spare in your pocket you should have enough power for a full day of shooting. Connectivity is very good, there are two XLR audio inputs, one on the rear of the camera body and one on the right side of the removable handle. So even when you remove the top handle you can still attach an external XLR mic to the camera. On the top handle there is Sony’s MI shoe so you can add a radio mic or further XLR input box if you wish without extra wires or cables (the handle also includes a GPS receiver for adding your location to the footage metadata). On the back of the camera there is an HDSDI output and HDMI output. The SDI is HD only and the HDMI can be HD or 4K (UHD 8 bit, 4:2:2, 3840×2160) depending on the cameras shooting mode (Currently the HDMI/SDI output is not available when recording 4K internally. However a firmware update, version 1.1, will enable the HDMI/SDI while recording internally at a later date). It’s worth noting that there are no timecode or genlock inputs or outputs. In the future there will be a firmware option to add a raw output to the camera for the best possible image quality (there may or may not be a charge for this upgrade and I don’t know when it will be available). As well as the traditional video connections there is also a full size LAN port. The camera has wifi too, so you can connect to the internet or a network via either WiFi or a LAN cable and then use it’s built in streaming capability to stream your footage live or upload it via ftp at a later time. This is going to be great for breaking news or to stream corporate events for clients. Next year I’m going to try to stream the Northern Lights live from Norway.
SENSOR AND SENSITIVITY
Left side of the PXW-FS5
The sensor appears to be the same sensor as the PXW-FS7 and PMW-F5, so it’s a dedicated 4K video sensor. This means that compared to most DSLR’s and many other large sensor cameras it has minimal image skew and low levels of rolling shutter. When I shot with it I didn’t find any shots that were noticeably effected by rolling shutter even though I shot a lot of footage from a moving boat. Noise levels are well controlled even though the native ISO is 3200 ISOin S-Log and 1000 ISO in other gammas! It looks like the image processing in this camera is really rather good at reducing noise. In low light and the dark the pictures from this camera look very good. My understanding is that in order to keep the power consumption down and to keep heat levels low this camera uses different processing to the FS7.
Ungraded frame grab from the pre-production PXW-FS5. Note how little noise there is. Click on the image for the full size frame.
This makes sense as this camera does not have some of the more advanced functions of the FS7, like the CineEI mode, but on a camera like this the simpler menu structure and less complicated shooting modes really come in to their own as it helps make it a very easy camera to use. And for me, this was one of the best surprises with this camera. It’s very easy to use!
EASY TO SHOOT WITH
I had the 18-105mm power zoom lens which is available with the camera in the PXW-FS5K “kit”. It has to be said that this isn’t a high end cinema lens. It’s a low cost DSLR type lens with a powered zoom function. It’s a constant f4 throughout the zoom range but still small and compact. The camera includes electronic lens compensation that helps reduce some of the distortions and vignetting that would otherwise be visible (this does work in both HD and 4K with this camera). In addition with a Sony lens you can choose via the menu which direction the focus ring operates in. When paired together like this it’s almost like having an ENG handycam camera like the EX1 or PMW-200 again. You get a smooth power zoom that tracks focus reasonably well in a very compact package. OK, so it’s only a 6x optical zoom and the focus ring is one of those uncalibrated round and round servo jobs, but you know what, it works and it works pretty well. The camera even has Sony’s clear image zoom function that electronically increases the zoom range with virtually no image degradation. Apparently this can even be used with a prime lens to make it into a short zoom, although I was unable to test this clever feature out for myself. Once the production cameras come out I’ll be sure to try this!
The autofocus is pretty good too! The camera has Sony’s face tracking auto focus which is great for shooting people on the go as it locks on to faces and will ignore the background etc. Turn off the face tracking and you have a smooth and accurate autofocus system. Add in image stabilisation as well and for run and gun this really starts to make a compelling package that could be handed off to an assistant or less experienced operator for some B roll.
The PXW-FS5 with 18-105mm power zoom.
LIMITATIONS COMPARED TO THE FS7
What about the limitations? Compared to the FS7 there are a few limitations. The codec options are all long GOP. You can choose between AVCHD or XAVC-L. There is no option for XAVC-I and in part that’s because this camera records to SD cards (SDXC for XAVC-L). There are two card slots so you can have either relay (one card after the other) or simultaneous recording to provide an instant backup. It’s nice to be able to use such cheap media, provided you remember that this is low cost consumer media, not really designed for professional applications. SD cards are normally very reliable provided you buy good quality cards from a reputable source.
Each card slot can be independently controlled by the hand grip rec button, the top handle rec button or body rec button if you wish. Back to the codec…. XAVC-L is a great codec. In HD it’s 10 bit 422 at up to 50Mb/s so offers full broadcast quality recording. In UHD (4K, 3840×2160) it is only 8 bit 4:2:0 at 100Mb/s so a little more restricted. But don’t panic! The 8 bit UHD recordings look beautiful. They are packed with detail and have rich well balanced color. I think it’s also worth remembering that like most 4K cameras this uses a bayer sensor, so you never have a true full chroma resolution equivalent of a 444 or even 422 signal off the sensor to record anyway. One small but important point to consider is that a Long GOP codec needs a more powerful computer to decode than an I Frame codec. So to edit the 4K (UHD only, no DCI 4K in the FS5) from this camera you will need an up to date and reasonably high spec computer. My retina MacBook Pro will play back and edit a single stream without issue, but start trying to use multiple layers or grading and adding filters and it will start to drop frames. One further limitation of the FS5 is that the highest base frame rate in 4K is 30fps. So you can shoot at 24, 25 or 30fps in 4K at 100Mb/s or 24, 25, 30, 50 or 60fps in HD at 50 or 35 Mb/s XAVC-L or AVCHD (1920×1080 @ 17/24/28 Mb/s, plus 1280×720 @ 9/17/24Mb/s) or an AVCHD proxy for ftp or streaming at (it’s a multi-region camera).
SUPER SLOW MOTION
You can however shoot at up to 960fps by using the S&Q motion mode. This mode operates in almost exactly the same way as the FS700. It’s HD only. Up to 60fps the camera can record continuously, there is no sound however. Above 60 fps the camera uses an internal memory buffer to cache the super slow motion content. This means that at 240 fps, which is the fastest full HD speed, the camera can record up to 8 seconds of action. You have a choice of a start trigger which starts the 8 second record period when you press the rec button or an end trigger. If you use the end trigger you can wait for the action to happen, then press the rec button and the 8 seconds prior to pressing rec is then transferred to the SD cards. At 240fps 8 seconds of action becomes an 80 second clip. At 480 fps the sensor is read at half HD vertical resolution, at 960 fps the resolution is about 1/4 HD and it gets pretty grainy looking.
PICTURE PROFILES, S-LOG AND GAMUT
The PXW-FS5 includes picture profiles that have a number of preset “looks” straight from the factory. But you can go in to each of these picture profiles and change the gamma, colorspace, matrix and many other image quality settings. The FS5 has Cinegammas and S-Log2, S-Log3 as well as S-Gamut, S-Gamut3 and S-Gamut3.cine (some of these options may not be in the camera at launch, maybe only S-Log3/S-Gamut3.cine, the others added later). The Cinegammas are great for projects that won’t be graded or only have minimal grading. S-Log2/3 are fantastic for film projects or other higher end work that will be graded as it allows the full dynamic range (14 stops) of the camera to be captured. In HD the 10 bit recordings are going to be fantastic with S-log3 or S-Log2. In UHD the 8 bit recordings will be a bit more restrictive when it comes to heavy grading or post production work. S-Log2 is better than S-log3 when you only have 8 bit data as it uses all of the data available. But as a test I decided to record some S-Log3 with the FS5 and then grade it to see how it holds up. I was really very pleasantly surprised. Get the exposure right and it works well and can produce a beautiful image provided you don’t push the grade too far. When shooting in S-Log you can add a gamma assist LUT to the viewfinder to make exposure assessment easier. At the moment there is only one LUT which is the 709(800) LUT. This corrects the gamma in the viewfinder to a much more normal looking image to make getting your exposure right much simpler. I noticed that the cameras Histogram always measures the recorded signal. I think this LUT is going to be the key way of getting good log exposure with this camera, but it’s also very simple to use and that’s what you need for run and gun. Add the LUT and if it looks right, it is right, it really is that simple. The camera will feature an enhanced zebra function that will operate over the full brightness range of 9 to 109 IRE and when the histogram is used you can include a marker line at the zebra level, so if you want to use a grey card or white card to set your log exposure this will be possible (this feature wasn’t working on the review sample so I have not tested it yet). There is no CineEI mode in the FS5.
The images from the PXW-FS5 really are very nice indeed. They contain lots of very fine detail and nice rich colors. The camera I had was a pre-production prototype, so there will be some tweaking of the image before launch, but I really hope that Sony don’t change it too much as it really looks great already. There is a little noise at 3200 ISO but the noise has a very fine grain and is not at all unpleasant. You can use a lower ISO if you want, even when shooting in S-log. Once the production cameras are available I will investigate the best ways to get the most out of the standard gammas and log gammas.
Ungraded S-Log3 frame grab fro a prototype PXW-FS5. Click on the image for the full size. Note THIS IS A JPEG so will contain artefacts not in the original image.Graded S-log3 from the PXW-FS5. Click on the image for the full size frame. Note THIS IS A JPEG so will contain artefacts not in the original footage.
CENTER SCAN MODE
FS5 has a center scan mode that uses just the center super 16mm sized part of the sensor. This mode is only available when shooting in HD, but the really nice thing is that you can assign the center scan mode to one of the assignable buttons and it switches instantly between full scan and center scan. This can be useful for extending your focal length electronically, in effect acting as a 2x extender. It means that if using the 18-105 lens for example you can get the equivalent of a 36 to 210 focal length by using the center scan mode. Another possibility is being able to use super 16mm lenses or even some 2/3″ ENG B4 zoom lenses. Super 16 is slightly larger than 2/3″ so not all 2/3″ lenses will be suitable, but many will be fine and won’t need an optical adapter, just a mount adapter.
THE LCD AND VIEWFINDER
For monitoring you have two options. There is a nice 3.5″ LCD panel (same panel as the FS7 perhaps) that can be attached to either the right, left, front or the rear of the hand grip. The LCD is plugged in to the side of the camera using the same connector as the FS7 viewfinder. The LCD can be rotated into a wide range of different positions for viewing from the rear, front or side of the camera. The attachment system and mount is well thought out and much better that the FS7’s viewfinder mounting system. The resolution is approx 1/4HD (960 x 540) which appears to be the norm for this size of LCD panel. On the back of the camera there is a small electronic viewfinder (EVF). This little EVF is actually rather good. It’s OLED so has great contrast and has a resolution very similar to the larger LCD panel. It is however quite small and you do need to get your eye nice and close to the EVF to get the best from it. I used it a lot for my shoot in Amsterdam.
VARIABLE ND FILTER
The FS5 Has an electronic variable ND filter.
I’ve saved one of the best bits about this camera to last. It has an electronic variable ND filter. On the front of the camera there is a traditional looking filter wheel knob with 4 positions. In addition on the side of the camera there is an exposure adjustment wheel that can be used to control the iris or the ND filter! When the front ND filter wheel knob is set to clear the ND filter system is removed from the optical path. But in the other 3 positions the variable ND is placed between the lens and the sensor. It’s very important to understand that this is not a polarising ND filter as often used on the front of camera lenses. It is a special crystal that darkens when a voltage is applied to it that does not polarise the light. When the ND filter is in place it can be controlled either via the ND knob or the exposure dial. If controlled by the ND knob you can set the 3 selectable ND levels via the menu, so you can choose just how much ND you get at each of the 3 ND knob positions. If you use the wheel the you get smooth control of the ND from dark to near clear over what I believe is a 7 stop range. In the future there will be a firmware update to allow automatic control of the ND filter.
The FS5 uses what we know as Sony’s E-Mount (although Sony actually call the lens system the Alpha system). Because the sensor is very close to the lens mount it’s very easy to adapt from E-Mount to almost anything else, such as PL-Mount or Canon EF. As anyone that’s used a Canon EF lens or camera will know, the aperture on the Canon lenses operates in steps. This means that you can’t make a smooth exposure change mid shot. The variable ND filter on the FS5 gets around this problem very nicely as you can set you exposure with the aperture as you would normally and then use the ND filter for any mid shot exposure changes. The other nice thing about a variable ND is that it allows you to make exposure changes without altering your depth of field. It’s very clever technology that first appeared on the PXW-X180.
CONCLUSIONS
I think Sony really have a winner on their hands. The current FS7 is a great camera, but can be a bit bulky for run and gun, it’s a shoulder cam. The FS7 is a great digital cinema camera with 10 bit 422 4K DCI and UHD and full LUT and EI capabilities. The new PXW-FS5, while a little more limited as a digital cinema camera is much smaller and I think much easier to use for run and gun. The combination of the FS5 with the 18-105mm lens with it’s power zoom, effective autofocus, variable ND and really great handheld ergonomics make this a really easy camera to shoot with on the move. It really does remind me of the EX1 when that was launched. At that time to get really good quality images you almost always had to use a shoulder mounted camera, but the EX1 changed that forever. Now we have broadcast quality handycams such as the PXW-X200 that are used day in, day out for news and documentary production. To me the FS5 is similar. Up to now the majority of high quality super 35mm cameras have been shoulder mounted or bulky. The Fs5 brings really exceptionally good image quality combined with ease of use into a truly useable handheld package for the first time. While there are other small options such as the new Sony A7s2 they are not as ergonomic as the FS5 for video work, they don’t have XLR audio without the use of adapters, they don’t have conveniently located zoom rockers etc.
The FS5 is sure to be a hit. I have one on order.
Please remember that my review is based on a pre-production prototype camera. Some features and functions may change between now and release and options may or may not be added in later firmware updates. I have tried to be as accurate as possible and believe that everything is true and accurate, but things do change! NORTHERN LIGHTS 2016.
Don’t forget I run storm chasing and Northern Lights expeditions every year. I still have some places on the second Northern Lights tour in Feb 2016. These are amazing expeditions by snowmobile up on to the Finnmarksvidda. We go ice fishing, dog sledding, exploring, cook a meal in a tent and enjoy traditional Norwegian saunas.
This is a quite nice update for these cameras. Not just a bug fix but some big additions including a new quick access menu system that uses the option button on the side of the camera You’ll also get Rec2020 options in Custom Mode. Estimated to be ready by January 2016.
Posted on Sony Europe’s website and on Twitter. A new FS camcorder to come at IBC. Click on the picture to register to be first to hear the details. I’ll get a hands on look next week. It’s very cool, feature rich and I’m sure it will be popular.
I’ve been asked by quite a few people now to comment on the upcoming GH-4 V-log option. For a start I haven’t tried it for myself, I have only seen content that’s been posted online, so it’s hard to tell a great deal about it especially as the online examples I’ve seen so far have been terribly exposed, typically grossly overexposed (but maybe that’s a design characteristic). What I know for sure is that it brings an improvement in dynamic range from 10 stops to 12 stops and that’s obviously a very big improvement. But, it has to be considered that many video cameras have been providing 11 stop ranges for many years, so in many respects this is just the GH4 catching up.
I’m afraid I had to laugh at some online V-log examples where the shooter had applied look up tables for Arri’s LogC to the footage. This clearly demonstrates a complete lack of understanding of log curves and LUT’s and how they work. You’re never going to get a great image by applying a LUT designed a 14+ stop input range and wide colorspace to footage with narrow colorspace, totally different luma recording range and only 12 stops. I really wish people would learn how these things actually work before blindly assuming that “because it’s log it must be better” and “because it’s an Arri LUT it’s going to make my camera look like an Alexa”. Sorry, but it really isn’t that simple and this is a case of the blind leading the blind. If you want to use LUT’s then V-Log will need it’s own dedicated LUT’s as it’s unlike any other log curve out there. The majority of log cameras have ranges of at least 13 stops (2 x the range of the GH-4’s 12 stops) and more commonly 14 stops or more.
Clearly, it’s an improvement to the camera, but this upgrade really reminds me of many of the flat profiles for the Canon 5D that don’t do much other than making the picture look, well, flat. They don’t actually add any dynamic range. I’d be really interested in the noise in the shadows from the GH4 in V-Log. My suspicion is that it will be quite noisy or heavily noise reduced compared to the standard profiles.
I first came across the Sony NXR100 at Broadcast Asia and I thought it was a great little camera then. I’ve now just finished a short shoot with it and it confirms my first thoughts. This is an interesting little camera that shares the same 1″sensor as the PXW-X70 but in a larger housing that is easier to handle in many professional applications. You get the same great image quality (although only recording XAVC-S or AVCHD) but the bigger package really looks the part (important for corporate and other pro applications) and offers larger controls, more assignable buttons and separate focus and zoom rings. To find out more why not join me next week for an introductory webinar. Click here for more details.
A rainbow of colours from the Northern Lights over the mountain cabins. Taken Jan 2013.
The dates are now up and I am now taking bookings for next years Northern Lights expeditions. I have been running these journeys of adventure into the arctic circle for 8 years following a tried and tested formula that gets better and better every year as we add more activities.
These are not just for photo and video enthusiasts. Many, many of those that come have little or no interest in photography and simply come to experience the arctic adventure and see the magical Northern Lights. Full details can be found here: https://www.xdcam-user.com/northern-lights-expeditions-to-norway/.
If you are into photography and video then these trips are an amazing opportunity to learn new skills as I offer unlimited free coaching and tuition on photographing the Northern Lights and working with video or stills cameras in this incredibly beautiful arctic environment. Almost every year people come back for a second or even third trip.
These trips normally sell out. I can only take a small group of up to 8 people due to some of the logistics of travelling by snow scooter up to the cabins and I only run these tours when the moon conditions are just right. So if you want to come let me know asap.
December 2015. Please contact me if you would like a bespoke tour in November or December 2015.
TOUR 1 Arrive 1st February 2016 – Depart 7th February 2016. £1,350 per person. Max 8 people. (cost of flights NOT included).
Arrive 7th February 2016 – Depart 13th February 2016. £1,350 per person. Max 8 people. (cost of flights NOT included).
The tour dates are timed for optimum moon conditions. You don’t want a bright full moon making the Auora invisible! While the prices may seem high do consider that food is included for most of the trip. Eating out in Norway is very expensive, breakfast, lunch and an evening meal could easily cost £65-£100 ($100-$150) per day. A one day snow scooter safari costs around £400 to £500, but we are using snow scooters almost every day, so I hope you can see that these adventure tours really are excellent value. Where possible we now also go Dog Sledding on one day. There is an extra charge £110 per person for this and get to drive your own team of dogs during a magical 2 hour dog sled ride.
I’m still here. Still preparing lots of training aids for you. The reason I haven’t been posting anything recently is just simply because I’m extremely busy preparing a dozen training films, shooting an in-depth review and on top of all that a TV commercial. This is all good stuff and I think a lot of you will love the training films once they are released.
Later in September/Early Oct I will be running a 3 day film making workshop in the Berkshire in the UK. It will be class room on a Friday on preparing for a shoot, camera setup and then discussion of the storyboard. On the Saturday we will be shooting an interesting fast action commercial and then on the Sunday we will have a class on grading and editing as we start to put the footage together. Cameras used will be the FS7, F5 and A7s. We will be using a lot of camera movement including jibs and gimbals. Space is limited so if you are interested drop me message using the contact form and I will fill you in with all the details.
That’s it for now. I promise there will be some new and interesting stuff for you on here very soon. Stay tuned.
Manage your privacy
To provide the best experiences, we use technologies like cookies to store and/or access device information. Consenting to these technologies will allow us to process data such as browsing behavior or unique IDs on this site. Not consenting or withdrawing consent, may adversely affect certain features and functions.
Functional
Always active
The technical storage or access is strictly necessary for the legitimate purpose of enabling the use of a specific service explicitly requested by the subscriber or user, or for the sole purpose of carrying out the transmission of a communication over an electronic communications network.
Preferences
The technical storage or access is necessary for the legitimate purpose of storing preferences that are not requested by the subscriber or user.
Statistics
The technical storage or access that is used exclusively for statistical purposes.The technical storage or access that is used exclusively for anonymous statistical purposes. Without a subpoena, voluntary compliance on the part of your Internet Service Provider, or additional records from a third party, information stored or retrieved for this purpose alone cannot usually be used to identify you.
Marketing
The technical storage or access is required to create user profiles to send advertising, or to track the user on a website or across several websites for similar marketing purposes.