Tag Archives: Review

A Review of the Tokina Vista Prime Lenses

I was recently given the opportunity shoot some test footage with a Sony Venice II.  A camera like Venice needs good glass, so I put out some feelers to see what lenses I could get for the shoot. I was offered the use of a set of the Tokina Vista primes, lenses I have been wanting to try for some time, so this was the perfect opportunity to try these interesting lenses on Sony’s newest cinema camera.

Shooting at Tower Bridge London with the Tokina Vista 135mm and Venice 2


Lets cut straight to the point: I love these lenses and I loved using them with the Venice 2.

I guess I had some concerns at first over choosing the Tokina Vista’s. Lets face it, Tokina are not the first brand that springs into most peoples minds when you are thinking about high quality PL cinema lenses. But I had been hearing nothing other than good things about them and when I had played with them at a couple of different trade shows, they did always look nice.

There are currently 8 lenses in the Vista range starting at the very wide 18mm and going up to 135mm. All are t1.5, are beautifully constructed with all metal bodies. The focus and aperture rings (with approx 300 degrees of travel) are in the same position on every lens in the set, so lens swaps are easy. The 9 bladed iris works well to give pleasing smooth bokeh.

The Tokina Vista 135mm t1.5 on a Venice 2


Many manufacturers claim that their lenses have minimal breathing and this is definitely true of the Tokina Vista. Focussing from near to far resulted in only a very small change of the image size on all the lenses I tried. The breathing is truly minimal.

As I was shooting using the Venice 2’s 8.2K 17:9 mode this was a good test of the lenses resolution and sharpness. In the video at the bottom of the page you will see a couple of shots where I added a slow post production zoom in to the image, reaching 2x magnification. If you watch the video in 4K you won’t see any appreciable drop in image quality during the zoom in where I am in effect expanding the original 8.2K pixel image by 200%. This to me is a clear indication that these lenses are plenty good enough for 8K capture.

Wide shot, taken at 8.2K with the 18mm Tokina Vista.
A crop from the frame above. Even in 4K this image looks great.


But, at the same time I also felt that the lenses were not excessively sharp. There is a “roundness” to the images from these lenses that I really like. The Vista’s are also very slightly warm looking and this combined with the roundness of the image and very slight propensity to flare a little gives them a very appealing look. I guess I could describe it as a vintage look, but that might make them sound old fashioned. These are not old fashioned lenses, these are clearly modern, high performance lenses. But the images they deliver has a beautiful, almost old school look that I found to be very appealing.

The Tokina Vistas and Venice 2 deliver great colours and skin tones.
This is a crop from the above image. When you have 8.2K of pixels and a high resolution lens its very easy to reframe in post production, even when delivering in 4K.


Faces and skin tones looked really nice, of course this is a combination of both a great camera and great lenses, but the colour reproduction from the combination of Venice 2 and the Tokina Vistas was very pleasing.

At t1.5 the Tokina Vista’s are great for low light and Venice at 3200 ISO looks great.


I did have a play with most of the lenses in the set and they all appeared to perform similarly. But for the video shoot in London I focussed on the 18mm, 40mm and 135mm lenses. 

The 18mm is very wide. It is not truly rectilinear, there is some barrel distortion, but nothing too severe. You do have to remember that this is a t1.5 lens and it’s not easy to produce very fast, very wide lenses for full frame. The 46.7mm image circle of all the Vista lenses means that they comfortably cover the full frame Venice sensor and even at 18mm there is barely any light fall off or vignetting at the edges of the frame.

One of the other things that really impressed me with all the Vista’s was the lack of chromatic aberration. Even when shooting very high contrast, backlit edges or specular reflections it was hard to spot any chromatic aberration. There is not a single shot amongst all of the material that I shot where I noticed anything nasty.

Trafalgar Square, shot with the 18mm Vista. You can see that there is some barrel distortion, but it’s pretty good for an 18mm t1.5 lens.


The only negative I can really find about the 18mm is the size and bulk. This is a big and heavy lens. All the Vista have the same external diameter of 114mm. The 18mm is no different in that regard. But the 18mm is one of the longest lenses in the set, it’s 180mm from front to back. And it weighs almost 2.7Kg. A big part of the weight probably comes from the bulbous front element of the lens – which you will be glad to know does not protrude beyond the end of the lens housing, giving it some protection from accidental damage.

When you have an 8K camera, wide angle lenses can be used to capture a very wide frame that can then be cropped into to re-frame in post, so having that maximum t1.5 aperture which helps maintain a shallow DoF is important. 

London’s China Town, shot with the 40mm Tokina Vista


The 40mm lens is also really nice. 40mm is an interesting focal length, a shade longer than 35mm and wider than 50mm. I found it to be a very nice focal length for a lot of different types of shots with the Venice Full Frame sensor.  At 2.24kg it is a much lighter lens than the 18mm and a fair bit shorter at 160mm. Once again extremely small amount of breathing and near total lack of chromatic aberrations makes this a lovely lens to shoot with. When shooting high contrast point light sources such as street lights at night there is a bit of circular flare around the light source, but I find this to be quite pleasing. Strong light sources just out of frame can lead to some minor veiling flare on all the lenses in the set, but this is no worse than seen with most other similar quality lenses and the lens coatings give the flare a slight warmth that again, I find very appealing.


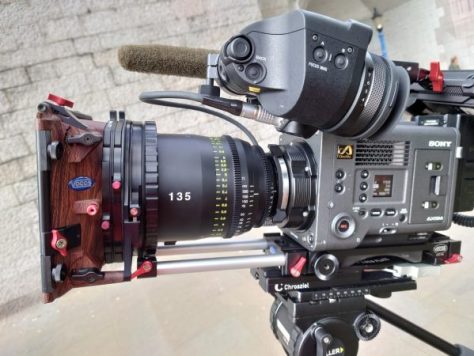
The 135mm lens doesn’t disappoint either, shooting at 135mm and t1.5 delivers a very narrow depth of field.  As expected this is one of the larger lenses in the set. It’s 187mm long so a bit shorter than the 18mm but it is heavier with the PL mount version coming in very close to 3kg. There isn’t much more I can say about this lens that I haven’t covered with the other lenses, extremely minimal breathing, near zero chromatic aberration etc all make for a great image. The consistent look across all the lenses means this too shares that well rounded not too clinical and very slight warmth that makes these all of these lenses very appealing.

Tokina Vista 40mm on Venice 2 at 3200 ISO. I really like the way the Vistas flare.


The Tokina Vista’s are not re-housed photo lenses, they were designed specifically for digital cinematography. They are available in a range of mounts including PL, Canon EF, MFT, LPL and Sony E. I had heard good things about them from other users before I tried them and now I have had a chance to shoot with them I have to say that they are lenses that I will want to use again. Perhaps in particular when the project would benefit from a slight vintage or romantic look without being soft and without giving up any resolution. For the money they are great looking lenses and would recommend anyone that hasn’t tried them to give them a go.

PAG MPL Mini Pag Link Batteries

I’ve been using PAG batteries forever, well at least for as long as I have worked in film and TV and that’s a very, very long time now. Pag batteries have always been known for their robustness, reliability and performance, all things that are vitally important to me as often I find myself shooting in some very remote and very tough environments.

Shooting with Venice deep in the Slot Canyon powered by a Pag Link PL150 battery.


For around 7 years I have been using the Pag Link battery system. Pag link allows you to quickly link together multiple batteries. This has many benefits. For a start you can charge many batteries at once with a single channel battery charger. This is great for me when travelling as I can use the tiny Pag travel charger to charge several batteries overnight. Or back at base with my 2 channel Pag charger I will often put 3 or 4 linked batteries on each charger channel so that all my batteries will charge in one single session. And you are not limited to using a Pag charger, you can stack the Pag Link batteries on almost any charger.

A single Pag PagLink PL150 battery will run Venice for around 2 hours.


Another benefit is being able to link a couple of batteries together when you need a higher current output, perhaps to power a big video light or to run a higher powered digital cinema camera. If using more than one battery on a camera it is even possible to hotswap the rear most battery without needing to turn off the camera or stop recording.

The Pag Link batteries have served me extremely well and even after 6 or more years of use are only showing very minimal capacity loss. But as modern cameras are getting smaller and smaller and need less and less power, even the already relatively compact Pag Link batteries sometimes seemed like overkill.

Enter the MPL series.

The Pag Link MPL batteries have taken what was already a great concept and miniaturised it. Using the latest battery cell technologies Pag have managed to produce new smaller and lighter stackable batteries with the similar capacities to the original Pag Links. Pag have also listened to customer feedback adding D-Tap ports to the tops of the batteries as well as an additional USB output. The USB output module can be swapped to other outputs if you need them such as Hirose or Lemo. In addition, the MPL batteries are fitted with industry standard ¼” mounting points. These can be used to either mount accessories to the battery or to mount the battery on to something that doesn’t have a standard battery connection.

Pag Link Mini MPL99 powering my FX6 while shooting the Volcano in Iceland.


My first real test for the MPL batteries was a trip to Iceland to shoot the Fagradalsfjall Volcano. When travelling by air you must take your Lithium batteries as carry on luggage. The MPL’s are built to very high standards and UN tested, so you can be confident that they are as safe and as flight friendly as possible. The smaller size and light weight makes it nice and easy to travel with these batteries.


To get to the Volcano you have to hike up a small mountain using rocky, slippery and sometimes very steep routes. It’s around 2.5 miles from the nearest road to the closest places from where you can see the volcano crater, so a minimum of a 5 mile round trip.  I was working on my own, so had to carry camera, lenses, tripod and batteries in a backpack. Plus spare clothing, food and drinks as the weather in Iceland changes frequently and can often be quite nasty. So, every gram of weight counted. I was shooting with a Sony FX6 using an Atomos Ninja V raw recorder and needed enough power to run everything for a full day of on and off shooting. The Pag MPL’s had just become available and were perfect for the job. The built in D-Taps could be used to power the recorder. I used a V-Mount adapter plate for the camera and the USB port in the MPL batteries was perfect for topping up my phone for the live streams I was doing.

I spent several days up at the Volcano, often hiking even further from the road, seeking out different camera angles and different views. A single 100Wh MPL 99 ran the whole setup for most of the day. By adding an additional 50Wh MPL50 on to the back of the MPL99 I had power in reserve. The diminutive size and light weight of these batteries made a big difference for this shoot. Then back at the hotel I could use the Pag travel charger to charge all of my MPL batteries overnight by connecting them together on the charger, no need to get up in the middle of the night to swap batteries over.

Since then, I’ve used the MPL batteries for many different applications. Their small size is deceptive, they don’t look like they would be able to power anything for a long time, but they can. On a shoot using a Venice 2 I used a stacked MPL99 and an MP50 to power the camera while walking around London to save weight. The batteries ran the camera for close to 2 hours and the capacity display on the battery as well as the run time indicator in the cameras viewfinder was highly accurate.

Pag MPL99 and MPL50 being used to power a Sony Venice II


I can’t recommend the Pag Link system highly enough. The only negative is that the original larger V-Mount Pag Link batteries and the new compact V-Mount Pag Link ML batteries can’t be connected together. A new mating system for V-Mount was require for the new smaller batteries. The Gold mount versions both old and new can be stacked together. Stacked together, despite their diminutive size a pair of MPL99’s can deliver up to 12 amps of power, enough for most video lights. The intelligent linking system means there is no issue connecting a fully charged battery to a flat battery. These are very clever, small, light and compact batteries.

Nanlite Forza 300 LED Spotlight

 The Nanlite Forza 300 is a LED COB spotlight normally used with a reflector to provide a 55 degree light cone.

Nanlite Forza 300 spotlight with included reflector.


The lamp is 300 watts and can be powered from the mains with the included power adapter or vai a pair of V-lock batteries. It is daylight balanced at 5500K and has a CRI of 95 (measured by myself). It has always resulted in very pleasing skin tone whenever I have used it.

Skin tones look good when using the Forza 300 from Nanlite.


The 300 watt LED COB emitter produces a similar amount of light to a 3000 watt tungsten lamp. This  makes the Forza 300 suitable for illuminating very large areas or as a source light for a large soft box or for use with large silk diffusers. Nanlite make a very nice parabolic reflectors/soft boxes for the Forza lamps that are very quick to erect due to the use of clever quick locking support arms.

Parabolic reflector/soft box for the Nanlite Forza 300


The lamphead has a standard Bowens mount so there are many light modifiers that can be used, but one that I particularly like is the Nanlite zoomable Fresnel adapter. This large fresnel lens can be adjusted to provide a very tightly controlled light beam from just 5 degrees wide to 45 degrees wide. It comes with barn doors and turns the Forza 300 into something comparable to the old Arri 2K fresnel, just without the heat and power draw.

Nanlite zoomable fresnel lens with barn doors for the Forza 300 and Forza 500.


I’m a big fan of fresnels as they give you good control of where your light is going. Make it dimmable as well and you have a very versatile lamp.

The light can be controlled via DMX as well as a couple of very cheap wireless remote control units (around £20/$30) and an app is due to be released soon. 

Like many modern lights it also has a number of effects modes including strobe, storm, TV and bad bulb and these can be quickly and easily selected from the lamps control unit and power supply. The build quality is very good. The lamp head is mostly metal while the control unit is a mix of good quality plastics and metal.  The whole thing weighs 4.8kg so you don’t need a particularly large light stand to support it.

with a street price of around £650/$850 this is a very affordable yet also very capable lamp. I would suggest that anyone trying to build their own versatile light kit should include at least one spot light and not just rely on LED panel lights. Having a good, bright spot light allows you to a lot more creative lighting as a spot light, especially if you add the Fresnel lens can be used with gobo’s or objects in the foreground to create interesting shadow effects.


For a recent short film shoot I used the Forza 300 to throw light through a forest of trees. The trees creating interesting shadows adding a lot of extra contrast to the shots.  For another scene I used the Forza 300 as a backlight through some smoke for an interesting mystic effect. A flat panel light cannot reproduce these effects in the same way.


For this shoot I needed to power the lamp off batteries. It is worth noting that if running the lamp at is maximum output of 300 watts you will be drawing over 10 amps from each of the 2 V-Lock batteries need to run it. This is right at the limit of what many V-Locks can deliver.  As a result you may find your batteries cutting off before they are fully discharged. To run a high power LED lamp like this you should consider Lithium Manganese batteries or other batteries capable of at least a 12 amp output. My own preference is to use Pag Paglink batteries as by linking two batteries together you can double the amount of power they can deliver. Using 4 Paglink batteries (2 pairs of 2) I was able to run the lamp for 90  minutes at full power.

4 Paglink batteries will power the Forza 300 for around 90 minutes.


The lamp I used for the review was supplied by Prolight Direct UK. They are very knowledgable with many years of experience with all kinds of film and television lighting, so do contact them with your lighting needs.

I highly recommend the Forza 300. It is, in my opinion, one of the best of this type of lamp on the market today and very competitively priced. Please see the video above for more information.

Nanlite.com

Accsoon CineEye 2S

Wireless video transmitters are nothing new and there are lots of different units on the market. But the Accsoon CineEye 2S stands out from the crowd for a number of reasons.

First is the price, at only £220/$300 USD it’s very affordable for a SDI/HDMI wireless transmitter. But one thing to understand is that it is just a transmitter, there is no reciever. Instead you use a phone or tablet to receive the signal and act as your monitor. You can connect up to 4 devices at the same time and the latency is very low.  Given that you can buy a reasonably decent Android tablet or used iPad for £100/$140 these days, it still makes an affordable and neat solution without the need to worry about cables, batteries or cages at the receive end. And most people have an iPhone or Android phone anyway. The Accsoon app includes waveform and histogram display, LUT’s, peaking and all the usual functions you would find on most pro monitors. So it saves tying up an expensive monitor just for a directors preview. You can also record on the tablet/phone giving the ability for the director or anyone else linked to it to independently play back takes as he/she wishes while you use the camera for other things.


Next is the fact that it doesn’t have any fans. So there is no additional noise to worry about when using it. It’s completely silent. Some other units can get quite noisy.

And the best bit: If you are using an iPhone or iPad with a mobile data connection the app can stream your feed to YouTube, Facebook or any similar RMTP service. With Covid still preventing travel for many this is a great solution for an extremely portable streaming solution for remote production previews etc. The quality of the stream is great (subject to your data connection) and you don’t need any additional dongles or adapters, it just works! 

Watch the video, which was streamed live to YouTube with the CineEye 2S  for more information. At 09.12 I comment that it uses 5G – What I mean is that it has 5Ghz WiFi as well as 2.5Ghz Wifi for the connection between the CineEye and the phone or tablet. 5Ghz WiFi is preferred where possible for better quality connections and better range. https://accsoonusa.com/cineeye/


Chrosziel FX6 kit and Chrosziel Quick lock Plate

Chrosziel FX6 Kit. Top plate, base plate and arm for the FX6


In the video below I take a look at the Chrosziel FX6 kit as well as the Chrosziel Quick Lock plate. The FX6 Kit includes a very nice lightweight top cheese plate that doesn’t get in the way of the existing handle.

There is a lightweight base plate with a highly adjustable soft and comfortable shoulder pad specifically designed for the FX6 that is compatible with Sony VCT type quick release plates (but can also be used with other base plates)  as well as an extension arm and extension cable for the hand grip. 

This versatile kit will be great for anyone wishing to shoulder mount the FX6 as well as those that like to use a VCT quick release plate on a tripod etc. 

Chrosziel Quick Lock Plate and superior alternative to a VCT type QR plate.


As an alternative to the usual slightly wobbly Sony VCT quick release plate I also take a look at the Chrosziel Quick Lock Plate. This is designed to replace the Sony style tripod plates and is a significant upgrade. It is vey light but far, far more rigid than a normal VCT plate thanks to a completely redesigned locking system. The Quick Lock Plate is fully compatible with all shoulder mounts and base plates that you would normally use with a VCT plate, not just Chrosziel. While expensive it is a piece of kit that will last for years and years and if you use long lenses or simply want an exceptionally stable mounting system worth every penny.


Thoughts on the FX6

I’ve written a review of the FX6 that you can read here.

https://sonycine.com/articles/the-new-sony-fx6—the-definitive-review-by-alister-chapman/

But I thought I would also write more of an opinion piece here. What do I really think about the FX6 and also where does it fit in the grand scheme of things.

Sony FX6 4K Camcorder


First off, it is a brilliant little camcorder. But it has to be. There is huge pressure from ever better mirrorless cameras and ever better larger cameras. Red’s Komodo is similarly priced and offers an interesting option if you are a film maker that doesn’t mind adding your own viewfinder etc..

Sony really have packed an amazing set of features into the FX6, S-Cinetone, LUT’s, CineEI all make it a very, very interesting camera for film makers and corporate video producers alike. But the FX6 hasn’t been aimed at broadcasters, the lack of interlace recording and the lack of a streaming function make it less desirable for news and current affairs. That’s more of the realm of the FX9.

The FX6 is likely to be a huge success. I know I will be getting one. It will be fantastic for my trips overseas where size and weight are important, and I can’t wait to try to shoot the Northern Lights with it. The low light performance is indeed very impressive but this could become a problem area for it.

When you have a camera with a base ISO of 12,800 I think there will be an expectation that you won’t need to light, that it will produce brilliant pictures no matter how dark it is. But you have to remember that one of the keys to getting good results in any light level is not the amount of light but the amount of contrast. You will still need to think about how you add or control the light in your scenes and it will be all too easy to blame the camera when you don’t get great looking pictures on a pitch dark night shoot with no light to add some contrast.

I also think that the gap between 800 ISO and 12,800 ISO is too big. At 12,800 ISO there is so little light that something called Photon Shot Noise becomes an issue. It can make the mid range noisier than you would like it to be, even when you are correctly exposed. And ND filters won’t help as they reduce the light hitting the sensor and the relative photon shot noise increases. But if you do want to shoot in very dark conditions, then the FX6 performance is indeed impressive.

When I had the pre-production FX6 I took it up to the Lake District, shot interiors at home and spent a couple of days examining the images with charts and test scenes. What I learnt was that it is a very easy camera to work with. Changing settings via the touch screen is quick and simple. The single menu button that first brings up what are referred to as status pages on the FX9 and then with a long push brings up the main menus is brilliant. One button for both. No fumbling around going from the status button to the menu button as on the FX9. The auto focus works brilliantly, and I love having a waveform display with the zebra levels clearly indicated on it. It makes judging exposure easy and reliable. Set the zebras to 61% and if you toggle the s709 LUT on and off you can check the brightness of a white card when looking at the S-Log3 or skin tones when looking at the s709.

Going back to the Auto Focus for a moment – Yes, it does work in S&Q and even when shooting UHD 100 or 120fps. BUT I did find it less responsive and slower to respond when shooting at 120fps, it definitely didn’t seem as good as when shooting at normal frame rates. And there are actually a few limitations, AF only works when the shooting frame rate is a direct multiple of the base frame rate.

it also has some other oddities, like the field of view when shooting 17:9  4K DCI is narrower than when shooting ordinary 16:9 UHD because of the way the scan modes work. If you want to output raw the FOV is narrower than when recording UHD internally.

I’m really looking forward to using it on gimbals, lighter weight sliders etc. For those on a tight budget having a lighter camera means you can also save money on your support gear compared to a heavier camera. I think I’m going to enjoy shooting with the FX6 and I’m sure many others will enjoy it to.

And that’s the thing. It’s an easy camera to use, it delivers a beautiful image with very little effort. This is one of it’s big strengths and why I believe it will convert a lot of mirrorless DSLR shooters over to a “proper” video camera. It brings the ease of a built in variable ND filter, LUT’s and other great exposure tools for shooting log, good battery life and pro audio all together in an easy to use package at a good price. At the same time it isn’t so big that you need huge pro tripods and expensive heavy duty support equipment.

It will also appeal to users of Sony’s Venice digital cinema camera to get into places you simply can’t get the bulk of a Venice or as a crash camera for high risk shots. The pictures match close enough that it won’t stand out in a finished production as an obviously different camera.

One issue is the lack of audio inputs when the top handle is removed. This does seem to be an oversight. Gimbal users will find it frustrating I’m sure. Time to break out the external audio recorders, at least the built in scratch mic will help with audio sync. Maybe someone will figure out a way to get audio into the camera body via the connector that the top handle plugs into. The other alternative is to take the video out of the FX6 to an external recorder that also has an audio input such as many of the Atomos recorders.

So where does this leave the FX9? The FX9 is a great camera. It is worth remembering that the FX6 really is Full Frame only (unless you are happy shooting HD in it’s super 35mm mode). So users of normal 35mm PL lenses or APSC lenses will be better off with the FX9 with it’s greater choice of scan modes including 6K FF, 5K crop FF and 4K s35. In the next firmware update the FX9 will also get a 2K s16 center scan mode and it will be able to use the Sony B4 lens adapter with 2/3″ ENG zoom lenses. I still love shooting with my super 35mm Fujinon MK’s on the FX9, it’s a great combination. The FX9 also has no issues with interlace, so news shooters that still need 1080i will want the FX9 and not the FX6. I have every intention of getting an FX6 but I have no plans on parting with my FX9. Because the images from the two cameras look virtually identical they will compliment each other nicely (anyone want to buy my FS5??). 

And that for me is the thing: Two cameras for two different types of shoots, but both look the same, so I can just use whichever is the most appropriate for the job without any concern. 


ACS Technical Panel Review The PXW-FX9

The ACS have produced a video report about some of the testing that they did with a pre-production FX9. It’s quite a long video but has some interesting side by side comparisons with the FS7 which we all already know very well. You’ve heard much of what’s in the video from me already, but I’m a Sony guy, so it’s good to hear the same things from the much more impartial ACS.

With my super geek hat on it was really interesting to see the colour response tests performed by Pawel Achtel ACS at 37.08. These tests use a very pure white light source that is split into the full spectrum and then the monochromatic light is projected onto the sensor. It’s a very telling test. I was quite surprised to see how large the FS7’s response is, it’s not something I have ever had the tools to measure. The test also highlights a lack of far red response from the FS7. It’s not terrible, but does help explain why warm skin tones perhaps don’t always look as nice as they could. I do wonder if this is down to the characteristics of the cameras IR cut filter as we also know the sensor to be quite sensitive to IR. The good news is that the PXW-FX9 has what Pawel claims to be the best colour accuracy of any camera he’s tested, and he’s tested pretty much all of the current cinema cameras. Take a look for yourself.

Sony FX9 ACS Roundtable from ACS on Vimeo.

The Sony PXW-Z90 – a compact 4K camcorder with auto focus at it’s best!

Normally when I travel up to arctic Norway for my annual Northern Lights expeditions I take a large sensor video camera. Last year it was the Sony FS5, which performed very well and gave me some great results. But this year I decided to down size and instead of taking a bulky camera I chose to take a pre-production sample of Sony’s diminutive new PXW-Z90 camcorder.

In Norway with the PXW-Z90.

On the outside the Z90 looks almost exactly the same as the older PXW-X70 camcorder. I’ve shot several videos with the X70 and it’s a great little camcorder that produces a very good image considering it’s small size. Being a new model I expected the Z90 to offer some small improvements over the X70, but what I didn’t expect was the very big improvements that the Z90 brings.

The Z90 is the first camcorder from Sony to incorporate a new design of sensor. It’s a 1″ type sensor, so like the X70, bigger than you used to find on small handycams, but not as big as the super 35mm sensor found in the FS5, FS7 etc. This is a nice size for this type of camera as it makes it possible to obtain a shallow depth of field by using the cameras built in ND filters (yes- it really does have ND filters built in) and a large aperture. Or if you need a deeper depth of field for easier focussing or run and gun then you can use a smaller aperture by switching out the ND filters. The maximum aperture of the zoom lens is f2.8 but it does stop down to f4 towards the telephoto end.

Sony’s new stacked CMOS EMOR RS sensor

This new sensor uses a new construction method that allows it to have several layers of electronics immediately below the imager pixels. The “stacked” sensor can as a result incorporate more image processing and a large memory area right under the pixels. This means that the sensor can be read out much more quickly than is normal for this type of camera and as a result rolling shutter is hugely reduced (I didn’t notice any in any of my footage).

As well as a reduction in rolling shutter compared to other similar sensors, the ability to do more on chip image processing appears to bring other advantages as the noise levels from this camera are very low indeed.

Frame grab from a night time snow scooter ride. Shot at +15dB gain the noise is still very minor. (click on the image to view a larger version.

The low noise levels mean that this camera performs surprisingly well in low light. Adding in +6dB  was not a problem if needed. Even with +15dB of gin the images hold together very well. Clearly the camera is doing a fair bit of electronic noise reduction at higher gain levels and there is a slight increase in image smear as a result. Plus in certain circumstances the noise levels do rise, especially if you have large dark areas amongst in an otherwise brighter scene. In my sample footage during the night time snow scooter ride, which was shot at +15dB gain, you don’t see and noise over the snow, but you can see some grainy noise over the dark jacket of the snow scooter driver (see the frame grab above).  The fact that you can push the camera up to +15dB and in most cases get a pretty good image is very nice.

Frame grab form a PXW-Z90 – Hybrid Log Gamma. Click on the image to see a larger version.

On top of good sensitivity you also have great dynamic range, more than the X70 and enough to make direct HDR shooting and log shooting possible with this tiny hand held camcorder. It doesn’t quite have the dynamic range of an FS5 or FS7, but there is still plenty of range to help deal with challenging lighting situations.

As well as bringing a nice improvement in image quality over the X70 (which is pretty good already) the new sensor brings a vastly improved autofocus system. There are 273 focus detection points which are combined with faster readout, faster on sensor processing and the same AF processing technology as used in the flagship Sony A9 stills camera. This brings a really remarkable autofocus system to this camera. The AF system is a newly developed hybrid system that combines phase detection AF with new algorithms created specifically for video rather than stills photography. At last this is an autofocus system that really works for a video camera. It is intelligent and responsive. There is no hunting for focus, it just seems to get on with the job.

Adjusting the AF response on the PXW-Z90.

Just about every aspect of the autofocus system can be customised in the camera menu. You can choose between using focus zones, the full image width or selectable focus spot areas. The cameras LCD screen is a touch screen so you tap the screen where you want to focus.

You can also tailor the AF’s response speed, you can adjust the size of the tracking range, using a wide range for occasions when you want the AF to follow an object through the shot, or use a narrow range to restrict the focus depth range.

The PXW-Z90’s variable AF drive speed.

You can customise how quickly the AF will move from one object to another, from staying locked on to a faster more responsive setting.

In addition it has that wonderful Sony face detection system that allows you to choose one face out of a crowd of people using the thumb stick on the hand grip or the touch screen. Once selected the camera will stay locked to that face.

Working with the PXW-X90 in Norway.

While I was up in Norway it was between -24c and -30c. In those temperatures you really don’t want to take your mittens off for more than a minute or so. Being able to rely on the cameras autofocus allowed me to keep my fingers warm. Not one shot out of all my rushes from the trip has incorrect focus. That is truly remarkable and made shooting with this camera a real pleasure. I’m not saying that you should always use autofocus. When possible I love to be able to pick and choose how I focus. But in many situations or for less experienced shooters this autofocus system will be a game changer.

For my test shoot in Norway I mostly used Picture Profile number 10 which gives an instant HDR workflow thanks to the use of Hybrid Log Gamma. Using HLG you can shoot as you would do with any other conventional camera. Then take the footage and play it back in HDR on an HDR TV without any grading or other post production work. I also shot at a couple of locations using S-Log2 to test how that worked (I was shooting in UHD and the camera is 8 bit in UHD. For 8 bit I prefer S-Log2 over S-Log3). The Z90 has 10 picture profiles that allow you to tailor how the image looks, including a crunchy DSLR type look. Some filmic looks using Sony’s cinegammas as well as profiles for shooting S-Log2, S-Log3 and Hybrid Log Gamma (HLG).

Dog sledding in the arctic (frame grab). Shot in HDR using HLG on the PXW-Z90.

The Z90 has Sony’s XAVC-L codec. This high quality codec offers 10 bit 4:2:2 broadcast quality recordings in HD and 8 bit 4:2:0 recordings in UHD (3840 x 2160). The camera records to SDXC cards, so media costs are very low. There are two card slots and you can record to each slot singly, record to one card after the other or dual record on to both cards at the same time for redundancy and an instant back. You can even use each of the cameras two record buttons to control the records on each card independently should you wish.

The PXW-X90 is very small, so carrying it around on the snow scooters was easy.

The rear of the hand grip of the PXW-Z90.

The Z90 is a small camcorder and like all small camcorders this doesn’t leave much room for large buttons and switches. The menu system and many of the cameras functions can be controlled via the touch screen LCD or the small joystick/thumb stick on the hand grip. Iris, shutter speed and gain each have a dedicated access button that selects the function.

The Full Auto switch and ND filter control on the PXW-Z90.

Then you use the thumb stick to select the value you want, or you can set each item to Auto. In addition there is a switch to put the camera into full auto on the rear of the camera. Just below the full auto switch is the control switch for the ND filters.

The Sony PXW-Z90 compact 4K camcorder.

The lens is a Zeiss 12x optical zoom with built in optical image stabilisation. It is controlled by a single ring around the barrel of the lens which can be switched between focus control or zoom control. In addition there is the usual zoom rocker on the handgrip as well as a small zoom switch on the top handle. In addition to the optical stabilisation the camera also has Sony’s electronic “super steadyshot” stabilisation that can be used in addition to the optical stabilisation. Another very handy function is “Clear Image Zoom”. This is a form of electronic zoom function that makes use of a database of textures and object types. When using clear image zoom the camera uses this database to apply just the right amount of image processing during the electronic zoom process. In most cases you can’t see any degradation of the image when using clear image zoom. I left it on for all of the Norway shoot as it turns the 12x zoom into a very handy 18x zoom.

The wide end of the PXW-X90’s zoom range.

The long end of the PXW-X90’s zoom lens.


After doing so much shooting on large sensor cameras with restricted zoom ranges getting back to a small camera with a big zoom range was fun. For future Norway trips I am very tempted to switch to a camera like the Z90.

The right side of the PXW-Z90.

The Z90 body is almost exactly the same as the X70. The cameras top handle has 2x XLR connectors with the audio controls for the two channels on the opposite side of the handle.

The audio controls of the PXW-Z90.

If you want to make the camera more compact the handle can be removed, but when you do this you will no longer have any XLR connectors. Instead you will have an MI shoe on the top of the camera body  that can be used to connect a Sony UWP-D radio mic or a n XLR adapter. There is also a stereo microphone built into the main body of the camera, so even with the hand grip removed there are plenty of audio options.

The PXW-Z90’s flip out LCD screen.

The flip out LCD panel acts as the cameras main viewfinder. Opening and closing the LCD screen turns the camera on and off. It starts up and shuts down very quickly. The resolution of the LCD is similar to most other modern camera LCD’s. It’s adequate for this type of camera, but it isn’t the highest resolution screen in the world. To check focus you have a button on the top of the hand grip to activate the image magnification function and the camera has a coloured peaking system to help pick out what is, and what is not in focus.  I suspect that with this particular camera, many users will take advantage of the cameras excellent auto focus system and there is a lot of feedback to the user of how this is working including coloured boxes that indicate exactly what the camera is focussing on.

The rear of the Sony PXW-Z90.

As well as the side LCD panel there is also a small OLED electronic viewfinder on the rear of the camera. This is very useful for use in very bright sunlight, but it is rather small.

The cameras gain, shutter and iris functions each have a dedicated button on the side of the camera. One push of the appropriate button enables that function to be controlled by a small dial wheel just under the front of the lens.

Iris, gain and shutter speed controls on the side of the PXW-Z90.

Press the shutter button and the wheel controls the shutter. Press the gain button and the wheel controls the gain. Overall this system works well, but I would still prefer a separate gain switch and a shutter speed up/down switch. On the rear of the hand grip there is a small joystick that sits under your thumb. You can use this thumb-stick to set many of the cameras settings and to navigate through the cameras menu system.  In addition you can use the LCD touchscreen to navigate through the menu as well as select your autofocus points etc.

The PXW-Z90 is a small camera that packs a very big punch. It’s never going to give the fine degree of image control that you get with most large sensor cameras and it won’t quite deliver the same image quality either (although it’s really, really close). If you need a small, discrete camera, perhaps you travel a lot, or you just need a “B” camera, then the Z90 offers a  possible solution.  I haven’t even touched on all the streaming, ftp and wifi capabilities of this camera. The auto focus system is a delight to use and it’s the best AF system I’ve ever come across on a video camera. The new sensor in the Z90 is clearly a fairly large step forwards from the sensor in the previous similar model the X70, it has more dynamic range, a lot less rolling shutter (not that it’s a big problem on the X70) and the final images look better as a result. I might just have to add one to my camera collection.


If you would like to join me on one of my adventures to arctic Norway please see take a look at this page. I’ve been running these trips for 11 years and EVERY tour has seen the Northern Lights. This year was no exception and we got to see some really great Auroras and had a great time dog sledding, ice fishing and exploring the Finnmarksvidda.

2018 was yet another great year for my Aurora tours. This picture taken on January 20th.


How does the Panasonic EVA1 stack up against the Sony FS7 and FS5?

This is a question a lot of people are asking. As I’ve mentioned in other recent posts, sensors have reached a point where it’s very difficult to bring out a camera where the image quality will be significantly different from any other on the market for any given price point. Most differences will be in things like codec choices or trading off a bit of extra resolution for sensitivity etc. Other differences will be in the ergonomics, lens mounts and battery systems.

So it’s interesting to see what Keith Mullin over at  Z-Systems thought of the EVA1. Keith knows his stuff and Z-Systems are not tied to any one particular brand.

Overall as expected there isn’t a huge difference in image quality between any of the 3 cameras. The EVA1 seems weaker in low light which is something I would have predicted given the higher pixel count. The dual ISO mode seems not to be anywhere near the same as the really very good dual ISO mode in the Varicam LT.

Why not take a look at the full article and video for yourself. http://zsyst.com/2017/12/panasonic-eva1-first-look/


The Fujinon Cabrio XK6x120 alongside the MK 18-55.

Having done a fair bit of shooting with the new and very nice Fujinon MK 18-55mm E-Mount lens I decided to take a much closer look at the Fujinon Cabrio XK6x20 20 to 120mm T3.5 lens with the servo hand grip.

The Fujinon XK6X20 20 to 120mm lens on my PMW-F5. The lens was loaned to me by Fujinon at my request as I wanted to test it for myself.

The price of this lens is very competitive and it can now be found as low as £11K/$16K. Lets not try to pretend that good quality PL mount zooms are cheap, but this is a great price for what is very high quality glass. The 20 to 120mm zoom range is nice and of course it’s truly parfocal there is a back focus adjuster along with macro function.

The XK6X20 viewed from the top.

Like the other similar ENG style PL zooms this lens is quite heavy. The front element of the lens is huge and I’m sure a lot of the weight comes from this big lump of glass. One of the nice things about this lenses baby brother the MK 18-55, is that the 18-55 is really very light, which is great on the smaller cameras like the FS5 or FS7.

The XK6X20 and it huge front element on the left and the smaller and lighter MK18-55 on the right.

The 20-120mm Cabrio exudes quality. The build quality of the lens is wonderful, the witness marks are crisp and well engraved, the servo zoom is silky smooth. The large servo module acts as a handgrip just like traditional ENG lenses and it really comfortable to hold and use this way. But if you don’t need it it can be easily removed leaving the bare bones lens body and saving a little bit of weight. There are the usual 0.8 mod pitch gears on each of the focus zoom and iris rings. Focus ring travel is huge at about 200 degrees and due to the physical size of the lens this is as much as I’d ever want. Even towards infinity there is still a nice range of travel so focussing accurately on distant objects is easy.

But what about the image quality, how does the lens perform in real world situations?

To find out I used it for a shoot in Norway. The shoot was for TV manufacturer Philips. We wanted to obtain some high quality 4K HDR footage to show off the capabilities of a new 4K OLED Ambilight TV. Unfortunately the weather conditions on the shoot were pretty grim most of the time and this made it all the more challenging. But I’m pleased to say that both lenses performed very well despite snow, ice and cold.

You can see the size difference here – XK6X20 on the left and MK18-55 on the right.

One of the great things about having both the high end Cabrio 20-120mm and the budget friendly 18-55mm for the shoot was that the overall look of the images from the FS5 and F5 was the same. Often mixing lenses from different manufacturers results in different looking images giving the colourist more work to do in post. Fujinon now have a range of lenses to suit most budgets from the high end Cabrio 19-90mm T2.9 down through the Cabrio 20-120 T3.5 to the MK 18-55 T2.9.

So what do the images from these lenses look like? I’m afraid I can’t show any of the footage from the Philips shoot yet, I should be able to show it later in the year. Below are a couple of frame grabs to give you an idea of the kind of images you can get. We didn’t shoot the same shots with the F5/XK6x20 and FS5/MK18-55 at the same time, I was the only cinematographer. So I don’t have a side by side comparison from the shoot, but the different scenes shot with each lens/camera combo match really well.

Sami woman feeding reindeer shot with the XK6X20 in Norway. Click on the image for a hi res version.

Wide of Sami woman feeding reindeer shot with the XK6X20 in Norway. Click on the image for a hi res version.

Annika Summerson filmed in Tromso with the Fujinon XK6X20.

Boats in the harbour on a cold but bright morning (the only one we had).

Icicles on the window. Shot with the Fujinon XK6X20 with my PMW-F5.

TESTING BOTH LENSES:

In order to better directly compare the two lenses I shot some test shots. The XK6x20 on my F5 and the MK18-55 on my FS7. Both cameras were set to the same settings and hypergamma 3 with the cinema matrix used. The images you will see below have not been touched, this is how they looked straight from the camera. If you click on the picture you should get a link to the full frame 4K image, but do remember this are Jpegs.

Testing the Fujinon MK18-55 and XK6X20 with my PMW-F5 and PXW-FS7.

I tried to get the same shots with both combinations but you will see some small variations. I apologise for that. To give as fair a comparison as possible I did most of the shots at 20mm and 55mm, but then in addition shot at 18mm on the MK18-55 and 120mm on the XK6X20 so you can see the additional range each lens offers.

First test was of a neighbours Cherry tree in blossom.

The FS7 with XF 18-55mm at 55mm. Click on the image for the full size 4K frame.

PMW-F5 with XK20X6 at approx 55mm (sorry about the different framing). Click on the image for the size 4K full frame.

The FS7 with XF 18-55mm at approx 20mm. Click on the image for the full size 4K frame.

PMW-F5 with XK20X6 at 20mm. Click on the image for the size 4K full frame.

PMW-F5 with the Cabrio XK6X20 at 120mm showing the extra reach of the 20-120mm zoom.

The next test was a simple setup shot of a couple of beer bottles on a table with strong sunlight from above and behind to create deep contrast. I wanted to see if either lens showed signs of loosing shadow detail due to the very large, very bright table top introducing flare into the shadows.

PXW-FS7 with XF18-55mm at approx 20mm, high contrast scene.

PMW-F5 with XK20X6 at 20mm. High Contrast scene. Click on the image for the size 4K full frame.

PXW-FS7 with XF18-55mm at 55mm, high contrast scene.

PMW-F5 with XK20X6 at approx 55mm. High contrast scene. Click on the image for the size 4K full frame.

The FS7 with the XF18-55 at 18mm showing the extra “width” that 18mm gives over 20mm.

My conclusion with the above shots is that there is remarkably little difference between these two lenses. Both perform extremely well. I think the XK6X20 might be marginally sharper at the wide end than the 18-55mm, either that or the slightly better viewfinder of the F5 is allowing me to focus more precisely. In addition I think the bokeh of the more expensive Cabrio is marginally smoother than the 18-55, but again it’s a tiny difference (not as big as the difference in white balance of the two cameras).

Finally a shot of my ugly mug just so you can take a look at some skin tones.

PXW-FS7 with Fujinon XF 18-55 at approx 30mm. Click on the image for full size 4K frame.

PMW-F5 with Fujinon Cabrio XK6X20 at approx 30mm. Click on the image for the full size frame.

Again very little difference between these lenses which is a good thing. Both perform very well, both produce pleasing images. Sure the XK6X20 20-120mm is more than twice the price of the MK18-55 but then it does offer twice the zoom range and it’s very hard to make fast parfocal lenses with big zoom ranges for large sensors. There will be a companion MK50-135mm lens coming later in the year, so with both the MK lenses you will be able to get the full range of the XK6X20 and a bit more, provided you don’t mind swapping lenses. It’s a tough choice if you have an E-mount Sony camera, which to get? For E-Mount I think the pair of MK lenses will be the way to go. If you have a PL mount camera the XK6X20 has to be a very serious contender. It’s a great all-round cinema zoom lens and a realistic price. Whichever way you do go you won’t be disappointed, these are proper cinema lenses.