Many of you may have already seen articles about how DP Hoyte Van Hoytema used a Panavision System 65 film camera paired with an Alexa 65 modified to be sensitive to infrared light to shoot day for night on the film “Nope”. https://www.cined.com/filming-night-scenes-thinking-outside-the-box-on-the-film-nope/
Can You Make It Work?
Well, I was recently asked if I could come up with a rig to do the same using Sony cameras for an upcoming blockbuster feature with an A-list director being shot by a top DP. This kind of challenge is something I enjoy immensely, so how could I not accept the challenge! I had some insight into how Hoyte Van Hoytema did it but I had none of the fine details and often its the fine details that make all the difference. And this was no exception. I discovered many small things that need to be just right if this process is to work well. There are a lot of things that can trip you up badly.
So a frantic couple of weeks ensued as I tried to learn everything I could about infrared photography and video and how it could be used to improve traditional day for night shooting. I don’t claim any originality in the process, but there is a lot of information missing about how it was actually done in Nope. I have shot with infrared before, so it wasn’t all new, but I had never used it this way before.
As I did a lot of 3D work when 3D was really big around 15 years ago, including designing award winning 3D rigs, I knew how to combine two cameras on the same optical axis. Even better I still had a suitable 3D rig, so at least that part of the equation was going to be easy (or at least that’s what I thought).
Building a “Test Mule”.
The next challenge was to create a low cost “test mule” camera before even considering what adaptations might be needed for a full blown digital cinema camera. To start with this needed to be cheap, but it also needed to be full frame and capable of taking a wide range of cinema lenses and sensitive to both visible and infrared light. So, I took an old A7S that had been gathering dust for a while, dismantled it and removed the infrared filter from the sensor.


As the DP wanted to test the process with Panavision lenses the camera was fitted with a PV70 mount and then collimated in it’s now heavily modified state (collimation has some interesting challenges when working with the very different wavelength of infrared light compared to visible). Now I could start to experiment, pairing the now infrared sensitive A7S with a second camera on the 3D rig. We soon found issues with this setup, but it allowed me to take the testing to the next stage before committing to modifying a more expensive camera for infrared.

This testing was needed to determine exactly what range of infrared light would produce the best results. The range of infrared you use is determined by filters added to the camera to cut the visible light and only pass certain parts of the infrared spectrum. There are many options, different filters work in slightly different ways. And not only do you need to test the infrared filters but you also need to consider how different neutral density filters might behave if you need to reduce the IR and visible light. Once I narrowed down the range of filters I wanted to test the next challenge was find very high quality filters that could either be fitted inside the camera body behind the lens or that were big enough (120mm +) for the Panavision lenses that were being considered for the film.
Once I had some filters to play with (I had 15 different IR filters) the next step was to start test shooting. I cheated here a bit. For some of the initial testing I used a pair of zoom lenses as I was pairing the A7S with several different cameras for the visible spectrum. The scan areas of the different sensors in the A7S and the visible light cameras were typically very slightly different sizes. So, a zoom lens was used to provide the same field of view from both cameras so that both could be more easily optically aligned on the 3D rig. You can get away with this, but it makes more work for post production as the distortions in each lens will be different and need correcting. For the film I knew we would need identical scan sizes and matched lenses, but that could come later once we knew how much camera modification would be needed. To start with I just needed to find out what filtration would be needed.
At this point I shot around 100 different filter and exposure tests that I then started to compare in post production. When you get it all just right the sky in the infrared image becomes very dark, almost black and highlights become very “peaky”. If you use the luminance from the infrared camera with its black sky and peaky highlights and then add in a bit of colour and textural detail from the visible camera it can create a pretty convincing day for night look. Because you have a near normal visible light exposure you can fine tune the mix of infrared and visible in post production to alter the brightness and colour of the final composite shot giving you a wide range of control over the day for night look.
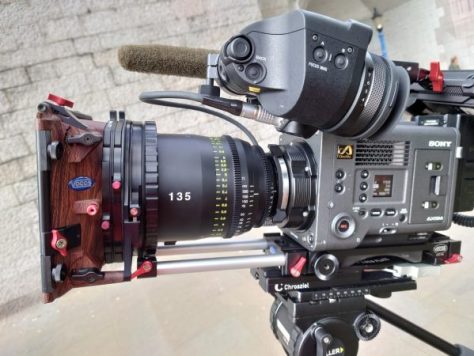
So – now I know how to do it, the next step was to take it from the test mule to a pair of matching cinema quality cameras and lenses for a full scale test shoot. When you have two cameras on a 3D rig the whole setup can get very heavy, very fast. Therefore the obvious camera to adapt was a Sony Venice 2 with the 8K sensor as this can be made very compact by using the Rialto unit to split the sensor from the camera body – In fact one of the very first uses of Rialto was for 3D shooting on Avatar – The Way of Water.
With a bit of help from Panavision we adapted a Panavised Venice 2, making it full spectrum and then adding a carefully picked (based on my testing) special infrared filter into the cameras optical path. This camera was configured using a Rialto housing to keep it compact and light so that when placed on the 3D rig with the visible light Venice the weight remained manageable. The lenses used were Panavision PV70 Primo’s (if you want to use these lenses for infrared – speak to me first, there are some things you need to know).

And then with the DP in attendance, with smoke and fog machines, lights and grip we tested. For the first few shot we had scattered clouds but soon the rain came and then it poured down for the rest of the day. Probably the worst possible weather conditions for a day for night shoot. But that’s what we had and of course for the film itself there will be no guarantee of perfect weather.


The large scale tests gave us an opportunity to test things like how different types of smoke and haze behave in infrared and also to take a look at interactions with different types of light sources. With the right lights you can do some very interesting things when you are capturing both visible light and infrared opening up a whole new world of possibilities for creating unique looks in camera.
From there the footage went to the production companies post production facilities to produce dailies for the DP to view before being presented to the studios post production people. Once they understood the process and were happy with it there was a screening for the director along with a number of other tests for lighting and lenses.

Along the way I have learnt an immense amount about this process and how it works. What filters to use and when, how to adapt different cameras, how different lenses behave in the infrared spectrum (not all lenses can be used). Collimating adapted cameras for infrared is interesting as many of the usual test rigs will produce misleading or confusing results. I’ve also identified several other ways that a dual camera setup can be used to enhance shooing night scenes, both day for night and as well as at night, especially for effects heavy projects.
At the time of writing it looks like most of the night scenes in this film will be shot at night, they have the budget and time to do this. But the director and DP have indicated that there are some scenes where they do wish to use the process (or a variation of it), but they are still figuring out some other details that will affect that decision.
Whether it gets used for this film or not I am now developing a purpose designed rig for day for night with infrared as I believe it will become a popular way to shoot night scenes. My cameras of choice for this will be a pair of Venice cameras. But other cameras can be used provided one can be adapted for IR and both can be synchronised together. I will have a pair of Sony F55’s, one modified for IR available for lower budget productions and a kit to reversibly adapt a Sony Venice. If you need a rig for day for night and someone that knows exactly how to do it, do get in touch!
I’m afraid I can’t show you the test results, that content is private and belongs to the production. The 3D rig is being modified as you don’t need the ability to shoot with the cameras optically separated, removing the moving parts will make the rig more stable and easier to calibrate. Plus a new type of beam splitter mirror with better infrared transmission properties is on the way. As soon as I get an opportunity to shoot a new batch of test content with the adapted rig I will share it here.

 The above image is of the painting Salome with the Head of John the Baptist by Caravaggio(1610). This image is generally considered Low Key. The mains source of light, the key light, appears to be quite strong, like sunlight through a window, appearing to come from above and to the left of frame.


 When testing and evaluating a camera, whether that’s a digital photo camera, video camera or digital cinema camera it is always useful to have a test chart or 2 (or more). While printing a chart at home isn’t always the best way to go, comercial charts can be very expensive to buy. So below is a link to an ISO 12233 chart, a Zone Plate chart and a Siemens Star chart that you can download for free and print at home. You will need a good printer and good quality photo paper for the best results.