I have a 6U tall, shallow depth 19″ rack that I put together as a general purpose system to cover a wide variety of applications. In its original form the main units in the rack were a Blackmagic Design 1ME 4K Production Studio switcher, a 4K Hyperdeck Studio and a 4K Ultrastudio.
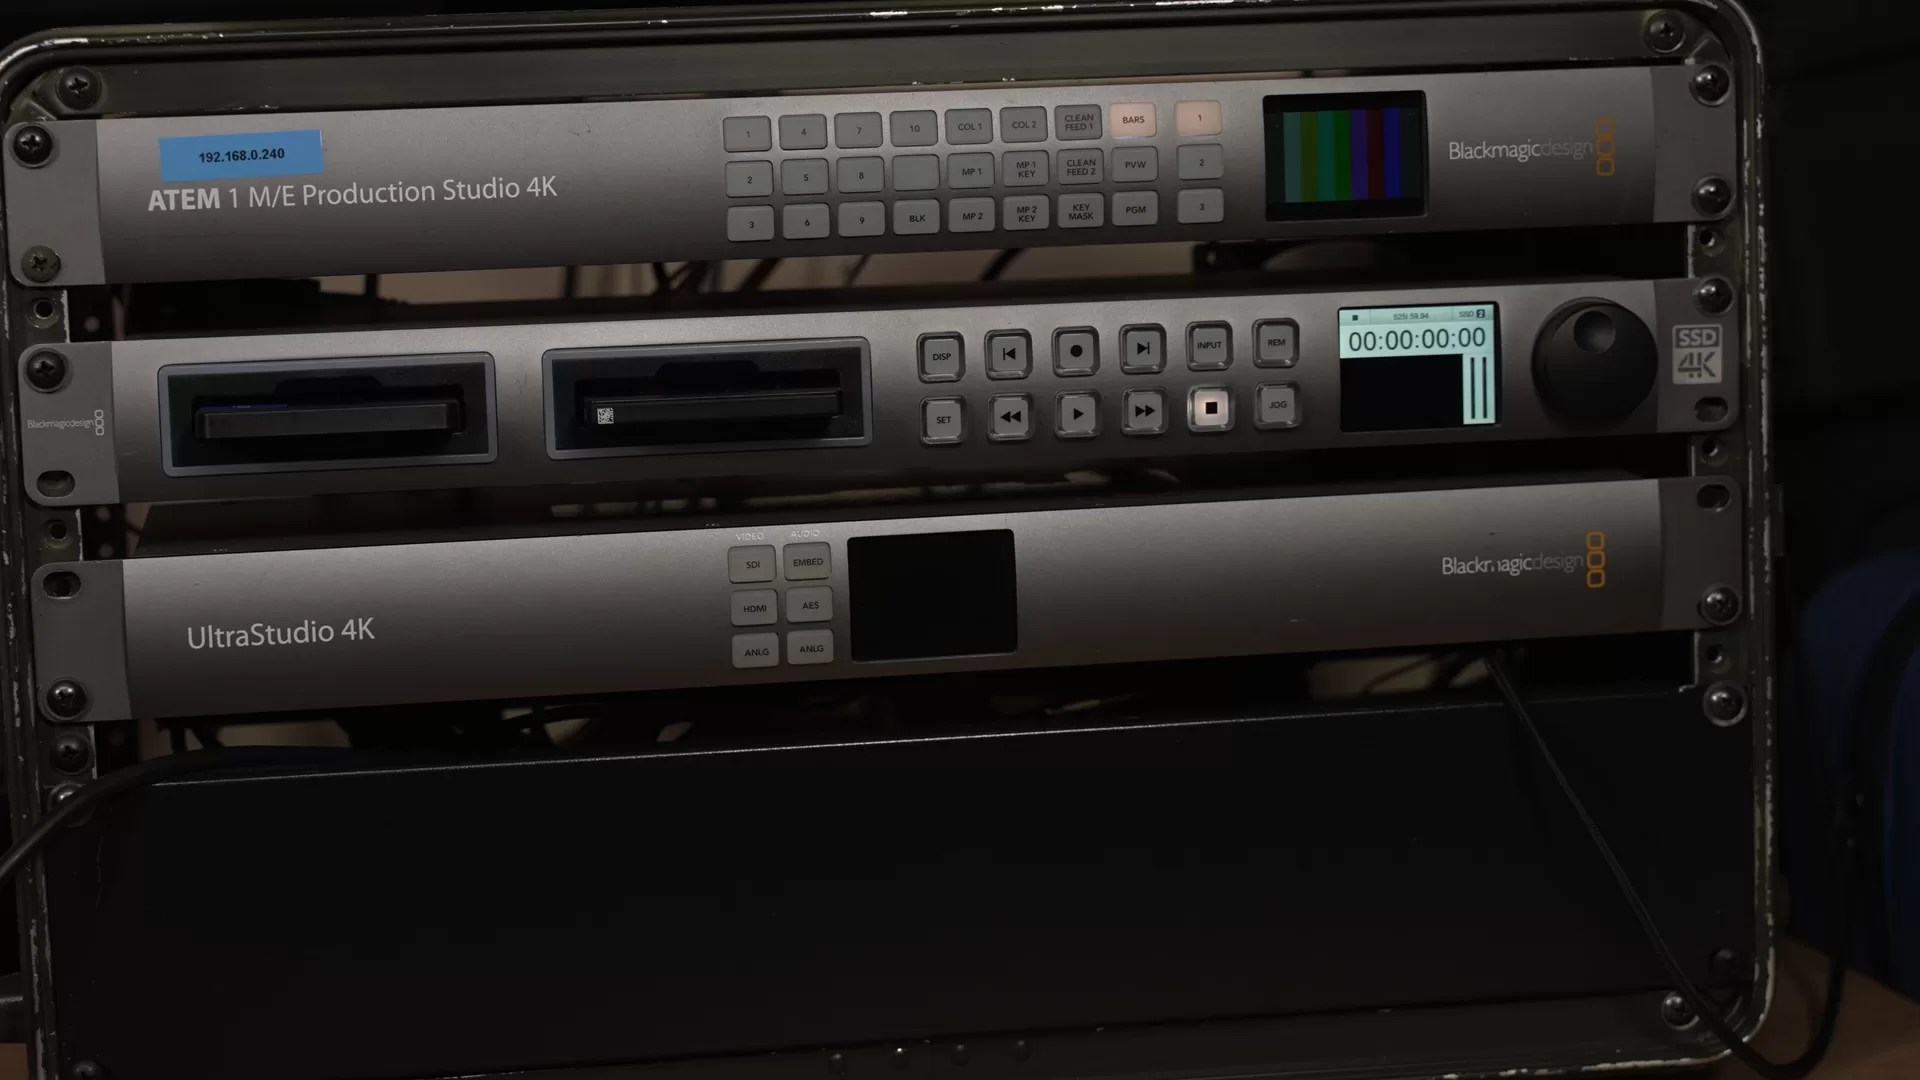
These units worked very well for me, but they are older units and less efficient than the latest ones and this leads to 2 issues – heat and noise. Even after replacing the fans in the units with special very low noise fans they could still be quite noisy at times and the units always ran hot, necessitating the addition of additional fans in the back of the unit. When using it for DIT jobs the fan noise could be a problem on a quiet set. Additionally, the lower efficiency of these older units means they need more power than more recent similar units and one of the applications I have is portable live switching and DIT work, perhaps based out of my camper van and sometimes “off grid”. Another investment will be a portable power pack or “solar generator” to run the rack when I don’t have mains power, so efficiency is important. And finally these are 6G units, so limited to 4K 30p, for 4K 60p you need the more recent 12G units.
With a big job at the Glastonbury festival coming up, where I would be deeply involved with a special Circus spectacular that would open the festival in front of a crowd of around 70,000, helping with the video feed to the side screens of the main stage and the BBC, I decided it was time to upgrade the units to the latest versions.
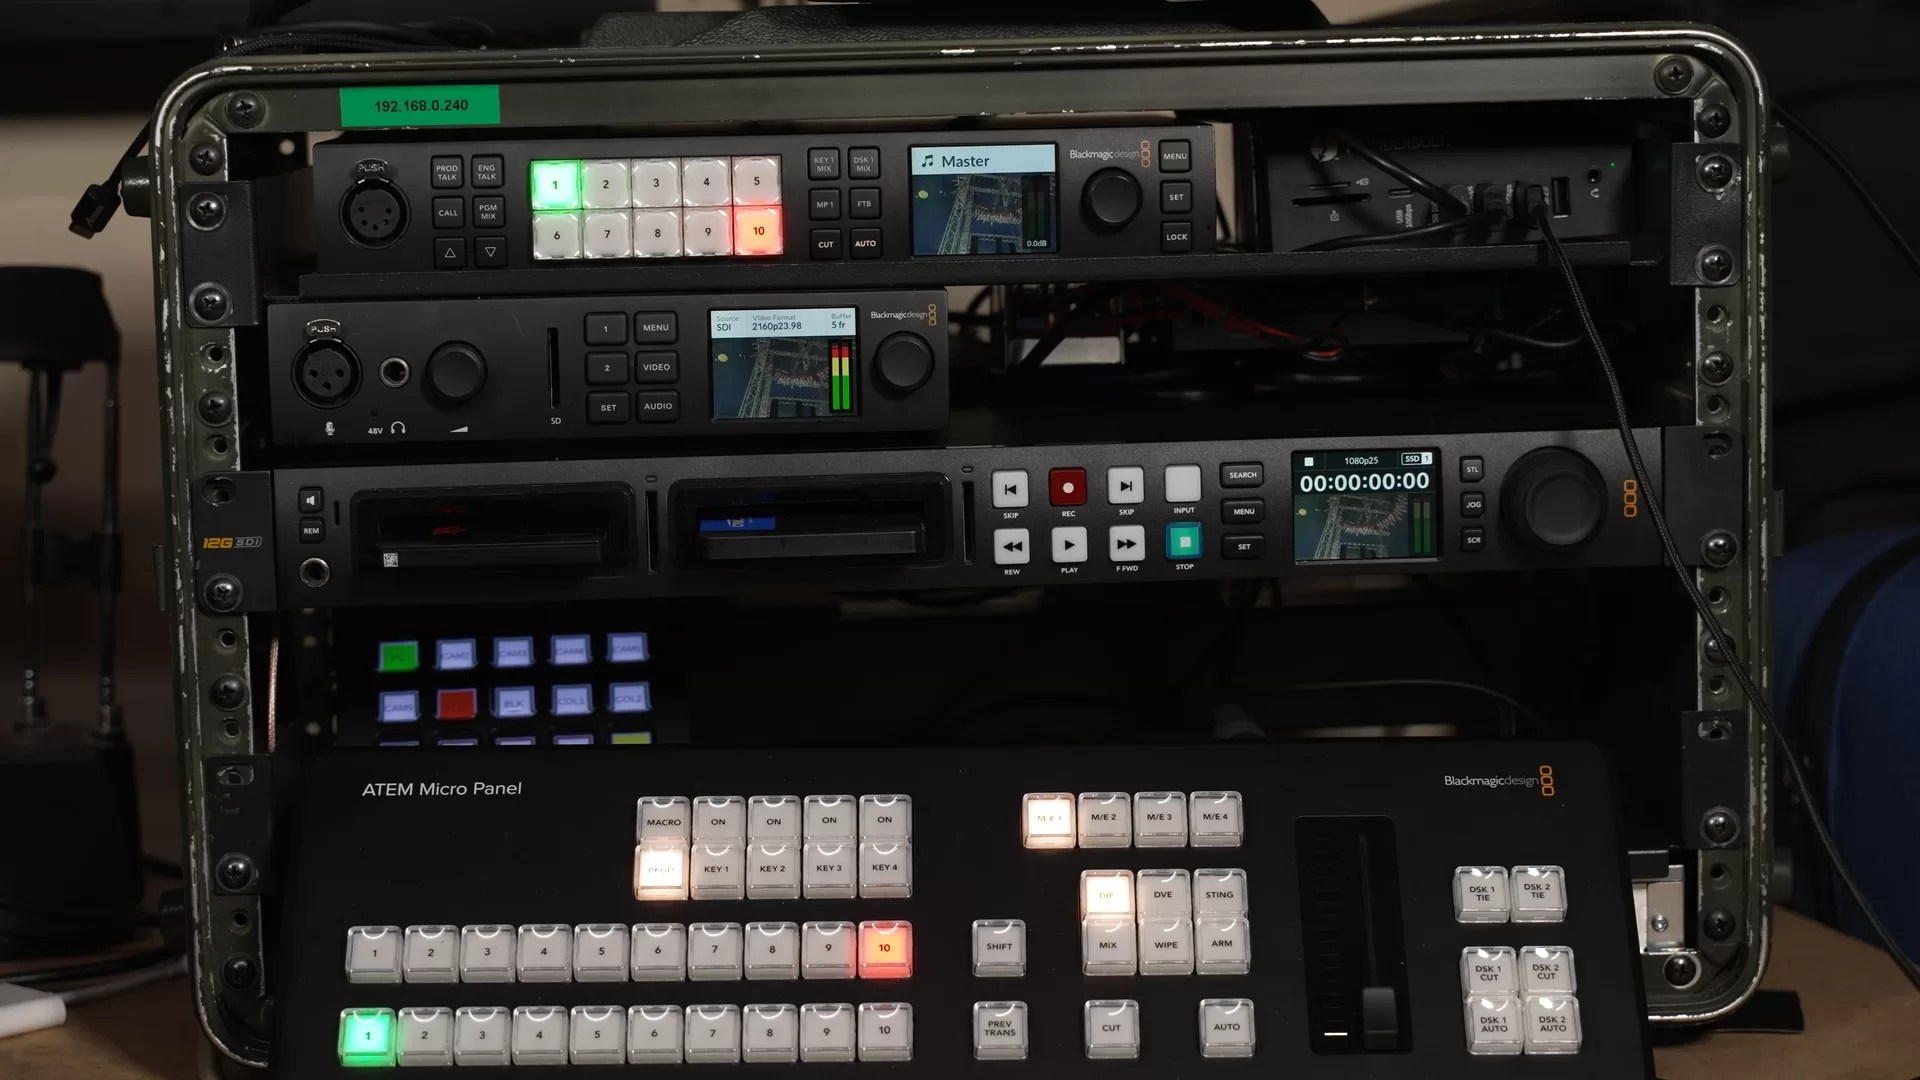
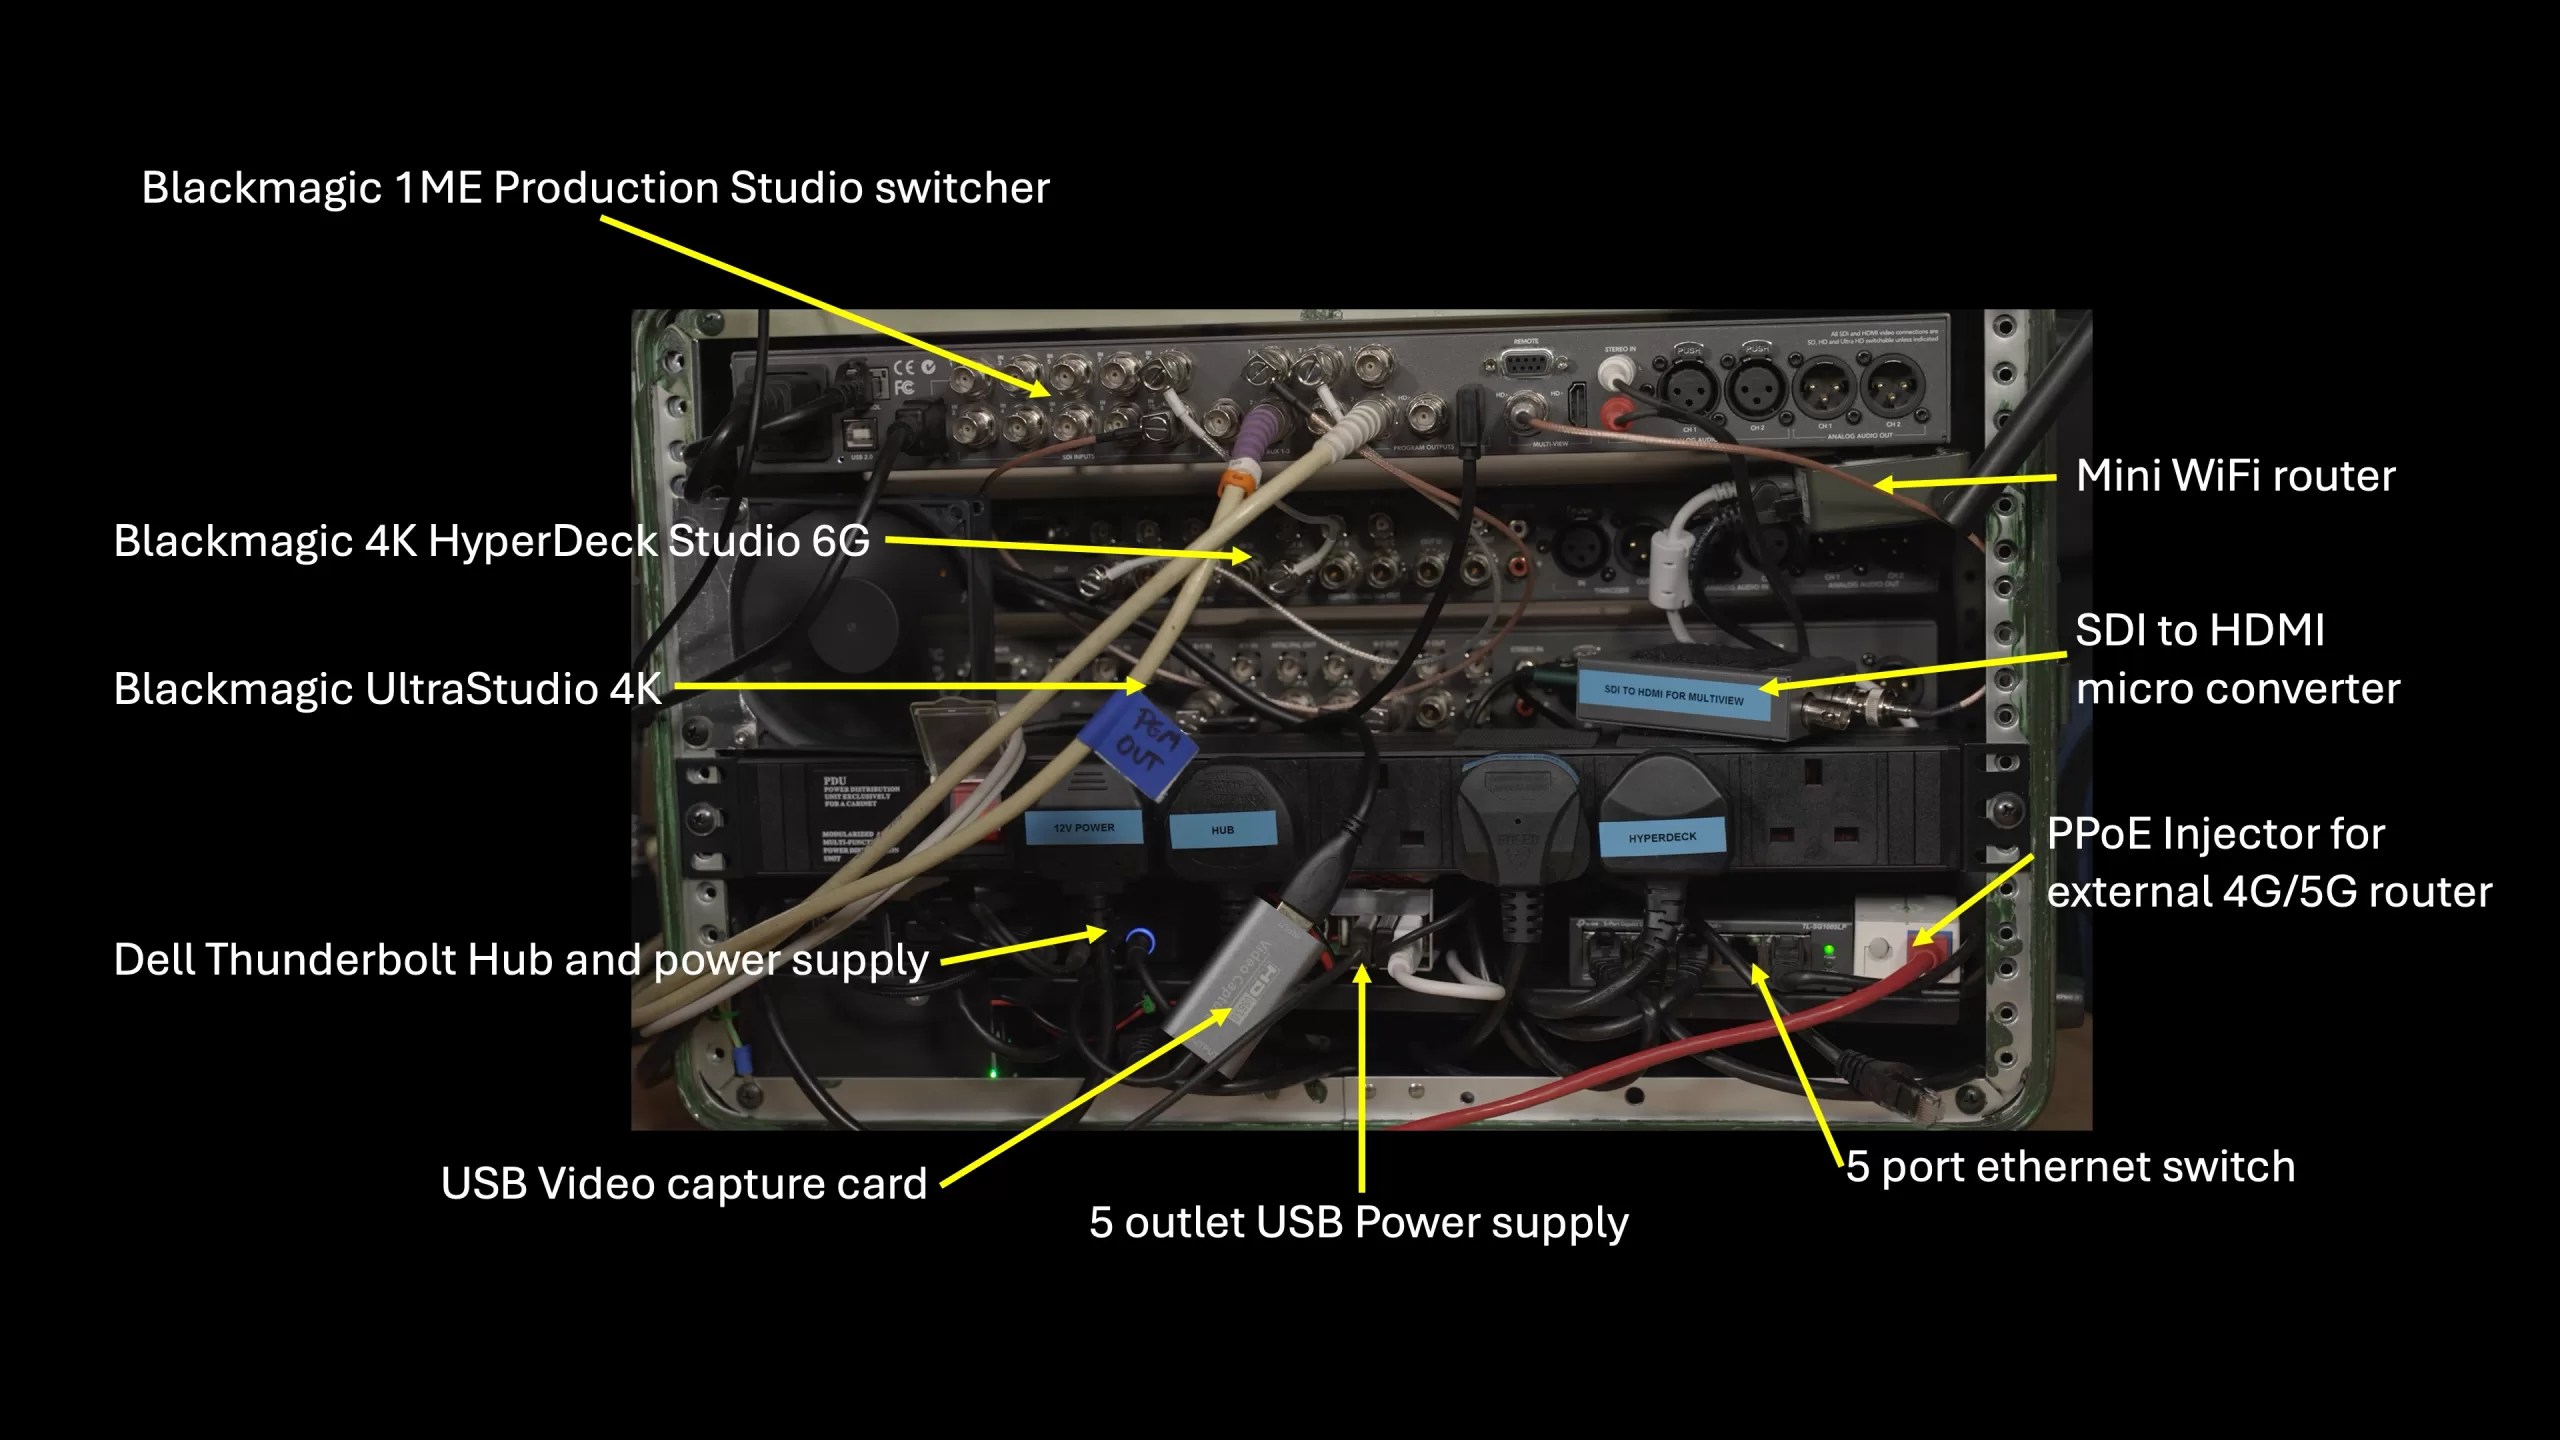
My 1ME 4K Production studio was replaced with a Blackmagic Atem 4K Constellation with 10 inputs and 6 outputs. This has the wonderful benefit of being able to map any of the inputs or the program or preview bus to any of the 6 outputs. So, as well as being a great switcher it can also act as a 10 input, 6 output router. My previous 1ME switcher had 3 AUX outputs that could be assigned to any input, but having 6 gives me a lot more routing possibilities. The ability to act as a router is really useful in the DIT role where I may have feeds from multiple cameras that need to be routed to different monitors etc. The Constellation is also smaller than my old 1ME, it’s the same 1U high, but now less wide and this freed up some space in the rack for a new Thunderbolt 3 hub. The Thunderbolt 3 hub powers my Macbook Pro and thanks to the TB3 loop through also connects it to the new 4K UltraStudio Mini. The Ultrastudio Mini is half the size of my old Ultra studio, uses a lot less power and generates a lot less heat. It also has a more up to date Thunderbolt 3 interface . The Ultrastudio allows me to perform live grades with DaVinci Resolve when I’m working as a DIT. It also gives me that all important calibrated video output when I’m doing normal grading jobs.
One thing I’m not sure many actually realise is how important it is to have something like an Ultrastudio or Decklink card to provide an HDMI or SDI output when editing or grading rather than trying to use a computers built in HDMI output. Computers often use different gamuts to the gamuts we use in the world of video production. And while computers do a pretty reasonable job of adding corrections between gammas like Rc-709 or HDR10 and the computers internal colourspace, very often small errors will creep in and all the extra conversions introduce artefacts such as banding into the monitoring pipeline. It’s only by using a proper video production oriented output device or card that you can be sure that you are monitoring your content in the correct colourspace and without any gamma shifts. The Ultrastudio is an absolutely essential piece of kit in my workflow.
I also upgraded the Hyperdeck from a 6G Hyperdeck 4K to the latest Hyperdeck Studio 12G. This new 12G Hyperdeck can also record to SD cards as well as SSD’s and adds H264 and H265 codec options. For a live switching job the Hyperdeck can be used to record the mixer output or it can be used as a playout device for clip playback and the playback can be controlled by the switcher, although most of the time for playback I prefer to play out of a laptop via the Ultrastudio. In the DIT role the Hyperdeck gets used as a backup recorder to record the cameras output at the DIT station. This then allows me to play back clips almost instantly without having to remove any media from the camera. It’s great to check for problems and the footage can also be looped into DaVinci Resolve via the Ultrastudio for live grading (one thing the old 6G Hyperdeck studio had was the ability to provide an input in to Resolve via Thunderbolt 2, but this one can’t do that). Again this new Hyperdeck runs cooler, quieter and uses less power.
What else is in the rack?
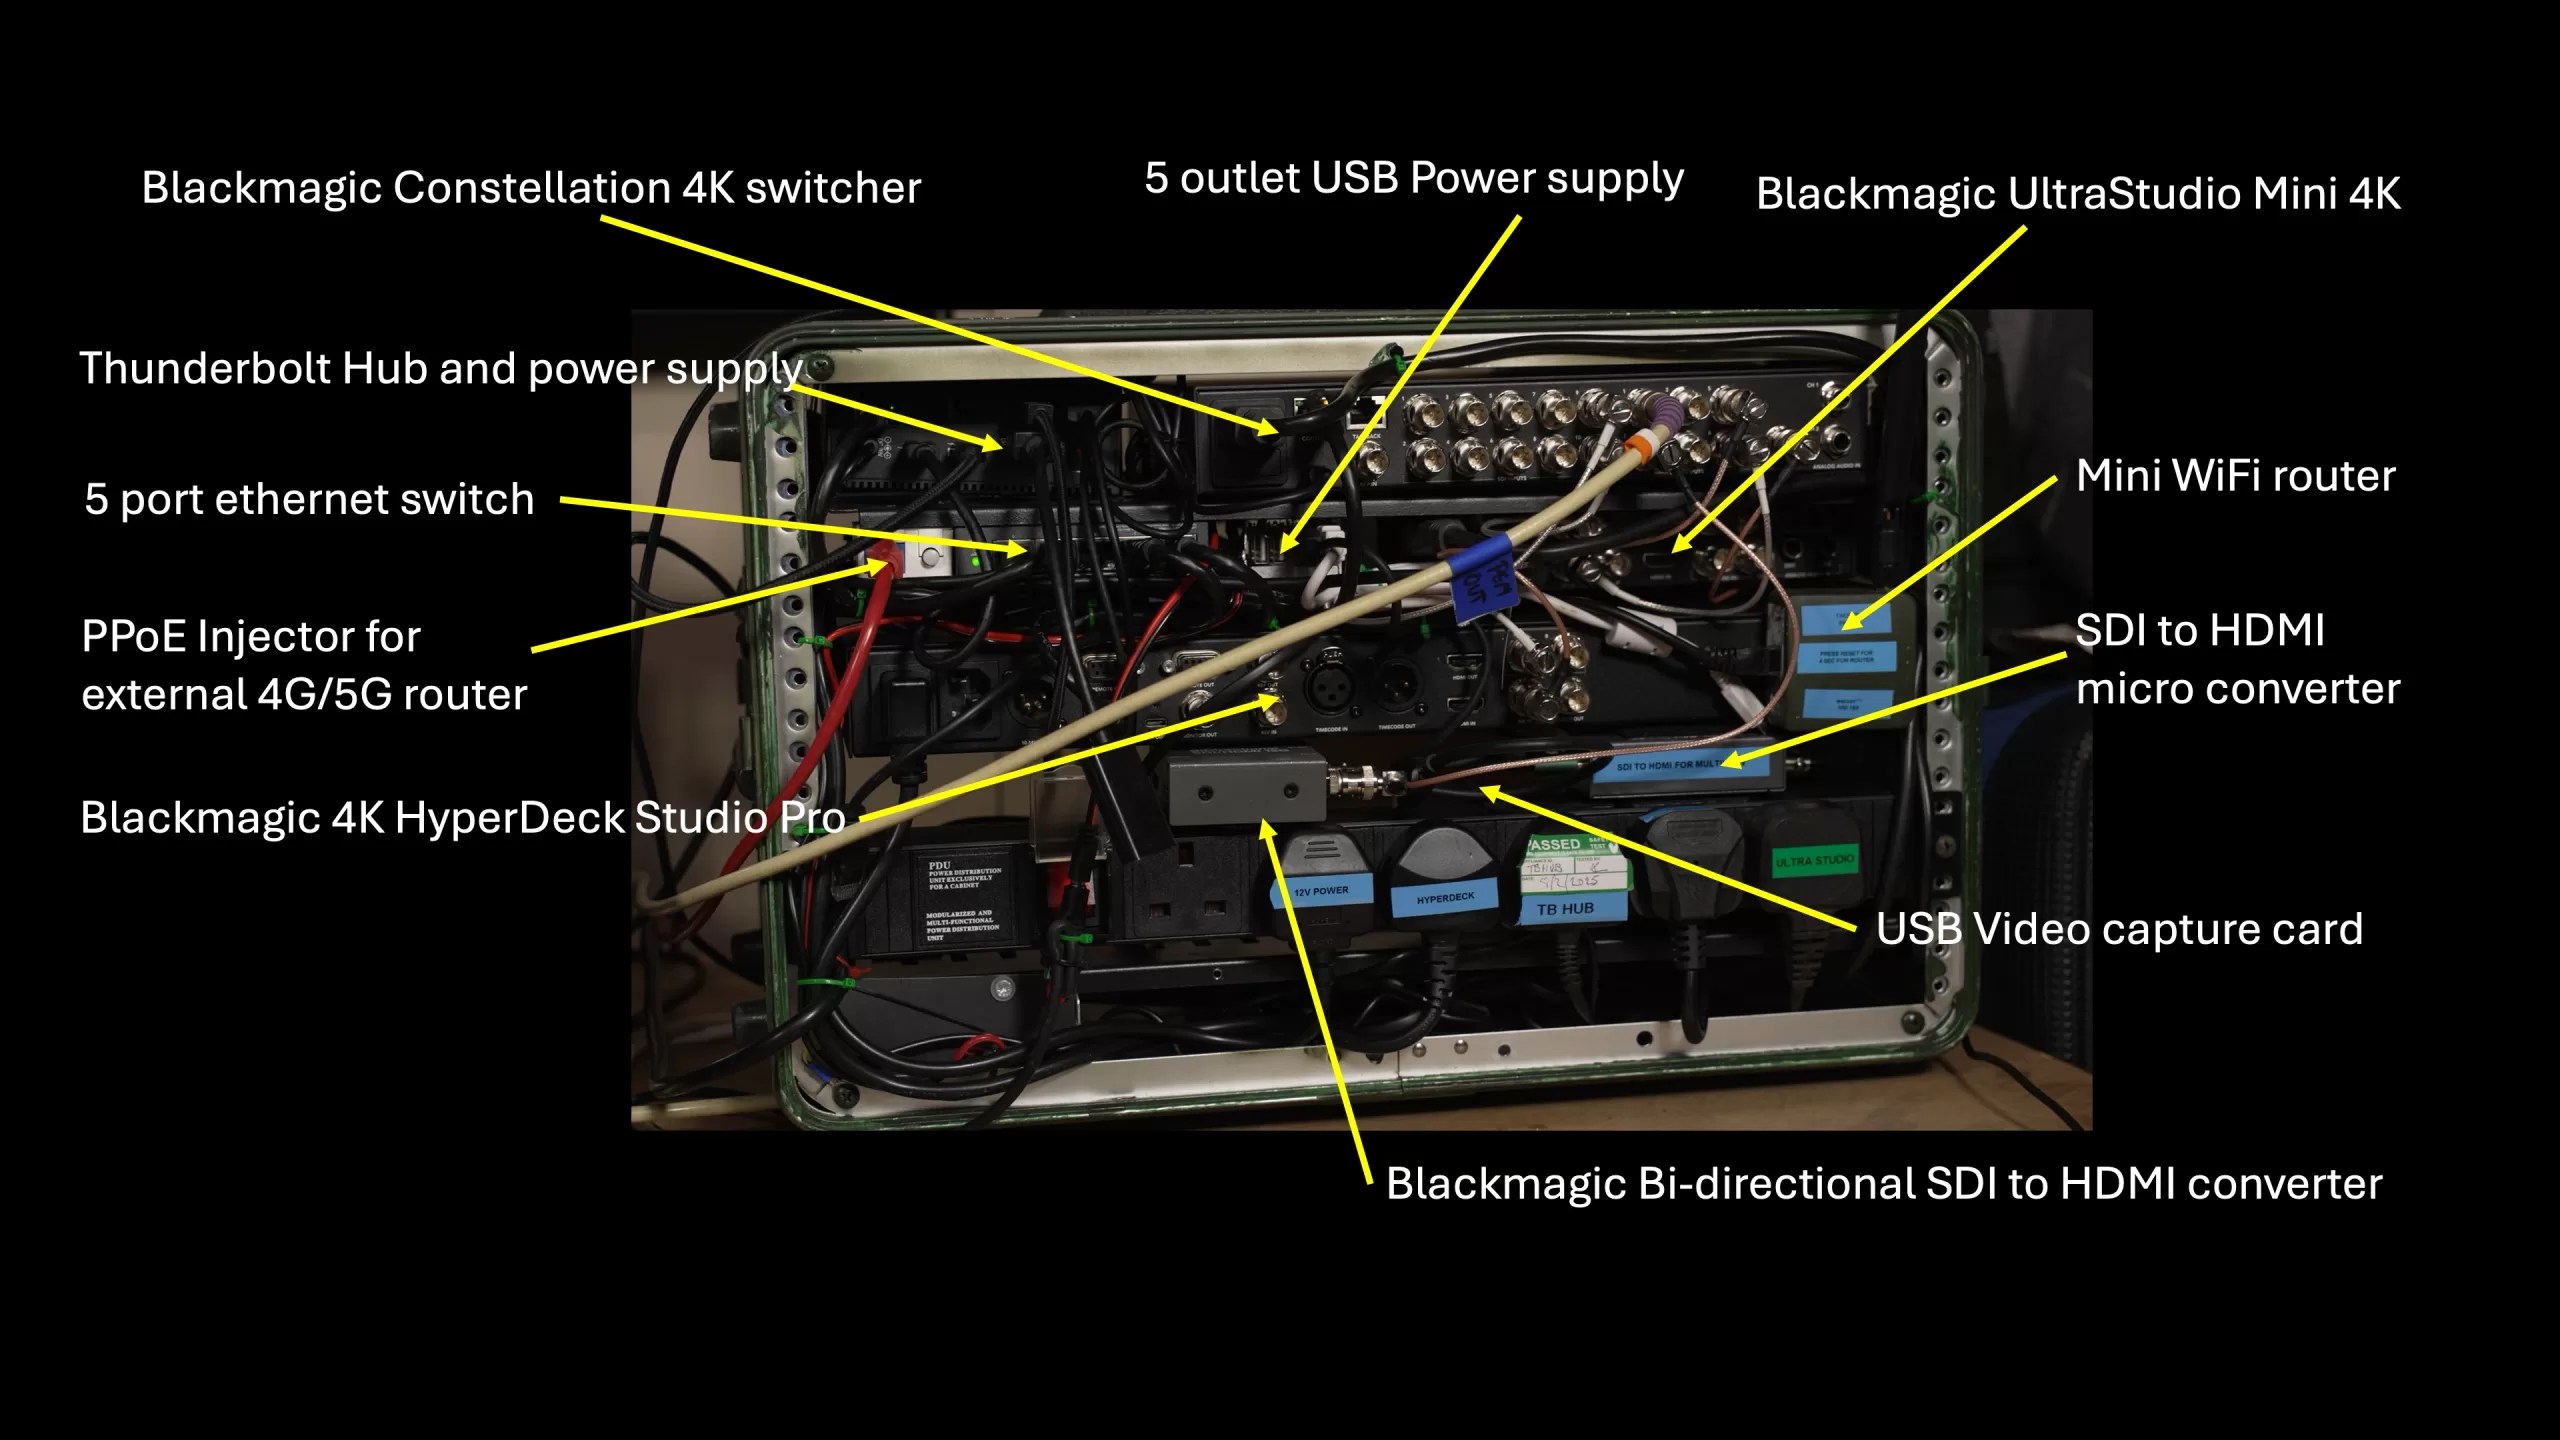
Well…. There is a 5 port ethernet switch and a small router. The router is there to create a network for the times the rack isn’t connected to an external network such as my home office network. The network is necessary to allow a computer and other devices to control the Constellation switcher and the Hyperdeck. The router also provides WiFi access so that a tablet can be used to control the switcher (more on that in a bit).
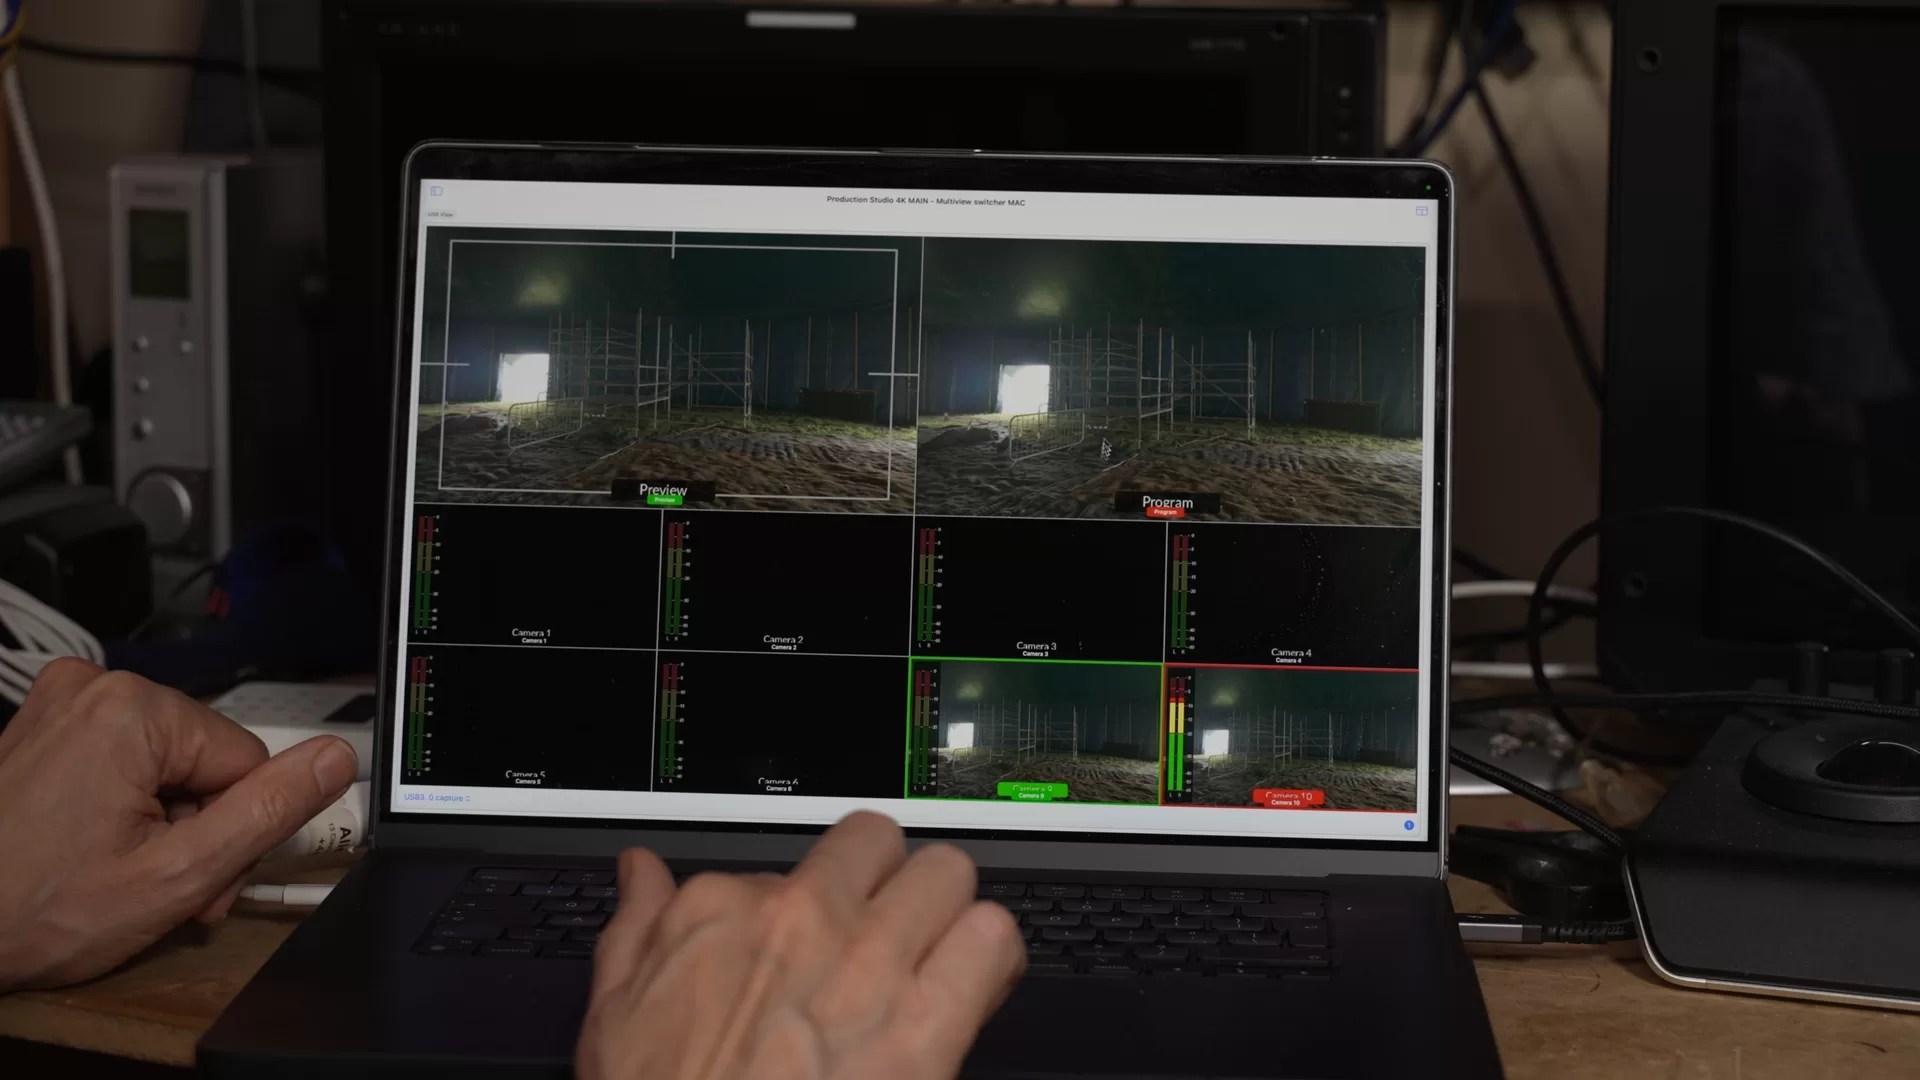
I have also included an SDI to HDMI mini converter to feed one of the switchers 6 SDI outputs to a cheap HDMI to USB dongle. The dongle is then connected to the Thunderbolt hub and this allows me to convert the switcher output to a UVC compatible video input on the connected laptop.
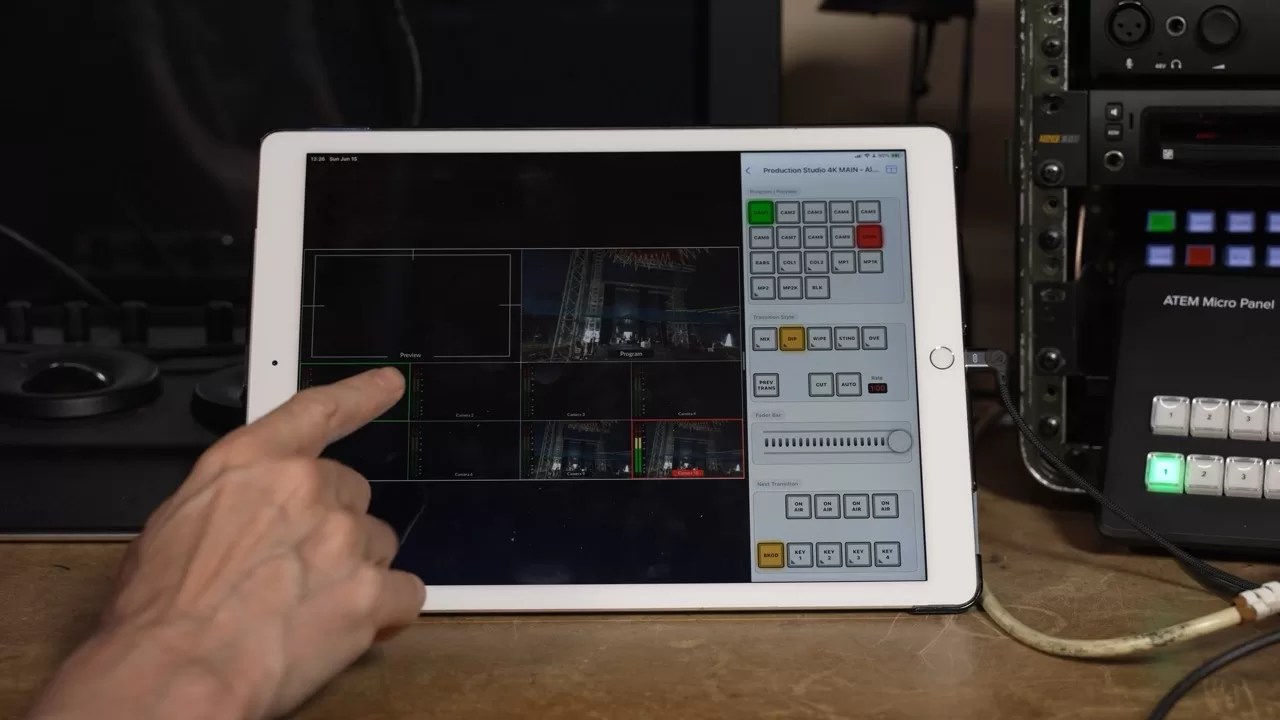
The main way I use this is to take the switchers multiview output and feed that into the “MixEffect” application on the computer. MixEffect is a brilliant way to control a BlackMagic switcher as it is highly configurable and can run on many different types of device including tablets. On my Macbook I use MixEffect’s ability to overlay the switcher controls over the live Multiview feed, so I can monitor and control the switcher from a single screen. This is very handy for portable setups.
I also have a Blackmagic Bi-directional HDMI to SDI converter in the rack as often I need to bring in an HDMI signal such as the output from a PC for event productions. Being Bi-directional this can also be used to take any of the SDI outputs in the rack and convert it to HDMI. The old 6G switcher had a couple of HDMI outputs but the Constellation doesn’t have any, which is a shame.
There is also an Accsoon Seemo Pro. The Seemo is connected to one of the switchers SDI outputs and I can use it to provide a video feed into an iPad. This allows me to use the MixEffect app on an iPad to both monitor and control the switcher. I’ve been using an old 12.9″ iPad Pro as a low power monitor for those times when I’m running the system off grid. The iPad Pro makes a great monitor, it’s colour accurate and very low latency.
There is a 12v 10 amp power supply. It provides power for the Seemo (which in turn will power and charge the iPad Pro). It also powers a small, 5 output USB power supply that I use to power the SDI and HDMI converters and the router. The power supply is also connected to a 56v power converter that provides PPoE power that can feed an external 5G/4G router for those times when I need to get an internet connection via the cellphone network. It also gives me the ability to power a small 12v monitor or other 12v accessories from the rack.
On average, with everything running and a 16″ MacBook Pro connected (remember the thunderbolt hub in the rack also powers the MacBook) the updated rack draws between 175w and 200w of power. So, a relatively affordable 1000Wh Solar Generator should be able to run it and a monitor for around 4 hours. If I’m using it in the camper van, the van has a 1000Wh power system plus up to 300W of solar (on a bright and sunny day). With enough sun, I should be able to run all day, but we can’t rely on the sun in the UK. To be honest I think I will still need “shore power” mains power for longer jobs unless I get enough off grid projects to justify the expense of a +3000Wh solar generator.


