I’ve written about this many times before, but still it comes up again and again. Which is better? Which should I use? I hear all kinds of crazy comments and a lot of incorrect information, so first of all lets dispel a few myths:
S-Log2 captures more dynamic range than S-Log3, it goes to a higher level on the waveform, S-Log3 clips the highlights sooner.
On most of Sony’s current cameras S-Log2 and S-Log3 both currently record exactly the same dynamic range as this is limited by the sensors that Sony are using. The S-log3 curve could be used in a future camera to capture up to 16 stops and in fact the new Venice camera records over 15 stops. But as all of Sony’s other cameras sensors can only see 14 stops and the S-Log3 curve is designed to go beyond 14 stops, stop No. 14 is not recorded all the way at the top of the recording range. S-Log2 is a 14 stop maximum curve, so the peak level is recorded right at the top of the recording range. There is no space held in reserve for anything beyond 14 stops.
In Sonys current camera range (other than Venice) the limit is 14 stops whether it’s S-Log2 or S-Log3. The chart that Sony provide showing both S-Log2 and S-Log3 is a little confusing as it shows the entire gamma curve rather than what the camera can actually “see”. In their current implementations both curves stop at +6 stops over middle grey, both capture the same dynamic range, there is no difference.
S-Log2 is brighter than S-Log3 so it must be capturing highlights better.
No, not really, see above. Playback and on screen brightness comes from the levels chosen to record something at and is dependant on the shape and range of the gamma curve. But the actual captured range is dependant on what the sensor can cope with. As we are not changing the sensor, the captured dynamic range, brightness range and shadow range does not change between S-Log2 and S-log3, both of which take the entire sensor range (they just store that same range using slightly different levels or code values). After applying a LUT or other conversion to your normal viewing gamma both S-Log2 and S-log3 will have the same brightness, same highlight and same shadow range.
S-Log3 has noisy shadows.
No, not really. Shadows appear noisy with S-Log3 as the shadow part of the curve is stored using higher code values compared to S-Log2. So when you view S-Log3 uncorrected the shadows are raised and stretched on your conventional monitor and this gives the impression of a noisy picture. In reality once you restore the levels to normal there is no additional noise. See this article for a full explanation.
Chart showing S-Log2 and S-Log3 plotted against f-stops and code values. Note how little data there is for each of the darker stops, the best data is above middle grey. Note that current sensors only go to +6 stops over middle grey so S-Log2 and S-Log record to different peak levels.
S-Log3 is newer than S-Log2 so it must be better.
Newer, perhaps not. Better, no not really. S-Log3 is based on the industry standard Cineon log gamma curve. This curve was developed in the 1980’s to allow the digitising of film using 10 bit data. So S-Log3 matches a curve designed to work with negative film and is capable of storing more than the 14 stops that most of the current cameras sensors can see. In effect it is an old log gamma curve. As it is a curve designed for more than 14 stops, when used in a 14 stop camera some of the available recording data is empty and wasted.
S-Log2 was specifically designed by Sony to work with an electronic sensor with 14 stops of dynamic range and is optimised to match the performance characteristics of video sensors. By using a 14 stop curve with a 14 stop camera almost every bit of available data is utilised, there is no wastage. So S-Log2 makes better use of the data you have available to you,
BUT THERE ARE SOME OTHER FACTORS WE NEED TO CONSIDER.
S-Log2 and S-Gamut:
As well as the gamma curve we also have different Gamuts or color ranges. S-Log2 was originally designed for the F65 camera. The F65 sensor can capture a huge color range beyond the range that most conventional video sensors can see. So as well as S-Log2 Sony introduced S-Gamut which was matched to the very wide color range of the F65 sensor. S-Log2 is designed to be used with S-Gamut. But many of the cameras we use, like the FS7, F5, FS5 cannot see this color range (Sony’s F55 and Venice can). In addition this very large color range can be a little tricky to deal with in post production. Add to this the fact that S-Log2 is quite different to the quite common Cineon gamma curve and behaves differently to other curves in post. The end result was that in the early days of S-Log2 there were a number of complaints and comments that Sony’s S-log2 material was difficult to grade.
S-Log3 and S-Gamut3.
Because some people were struggling a bit with S-Gamut and S-Log2 in post production (Resolve and many of the other tools we have today were not as well developed 4 years ago), Sony introduced S-Gamut3 and S-log3 as well as a further Gamut called S–Gamut3.cine. S-Log3 was based on Cineon as that’s what people were familiar with. Arri’s Log-C is also based on Cineon as are many other log curves. This makes it a more “familiar” grading experience for many colorists. In addition Sony created a modified version of the super large S-Gamut to make it easier to grade. S-Gamut3 is just as big as S-Gamut but some tweaks inside make it easier to grade (fewer color shifts). At the same time Sony realised that most users were producing content for TV, the web or digital cinema that had little use for the huge color range of S-Gamut/S-Gamut3. So S-Gamut3.cine was developed as a smaller, more manageable version of S-Gamut3 and it incorporated a few tweaks to the color science to provide colors closer to those used by other manufacturers. S-Gamut3.cine is also a better match for cameras with sensors that cannot see the full S-Gamut range (like the FS5, FS7, F5, A7).
The end result is that in general most people prefer or find it easier to grade S-Log3/S-Gamut3.cine material than S-Log2/S-Gamut. Plus you can often use LUT’s designed for Log-C or Cineon with S-log3 material (this isn’t optimum, but it can work).
SGamuts Compared.
Getting the data from camera to post.
In terms of getting the data from your cameras sensor in to post production S-Log2 is the better choice (unless you have a Sony Venice which only has S-Log3). S-Log2 is optimised for the way an electronic sensor works. S-log3 is essentially a curve designed for negative film applications, not video and no matter how you look at it, these are electronic video cameras. However, if you are recording 10 bit or greater you have a lot of data whichever curve you use, so in practice it will be rare to see any difference in the final result.
So use the curve you find easiest to work with. It is true that S-Log 3 allocates a little more data to the shadows and less to the highlights than S-Log2, but don’t confuse data and code values with more range. S-Log3 has a few extra code values in it’s darkest stops, S-log2 has a few extra in the bright stops, but the dynamic range, highlight and shadow handling is governed by the sensor not the gamma curve. Overall S-Log3 has fewer code values than S-Log2, S-Log2 makes better use of the data available, but with 10 bit this really isn’t going to make a huge difference.
8 Bit Recording.
But if you are only recording with an 8 bit codec you are already at a disadvantage. When recording 8 bit you really need to maximise the way what little data you have is used. For that reason I will always recommend that S-Log2 is used when recording 8 bit on a camera like the FS5 in UHD or A7s or similar (FS5 is 10 bit in HD). By using S-Log2 you are using as many of the limited code values available as you can. This doesn’t mean you can’t use S-log3, it just wouldn’t be my choice.
The end result should be the same.
At the end of the day, if you were to use matching LUTs, S-log2 and S-log3 material should look more or less exactly the same after grading or application of the LUT, no matter what the scene you are shooting. If they do look significantly different then you are doing something wrong. So your choice of curve, other than for 8 bit recordings will most likely come down to ease of use rather than anything else.
If your camera doesn’t have LUT’s then S-Log2 can be easier to work with as it is more contrasty. This makes it a bit easier to focus and also makes it easier to gauge exposure. If your camera has LUT’s and you use them, then you may decide to use S-Log3 simply because you should find it a little easier to work with in post. Either way both curves capture the same range of picture information and both should give more or less the same end result.
There may be some very, very subtle differences due to the small differences in data distribution, but often these will be hard to really see in the final image.
The new Sony A6300 is making quite a stir. This compact interchangeable lens camera has an amazing feature set that is very similar to the features found on it’s bigger brothers the A7sII and A7RII.
As a video camera it’s also capable recording using the XAVC-S codec in both HD and UHD(4K). It can even shoot at 120fps in HD. It also has picture profiles so you can tailor the look of the pictures or to suit different shooting conditions. The Cinegammas are very useful for challenging lighting conditions as they offer an improved highlight roll-off. As well as the Cinegammas the camera also has the S-Log2 and S-Log3 log gamma curves as well as S-Gamut, S-Gamut3 and S-Gamut3.cine.
Log gamma curves are very different to conventional gamma curves. Conventional gamma curves (like rec-709 or Cinegamma) are designed to produce a pleasing on screen image without any post production work (although the cinegammas do typically benefit with some tweaking in post). To do this conventional gammas keep the mid-range contrast compatible with conventional TV’s and monitors, so the picture has natural contrast when viewed on a TV. Then to help deal with bright highlights conventional gammas use some kind of highlight roll off or knee to increase the brightness range the camera can capture without effecting the mid range. Unfortunately this means that the highlights are somewhat compromised, looking very flat, lacking contrast and this is often what gives video the “video look”. In addition it also means that if you are over exposed when you shoot, the picture will look bad and no amount of post production correction will ever make it look good. Most TV camera operators will be very familiar with the phrase “protect your highlights”, meaning don’t over expose, if anything under expose a tiny bit to keep the highlights looking good.
Log gamma curves such as S-Log2 and S-Log3 are very different. They extended the dynamic range that the camera can capture. To do this they no longer try to be directly compatible with conventional TV’s and monitors and just focus on capturing the biggest possible range. The pictures will be made compatible with the TV or monitor via adjustments made during editing or in post production. So working with S-log2 and S-Log3 is a two step process – shooting and grading (grading is the term used for adjusting the look of an image in post production).
Because log gamma no longer needs to have a contrast range that matches the display range, more dynamic range can be squeezed into a conventional recording codec. It also means that there is no longer a need to use any highlight roll off or knee, so there is a lot more picture information in the highlights and brighter parts of the image. As a result exposing log gamma extra brightly is not normally a problem and in many cases brings lot of advantages. Log gamma curves do have a shadow roll off that mimics the real world shadow roll off. As a result log gammas really don’t like being under exposed, instead they prefer to be over exposed. So unlike conventional gamma where we “protect the highlights” with log gamma you need to “protect the shadows”. Under exposed log looks bad. It will lack color and it will be noisy and grainy.
For most camera operators it’s quite disconcerting to start shooting very slightly over exposed as it goes against everything you’ve learnt about shooting with a conventional video camera. But trust me, shooting 1 to 2 stops brighter than the recommended levels given by Sony on the A6300 (and any other Sony Log camera) will normally bring the best results.
The very same techniques can be used with the A6300, A7SII and A7RII. The A6300 etc also have S-Log3, but as these are 8 bit cameras (even when using an external recorder) I would still recommend that you use S-Log2. Besides, viewing and monitoring S-Log3 is tough as the pictures look even flatter than S-Log3.
If you follow the link below you will find a set of LUT’s (Look Up Tables) that can be applied to A6300 footage in post production to give different looks. There are some film-look LUT’s and 709 (normal TV look) LUT’s and in each case there are LUT’s for normal exposure as well as footage exposed 1 stop and 2 stops brighter. If a LUT name includes “1OVER” this means that the LUT is designed to work with footage that has been exposed 1 stop brighter than the levels given by Sony. My recommendation is to shoot at between 1 and 2 stops bright. For both S-Log2 and S-Log3 this would mean setting zebras to 70% and exposing a piece of white paper so that zebras are just starting to appear on the white paper.
If you find these LUT’s useful please consider buying me a coffee or a beer. I’m not paid to write these articles. For the LUT set I would appreciate a Cocktail, but am happy with whatever you feel is appropriate or affordable.
This is something that keeps coming up in my workshops. It’s very important if shooting with S-Log2 or S-Log3 not to under expose and in most cases it can be highly beneficial to over expose a bit. Especially if you are using a camera like the A7s or FS5 in 4K when you only have 8 bit data.
Take a look at this chart. It plots the S-Log2 and S-Log3 gamma curves on a log scale of f-stops against the amount of 10 bit or code values used to record each stop. The center line of the chart is middle grey. Both S-log2 and S-log3 provide 8 stops below middle grey and 6 stops above. Take a look at the darkest stop, the one that is -7 to -8 and look at how much data is allocated to that stop. With 10 bit recording you have according to this chart about 10 code values for S-Log2 and about 20 for S-Log3. That’s if you have 10 bit, and it’s not a lot of data. Admittedly there isn’t going to be a great deal of scene information in that darkest stop, deep in the shadows and the noise. But there’s part of the issue, the noise. If you have under exposed and you take this in to post and have to stretch out the shadows, the noise in these darkest shadows is going to look pretty coarse because it hasn’t been recorded with many shades/steps so stretching it out will make even “rougher” for want of a better term. If you are recording with 8 bit the problems is even worse. With 8 bit, S-Log2 will only have around 2 or 3 code values for that bottom stop, in effect the noise will have two values – black or +1 stop. Imagine how nasty that will look if you need to raise or stretch you blacks because you are under exposed, it will become very blocky and grainy.
The solution is to over expose a bit. By over exposing your footage by a stop when you go in to post production you will in most cases be bringing your levels down. So instead of stretching the noise out and making it worse you will be shrinking it down and reducing the negative impact it has on it’s image. Because cameras like the FS5, A7s etc have 14 stops of dynamic range this small bit of over exposure is going to make very little difference to your highlights in the vast majority of situations. Any slight over exposure you may have will likely look quite natural anyway, after all our own eyesight does also over expose, we don’t have unlimited dynamic range. On top of that the display technology does not exist to show a 14 stop range shot in it’s entirety and with natural contrast.
These LUT’s are primarily designed for the PMW-F5 and PXW-FS7 but they should also work with the PMW-F55 and A7s. You need to shoot in SGamut/S-Log2.
There are two types of LUT. The AC-Canon-Log versions will output Canon C-Log with Canon wide range colorspace while the AC-Canon-Look versions output using Canons wide dynamic range gamma. The C-Log versions should be a close match to a C300 shooting C-Log but the footage will need some grading as it is still log. The Canon Look versions will have better contrast and need less grading but have less dynamic range.
I don’t have a C300 to hand to test these, so I am not sure how close they are and it will vary a little depending on whether you use an FS7, A7s or F5/F55.
Click on the links below to download the LUT sets. PLEASE DO NOT HOST THESE ELSEWHERE OR DISTRIBUTE THESE ELSEWHERE OR VIA ANY MEANS OTHER THAN A LINK TO THIS PAGE.
This is not going to be a tutorial on editing or grading. Just an outline guide on how to work with S-log2, mainly with Adobe Premiere and DaVinci Resolve. These are the software packages that I use. Once upon a time I was an FCP user, but I have never been able to get on with FCP-X. So I switched to Premiere CC which now offers some of the widest and best codec support as well as an editing interface very similar to FCP. For grading I like DaVinci Resolve. It’s very powerful and simple to use, plus the Lite version is completely free. If you download Resolve it comes with a very good tutorial. Follow that tutorial and you’ll be editing and grading with Resolve in just a few hours.
The first thing to remember about S-Log2/S-gamut material is that it has a different gamma and colour space used by almost every TV and monitor in use today. So to get pictures that look right on a TV we will need to convert the S-Log2 to the standard used by normal HD TV’s which is know as Rec-709. The best way to do this is via a Look Up Table or LUT.
Don’t be afraid of LUT’s. It might be a new concept for you, but really LUT’s are easy to use and when used right they bring many benefits. Many people like myself share LUT’s online, so do a google search and you will find many different looks and styles that you can download for your project.
So what is a LUT? It’s a simple table of values that converts one set of signal levels to another. You may come across different types of LUT’s… 1D, 3D, Cube etc. At a basic level these all do the same thing, there are some differences but at this stage we don’t need to worry about those differences. For grading and post production correction, in the vast majority of cases you will want to use a 3D Cube LUT. This is the most common type of LUT. The LUT’s that you use must be designed for the gamma curve and colour space that the material was shot in and the gamma curve and colorspace you want to end up in. So, in the case of a Sony camera, be that an A7s, A7r, A6300 or whatever we want LUT’s that are designed for either S-Log2 and S-Gamut or S-Log3 and SGamut3.cine. LUT’s designed for anything other than this will still transform the footage, but the end results will be unpredictable as the tables input values will not match the correct values for S-Log2/S-Log3.
One of the nice things about LUT’s is that they are non-destructive. That is to say that if you add a LUT to a clip you are not actually changing the original clip, you are simply altering the way the clip is displayed. If you don’t like the way the clip looks you can just try a different LUT.
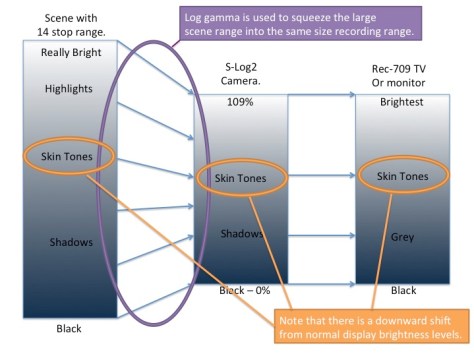
If you followed the A7s shooting guide then you will remember that S-Log2 or S-Log3 takes a very large shooting scene dynamic range (14 stops) and squeezes that down to fit in a standard video camera recording range. When this squeezed or compressed together range is then shown on a conventional REC-709 TV with a relatively small dynamic range (6 stops) the end result is a flat looking, low contrast image where the overall levels are shifted down a bit, so as well as being low contrast and flat the pictures may also look dark.
To make room for the extra dynamic range and the ability to record very bright objects, white and mid tones are shifted down in level.The on screen contrast appears reduced as the capture contrast is greater than the display contrast.
To make the pictures on our conventional 709 TV or computer moniotr have a normal contrast range, in post production we need to expand the the squeezed recorded S-Log2/S-Log3 range to the display range of REC-709. To do this we apply an S-Log2 or S-Log3 to Rec-709 LUT to the footage during the post production process. The LUT table will shift the S-log input values to the correct REC-709 output values. This can be done either with your edit software or dedicated grading software. But, we may need to do more than just add the LUT.
Adding a LUT in post production expands the squeezed S-Log2 recording back to a normal contrast range.
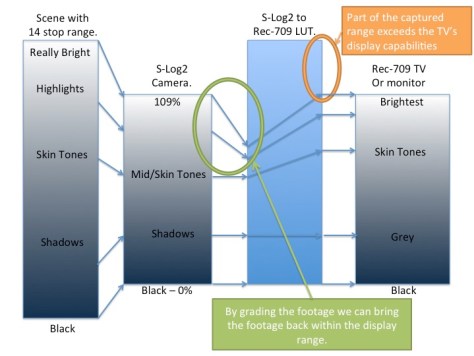
There is a problem because normal TV’s only have a limited display range, often smaller that the recorded image range. So when we expand the squeezed S-Log2/S-Log3 footage back to a normal contrast range the amount of dynamic range in the recording exceeds the dynamic range that the TV can display so the highlights and brighter parts of the picture are lost, they are no longer seen and as a result the footage may now look over exposed.
With the dynamic range now expanded by the LUT the recordings brightness range exceeds the range that the TV or monitor can show, so while the contrast is correct, the pictures may look over exposed.
But don’t panic! The brightness information is still there in your footage, it hasn’t been lost, it just can’t be displayed. So we need to tweak and fine tune the footage to bring the brighter parts of the image back in to range. This is typivally called “grading” or color correcting the material.
Normally you want to grade the clip before it passes through the LUT as prior to the LUT the full range of the footage is always retained. The normal procedure is to add the LUT to the clip or footage as an output LUT, that is to say the LUT is on the output from the grading system. Although it’s preferable to have the LUT after any corrections, don’t worry too much about where your LUT goes. Most edit and grading software will still retain the full range of everything you have recorded, even if you can’t always see it on the TV or monitor.
By grading or adjusting the footage before it enters the LUT we can bring the highlights back within the range that the TV or monitor can show.
If you chose to deliberately over expose the camera by a stop or two to get the best from the 8 bit recordings (see part one of the guide) then the LUT that you should use should also incorporate compensation for this over exposure. The LUT sets that I have provided for the Sony Alpha cameras includes LUTs that have compensation for +1 and +2 stops of over exposure.
IN PRACTICE.
So how do we do this in practice?
First of all you need some LUT’s. If you haven’t already downloaded my LUT’s please download one or both of my LUT sets:
To start off with you can just edit your S-Log footage as you would normally. Don’t worry too much about adding a LUT at the edit stage. Once the edit is locked down you have two choices. You can either export your edit to a dedicated grading package, or, if your edit package supports LUT’s you can add the LUT’s directly in the edit application.
In Premiere CC you use the built in Lumetri filter plugin found under the “filters”, “color correction filters” tab (not the Lumetri Looks).
In all the above cases you add the filter or plugin to the clip and then select the LUT that you wish to use. It really is very easy. Once you have applied the LUT you can then further fine tune and adjust the clip using the normal color correction tools. To apply the same LUT to multiple clips simply select a clip that already has the LUT applied and hit “copy” or “control C” and then select the other clips that you wish to apply the LUT to and then select “paste – attributes” to copy the filter settings to the other clips.
Exporting Your Project To Resolve (or another grading package).
This is my preferred method for grading as you will normally find that you have much better correction tools in a dedicated grading package. What you don’t want to do is to render out your edit project and then take that render into the grading package. What you really want to do is export an edit list or XML file that contains the details of your project. The you open that edit list or XML file in the grading package. This should then open the original source clips as an edited timeline that matches the timeline you have in your edit software so that you can work directly with the original material. Again you would just edit as normal in your edit application and then export the project or sequence as preferably an XML file or a CMX EDL. XML is preferred and has the best compatibility with other applications.
Once you have imported the project into the grading package you then want to apply your chosen LUT. If you are using the same LUT for the entire project then the LUT can be added as an “Output” LUT for the entire project. In this way the LUT acts on the output of your project as a final global LUT. Any grading that you do will then happen prior to the LUT which is the best way to do things. If you want to apply different LUT’s to different clips then you can add a LUT to individual clips. If the grading application uses nodes then the LUT should be on the last node so that any grading takes place in nodes prior to the LUT.
Once you have added your LUT’s and graded your footage you have a couple of choices. You can normally either render out a single clip that is a compilation of all the clips in the edit or you can render the graded footage out as individual clips. I normally render out individual clips with the same file names as the original source clips, just saved in a different folder. This way I can return to my edit software and swap the original clips for the rendered and graded clips in the same project. Doing this allows me to make changes to the edit or add captions and effects that may not be possible to add in the grading software.
As an owner of both the A7s and AX100 and as someone that has shot with the PXW-X70, if I had to choose one which would it be? That’s tough because although they really are very different cameras they both have strengths that are nice to have. The A7s produces a prettier picture and can be used run and gun, with limitations. I use the kit 28-70mm f3.5-f5.6 and it works well, good auto focus, smooth aperture changes etc. BUT and it is a very big BUT you need a really good set of ND’s or a strong ND fader to use it outdoors due to the extreme sensitivity. Add to that the minimal 3x zoom and it’s pretty restrictive as to what you can shoot without switching lenses and fiddling around. Sure you can add something like the new Tamron 16-300mm f3.5-f6.3 but the autofocus tends to hunt a lot more, manual focus is fiddly and you still need to mess around with ND’s. I think you need to be a fairly competent cameraman and need to be very careful over lens choices etc to use the A7s for run and gun successfully. Plus don’t forget the cost of all the extra lenses, filters etc adds up and makes the kit bulkier.
The new Sony PXW-X70 XDCAM camcorder, the pro version of the AX100.
The AX100 (or PXW-X70) on the other hand really is a grab and go camera. Easy to use, great zoom range, built in ND’s. It’s quick and easy to use and may get you shots that you will miss with the A7s. But the pictures are not as pretty, primarily they lack the dynamic range of the A7s. But they are very easy to use, so well suited to those that are full auto shooters or rely heavily on auto functions to keep life simple. The X70 has much better ergonomics than the AX100 but is a bit more expensive. Both are very compact packages and as you don’t need to buy extra lenses or filters work out substantially cheaper than an A7s kit with a set of lenses to cover the same focal lengths at reasonable apertures.
Anyway, if I had to give up one of mine (A7s or AX100), for me it would be the AX100 that would go. I would be prepared to sacrifice the ease of use of the AX100 for the better images from the A7s. But I normally shoot manually anyway. I’m used to swapping lenses, working with ND filters etc. If you not used to shooting manually then the AX100 may be the better choice. Great images are of course important, but the best camera to own is a camera you will use. It’s all very well having fancy pictures and the ability to swap lenses etc. But if fiddling around means you don’t use it very often, then there is no point in having it. You would be better off with a camera that you will be comfortable with, that you will use regularly.
This guide is for the A7S and A7SII. The A7SIII does not in my opinion need the same degree of over exposure as documented here. So please bear this in mind if using the A7SIII.
This document has been prepared independently of Sony. It is based on my own findings having used the camera and tested various exposure levels and methods. Part 2 which explains how to use LUT’s to correct the footage in the edit suite or post production is here: https://www.xdcam-user.com/2014/10/using-s-log2-from-the-a7s-in-post-production/
If you find this useful please consider buying me a coffee or a beer. I’m not paid to write these articles.
One of the really nice features of the Sony A7s and Sony’s other Alpha cameras, including the A6300, A6500 etc is the ability to use different gamma curves and in particular the Sony S-Log2 gamma curve.
What are gamma curves?
All conventional cameras use gamma curves. The gamma curve is there to make the images captured easier to manage by making the file size smaller than it would be without a gamma curve. When TV was first developed the gamma curve in the camera made the signal small enough to be broadcast by a transmitter and then the gamma curve in the TV set (which is the inverse of the one in the camera) expanded the signal back to a normal viewing range. The current standard for broadcast TV is called “Recommendation BT-709”, often shortened to Rec-709. This gamma curve is based on standards developed over 60 years ago and camera technology has advanced a lot since then! Even so, almost every TV and monitor made today is made to the Rec-709 standard or something very similar. Many modern cameras can capture a brightness range, also known as dynamic range, that far exceed the Rec-709 standard.
The limitations of standard gammas.
As gamma effects the dark to light range of the image, it also effects the contrast of the image. Normal television gamma has a limited dynamic range (about 6 to 7 stops) and as a result also has a limited contrast range.
When shooting a high contrast scene with conventional gamma the brightest highlights and the darkest shadows cannot be recorded. The contrast on the TV or monitor will however be correct as the camera captures the same contrast range as the monitor is able to display.
Normally the gamma curve used in the camera is designed to match the gamma curve used by the TV or monitor. This way the contrast range of the camera and the contrast range of the display will be matched. So the contrast on the TV screen will match the contrast of the scene being filmed and the picture will look “normal”. However the limited dynamic range may mean that very bright or very dark objects cannot be accurately reproduced as these may exceed the gammas dynamic range.
Although the dynamic range of Rec-709 may not always capture the entire range of the scene being shot, as the gamma of the camera matches the gamma of the TV the contrast will appear correct.
The over exposure typical of a restricted range gamma such as Rec-709 is commonly seen as bright clouds in the sky becoming white over exposed blobs or bright areas on faces becoming areas of flat white. Objects in shade or shadow areas of the scene are simply too dark to be seen. But between the overexposed areas and any under exposure the contrast looks natural and true to life.
Typical limited Rec-709 exposure range. Contrast is good but the clouds are over exposed and look un-natural.
Log Gamma.
Log gamma, such as Sony’s S-Log2, allows the camera to capture a much greater brightness range or dynamic range than is possible when shooting with conventional television gamma. Dynamic range is the range from light to dark that the camera can capture or the range that the monitor or TV can display within one image. It is the range from the deepest blacks to the brightest whites that can be captured or shown at the same time.
There are some things that need to be considered before you get too excited about the possibility of capturing this much greater dynamic range. The primary one being that if the camera is set to S-log2 and the TV or monitor is a normal Rec-709 TV (as most are) then there is no way the TV can correctly display the image being captured, the TV just doesn’t have the range to show everything that the camera with it’s high range log gamma can capture accurately.
Fixed Recording Range For Both Standard and Log Gamma.
The signal range and signal levels used to record a video signal are normally described in percent. Where black is 0% and the brightest thing that can be recorded is normally recorded at 100% to 109%. Most modern video cameras actually record the brightest objects at 109%. The important thing to remember though is that the recording range is fixed. Even when you change gamma curve the camera is still constrained by the zero to 109% recording range. The recording range does not change whether you are recording Rec-709 or S-log2. So log gamma’s like S-Log2 must squeeze a much bigger signal range into the same recording range as used by conventional Rec-709 recordings.
Log gamma squeezes the scenes large range to fit in the camera’s normal 0%-109% recording range.
Recording S-Log2.
In order to record using S-log2 with the A7s you need to use a picture profile. The picture profiles give you several recording gamma options. For S-log2 you should use Picture Profile 7 which is already set up for S-log2 and S-Gamut by default (for information on gamuts see this article). In addition you should ALWAYS use the cameras native ISO which is 3200 ISO and it is normally preferable to use a preset white balance. Using any other ISO with S-log2 will not allow you to get the full benefit of the full 14 stops of dynamic range that S-log2 can deliver. In most of the Alpha cameras you now also have the ability to use a different version of S-log, – S-Log3 and this is found in picture profiles 8 and 9. You can use S-Log3 if you wish, but S-Log2 was designed from the outset by Sony to work with digital camera sensors. S-Log3 is based on an older curve designed for film transfers to a 10 bit recording. As a result when using a camera that only has 8 bit recording with a limited number of code values, S-Log2 tends to be more efficient and yield a better end result. This is what it was designed for.
Grey Cards and White Cards.
Before I go further let me introduce you to grey and white cards in case you have not come across them before. Don’t panic you don’t have to own one, although I would recommend getting a grey card such as the Lastolite EzyBalance if you don’t have one. But it is useful to understand what they are.
The 90% White Card.
The 90% white card is a card or chart that reflects 90% of the light falling on it. This will be a card that looks very similar in brightness to a piece of ordinary white paper, it should be pure white, some printer papers are bleached or coloured very slightly blue to make them appear “brilliant white” (as you will see later in many cases it is possible to use an ordinary piece of white paper in place of a 90% white card for exposure).
The Grey Card.
The 18% grey card, also often called “middle grey” card, is a card that reflects 18% of the light falling on it. Obviously it will appear much darker than the white card. Visually to us humans an 18% grey card appears to be half way between white and black, hence it’s other name, “middle grey”.
Middle grey is important because the average brightness level of most typical scenes tends to be around the middle grey brightness value. Another key thing about middle grey is that because it falls in the middle of our exposure range it makes it a very handy reference level when measuring exposure as it is less likely to be effected by highlight compression than a 90% white card.
Exposing White and Middle Grey.
Coming back to Rec-709 and conventional TV’s and monitors. If we want a piece of white paper to look bright and white on a TV we would record it and then show it at somewhere around 85% to 95% of the screens full brightness range. This doesn’t leave much room for things brighter than a white piece of paper! Things like clouds in the sky, a shiny car, a bright window or a direct light source such as a lamp or other light. In order to make it possible for S-log2 to record a much greater dynamic range the recording level for white and mid tones is shifted down. Instead of recording white at 85%-95%, when using S-log2 or S-Log3 it is recommended by Sony that white is recorded at around 60%. For S-Log2 Middle grey moves down too, instead of being recorded at 42%-43% (the normal level for Rec-709) it’s recorded at just 32% with S-Log2 (S-log3 uses 41%).
By recording everything white (ie a white piece of paper) and darker in a lower range, we free up lot of extra space above the white recording level, within the full recording range, to record all those bright highlights in any scene that would be impossible to record with conventional gammas where there is only 10% to 20% from white at 90% to the peak of the recording range at 100 to 109%.
To make room for the extra dynamic range and the ability to record very bright objects, white and mid tones are shifted down in level by the S-log2 gamma curve. As a result, white, mid tones etc will be displayed darker than normally expected with conventional gamma.
As S-Log2 and S-Log3 normally shift a lot of the recording levels downwards, if we show a scene shot with S-Log2 or S-log3 that has been exposed correctly on a conventional TV or monitor it will look dark due to the lower recording levels. In addition it will look flat with very low contrast as we are now squeezing a much bigger dynamic range into the limited conventional Rec-709 display range of a normal TV or computer monitor.
The on screen contrast appears reduced as the capture contrast is greater than the display contrast.
This on screen reduction in contrast and the darker levels are actually perfectly normal when shooting using log gamma, this is how it is supposed to look on a normal monitor or TV. So don’t be alarmed if when shooting using S-Log your images look a little darker and flatter than perhaps you are used to when shooting with a standard gamma. You will adjust the S-Log footage in post production to restore the brightness and contrast later.
Correctly exposed S-Log2 can look dark and washed out.
The post production adjustment of S-Log2 and S-log3 is very important and one of the keys to getting the very best finished images. The S-Log recording acts as a digital negative and by “processing” this digital negative in post production (normally referred to as “grading”) we manipulate the large 14 stop dynamic range of the captured image to fit within the limited display range of a Rec-709 TV in a pleasing manner. This may mean pulling up the mid range a bit, pulling down the highlights and bit and generally shifting the brightness and colour levels of different parts of the image around (see PART 2 for more post production information).
SLog-2 and 10 bit or 8 bit data.
Originally Slog-2 was designed for use on high end digital cinema cameras such as Sony’s F65 camera. These cameras have the ability to record using 10 bit data. A 10 bit recording can have up to around 1000 shades of grey from black to white. The A7s however uses 8 bit recording which only has a maximum of 235 shades from black to white. Normally 8 bit recording is perfectly OK as most transmission and display standards are also 8 bit. Shoot with an 8 bit camera and then display that image directly via an 8 bit system and nothing is lost. However when you start to grade and manipulate the image the difference between 8 bit and 10 bit becomes more significant. If you start to shift levels around, perhaps stretching out some parts of the image then the increased tonal resolution of a 10 bit recording helps maintain the very highest image quality. Photographers that have shot using both jpeg and raw will know how much more flexibility the 12 bit (or more) raw files have compared to the 8 bit jpeg’s. However they will also know that 8 bit jpeg’s can be also adjusted, provided you don’t need to make very large adjustments.
Contrary to popular belief heavy grading of 8 bit footage does not necessarily lead to banding in footage across smooth surfaces except in extreme cases. Banding is more commonly a result of compression artefacts such as macro blocking. This is especially common with very highly compressed codecs such as AVCHD. The 50Mbps XAVC-S codec used in the Sony Alpha cameras is a very good codec, far superior to AVCHD and as a result compression artefacts are significantly reduced, so banding will be less of an issue than with other lower quality codecs. If you’re going to shoot using S-Log2, some grading will be necessary and as we only have 8 bit recordings we must take care to expose our material in such a way as to minimise how far we will need to push and pull the material.
Getting Your Exposure Right.
When S-Log2 was developed the engineers at Sony produced tables that specified the correct exposure levels for s-Log2 which are:
As you can see the nominal “correct” exposure for S-Log2 is a lot lower than the levels used for display on a typical Rec-709 TV or monitor. This is why correctly exposed s-log2 looks dark on a conventional TV. The implication of this is that when you grade your footage in post production you will have to shift the S-log2 levels up quite a long way. This may not be ideal with an 8 bit codec, so I decided to carefully test this to determine the optimum exposure level for the A7s.
Correct Exposure.
The panel of images below is from the A7s recording S-log2 and exposed at the Sony recommended “correct” 32% middle grey level. The correct exposure was determined using a grey card and an external waveform monitor connected to the cameras HDMI output. Then the S-log2 was corrected in post production to normal Rec-709 levels using a Look Up Table (LUT – more on LUT’s in part 2). You can also see the viewfinder display from the camera. If you click on the image below you can expand it to full size. Sorry about the shadow from the laundry line, I didn’t see this when I was shooting the test shots!
Correctly exposed S-Log2 from A7s.
From this you can see just how dark and low contrast looking the original correctly exposed S-log2 is and how much more vibrant the corrected Rec-709 image is. I have also indicated where on the cameras histogram middle grey and white are. Note how much space there is to the right of white on the histogram. This is where the extra highlight or over exposure range of S-log2 can be recorded. When correctly exposed S-log2 has an exposure range of 6 stops above middle grey and 8 stops under.
Over Exposing or “Pushing” S-log2.
If we deliberately raise the exposure level above the Sony recommended levels (known as pushing the exposure), assuming you grade the image to the same final levels some interesting things happen.
For each stop we raise the exposure level you will have 1 stop (which is the same as 6db) less noise. So the final images will have half as much noise for each stop up you go. This is a result of exposing the image brighter and as a result not needing to raise the levels in post as far as you would if exposed at the normal level.
You will loose one stop of over exposure headroom, but gain one stop of under exposure headroom.
Bright highlights will be moved upwards into the most compressed part of the log gamma curve. This can result in a loss of texture in highlights.
Skin tones and mid tones move closer to normal Rec-709 levels, so less manipulation is need for this part of the image in post production.
This last point is important for the A7s with it’s 8 bit codec, so this is the area I looked at most closely. What happens to skin tones and textures when we raise the exposure?
Exposing at +1, +2 and +3 Stops.
Below are another 3 panels from the A7s, shot at +1 stop, +2 stops and +3 stops. Again you can click on the images if you wish to view them full size.
A7s S-Log2 over exposed by one stop.A7s S-Log2 over exposed by 2 stops.A7s S-Log2 over exposed by 3 stops.
Looking at these results closely you can see that when you increase the exposure by 1 stop over the Sony specified correct level for S-log2 there is a very useful reduction in noise, not that the A7s is particularly noisy to start with, but you do get a noticeably cleaner image.
Below are 4 crops from the same images, after grading. I really recommend you view these images full size on a good quality monitor. Click on the image to view larger or full size.
Crops at different exposure of LUT corrected A7s S-log2 footage.
The noise reduction at higher exposures compared to the base exposure is very clear to see if you look at the black edge of the colour checker chart (the coloured squares), although the difference between +2 and +3 stops is very small. You can also see further into the shadows in the +3 stop image compared to the base exposure. A more subtle but important effect is that as the exposure goes up the visible texture of the wooden clothes peg decreases. The grain can be clearly seen at the base level but by +3 stops it has vanished. This is caused by the highlights creeping into the more compressed part of the log gamma curve. The same thing is happening to the skin tones in the +3 stop image, there is some reduction of the most subtle textures.
From this we can see that for mid tones and skin tones you can afford to expose between 1 and 2 stops above the Sony recommended base level. More than 2 stops over and brighter skin tones and any other brighter textures start to be lost. The noise reduction gain by shooting between one and 2 stops over is certainly beneficial. The down side to this though is that we are reducing the over amount of exposure headroom.
As you raise the exposure level you reduce the over exposure headroom.
Given everything I have seen with this 8 bit and almost every other 8 bit camera my recommendation is to shoot between the Sony recommended base S-log2 level and up to two stops over this level. I would try to avoid shooting more than 2 stops over as this is where you will start to see some loss of texture in brighter skin tones and brighter textures. Exactly where you set your exposure will depend on the highlights in the scene. If you are shooting a very bright scene you will possibly need to shoot at the Sony recommended level to get the very best over exposure headroom. If you are able to expose higher without significantly compromising any highlights then you should aim to be up to 2 stops over base. But whatever you do never expose darker than the Sony base level, this will normally look really nasty.
Determining The Correct Exposure.
The challenge of course is determining where your exposure actually is. Fortunately as we have seen, provided you in the right ball park, S-log2 is quite forgiving, so if you are a little bit over exposed it’s probably not going to hurt your images much. If you have a waveform monitor then you can use that to set your exposure according to the table below. If you don’t have proper white or grey cards you can use a piece of normal white paper. Although slightly less accurate this will get you very close to where you want to be. Do note that white paper tends to be a little brighter than a dedicated 90% reflectivity white card. If you don’t have any white paper then you can use skin tones, again a bit less accurate but you should end up in the right zone.
My suggested exposure levels for the Sony A7s. The “sweet spot” is from normal to +2 over.
If you don’t have an external waveform monitor then you do still have some good options. Sadly although the camera does have zebras, these are not terribly useful for S-log2 as the lowest the zebras can go is 70%.
Light Meter: You could use a conventional photography light meter. If you do choose to use a light meter I would recommend checking the calibration of the light meter against the camera first.
Mark 1 Eyeball: You could simply eyeball the exposure looking at the viewfinder or rear screen but this is tricky when the image is very flat.
In Camera Metering: The cameras built in metering system, like the majority of DSLR’s is calibrated for middle grey. By default the camera uses multi-point metering to measure the average brightness of several points across the scene to determine the scenes average brightness and from there set the correct base S-log2 exposure.
Auto Exposure:
When you are using S-Log2, auto exposure in most cases will be very close to the correct base exposure if you use the default Multi-Zone exposure metering. The camera will take an average exposure reading for the scene and automatically adjust the exposure to the Sony recommended 32% middle grey exposure level based on this average. In the P, A and S modes you can then use the exposure compensation dial to offset the exposure should you wish. My recommendation would be to add +1 or +2 stops via the dial. Then observe the histogram to ensure that you don’t have any significant over exposure. If you do then reduce the exposure compensation. Lots of peaks to the far right of the histogram is an indication of over exposure.
Manual Exposure And Internal Metering.
If you are exposing manually you will see a small M.M. indication at the bottom of the LCD display with a +/- number. In the eyepiece viewfinder this appears as a scale that runs from -5 to +5, in S-log2 only the -2 to +2 part of the scale is used. In both cases this is how far the camera thinks you are away from the optimum exposure. + meaning the camera is over exposed, – meaning under.
A7s Viewfinder indications in manual exposure mode showing both M.M. offset from metered exposure and histogram.
In the image above we can see the M.M. indication is +0.3, in the eyepiece you would see a small arrow one bar to the right of “0” , indicating the cameras multi zone metering thinks the shot is just a little over exposed, even though the shot has been carefully exposed using a grey card and external waveform monitor. This error is probably due to the large amount of white in the shot, white shirt, white card, test charts with a lot of brighter than grey shades. In practice an error of 0.3 of a stop is not going to cause any real issues, so even if this was exposed by setting the exposure so that you have “M.M. 0.0” the exposure would be accurate enough. But it shows that multi point exposure averaging is easily confused.
The scene above is a fairly normal scene, not excessively bright, not particularly dark. If shooting a snow scene for example the cameras multi point averaging would almost certainly result in an under exposed shot as the camera attempts to bring the bright snow in the scene down to the average middle grey level. If shooting a well lit face against a very dark background then the averaging might try to bring the background up and the shot may end up overexposed.
If you want really accurate exposure then you should put the cameras metering system into the spot metering mode where instead of taking an average of various points across the scene the camera will just measure the exposure at the very center of the image.
A7s Spot Metering Mode.
You can then use a grey card to very accurately set the exposure. Simply place the circular shaped symbol at the center of the viewfinder display over a grey card and set the exposure so that M.M is 0.0 for the correct S-Log2 base exposure. To expose 1 stop over with a grey card, set M.M. +1.0 and two stops over M.M. +2.0 (not flashing, flashing indicates more than +2 stops).
Using Spot Metering to set exposure correctly for S-log2. MM 0.0.
One small issue with this is that the camera will only display a M.M. range of -2.0 to +2.0 stops. Provided you don’t want to go more than 2 stops over base then you will be fine with a grey card.
Using White Instead of Grey:
If you don’t have a grey card then you can use a 90% reflectivity white target. As white is 2 stops brighter than middle grey when S-Log2 is correctly exposed the 90% white should indicate M.M +2.0.
Using spot metering to set the correct exposure for S-Log2. M.M should read M.M +2.0 for a 90% reflectivity white target.
Once you have established the correct exposure you can then open the iris by 1 or two stops to increase the exposure. Or halve the shutter speed to gain a one stop brighter exposure. Each time you halve the shutter speed your exposure becomes one stop brighter, so divide the shutter speed by 4 to gain a 2 stop increase in exposure. As always you should observe the histogram to check for any over exposure. White peaks at the far right of the histogram or disappearing completely off the right of the histogram is an indication of over-exposure. In this case reduce your exposure back down towards the base exposure level (M.M 0.0 with a a grey card).
Exposure Summary:
I recommend using an exposure between the “correct” base S-Log2 exposure level of middle grey at 32% and two stops over this. I would not recommend going more than 2 stops over over base.
In the P, A and S auto exposure modes, when using the default multi-zone metering the camera will set the base S-log2 exposure based on the average scene brightness. For most typical scenes this average should be very close to middle grey. This exposure can then be increased (brightened) by up to 2 stops using the exposure compensation dial.
In manual exposure the “M.M.” number displayed at the bottom of the viewfinder display is how far you are from the correct base S-log2 exposure. M.M. +2.0 indicates +2 stops over base. If using multi zone metering (the cameras default) this exposure will be based on the scenes average brightness.
If you set the metering to “Spot” you can use a grey card centred in the image to determine the correct base exposure and up to 2 stops of over exposure via the M.M. indication when shooting manually.
In Part 2:
In part two I will take a look at grading the S-log2 from the A7s and how to get the very best from the S-log2 images by using Look Up Tables (LUT’s).
Don’t forget I run storm chasing and Northern Lights expeditions every year. These are amazing expeditions by snowmobile up on to the Finnmarksvidda. We go ice fishing, dog sledding, exploring, cook a meal in a tent and enjoy traditional Norwegian saunas.
I’ve been doing a lot of work on shooting SLog-2 with the A7s. I realised almost straight away that a set of LUT’s for this camera would really help speed up my grading and testing. In addition as the camera is only 8 bit I have found that I am actually getting the best results from the Slog-2 if I over expose it just a little bit, depending of course on the scene. So I created a set of LUT’s that includes compensation for shooting at the nominal correct exposure as well as either 1 or 2 stops over exposed. In all there are 20 LUT’s in two sets. One is Rec-709 based LUT’s and the other Filmic LUT’s to act as starting points for further grading.
I am in the process of creating the complete workflow and SLog-2 guide for the A7s which I should be publishing later next week which will have much more information on how to use these LUT’s. But in the mean time here are the LUT’s if anyone want’s to play (and I would like feedback on what you think of them).
The LUT naming goes something like this:
AC A7S 709(800) ZERO
AC (That’s me!). A7S (The Camera).
709(800) = Output gamma or style. ZERO = Exposure off set.
The exposure offset refers to the number of stops the footage is over exposed by relative to the normal SLog2 exposure level of Middle Grey at 32% and 90% white at 59%. ZERO menas no exposure offset. 1STOP would be used when the SLog2 was exposed 1STOP over and in this case the LUT then shifts the exposure back down 1 stop to compensate.
709 = Vanilla Rec-709, very contrasty, but limited highlight response and hard clip of over exposure.
709(800) = Rec-709 gamma with 800% (high) dynamic range. Will be slightly low contrast but deals much better with over exposure or bright highlights than vanilla 709.
Film-Like1 = An extended range gamma with highlight roll off (+400% range), slightly de-saturated, slightly more film like color (small red/yellow removed).
Filmic2 = Extended range low contrast gamma with very good over exposure handling. Slightly de-saturated. Good grading start point.
Filmic3 = Similar to Filmic2 but a little more contrast at the expense of a little less highlight roll off.
Click on the links below to download the LUT sets. PLEASE DO NOT HOST THESE ELSEWHERE OR DISTRIBUTE THESE ELSEWHERE OR VIA ANY MEANS OTHER THAN A LINK TO THIS PAGE.
So I have had my A7s for 10 days now. I took it on holiday with me shooting both stills and video, getting a feel for the camera in a wide range of situations from brilliant sunshine to shooting under candlelight.
It has been an absolute delight using it, with one small caveat: No ND filters built in and boy, does this camera need ND filters! I see that there are now some lens adapters with ND faders built in from Fotodiox and HolyManta. I hope to test these soon, but these ND adapters are dumb adapters so only for fully manual lenses. So a set of front of lens ND’s or a good ND fader is essential to get the best from the A7s.
Lens wise I don’t have the greatest range of full frame lenses. I have my Samyang 24, 35 and 85mm full frame primes which work really well with the camera and the Sony 28-70mm f3.5-f5.6 kit lens and some old f1.4 nikkors. Actually the kit lens has really surprised me, for what it is, it does give a nice image. Almost all my lenses are Canon EF mount so I have been using an adapter. The one I have is the Commlite Full frame E to EF smart adapter, which has worked perfectly (it supports a wider range of lenses than my early model metabones adapter). For some longer focal lengths I’ve been playing with the new Tamron 16-300mm APS-C lens. One side note is that if you use an APS-C lens with a 1.4x teleconverter, in most cases the image circle will then fill the full frame sensor. I will be testing this further and posting some sample images soon. This might be handy for 4K video when you really need to use the full sensor.
Anyway, back to the camera. I had forgotten how nice full frame can be to work with. For photo’s the shallow DoF is a delight. For video you have much greater control over your DoF. As the camera is 3200 ISO you can shoot in the dark with ease and get very natural looking images without having to add extra light. SLog2 is great for capturing a huge dynamic range video. Today and tomorrow I am pushing the Slog2 though some torture and exposure tests to find the exposure sweet spot for Slog2 and 8 bit recordings. I’m also developing some LUT’s to use with the camera and I’ll have a full workflow guide to slog2 on the A7s in the next couple of weeks.
I really love that this little camera can shoot video that is of really remarkably good quality. Most people don’t realise your shooting video with it. It’s really quite scary just how good the video is, it’s starts you thinking… do I need an F5 when the video from the A7s is so good? But then when I started to set up the A7s for my Slog2 torture tests and added a monitor, the battery to power the monitor, rods, matte box, external recorder etc it soon turned into a frankenstien monster of a camera rig. The F5 is so much nicer to use in this respect. For casual shooting, covert filming or as a grab camera the A7s is pretty incredible and I will use it for a lot of things, but it’s not a replacement for my F5/R5.
One very nice feature of the A7s is the silent shutter stills mode. In this mode the camera makes use of the sensors electronic shutter rather that the cameras mechanical curtain shutter. This is great for time-lapse as you won’t wear out the mechanical shutter. The only down side is that when I use a DSLR for time-lapse I often make use of the large frame size from a 24MP or more sensor to re-frame or pan and scan the shot in post. The A7s is only 12.2MP or 4,240 x 2,832 pixels so very little room for re-framing in a 4K production, although not too bad for an HD programme. I wish the vanilla A7 had this feature, it would make it a great time-lapse camera. One application I’m very excited about is using the A7s to shoot the northern lights in both time-lapse and real time next year during my Northern Lights expeditions and workshops.
Keep an eye out for my Slog2 guide in the next week or so where I’ll document my findings on how to get the very best from the A7s. It’s an amazing little camera. Can’t wait for the 4K recording options for the camera to become a reality. Maybe we will find out more at IBC.
Manage your privacy
To provide the best experiences, we use technologies like cookies to store and/or access device information. Consenting to these technologies will allow us to process data such as browsing behavior or unique IDs on this site. Not consenting or withdrawing consent, may adversely affect certain features and functions.
Functional
Always active
The technical storage or access is strictly necessary for the legitimate purpose of enabling the use of a specific service explicitly requested by the subscriber or user, or for the sole purpose of carrying out the transmission of a communication over an electronic communications network.
Preferences
The technical storage or access is necessary for the legitimate purpose of storing preferences that are not requested by the subscriber or user.
Statistics
The technical storage or access that is used exclusively for statistical purposes.The technical storage or access that is used exclusively for anonymous statistical purposes. Without a subpoena, voluntary compliance on the part of your Internet Service Provider, or additional records from a third party, information stored or retrieved for this purpose alone cannot usually be used to identify you.
Marketing
The technical storage or access is required to create user profiles to send advertising, or to track the user on a website or across several websites for similar marketing purposes.


 The new Sony A6300 is making quite a stir. This compact interchangeable lens camera has an amazing feature set that is very similar to the features found on it’s bigger brothers the A7sII and A7RII.