


If you have followed my guide to shooting S-Log2 on the A7s then you may now be wondering how to use the footage in post production.
This is not going to be a tutorial on editing or grading. Just an outline guide on how to work with S-log2, mainly with Adobe Premiere and DaVinci Resolve. These are the software packages that I use. Once upon a time I was an FCP user, but I have never been able to get on with FCP-X. So I switched to Premiere CC which now offers some of the widest and best codec support as well as an editing interface very similar to FCP. For grading I like DaVinci Resolve. It’s very powerful and simple to use, plus the Lite version is completely free. If you download Resolve it comes with a very good tutorial. Follow that tutorial and you’ll be editing and grading with Resolve in just a few hours.
The first thing to remember about S-Log2/S-gamut material is that it has a different gamma and colour space used by almost every TV and monitor in use today. So to get pictures that look right on a TV we will need to convert the S-Log2 to the standard used by normal HD TV’s which is know as Rec-709. The best way to do this is via a Look Up Table or LUT.
Don’t be afraid of LUT’s. It might be a new concept for you, but really LUT’s are easy to use and when used right they bring many benefits. Many people like myself share LUT’s online, so do a google search and you will find many different looks and styles that you can download for your project.
So what is a LUT? It’s a simple table of values that converts one set of signal levels to another. You may come across different types of LUT’s… 1D, 3D, Cube etc. At a basic level these all do the same thing, there are some differences but at this stage we don’t need to worry about those differences. For grading and post production correction, in the vast majority of cases you will want to use a 3D Cube LUT. This is the most common type of LUT. The LUT’s that you use must be designed for the gamma curve and colour space that the material was shot in and the gamma curve and colorspace you want to end up in. So, in the case of a Sony camera, be that an A7s, A7r, A6300 or whatever we want LUT’s that are designed for either S-Log2 and S-Gamut or S-Log3 and SGamut3.cine. LUT’s designed for anything other than this will still transform the footage, but the end results will be unpredictable as the tables input values will not match the correct values for S-Log2/S-Log3.
One of the nice things about LUT’s is that they are non-destructive. That is to say that if you add a LUT to a clip you are not actually changing the original clip, you are simply altering the way the clip is displayed. If you don’t like the way the clip looks you can just try a different LUT.
If you followed the A7s shooting guide then you will remember that S-Log2 or S-Log3 takes a very large shooting scene dynamic range (14 stops) and squeezes that down to fit in a standard video camera recording range. When this squeezed or compressed together range is then shown on a conventional REC-709 TV with a relatively small dynamic range (6 stops) the end result is a flat looking, low contrast image where the overall levels are shifted down a bit, so as well as being low contrast and flat the pictures may also look dark.
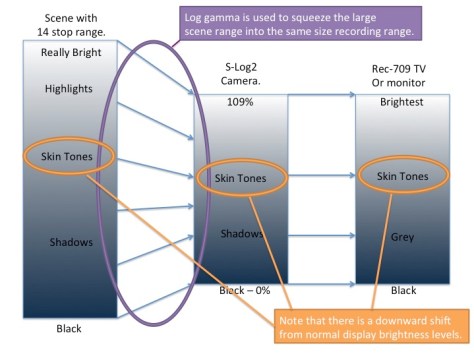

To make the pictures on our conventional 709 TV or computer moniotr have a normal contrast range, in post production we need to expand the the squeezed recorded S-Log2/S-Log3 range to the display range of REC-709. To do this we apply an S-Log2 or S-Log3 to Rec-709 LUT to the footage during the post production process. The LUT table will shift the S-log input values to the correct REC-709 output values. This can be done either with your edit software or dedicated grading software. But, we may need to do more than just add the LUT.

There is a problem because normal TV’s only have a limited display range, often smaller that the recorded image range. So when we expand the squeezed S-Log2/S-Log3 footage back to a normal contrast range the amount of dynamic range in the recording exceeds the dynamic range that the TV can display so the highlights and brighter parts of the picture are lost, they are no longer seen and as a result the footage may now look over exposed.

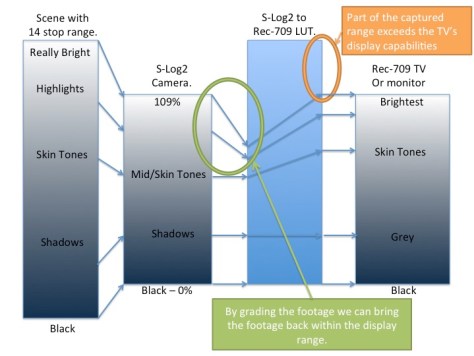
But don’t panic! The brightness information is still there in your footage, it hasn’t been lost, it just can’t be displayed. So we need to tweak and fine tune the footage to bring the brighter parts of the image back in to range. This is typivally called “grading” or color correcting the material.
Normally you want to grade the clip before it passes through the LUT as prior to the LUT the full range of the footage is always retained. The normal procedure is to add the LUT to the clip or footage as an output LUT, that is to say the LUT is on the output from the grading system. Although it’s preferable to have the LUT after any corrections, don’t worry too much about where your LUT goes. Most edit and grading software will still retain the full range of everything you have recorded, even if you can’t always see it on the TV or monitor.

If you chose to deliberately over expose the camera by a stop or two to get the best from the 8 bit recordings (see part one of the guide) then the LUT that you should use should also incorporate compensation for this over exposure. The LUT sets that I have provided for the Sony Alpha cameras includes LUTs that have compensation for +1 and +2 stops of over exposure.
IN PRACTICE.
So how do we do this in practice?
First of all you need some LUT’s. If you haven’t already downloaded my LUT’s please download one or both of my LUT sets:
20 Cube LUT’s for S-Log2 and A7 (also work with any S-Log2 camera).
Or
To start off with you can just edit your S-Log footage as you would normally. Don’t worry too much about adding a LUT at the edit stage. Once the edit is locked down you have two choices. You can either export your edit to a dedicated grading package, or, if your edit package supports LUT’s you can add the LUT’s directly in the edit application.
Applying LUT’s in the edit application.
In FCP, Premiere CS5 and CS6 you can use the free LUT Buddy Plug-In from Red Giant to apply LUT’s to your clips.
In FCP-X you can use a plugin called LUT Utility from Colorgrading Central.
In Premiere CC you use the built in Lumetri filter plugin found under the “filters”, “color correction filters” tab (not the Lumetri Looks).
In all the above cases you add the filter or plugin to the clip and then select the LUT that you wish to use. It really is very easy. Once you have applied the LUT you can then further fine tune and adjust the clip using the normal color correction tools. To apply the same LUT to multiple clips simply select a clip that already has the LUT applied and hit “copy” or “control C” and then select the other clips that you wish to apply the LUT to and then select “paste – attributes” to copy the filter settings to the other clips.
Exporting Your Project To Resolve (or another grading package).
This is my preferred method for grading as you will normally find that you have much better correction tools in a dedicated grading package. What you don’t want to do is to render out your edit project and then take that render into the grading package. What you really want to do is export an edit list or XML file that contains the details of your project. The you open that edit list or XML file in the grading package. This should then open the original source clips as an edited timeline that matches the timeline you have in your edit software so that you can work directly with the original material. Again you would just edit as normal in your edit application and then export the project or sequence as preferably an XML file or a CMX EDL. XML is preferred and has the best compatibility with other applications.
Once you have imported the project into the grading package you then want to apply your chosen LUT. If you are using the same LUT for the entire project then the LUT can be added as an “Output” LUT for the entire project. In this way the LUT acts on the output of your project as a final global LUT. Any grading that you do will then happen prior to the LUT which is the best way to do things. If you want to apply different LUT’s to different clips then you can add a LUT to individual clips. If the grading application uses nodes then the LUT should be on the last node so that any grading takes place in nodes prior to the LUT.
Once you have added your LUT’s and graded your footage you have a couple of choices. You can normally either render out a single clip that is a compilation of all the clips in the edit or you can render the graded footage out as individual clips. I normally render out individual clips with the same file names as the original source clips, just saved in a different folder. This way I can return to my edit software and swap the original clips for the rendered and graded clips in the same project. Doing this allows me to make changes to the edit or add captions and effects that may not be possible to add in the grading software.
 If you like what you read here, please also visit and subscribe to my YouTube Channel by clicking here. Thanks.
Alister,
thank you for these simple and effective explanations (as usual!)
And …. sorry for my horrible “google english”.
issue:
did you notice that Resolve doesn’t recognize the XAVC-S audio part ?
Are you grading silent footage in resolve ?
After many trials, I first encode all my rushes in DNxHD 120 8bit : with A7S, going “higher” does not give better results when grading.
in your opinion ?
Hi Alister,
Have you noticed that the S-LOG2 gamma curve that is recorded to XAVC-S internally does NOT match the same S-LOG2 gamma curve that is output over HDMI?
It seems that the A7s adds significantly more contrast over HDMI and the image is brighter and clips whites faster.
It’s easy to test. Just record a clip internally and also with any HDMI recorder of your choice. Compare the two files on scopes and notice the difference.
Both Atomos and Convergent Design are both looking into this.
What is your take on it?
CT
@Cliff: The problem is that the HDMI output gets interpreted as a limited range signal (16-235) when in fact it’s a full range signal (0-255). If the signal is interpreted correctly (you can change this in your editing software), the internal and external clips match 100%.
Thanks for a great summary of post-production for this awesome little camera. Two questions:
— I see stuttery playback of XAVC-S, both during playback by the camera, and in Vegas on my PC. Someone suggested slow drives and SD cards may be the problem. Any thoughts?
— Are you editing on a PC or Mac? I’m thinking of using Adobe and Resolve on a PC, but don’t know how well they work in that environment.
Thanks again for all your great advice!
Aha, I think I found the problem to the stuttery play — I was filming video in “M” mode, not movie mode. Once I switched it to the movie icon on the dial, problem went away.
Hey Alister,
once again a very helpfull Articel. I always love to read up and you are a fountain of wisdome ! Could you get into some more detail about the HDMI “Problem” ? I will buy the Atomos Shogun and am a bit worried that I wont get the same S-Log2 as internaly. There have been some rumours around about this problem.
All the best
Gil
Hi Alister,
Thank you for your article and LUTs.
I see you made a few different versions for expos (0, 1-2-stops).
How could you oversexpo with more then 2 stops (for example 3) becuse the expsoure indicator only shows it until 2 stops?
Thank you for your reply!
Zoltan
Open the lens one more stop.
thank you for your reply.
Could you suggest some ND filters?
I’m thinking about Fotodiox Vizelex ND Throttle and Holymanta.
Have you tried them? What’s your opinion?
I think the main problem is these ND filters are full manual adapter so you can’t use your EOS lens (only samyang lens with manual ap.).
I have the fotodiox ND throttle and it works very well. It’s certainly very convenient having the ND behind the lens. I have not tried the Holymanta.
Thank you!
Is ND1000 (what is the maximum of Fotodiox) enough at very bright summer scene with open apperture?
One more question with spot metering.
I don’t understand perfectly how should I use it for video (for still ok).
For example how can I use spot metering when my scene is a black car at sunny summer background? If I spot metering with 2 or 3 stops over to the car the sunny background will blowed up and I can’t move (steady) or pan with this expo.
Thanks for this info!! Are u doing a part 2?
One day……. Just too busy right now with paying work.
Alister is the best and really knows what he’s talking about! Some other folks that muddy up the waters (like JCS who likes to flirt with vector math) just don’t convey it so most of us can understand what’s really going on. Dave Doofisdale doesn’t seem to like that the A7S has this greenish color cast: a consequence of S-gamut being displayed in REC. 709, which Alister brilliantly wrote about in another article.
We have both gamut and gamma “interpretations” designed to capture more info than what conventional rec 709 has historically captured. But these can be interchangeable. For example, I shoot an S-Log2 gamma curve on the A7r2 and a6300 but can choose SGamut3 or the “.cine” variant for something more closely representing the Rec709 primaries–just wider and not twisted. But now what LUT do I use? The LUTs only specify exposure and gamma info. The LUT remaps the data for both a gamma and gamut shift, generally speaking, but this doesn’t seem to be mentioned here. Right? Resolve’s color managed workflow does not allow for shooting S-Log-2 gamma and anything but “S-Log” gamut.
While I’m on the topic of color, I know it has previously been suggested that one uses “preset white balance” in S-Log2 with these mirrorless sony ILC’s. I’m curious as to why that is and if it is still pertinent. Is it because of the fact that everything goes green half the time you try setting custom white balance in S-Log?
And a final color note: I know I read this in the Sony white paper on SLog3–”Technical Summary for S-Gamut3.Cine/S-Log3″:
” But S-Gamut3 is optimized to combine these color conversion matrix. The conversion matrix does not depend on color temperature any more.” I would think conversion matrices are heeded during raw interpretation, so may not be relevant on XAVC-S cameras, but curious for an explanation as to how a camera’s “color temperature” can operate independent of its conversion matrix.
Thank you kindly for all your info and please help clarify. I’ll give you $30 and my number if you want to explain any or all of this over the phone 🙂
S-Log2 LUTs are almost always designed for S-Log2/S-Gamut, S-Log3 LUT’s can be created of either S-Gamut3 or for S-Gamut3.cine, so it’s just a case of making sure the LUT matches what you shoot with. It is possible to make LUT’s for any combination of gamma and gamut.
The white balance is preset to avoid unwanted clipping in the individual RGB channels as any clipping may not be visible when shooting but become a very big problem when you try to grade. As variable white balance is performed by altering the gain of the R,G and B channles it also effects the dynamic range of each channel. The white balance presets are calculated to avoid this.
Alister, thank you kindly for your response. I’m updating this thread to note that Resolve’s latest version does allow for independent gamma and gamut selection in its color management settings (e.g. I can now select an S-Log2/S-Gamut3.Cine pairing). Atomos has also updated firmware for their recorders with similar functionality.
The big question now is that, since I assume both Blackmagic and Atomos create their gamma transforms based on Sony spec, but good folks like Alister have helped us understand the benefits of “overexposure” when shooting S-log, are we even able to take advantage of this new functionality in Resolve and Atomos when exposing 2 stops over since the transform is likely going to expect an “exposed per spec” image? I assume a LUT designed to properly transform an overexposed image of a set amount of stops is a different thing than using the standard LUT with a manual offset?
Yes it is very different because the LUT or transform will be compressing and expanding specific ranges of input values. For example anything above 60% at standard exposure would be considered a highlight, so a standard exposure LUT will compress anything above 60% together to create a highlight roll off. Expose 2 stops brighter and your highlights are now not starting until around 75%, skin tones will be above 60%, so a standard exposure LUT will be squeezing skin tones together, not something you want. This is why the LUT sets I provide here include exposure offsets. If you use a standard exposure LUT or Transform with offset exposure material the LUT/Transform should be the final operation (placed on the output or last node) and then you do the exposure adjustment before the material is passed to the LUT so the LUT applies the right modifications to the right parts of the image.
This makes complete sense. The issue is that Resolve’s “Offset” control does not affect the signal in a way that allows for a simple dropping of the entire image roughly two stops before it hits the LUT in a serial node following the -2 correction. PVC has an article explaining Resolve’s controls that cites the video output as:
output = (input x slope + offset)power
I wonder if it’s that power multiplier for gamma that makes Offset unusable in this way.
Ideally we could use Resolve’s color management tools since they reduce the risk of clipping where traditional LUTs would if not sequenced correctly. I don’t believe there’s any way to add any operation prior to the transform done for the Input Color Space however. For now I think I need to simply accept that this is how things are and use LUTs 🙂
An ACES workflow is one solution as internally ACES converts the media to linear so a simple gain adjustment is all that is needed to change the exposure.
Or ignore LUT’s and transforms and apply an S-Curve (go approx 1/4 of the way up the luma curve and pull it down about half way towards the bottom. Come down 1/4 of the way from the top and pull it up) to the footage in the first node, this has the effect of crudely de-logging the footage. Gain corrections will then adjust exposure and adding some saturation will shrink the gamut.
There’s something more satisfying to my soul in officially “de-logging” over the manual S-curve. That’s actually one thing I’ve found beneficial about log-–you can get LUTs or use color management to “de-log”. One wish I’ve had with the Cinegammas is for a way to linearize their highlight rolloff with a technically correct inversion of said rolloff. I’m not always happy with playing around with highlights in curves to try and get contrast back. Funny that for log we all have come to expect a LUT, but why is it not common practice for something like Cinegammas where a similar principal applies?
Hi Alister, I’ve been having an issue with yellows and oranges with your LUTS and i’m not sure if its the LUT, the camera, or what. I’ve exposed and white balanced by following your guides, yet any yellow near the highlight range has major pixel bleeding and degradation. like yellow flowers in the sunlight or bananas. Have you heard of this before?
I’ve not heard this from anyone else. What software are you using?
Incredible job Alistair, I really appreciate your dedication, so the least I could do is inviting u to a latte! Have a good day and keep the work!