Just a quick note to remind those eagerly waiting the arrival of their FS7 cameras that the CineEI mode of the FS7 is just about identical to the CineEI mode of the F5 and F55. SO if you want to know how it works then take a look at my guides to CineEI and LUT’s on the F5 and F55.
Using S-log2 and S-Log3 from the A7S (or any Alpha camera) in post production.
If you have followed my guide to shooting S-Log2 on the A7s then you may now be wondering how to use the footage in post production.
This is not going to be a tutorial on editing or grading. Just an outline guide on how to work with S-log2, mainly with Adobe Premiere and DaVinci Resolve. These are the software packages that I use. Once upon a time I was an FCP user, but I have never been able to get on with FCP-X. So I switched to Premiere CC which now offers some of the widest and best codec support as well as an editing interface very similar to FCP. For grading I like DaVinci Resolve. It’s very powerful and simple to use, plus the Lite version is completely free. If you download Resolve it comes with a very good tutorial. Follow that tutorial and you’ll be editing and grading with Resolve in just a few hours.
The first thing to remember about S-Log2/S-gamut material is that it has a different gamma and colour space used by almost every TV and monitor in use today. So to get pictures that look right on a TV we will need to convert the S-Log2 to the standard used by normal HD TV’s which is know as Rec-709. The best way to do this is via a Look Up Table or LUT.
Don’t be afraid of LUT’s. It might be a new concept for you, but really LUT’s are easy to use and when used right they bring many benefits. Many people like myself share LUT’s online, so do a google search and you will find many different looks and styles that you can download for your project.
So what is a LUT? It’s a simple table of values that converts one set of signal levels to another. You may come across different types of LUT’s… 1D, 3D, Cube etc. At a basic level these all do the same thing, there are some differences but at this stage we don’t need to worry about those differences. For grading and post production correction, in the vast majority of cases you will want to use a 3D Cube LUT. This is the most common type of LUT. The LUT’s that you use must be designed for the gamma curve and colour space that the material was shot in and the gamma curve and colorspace you want to end up in. So, in the case of a Sony camera, be that an A7s, A7r, A6300 or whatever we want LUT’s that are designed for either S-Log2 and S-Gamut or S-Log3 and SGamut3.cine. LUT’s designed for anything other than this will still transform the footage, but the end results will be unpredictable as the tables input values will not match the correct values for S-Log2/S-Log3.
One of the nice things about LUT’s is that they are non-destructive. That is to say that if you add a LUT to a clip you are not actually changing the original clip, you are simply altering the way the clip is displayed. If you don’t like the way the clip looks you can just try a different LUT.
If you followed the A7s shooting guide then you will remember that S-Log2 or S-Log3 takes a very large shooting scene dynamic range (14 stops) and squeezes that down to fit in a standard video camera recording range. When this squeezed or compressed together range is then shown on a conventional REC-709 TV with a relatively small dynamic range (6 stops) the end result is a flat looking, low contrast image where the overall levels are shifted down a bit, so as well as being low contrast and flat the pictures may also look dark.
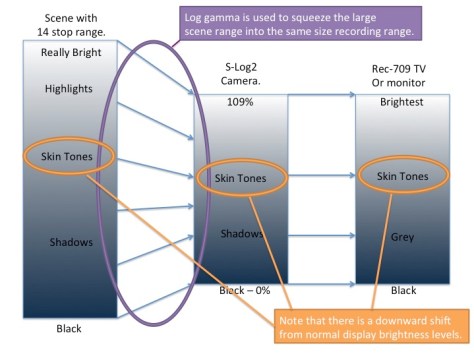

To make the pictures on our conventional 709 TV or computer moniotr have a normal contrast range, in post production we need to expand the the squeezed recorded S-Log2/S-Log3 range to the display range of REC-709. To do this we apply an S-Log2 or S-Log3 to Rec-709 LUT to the footage during the post production process. The LUT table will shift the S-log input values to the correct REC-709 output values. This can be done either with your edit software or dedicated grading software. But, we may need to do more than just add the LUT.

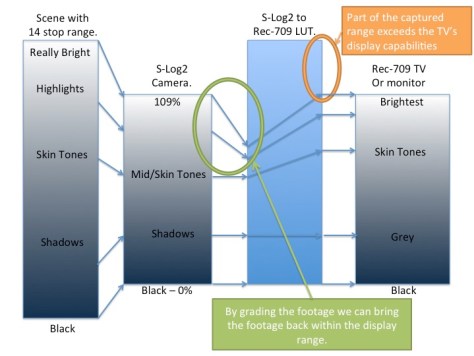
There is a problem because normal TV’s only have a limited display range, often smaller that the recorded image range. So when we expand the squeezed S-Log2/S-Log3 footage back to a normal contrast range the amount of dynamic range in the recording exceeds the dynamic range that the TV can display so the highlights and brighter parts of the picture are lost, they are no longer seen and as a result the footage may now look over exposed.

But don’t panic! The brightness information is still there in your footage, it hasn’t been lost, it just can’t be displayed. So we need to tweak and fine tune the footage to bring the brighter parts of the image back in to range. This is typivally called “grading” or color correcting the material.
Normally you want to grade the clip before it passes through the LUT as prior to the LUT the full range of the footage is always retained. The normal procedure is to add the LUT to the clip or footage as an output LUT, that is to say the LUT is on the output from the grading system. Although it’s preferable to have the LUT after any corrections, don’t worry too much about where your LUT goes. Most edit and grading software will still retain the full range of everything you have recorded, even if you can’t always see it on the TV or monitor.
If you chose to deliberately over expose the camera by a stop or two to get the best from the 8 bit recordings (see part one of the guide) then the LUT that you should use should also incorporate compensation for this over exposure. The LUT sets that I have provided for the Sony Alpha cameras includes LUTs that have compensation for +1 and +2 stops of over exposure.
IN PRACTICE.
So how do we do this in practice?
First of all you need some LUT’s. If you haven’t already downloaded my LUT’s please download one or both of my LUT sets:
20 Cube LUT’s for S-Log2 and A7 (also work with any S-Log2 camera).
Or
To start off with you can just edit your S-Log footage as you would normally. Don’t worry too much about adding a LUT at the edit stage. Once the edit is locked down you have two choices. You can either export your edit to a dedicated grading package, or, if your edit package supports LUT’s you can add the LUT’s directly in the edit application.
Applying LUT’s in the edit application.
In FCP, Premiere CS5 and CS6 you can use the free LUT Buddy Plug-In from Red Giant to apply LUT’s to your clips.
In FCP-X you can use a plugin called LUT Utility from Colorgrading Central.
In Premiere CC you use the built in Lumetri filter plugin found under the “filters”, “color correction filters” tab (not the Lumetri Looks).
In all the above cases you add the filter or plugin to the clip and then select the LUT that you wish to use. It really is very easy. Once you have applied the LUT you can then further fine tune and adjust the clip using the normal color correction tools. To apply the same LUT to multiple clips simply select a clip that already has the LUT applied and hit “copy” or “control C” and then select the other clips that you wish to apply the LUT to and then select “paste – attributes” to copy the filter settings to the other clips.
Exporting Your Project To Resolve (or another grading package).
This is my preferred method for grading as you will normally find that you have much better correction tools in a dedicated grading package. What you don’t want to do is to render out your edit project and then take that render into the grading package. What you really want to do is export an edit list or XML file that contains the details of your project. The you open that edit list or XML file in the grading package. This should then open the original source clips as an edited timeline that matches the timeline you have in your edit software so that you can work directly with the original material. Again you would just edit as normal in your edit application and then export the project or sequence as preferably an XML file or a CMX EDL. XML is preferred and has the best compatibility with other applications.
Once you have imported the project into the grading package you then want to apply your chosen LUT. If you are using the same LUT for the entire project then the LUT can be added as an “Output” LUT for the entire project. In this way the LUT acts on the output of your project as a final global LUT. Any grading that you do will then happen prior to the LUT which is the best way to do things. If you want to apply different LUT’s to different clips then you can add a LUT to individual clips. If the grading application uses nodes then the LUT should be on the last node so that any grading takes place in nodes prior to the LUT.
Once you have added your LUT’s and graded your footage you have a couple of choices. You can normally either render out a single clip that is a compilation of all the clips in the edit or you can render the graded footage out as individual clips. I normally render out individual clips with the same file names as the original source clips, just saved in a different folder. This way I can return to my edit software and swap the original clips for the rendered and graded clips in the same project. Doing this allows me to make changes to the edit or add captions and effects that may not be possible to add in the grading software.
USA Workshops and Events. October 2014.
Just a little over a week before I head off over the Atlantic to North America. Before going down to the USA I will be in Toronto, Canada on the 15th and 16th of October for the Vistek ProFusion event where I’ll be holding various workshops and seminars.
After ProFusion I’m flying down to North Virginia where I will be holding seminars during the SEVA film makers festival. This is going to be great event with some great speakers and presenters including Bruce Logan. The event runs from October 17th to 19th.
After a short break then I’m off down to Midtown Video in Miami, Florida for a 2 day extensive workshop on the 24th and 25th of October.
Then to finish off my trip it’s back up North again to New York for a “colorspace for dummies” 1 day workshop at Abel Cine. This will cover gamma, log and color space for those struggling with the concept, whether that’s on an A7s, FS700, FS7 or any other camera that uses log gamma or has a wide colorspace.
Sony’s new PXW-FS7. First Impressions.
I was lucky enough to get a chance to go out and shoot with a pre-production PXW-FS7 in Amsterdam during IBC. Guess what? It makes some very nice pictures!
In case you’ve had your head in the sand the last couple of weeks the PXW-FS7 is a new super35mm camcorder from Sony. It uses the same sensor as the Sony PMW-F5 and a lot of the camera is, I am sure, shared with the F5. Even the menu’s are almost exactly the same. It can record 4K internally on XQD cards using Sony’s XAVC codec. When the cameras start shipping next month you will be able to record 3840×2160 UHD/QuadHD as well as HD. Next year there will be an update to add 4096×2160 at up to 60fps.
 Want to shoot slow motion? That’s no problem as the camera can go up to 180fps internally in HD and if you add an external raw recorder you can stretch that out to 240fps.
The XAVC codec options are great. You can choose between I frame for easy editing or long GoP which gives a smaller file size but needs more processing power to decode. The 10 bit 422 image quality is very similar in both cases, so choose which to use based on how much recording media you have and how powerful your edit machine is. If you still need the legacy HD XDCAM Mpeg codec then you have that too.
Extension Unit:
By adding the optional extension box to the rear of the camera you can even record ProRes HQ to the XQD cards (after a firmware update early next year). The extension box also adds the raw output needed to record raw to an external recorder such as The Odyssey 7Q or Sony R5 recorder. On top of that you also gain Timecode in and out plus genlock. To power all of this (and the camera) the extension box has a V-Mount battery plate on it’s rear. When not using the extension box the camera runs off BP-U type batteries, the same 12V batteries as used by an EX1 or PMW200 etc.

The FS7 has two different shooting modes. In custom mode the camera behaves pretty much like any other conventional camera where what you see in the viewfinder is what’s recorded on the cards. You can alter the cameras gamma curve, matrix and other settings, but basically what you see is what you get. The other mode is the CineEI mode (just like an F5 or F55) and in this mode the camera records using SGamut3.cine and S-Log3. The aim being to capture the maximum possible dynamic range and in this mode the cameras sensitivity is locked to it’s native ISO of 2000. As S-Log3 results in a very flat picture (that’s great for grading and post work) the camera includes the ability to add a range of Look Up Tables (LUT’s) to the viewfinder or HDSDI output. LUT’s help you better judge exposure and give a more pleasing image prior to grading. You can even generate your own LUT’s in software such as Resolve and load them in to the camera. For exposure assistance the camera has a range of tools including a waveform, vectorscope or histogram display as well as zebras.

Ergonomically the camera is very interesting. It has Sony’s E-Mount lens mount so you can use just about any lens you want simply by adding a lens adapter. Using a metabones or Commlite adapter you can use Canon EF lenses with ease. Likewise PL or Nikon lenses with the appropriate adapters.
Designed to sit on the front of your shoulder and supplied with a handgrip on an adjustable arm (attached via a standard Arri type rosette) the camera is easy to use. There are a couple of assignable buttons on the hand grip as well as a small joystick for navigating through the cameras menu system. A large zoom rocker will control any E-Mount zoom lenses used such as the new 28-135mm f4 lens and a further assignable dial wheel can be used to control the lenses aperture or other functions. The hand grip uses the LanC protcol so it should be possible to use other LanC devices with this camera.

The camera is a little front heavy as it sits on the front of your shoulder. When you add the extension box and a V-mount battery the balance is much better as the weight is now set much further back. With a 3rd party shoulder mount such as the new Vocas one or the dedicated Sony VCT-FS7 mount the camera can be turned into a true shoulder mount camera.
The LCD viewfinder is mounted on a thin arm that gives it forwards and backwards adjustment as well as up and down adjustment, but there is no left right adjustment.

Overall I think the viewfinder is the weakest part of this camera. The images in the VF are quite reasonable (its 940×560 resolution) but the mounting mechanism and loupe are not the best. Maybe this will be improved before the camera ships. I made a lot of use of one of the hand grip assignable buttons to provide focus magnification while shooting to ensure focus was spot on and it’s nice to have the focus mag function so easily accessible.
One issue I did find with the arm for the hand grip was that unless you fold it up out of the way you can’t slide the camera on and off a tripod. If you are using a base plate this is less of a problem but with a bare camera it’s a bit of a pain.

I found the operation of the camera almost identical to the PMW-F5. There are some differences however. The FS7 does not have a 2K center scan mode for the sensor. This is used on the F5/F55 to eliminate aliasing problems when shooting above 60fps where the 4K sensor is read out as a 2K sensor. On the F5/F55 if you don’t want to use the 2K center scan mode you can fit a special 2K low pass optical filter to eliminate aliasing above 60fps, but again this is not possible on the FS7.
Another thing the FS7 doesn’t have is the large side display of the F5 and F55. For conventional shooting this is not really a big deal. But if you are using the CineEI mode where you may be using LUT’s on different outputs not having this information clearly displayed is a bit of a nuisance. In fact during the shoot with the FS7 at one point I though I was shooting with a LUT when in fact I was not. The only way to be sure of how everything is set is to go into the cameras menu system.

But what about the image quality? Frankly it’s amazing! For the money the images this camera produces are remarkable. It is using the F5’s sensor and it does have 14 stops of dynamic range. S-log3 is a great gamma curve and the camera is very low noise, even at it’s native 2000 ISO. It was hard to tell as most of the shooting took place at night, but initially it doesn’t look like there is any difference between the quality of the footage from the FS7 and the PMW-F5. Great colours, low noise, high dynamic range with very pleasing roll off what more can you want? One area where there will be a difference is with raw. The PMW-F5 takes the Sony R5 directly docked on it’s back. The raw form the F5 is 16 bit while the raw from the FS7 is going to be recorded on an external recorder at only 12 bits. 12 bit linear raw is really pushing the limits of what is needed for linear raw. However we do already know that the 12 bit raw from Sony’s FS700 works well, so this should be no different.
Where this camera will be really good is when combined with the new 28-135mm f4 servo zoom lens. Typically par-focal lenses with this kind aperture and zoom ratio cost in excess of $30K. This lens will be around $2.7K. Being able to zoom in and out on a large sensor camera smoothly really increases the cameras flexibility making it much easier to use in run and gun type situations. The lens is never going to be an incredible performer at this price and when wide open I did find it a little soft, but for shear ease of use it’s really remarkable. The FS7 combined with this lens will be a killer combination and that’s why I have ordered one. It’s NOT replacing my F5, I love my F5 and I think that the F5 is a much better camera for drama or studio type shoots. But the FS7 will be very handy for fast and fluid productions. In addition, for the money this camera is an absolute bargain.
NextoDI to show new NVS25B Storage Bridge at IBC.
 NextoDI will be showing their new NVS-25 storage bridge at IBC. This is the next step in their range of portable backup devices for solid state media. The current devices like the NVS2825 are brilliant for backing up media such as SxS or P2 cards. But as 4K becomes common and file sizes increase there is a growing need for fast, simple to use devices that can backup large files to high capacity hard drives and SSD’s. The new NVX25 is modular in design and can take adapters for most media types including SxS, XQD, P2, Red, AXS etc.
The device has two internal drives and a 3rd drive can be connected to it by USB 3. It can make up to 3 copies (1 to each drive) at the same time extremely quickly. It will CRC check your copies and produce a log of what has been copied. There is a 5″ screen to control the unit as well as for viewing playback of your backed up media. It even has an HDMI port to connect it to a larger monitor.
Finally an affordable way to securely backup large 4K files and raw on location without needing a computer. Very exciting!
Sony A7s or AX100, perhaps the PXW-X70?

As an owner of both the A7s and AX100 and as someone that has shot with the PXW-X70, if I had to choose one which would it be? That’s tough because although they really are very different cameras they both have strengths that are nice to have. The A7s produces a prettier picture and can be used run and gun, with limitations. I use the kit 28-70mm f3.5-f5.6 and it works well, good auto focus, smooth aperture changes etc. BUT and it is a very big BUT you need a really good set of ND’s or a strong ND fader to use it outdoors due to the extreme sensitivity. Add to that the minimal 3x zoom and it’s pretty restrictive as to what you can shoot without switching lenses and fiddling around. Sure you can add something like the new Tamron 16-300mm f3.5-f6.3 but the autofocus tends to hunt a lot more, manual focus is fiddly and you still need to mess around with ND’s. I think you need to be a fairly competent cameraman and need to be very careful over lens choices etc to use the A7s for run and gun successfully. Plus don’t forget the cost of all the extra lenses, filters etc adds up and makes the kit bulkier.

The AX100 (or PXW-X70) on the other hand really is a grab and go camera. Easy to use, great zoom range, built in ND’s. It’s quick and easy to use and may get you shots that you will miss with the A7s. But the pictures are not as pretty, primarily they lack the dynamic range of the A7s. But they are very easy to use, so well suited to those that are full auto shooters or rely heavily on auto functions to keep life simple. The X70 has much better ergonomics than the AX100 but is a bit more expensive. Both are very compact packages and as you don’t need to buy extra lenses or filters work out substantially cheaper than an A7s kit with a set of lenses to cover the same focal lengths at reasonable apertures.
Anyway, if I had to give up one of mine (A7s or AX100), for me it would be the AX100 that would go. I would be prepared to sacrifice the ease of use of the AX100 for the better images from the A7s. But I normally shoot manually anyway. I’m used to swapping lenses, working with ND filters etc. If you not used to shooting manually then the AX100 may be the better choice. Great images are of course important, but the best camera to own is a camera you will use. It’s all very well having fancy pictures and the ability to swap lenses etc. But if fiddling around means you don’t use it very often, then there is no point in having it. You would be better off with a camera that you will be comfortable with, that you will use regularly.
Don’t Confuse a DIT with a Data Wrangler or Runner.
Bit of a rant here as one of the roles I perform on some shoots is that of DIT or Digital Imaging Technician.
What does a good DIT do? Well lots of things. One of the key roles of the DIT is to work with both the camera department and post production to ensure that the shoots proposed workflow will work. Some DIT’s may even oversee some parts of the post process, ensuring the footage is correctly handled all the way through the production chain. On set the DIT may be responsible for camera setup including any paint settings, gamma curve and gamut choices. The DIT will work with the DP to create LUT’s for use in the camera, on set as well as in post production. Then the DIT may (but often not) be responsible for gathering the media and rushes from the camera and copying it or backing it up. Next the DIT will look at the footage checking for issues, not just file corruption but any other technical aspects that may trip up post production, possibly apply a first pass grade on set so that the production team can get an idea of how the footage will end up looking.
A good DIT will have a sound technical knowledge of the way a video camera works, how to set it up, how to best handle the footage plus how to ensure the footage passes through the post production chain. It is not an easy role as a good DIT can make or break a production.
But often the term DIT is used to refer to a person tasked with copying footage from the camera. This role is more normally referred to as “Data Wrangler”. A good Data Wrangler will manage the backup of the rushes from the camera. All backups will have their data integrity checked and log sheets with checksums and details of the contents of the files will be produced. As footage is passed from the shoot to post the data wrangler should keep a log of who has received what and track all copies of the footage. Sometimes a Data Wrangler will also perform some roles similar to a DIT such as producing footage with a first pass grade applied or viewing copies of footage. The role of the Data Wrangler is extremely important. But a Data Wrangler will not normally be asked to produce LUT’s, setup a camera or oversea any part of the post production process.
Finally the term DIT gets most abused when it is used to refer to a runner or other production assistant who is simply tasked with copying the footage from the camera to a hard drive or other backup. Sadly this incredibly important job is often given to the least skilled or cheapest person on the set. It’s often perceived as an easy job that anyone can do. But it really needs to be done with great care, lots of checks followed by lots more checks because a mistake at this stage could put the entire production at risk. Checksums should be used, log sheets made and you want to use a reliable person that won’t be distracted and will treat this highly responsible role with the respect it deserves. Not use some spotty faced kid that spends his time on facebook waiting for the copies to finish when he could be playing back and checking clips for problems.
So, if I can hack an F5 for 4K, can I also get the F55’s color gamut?
So, we have seen that it is possible to trick an F5 into thinking its an F55 by altering an all file from the F5 and adding some F55 4K settings. This enables 4K internal recording and 4K output over HDMI on the F5. Internal 4K is one of the key differences between the lower cost F5 and the much more expensive F55. Another major difference is that the F55 has a global shutter so no CMOS image skew or other rolling shutter artefacts and the F55 has a larger colour gamut allowing better colour rendition and capture.
A question that has been asked is: Well if we can get 4K, can we also enable the larger colour gamut? One thing we do know is that the sensor used in the F55 is different to the sensor in the F5 as the sensor is replaced if you upgrade your F5 to an F55.
A cameras gamut is determined more by the sensors colour filters than the recording gamut. The recording gamut is like a bucket, the sensor a scoop. If the scoop isn’t big enough you won’t fill the bucket.
The color filters on the F55 are very different to those in the F5, so the F55 can capture a much greater gamut than the F5.
If you think about it, if you hold a red gel up infront of your eyes you will only see an extremely narrow colour gamut, just a single narrow part of the red spectrum. Imagine if you have a red, green and blue filter, you will now see a bit of red, a bit of green and a bit of blue. But you might only see a very narrow part of the full blue spectrum or a very narrow part of red or of green, you won’t see the full spectrum or a large gamut, just narrow slithers of it. The trick is to make filters that are wide enough and with the righ charcteristics to pass all of the R, G and B spectrum but sharply cut off unwanted colors, infra-red or UV at the exactly the right point. This is very hard to do. So the quality and accuracy of the color filters determines both the gamut and the precision of the colors that the camera can capture.
In practice it can be hard to see this difference as none of the monitors available today can show the full gamut that the F55 can capture so you can’t directly see it. But it does make a difference in post as the F55 is able to separate subtle hues more accurately and capture an extended tonal range, for example very subtle differences in skin tones that may be lost on a camera with poorer filters. This means when grading you are able to draw more tonal information out of the image when you transform the color space in to Rec 709 or DCI-P3 and it results in a more natural looking image.
The F5’s sensor gamut is probably somewhere around the size of DCI P3, maybe a bit bigger, but it’s clearly not as big as the F55’s. In addition the colour precision is not as great so some subtle tones are lost. It’s not a massive difference and the F5 does a great job. It’s not something that can be changed with software, it’s all down to the sensor hardware. The F5 just can’t fill the S-Gamut recording bucket so by using S-Gamut your wasting a lot of data. By using a smaller recording gamut like S-Gamut3.cine you can more effectively fill the bucket and make better use of the data available to you.
Listen Up, XDCAM USERS!
Hi Guys and Gals.
So, IBC is just a few days away. I’m packing my bags, ready to go and I’m really rather excited. I’m under NDA so can’t reveal anything and maybe even writing this post will get me in trouble.
Unless you have completely had your head in the sand (or have been working hard) you will have probably seen the leaked picture of a new XAVC badged camcorder that has become known as the FS700 MK2 by many. You might also have seen a teaser video from Sony featuring several well known DP’s and bloggers talking about a new camera, if you haven’t click here. It doesn’t tell you much, but talks about what some people would like in a new camera, with the tag line “Be first to discover true freedom of expression”. So I don’t think I’m revealing any secrets by saying that it looks like there will be a major camera launch at IBC and it’s one that’s going to rock the boat a bit (well quite a LOT actually).
In recent months we have seen Sony release a new line of PXW XDCAM cameras that have Sony’s new and really very good XAVC codec. Yes, it’s a little confusing but these are still XDCAM cameras…. XDCAM meaning digital recording on to SxS or Optical Disc. So far we have seen the diminutive PXW-X70, the mid range 1/3″ PXW-X160 and X180 as well as the update to the PMW-300 to add XAVC. So IBC will be a great time to see the full range of XAVC cameras and I’m sure we can expect more news about XDCAM and XAVC in general.
There has also been a lot of commotion around the “hack” that allows owners of the PMW-F5 to get internal 4K recording. So far Sony have only responded to this with a brief “we do not approve and it may invalidate your warranty” type statement. I’m hoping we will get clarification from Sony over what they will do about this in future firmware updates. Will they leave it (doubtful), block it (likely) or just give F5 owners a 4K upgrade path (the BIG unknown) other than getting the entire camera upgraded to an F55. Again I’m sure we will get lots of news on the development of the PMW-F5 and F55 cameras.
I’ll be there at the show helping out on the Sony booth (no, I am NOT a Sony employee. I just get asked to work the booth to share my practical experience with the cameras). So I won’t get a lot of time to reveal all the secrets when they are announced here on the blog, but if you keep an eye on my twitter feed ( @stormguy ) I’ll try to tweet the news as fast as I can. The Sony press event is on Friday morning (12th Sept) so you can expect to see a flood of very exciting news immediately after that.
From Script to Screen. SEVA Fest 2014 film makers festival, South East Virginia.
I’m really please to be involved with the Mid-Atlantic Conference for film professionals which will be held in SouthEast VirginiA. . I’ll be running workshops along side Bruce Logan, the man that shot the blowing up the Death Star in the original Star Wars movie, was a cameraman on Tron, Batman Forever and many other films. Bruce, as well as bing a very talented DP is also a script writer, producer, director and colourist. Actor and Director Michael Copon, known for his roles in Power Ranges and Scorpion King – Rise of a Warrior will also being running sessions during the course of the 3 day event.
SEVA is open to anyone with a desire to network with other film professionals, discover new talent, and to better learn the creative technologies, techniques, and tools of the industry.
The inaugural SEVA Fest will be held at the Chesapeake Conference Center from October 17 through October 19. It will feature workshops and panel discussions hosted by Bruce Logan, Alister Chapman, and Michael Copon with the emphasis of storytelling using today’s modern technology. It will also feature a short film competition, to be held at the Roper Theater in Norfolk.
Workshops will include: Script to Screen with Bruce Logan, Painting and setting up digital cameras, by me. Acting and Producing with Michael Copon. There will be lots to learn, a great chance to meet some amazing people and hopefully a lot of fun.
There’s student and early bird pricing so jump on over to the SEVA website for full details: http://www.sevafest.com/