Here’s some sample footage from the Sony FDR-X3000 4K Action Cam with built in BOSS (Balanced Optical Steady Shot), a kind of gimbal inside the body of this small POV camera. If you have watched all of my video blog on this camera you will have already seen the footage.
Category Archives: cameras
Sony FDR-X3000 4K Action Cam – built in gimbal.
One of the cameras I used a lot in Norway is the new Sony FDR-X3000 action cam. What’s different about this POV camera is that the lens and sensor are actually mounted in an internal miniaturised gimbal. This really does work and helps stabilise the image.
There is also a tiny bluetooth monitor that you can wear on your wrist to view the pictures and control the camera. The image quality you get from these tiny cameras really is quite amazing. Take a look at the video to find out more and see some sample footage.
PXW-FS5 Native ISO’s
THIS DOCUMENT IS OUT OF DATE NEW FIRMWARE HAS CHANGED THE CAMERAS ISO”S.
This is as much for my benefit as yours as I can never remember what the native ISO (0dB) is for each of the gamma curves in the FS5.
Standard 1000 ISO
Still 800 ISO
Cinegamma 1 800 ISO
Cinegamma 2 640 ISO
Cinegamma 3 1000 ISO
Cinegamma 4 1000 ISO
ITU709 1000 ISO
ITU709(800) 3200 ISO
S-Log2 3200 ISO
S-Log3 3200 ISO
Using dB and setting it to 0dB really is so much easier with this camera!
Not all raw is created equal. Log may be better
This keeps cropping up time and time again.
Unfortunately every now and again a new term or buzzword comes along that gets taken as a holy grail term. Two that come to mind right now are log and raw. Neither log, nor raw, are magic bullet solutions that guarantee the best performance. Used incorrectly or inappropriately both can result in inferior results. In addition there are many flavours of log and raw each with very different performance ranges.
A particular point in case is the 12 bit raw available from several of Sony’s mid range large sensor cameras, the FS700, FS7 and FS5.
Raw can be either log or linear. This particular flavour of raw is encoded using linear data. If it is linear then each successively brighter stop of exposure should be recorded with twice as many code values or shades as the previous stop. This accurately replicates the change in the light in the scene you are shooting. If you make the scene twice as bright, you need to record it with twice as much data. Every time you go up a stop in exposure you are doubling the light in the scene. 12 bit linear raw is actually very rare, especially from a camera with a high dynamic range. To my knowledge, Sony are the only company that offer 14 stops of dynamic range using 12 bit linear data.
There’s actually a very good reason for this: Strictly speaking, it’s impossible! Here’s why: For each stop we go up in exposure we need twice as many code values. With 12 bit data there are a maximum of 4096 code values, this is not enough to record 14 stops.
If stop 1 uses 1 code value, stop 2 will use 2, stop 3 will use 4, stop 4 will use 8 and so on.
STOP: CODE VALUES: TOTAL CODE VALUES REQUIRED.
+1 1 1
+2 2 3
+3 4 8
+4 8 16
+5 16 32
+6 32 64
+7 64 128
+8 128 256 Middle Grey
+9 256 512
+10 512 1,024
+11 1,024 2,048
+12 2,048 4,096
+13 4,096 8,192
+14 8,192 16,384
As you can see from the above if we only have 12 bit data and as a result 4096 code values to play with, we can only record an absolute maximum of 12 stops of dynamic range using linear data. To get even 12 stops we must record the first couple of stops with an extremely small amount of tonal information. This is why most 14 stop raw cameras use 16 bit data for linear or use log encoded raw data for 12 bit, where each stop above middle grey (around stop +8) is recorded with the same amount of data.
So how are Sony doing it on the FS5, FS7 etc? I suspect (I’m pretty damn certain in fact) that Sony use something called floating point math. In essence what they do is take the linear data coming off the sensor and round the values recorded to the nearest 4 or 8. So, stop +14 is now only recorded with 2,048 values, stop +13 with 512 values etc. This is fine for the brighter stops where there are hundreds or even thousands of values, it has no significant impact on the brighter parts of the final image. But in the darker parts of the image it does have an impact as for example stop +5 which starts off with 16 values ends up only being recorded with 4 values and each stop below this only has 1 or two discreet levels. This results in blocky and often noisy looking shadow areas – a common complaint with 12 bit linear raw. I don’t know for a fact that this is what they are doing. But if you look at what they need to do, the options available and you look at the end results for 12 bit raw, this certainly appears to be the case.
Meanwhile a camera like the FS7 which can record 10 bit log will retain the full data range in the shadows because if you use log encoding, the brighter stops are each recorded with the same amount of data. With S-Log2 and 10 bit XAVC-I the FS7 uses approx 650 code values to record the 6 brightest stops in it’s capture range reserving approx 250 code values for the 8 darkest stops. Compare this to the linear example above and in fact what you will see is that 10 bit S-Log2 has as much data as you would expect to find in a straight 16 bit linear recording below middle grey (S-Log 3 actually reserves slightly more data for the shadows). BUT that’s for 16 bit. Sony’s 12 bit raw is squeezing 14 stops into what should be an impossibly small number of code values, so in practice what I have found is that 10 bit S-log has noticeably more data in the shadows than 12 bit raw.
In the highlights 12 bit linear raw will have more data than 10 bit S-log2 and S-Log3 and this is borne out in practice where a brightly exposed raw image will give amazing results with beautiful highlights and mid range. But if your 12 bit raw is dark or underexposed it is not going to perform as well as you might expect. For dark and low key scenes 10 bit S-Log is most likely going to give a noticeably better image. (Note: 8 bit S-log2/3 as you would have from an FS5 in UHD only has a quarter of the data that 10 bit has. The FS5 records the first 8 stops in 8 bit S-log 2 with approx 64 code values, S-Log3 is only marginally better at approx 80 code values. 12 bit linear outperforms 8 bit log across the entire range).
Sony’s F5 and F55 cameras record to the R5 and R7 recorders using 16 bit linear data. 16 bit data is enough for 14 stops. But I believe that Sony still use floating point math for 16 bit recording. This time instead of using the floating point math to make room for an otherwise impossible dynamic range they use it to take a little bit of data from the brightest stop to give extra code values in the shadows. When you have 16,384 code values to play with you can afford to do that. This then adds a lot of extra tonal values and shades to the shadows compared to 10 bit log and as a result 16 bit linear raw will outperform 10 bit log across the entire exposure range by a fairly large margin.
So there you have it. I know it’s hugely confusing sometimes. Not all types of raw are created equal. It’s really important to understand this stuff if you’re buying a camera. Just because it has raw it doesn’t necessarily mean an automatic improvement in image quality in every shooting situation. Log can be just as good or possibly even better in some situations, raw better in others. There are reasons why cameras like the F5/R5 cost more than a FS5/Shogun/Odyssey.
Camrade CB-HD camera bag.
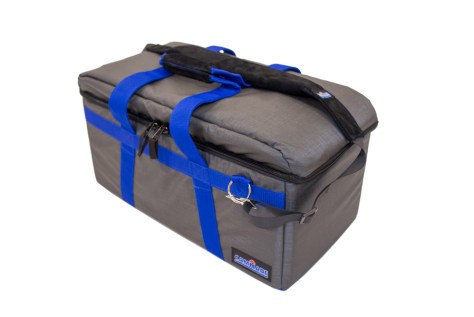 I’ve been using Camrade bags for years. They are tough, protect my gear well without being heavy and clunky like pelicases and other hard shell cases. In addition they don’t scream “expensive equipment here”. They just look like large holdalls. One of the best features is the use of dividers, pads and inserts that are attached with velcro that allow you to reconfigure the bags for different applications.

One thing I often do is carry my camera in a standard carry-on bag when I’m flying. Meanwhile my tripod goes in the camera bag in the hold. When I get to my destination the tripod comes out of the camera bag, I re-arrange the dividers and the camera then lives in the camera bag until I need to fly again. This is so easy to do with the Camrade bags. Although the bags look like soft bags they are extremely ridged. The sides, top and bottom have hard inserts in them that can withstand very large loads, they are strong enough for you to sit on them without collapsing. The bags have strong carry straps and come with a high quality, removable camera strap. There are mesh pockets on the outside as well as on the inside of the lid for those little accessories and bits and pieces that would otherwise get lost. Another bonus is a 90% white card for white balance and use as an exposure reference.
Here’s a video of the medium size Camrade CB-HD bag, designed to take the PXW-FS7 or other similar digital cinema cameras. It’s a bit taller than some of their other bags so perfect for cameras rigged up with base plates and matte boxes.
What is XOCN? Why is it so good, why do we need it?
This time last year I was just starting to earn about a new codec from Sony called XOCN (eXtended Original Camera Negative). XOCN is currently only available with the Sony F5/F55 and the new AXS-R7 raw recorder. Sony’s original R5 raw recorder takes 16 bit sensor data and applies a very mild amount of compression before recording the sensor data as linear raw. I have never seen any compression artefacts when using the 16 bit linear raw and it really is an amazing format to work with. So much so that I will always use it whenever possible.
But now as well as 16 bit linear raw the R7 can record 16 bit linear XOCN. Now, I’ll be completely honest here, I’m really not sure what the difference is between raw and XOCN. As far as I can tell XOCN is very, very similar to raw but sufficiently different to raw to avoid infringing on patents held by other manufacturers for compressed raw. XOCN is more highly compressed than Sony’s raw, but in every test I’ve done I have found it hard to spot any compression problems or any significant difference between XOCN and the original 3:1 raw.
So, I hear you ask…. “If it’s really that good what don’t we just do away with XAVC and use XOCN?” Well that is a good question. It all depends on processing power. XAVC is a traditional codec so inside the codec is a normal video image, so the only thing a computer has to do to play it back is uncompress the codec. XOCN is a compressed wrapper that contains sensor data, in order to view the image the computer has to uncompress the data and then it has to construct the image from the data. So you need a really good graphics card in a decent computer to work with XOCN. But if you do have a decent edit or grading workstation you should find XOCN straight forward to work with, it doesn’t require specialist cards to accelerate the decoding as Red raw does.
The key benefit that XOCN brings over traditional video is that it is 16 bit. 10 bit video is pretty good. In a 10 bit video you have almost 1000 tonal values, not bad when you consider that we have been using 8 bit for decades with only 235 shades. But 16 bit brings the potential for a whopping great 65,535 shades. This starts to make a big difference when you are extensively manipulating the image in post production. Any of you that are in to photography will know that you can push and pull a 16 bit raw photograph far, far further than an 8 bit jpeg. 16 bit video is no different.
But what’s really amazing about XOCN is you get almost all the benefits of linear raw but in a file size smaller than the same resolution 10 bit ProResHQ. If you use XOCN-LT the files are roughly half the size of ProResHQ. This means your media lasts a sensible amount of time and backups, transfers and archiving are all much easier, much faster than with uncompressed raw. Sony’s 3:1 compressed raw from the R5 has always been pretty easy to deal with. XOCN is even easier. Using XOCN-LT you can squeeze well over 2 hours of 16bit 4K on to a 512GB AXS card! In fact the file sizes are only marginally larger than XAVC class 480.

The reduction in data rates becomes really significant if you shoot at high frame rates. As 50p and 60p productions become more common XOCN allows production companies to shoot 60fps with the benefits of 16 bit data but with files sizes barely any bigger than 24fps ProResHQ. If you have a Sony PMW-F55 you can shoot at 120fps in 4K using XOCN and the files are twice as big as 24fps raw.
For further information on XOCN please take a look at this page from Sony, it’s very informative and has a very good example of why 16 bit data is important, especially if you are shooting for HDR.
Norway and the Northern Lights Video Blogs.
I produced 3 video blogs during my trip to Norway to shoot the northern lights. These blogs are now on youtube for you to watch. In the first video I take a look at some of the equipment that I took to Norway for the trip. I also look at how I like to lay everything out before I pack it and give some insight into some of the accessories that I like to take.
The second video looks back at the first week of the trip. You will see examples of the weather we had to deal with as well as some information on how some of the time lapse sequences of the aurora were shot.
The third video is about shooting a sunrise with 3 different cameras. The Sony a6300, FDR-AX3000 Action Cam and the PXW-FS5.
Packing for the shoot.
At the bottom of the page you’ll find a quick cut of a small selection of some of the Aurora footage shot on this trip.
Review of the first week in Norway.
Shooting a sunrise with 3 different cameras.
Quick sample of some of the Aurora footage:
Norway here I come!
Today I leave for my annual Northern Lights expeditions. So, I am off to the very north of Norway to shoot in the cold, long nights of the arctic winter. Currently sunrise is at 11am and sunset at about 12:30. You get golden hour all day and then a very long night (fully dark from about 3:30pm). If the weather gods are kind we will get clear skies and lots of opportunities to photograph and video the Northern Lights.
Over the next 3 weeks I will be releasing a number of video blogs about this adventure. They won’t be every day as I won’t always have internet access and the picture quality of the blogs may not be the best. But what I hope to cover are some of the practical aspects of a project like this. The first blog is about the equipment I’m taking, why I’ve chosen it and how I like to check what I’m packing.
There will be videos on shooting time-lapse, tips for shooting in the cold and more about the gear I’m using.
Here’s the first video: Packing.
Important Firmware Update For PXW-FS7. Please Update.
Sony have released a firmware update for the PXW-FS7 that includes a fix for a problem that can in very rare situations cause the footage to be over exposed. There have been very few reported cases of the problem and it only occurs in the CineEI mode after a camera re-start. The new firmware update has been released to prevent it happening. It’s recommended that you update you camera to this new version, version 4.1.
You can download it from here: https://www.sony.co.uk/pro/support/software/SET_BPE-SS-1238/70
The great S-Log2 or S-Log3 debate.
I’ve written about this many times before, but still it comes up again and again. Which is better? Which should I use? I hear all kinds of crazy comments and a lot of incorrect information, so first of all lets dispel a few myths:
S-Log2 captures more dynamic range than S-Log3, it goes to a higher level on the waveform, S-Log3 clips the highlights sooner.
On most of Sony’s current cameras S-Log2 and S-Log3 both currently record exactly the same dynamic range as this is limited by the sensors that Sony are using. The S-log3 curve could be used in a future camera to capture up to 16 stops and in fact the new Venice camera records over 15 stops. But as all of Sony’s other cameras sensors can only see 14 stops and the S-Log3 curve is designed to go beyond 14 stops, stop No. 14 is not recorded all the way at the top of the recording range. S-Log2 is a 14 stop maximum curve, so the peak level is recorded right at the top of the recording range. There is no space held in reserve for anything beyond 14 stops.
In Sonys current camera range (other than Venice) the limit is 14 stops whether it’s S-Log2 or S-Log3. The chart that Sony provide showing both S-Log2 and S-Log3 is a little confusing as it shows the entire gamma curve rather than what the camera can actually “see”. In their current implementations both curves stop at +6 stops over middle grey, both capture the same dynamic range, there is no difference.
S-Log2 is brighter than S-Log3 so it must be capturing highlights better.
No, not really, see above. Playback and on screen brightness comes from the levels chosen to record something at and is dependant on the shape and range of the gamma curve. But the actual captured range is dependant on what the sensor can cope with. As we are not changing the sensor, the captured dynamic range, brightness range and shadow range does not change between S-Log2 and S-log3, both of which take the entire sensor range (they just store that same range using slightly different levels or code values). After applying a LUT or other conversion to your normal viewing gamma both S-Log2 and S-log3 will have the same brightness, same highlight and same shadow range.
S-Log3 has noisy shadows.
No, not really. Shadows appear noisy with S-Log3 as the shadow part of the curve is stored using higher code values compared to S-Log2. So when you view S-Log3 uncorrected the shadows are raised and stretched on your conventional monitor and this gives the impression of a noisy picture. In reality once you restore the levels to normal there is no additional noise. See this article for a full explanation.

S-Log3 is newer than S-Log2 so it must be better.
Newer, perhaps not. Better, no not really. S-Log3 is based on the industry standard Cineon log gamma curve. This curve was developed in the 1980’s to allow the digitising of film using 10 bit data. So S-Log3 matches a curve designed to work with negative film and is capable of storing more than the 14 stops that most of the current cameras sensors can see. In effect it is an old log gamma curve. As it is a curve designed for more than 14 stops, when used in a 14 stop camera some of the available recording data is empty and wasted.
S-Log2 was specifically designed by Sony to work with an electronic sensor with 14 stops of dynamic range and is optimised to match the performance characteristics of video sensors. By using a 14 stop curve with a 14 stop camera almost every bit of available data is utilised, there is no wastage. So S-Log2 makes better use of the data you have available to you,
BUT THERE ARE SOME OTHER FACTORS WE NEED TO CONSIDER.
S-Log2 and S-Gamut:
As well as the gamma curve we also have different Gamuts or color ranges. S-Log2 was originally designed for the F65 camera. The F65 sensor can capture a huge color range beyond the range that most conventional video sensors can see. So as well as S-Log2 Sony introduced S-Gamut which was matched to the very wide color range of the F65 sensor. S-Log2 is designed to be used with S-Gamut. But many of the cameras we use, like the FS7, F5, FS5 cannot see this color range (Sony’s F55 and Venice can). In addition this very large color range can be a little tricky to deal with in post production. Add to this the fact that S-Log2 is quite different to the quite common Cineon gamma curve and behaves differently to other curves in post. The end result was that in the early days of S-Log2 there were a number of complaints and comments that Sony’s S-log2 material was difficult to grade.
S-Log3 and S-Gamut3.
Because some people were struggling a bit with S-Gamut and S-Log2 in post production (Resolve and many of the other tools we have today were not as well developed 4 years ago), Sony introduced S-Gamut3 and S-log3 as well as a further Gamut called S–Gamut3.cine. S-Log3 was based on Cineon as that’s what people were familiar with. Arri’s Log-C is also based on Cineon as are many other log curves. This makes it a more “familiar” grading experience for many colorists. In addition Sony created a modified version of the super large S-Gamut to make it easier to grade. S-Gamut3 is just as big as S-Gamut but some tweaks inside make it easier to grade (fewer color shifts). At the same time Sony realised that most users were producing content for TV, the web or digital cinema that had little use for the huge color range of S-Gamut/S-Gamut3. So S-Gamut3.cine was developed as a smaller, more manageable version of S-Gamut3 and it incorporated a few tweaks to the color science to provide colors closer to those used by other manufacturers. S-Gamut3.cine is also a better match for cameras with sensors that cannot see the full S-Gamut range (like the FS5, FS7, F5, A7).
The end result is that in general most people prefer or find it easier to grade S-Log3/S-Gamut3.cine material than S-Log2/S-Gamut. Plus you can often use LUT’s designed for Log-C or Cineon with S-log3 material (this isn’t optimum, but it can work).

Getting the data from camera to post.
In terms of getting the data from your cameras sensor in to post production S-Log2 is the better choice (unless you have a Sony Venice which only has S-Log3). S-Log2 is optimised for the way an electronic sensor works. S-log3 is essentially a curve designed for negative film applications, not video and no matter how you look at it, these are electronic video cameras. However, if you are recording 10 bit or greater you have a lot of data whichever curve you use, so in practice it will be rare to see any difference in the final result.
So use the curve you find easiest to work with. It is true that S-Log 3 allocates a little more data to the shadows and less to the highlights than S-Log2, but don’t confuse data and code values with more range. S-Log3 has a few extra code values in it’s darkest stops, S-log2 has a few extra in the bright stops, but the dynamic range, highlight and shadow handling is governed by the sensor not the gamma curve. Overall S-Log3 has fewer code values than S-Log2, S-Log2 makes better use of the data available, but with 10 bit this really isn’t going to make a huge difference.
8 Bit Recording.
But if you are only recording with an 8 bit codec you are already at a disadvantage. When recording 8 bit you really need to maximise the way what little data you have is used. For that reason I will always recommend that S-Log2 is used when recording 8 bit on a camera like the FS5 in UHD or A7s or similar (FS5 is 10 bit in HD). By using S-Log2 you are using as many of the limited code values available as you can. This doesn’t mean you can’t use S-log3, it just wouldn’t be my choice.
The end result should be the same.
At the end of the day, if you were to use matching LUTs, S-log2 and S-log3 material should look more or less exactly the same after grading or application of the LUT, no matter what the scene you are shooting. If they do look significantly different then you are doing something wrong. So your choice of curve, other than for 8 bit recordings will most likely come down to ease of use rather than anything else.
If your camera doesn’t have LUT’s then S-Log2 can be easier to work with as it is more contrasty. This makes it a bit easier to focus and also makes it easier to gauge exposure. If your camera has LUT’s and you use them, then you may decide to use S-Log3 simply because you should find it a little easier to work with in post. Either way both curves capture the same range of picture information and both should give more or less the same end result.
There may be some very, very subtle differences due to the small differences in data distribution, but often these will be hard to really see in the final image.