With the new FX6 making use of SD cards to record higher bit rate codecs the number of gigabytes of SD card media that many user will will be getting through is going to be pretty high. The more gigabytes of memory that you use, the more the chance of coming across a duff memory cell somewhere on your media.
Normally solid state media will avoid using any defective memory areas. As a card ages and is used more, more cells will become defective and the card will identify these and it should avoid them next time. This is all normal, until eventually the memory cell failure rate gets too high and the card becomes unusable – typically after hundreds or even thousands of cycles.
However – the card needs to discover where any less than perfect memory cells are and there is a chance that some of the these duff cells could remain undiscovered in a card that’s never been completely filled before. I very much doubt that every SD card sold is tested to its full capacity, the vast volume of cards made and time involved makes this unlikely.
For this reason I recommend that you consider testing any new SD cards using software such as H2Testw for windows machines or SDSpeed for Mac’s. However be warned to fully test a large card can take a very, very long time.
As an alternative you could simply place the card in the camera and record on it until its full. Use the highest frame rate and largest codec the card will support to fill the card as quickly as possible. I would break the recording up into a few chunks. Once the recording has finished check for corruption by playing the clips back using Catalyst Browse or your chosen edit software.
This may seem like a lot of extra work, but I think it’s worth it for piece of mind before you use your new media on an important job.
Category Archives: Technology
Atomos Adds Raw Over SDI For The Ninja V via the AtomX.
I know this is something A LOT of people have been asking for. For a long time it has always seemed odd that only the Shogun 7 was capable of recording raw from the FX9 and then the FX6 while the the little Ninja V could record almost exactly the same raw form the A7SIII.
Well the engineers at Atomos have finally figured out how to pass raw via the AtomX SDI adapter to the Ninja V. The big benefit of course being the compact size of the Ninja V.
There are a couple of ways of getting the kit you need to do this.
If you already have a Ninja V (they are GREAT little monitor recorders, I’ve taken mine all over the world, from the arctic to Arabian deserts) you simply need to buy an AtomX SDI adapter and once you have that buy a raw licence from the Atomos website for $99.00.
If you don’t have the Ninja V then you can buy a bundle called the “Pro Kit” that includes everything you need including a Ninja V with the raw licence pre-installed, The AtomX SDI adapter, a D-Tap power adapter cable, a mains power supply and a sun hood. The cost of this kit will be around $950 USD or £850 GBP + tax, which is a great price.
On top of that you will need to buy suitable fast SSD’s.
Like the Shogun 7 the Ninja V can’t record the 16 bit raw from the FX6 or FX9 directly, so Atomos take the 16 bit linear raw and convert it using a visually lossless process to 12 bit log raw. 12 bit log raw is a really nice raw format and the ProResRaw codec helps keep the files sizes nice and manageable.
This is a really great solution for recording raw from the FX6 and FX9. Plus if you already have an A7SIII you can use the Ninja V to record via HDMI from that too.
Here’s the press release from Atomos:
|
|
|
|
|
|
|
|
|
|
|
|
|
|
|
|
|
|
|
|
|
|
|
|
|
|
|
|
|
|
|
Accsoon Cineeye 2S Wireless Video Link with Streaming Function
So there are now quite a lot of these devices appearing on the market. I have a Hollyland Mars 400 kit and it works really well. But this one caught my eye because it includes the ability to stream to platforms such as YouTube using RTMP.
|
Accsoon releases Cineeye 2S super-affordable 5GHz wireless transmitter with SDI |
Wireless multi-device iOS and Android monitoring for SDI cameras at an unbelievably low price point has arrived with the new Accsoon Cineeye 2S. The SDI and HDMI camera-top 5GHz transmitter is perfect for the new normal of socially distanced filmmaking at every level of production. |
View a camera signal remotely on up to 4 iOS or Android devices at a range of up to 150m (approx. 500ft) – perfect for directors, producers, clients and anybody else that needs to see the image live on set. Once connected to your smartphone the Cineeye 2S can even stream to audiences or remote clients using Youtube and other content delivery networks via RTMP. |
![]() |
Strong, stable, low latency 5GHz transmission |
The Cineeye 2S can accept and transmit a 1080P video signal at up to 60fps from practically any modern mirrorless, cinema or professional camera. Signal strength, stability, and an average latency of less than 60ms mark it out as superior to other similarly priced systems. |
![]() |
At startup it uses automatic frequency selection to select the cleanest channel from up to 20 available. By choosing the frequency with least resistance it will be less prone to signal interference. If the user wishes they can override this with their own selection. |
The Cineeye 2S also streams the embedded audio accepting 44.1KHz/48KHz 16bit/24bit inputs which it then transports using a low compression codec for nearly lossless sound monitoring. |
![]() |
Transform your smart device into a monitor with LUTs |
The Cineeye 2S uses the free Accsoon Go app for iOS and Android to turn almost any modern iOS or Android phone or tablet into a fully featured monitor. It has advanced features like pinch to zoom, user selectable LUTs, peaking, false color, waveform, histogram and blue only display. The interface allows users to rapidly switch between setup menus and a totally clean uncluttered view of the image. |
![]() |
A user’s own custom LUTs or CDL can be loaded to preview on the iOS or Android device screen. Alternatively there are multiple presets for popular camera Log types that can also be selected. Users can display masks so that different aspect ratios can be previewed. There is also support for anamorphic lenses with 1.25x, 1.33x, 1.5x, 1.78x and 2x de-squeeze options. |
![]() |
Control your camera |
The app also allows users to send Rec/Stop commands to a range of popular cameras. Using the appropriate accessory cable you can trigger Sony A7/A9 series, Canon EOS R/5D IV, Panasonic GH5/GH5S/S1H, Nikon Z6/Z7, Fuji X-T3 and others. |
Rugged fanless design |
The Cineeye 2S has a striking modern industrial design with all metal construction. Importantly it is fanless and so runs completely silently. Integrated twin antennas fold into the body for easy transport and storage and it has compact dimensions of just 108mm×68.5mm×30mm. Weighing in at only 213g without battery it is easy to attach to cameras of any size. A 1/4 20 thread on the base of the unit features additional ARRI style anti-rotation holes that offer extra security when mounting using an appropriate arm or shoe mount. |
![]() |
Multiple power options and amazing battery life |
The Cineeye 2S has a super long battery life with up to 14 hours of runtime off a single NP-F970 battery. Alternatively it can be powered via DC barrel connector with a wide ranging input of 7.4-16.8V which is perfect for use on rigs where a single battery is used to power all accessories. If the two options are used in combination the battery can even be hot swapped without having to power down the unit. |
![]() |
Easy setup |
Setup is straightforward with easy menu-driven options for channel selection and transmission settings. A clear 1.3 inch OLED display shows the status of the Cineeye 2S at all times. Simple push buttons on the facia allow users to make rapid adjustments and settings can also be controlled with ease from the Accssoon Go app. |
Leading the way in 5GHz wireless |
The Cineeye 2S builds on the success of Accsoon’s previous HDMI-only Cineeye products and demonstrates the brand’s commitment to professional users by bringing them genuinely useful wireless features at a hitherto unthinkable price point. |
As well as film and TV work the Cineeye 2S has many other uses. It will allow for the creation of simple wireless streaming setups in education, sports, house of worship and countless other applications where a high quality mobile camera feed is required. |
The Cineeye 2S is available immediately from authorised dealers with a MSRP of $329 US/ 329 Euro (VAT included)/ 239 GBP (Tax not included). |
Product specification: |
Video input: HDMI+SDI |
Video formats supported: HDMI :1080p 23.98/24/25/29.97/30/50/59.94/60fps 1080i 59.94/60fps 720p 50/59.94/60fps 480p 59.94/60fps. SDI: 1080p 23.98/24/25/29.97/30/50/59.94/60fps |
Audio:44.1KHz/48KHz 16bit/24bit PCM?Via HDMI? |
Camera Control: Yes, |
Latency?<60ms?iOS system? |
OLED?1.3 inch OLED |
Firmware Update?Yes, via App |
Antenna?2 antenna |
Channel?Auto/Manual, 20 channels (dependent on local RF laws) |
Transmission Power?17~20dBm |
Range?150 meters?open sight, 1 transmitter to 1 phone? |
Power Supply?Sony type NP-F550, NP-F750, NP-F970 or DC?7.4?16.8V) Input. |
Power Consumption?4.0 Watt (Typical) |
Mounting Hole?1/4‘’ with ARRI style locating hole pattern |
Operating Temp?0?45 deg-C |
Dimensions?108mm×68.5mm×30mm |
Weight?213g |
About Accsoon: |
Focus, Listening and Innovation are at Accsoon’s core. Founded by a group of passionate and innovative filmmakers, designers and engineers, the company is committed to designing and producing the most innovative high-performance video transmission products for broadcast, cinema and imaging applications. Web: www.accsoon.com |
Xperia Pro – Is this the phone all video professionals should Own?

A dramatic headline perhaps, but once I start to look at what the Xperia Pro can do, I can’t help but say – I want one! The Xperia Pro is so much more than just a phone for making calls or watching YouTube videos.
The Xperia Pro shares many features of Sony’s flagship Xperia 1 II and adds an HDMI input.
HDMI IN. Yes, that’s right – it has a 4K/HD HDMI input. So you can plug your camera into it and use it as an HDMI monitor, plus its HDR so you have a small pocket sized HDMI monitor. When I travel (travel – hopefully that will happen again) to remote locations I often don’t take a monitor because of the extra bulk. But being able to use a phone as a monitor from time to time would be such a help. It supports HDR and Rec2020 and has pinch to zoom if you need to enlarge the image to check focus etc.
Streaming from the HDMI input.
Install a streaming app on the phone and you can use it to stream the HDMI feed from any connected camera direct to your favorite platforms. No need to use clumsy tethering, just plug in the HDMI and start your favorite app.
5G millimeter wave. Because the phone features 5G millimeter wave connectivity, where available you will have access to extremely fast data transfer speeds for streaming or ftp transfers. The phone also includes a Network Visualiser App that allows you to find the best network connectivity so you can be sure of the best possible connection wherever you are.
3x High Quality Cameras. The Xperia Pro has three 12mp cameras with Zeiss lenses that are the equivalent of 16mm f2.2, a particularly impressive 24mm f1.7 as well as a 70mm f2.4. The cameras have been co developed by engineers from the Alpha team and feature full manual control as well as raw stills. For video it can shoot at 4K HDR at 24, 30, 60 and 120fps with an optional wide screen 21:9 (2.370:1) aspect ratio mode that matches the 21:9 aspect ratio of the phone itself.
But all of this goodness comes at a price. Currently its priced at $2499 USD which is a huge amount of money for a phone. The very similar Xperia 1 II without the HDMI input can be found for less than half of that. But for someone that streams a lot, perhaps for TV news applications there is a lot to like. You could use the phone as your camera or use the phone to stream from a better camera, easily and simply. With 5G you can use it to upload finished packages quickly and easily. The cost of any high end phone plus an HDR 4K monitor would be close to that of the Xperia Pro, so while it is a lot of money it isn’t perhaps as outrageous as it first seems.
You can find more information here: https://www.sony.com/electronics/professional-smartphones/xperia-pro#product_details_default
Sony Launches Airpeak Drone – Designed to carry Alpha sized cameras.

Sony has launched an entirely new division called Airpeak. Airpeak have produced a large drone that can carry an Alpha sized camera. They claim that this is the smallest drone capable of carrying an Alpha sized camera. It’s unknown at this time whether the Airpeak division will purely focus on larger drones capable of carrying non integrated cameras or whether they will also produce smaller drones with integral cameras. It would certainly make sense to leverage Sony’s sensor expertise by creating dedicated cameras for drones and then drones to carry those cameras.
The drone market is going to be a tough one to make inroads into. There are already a couple of very well regarded drone manufacturers making some great drones such as the DJI inspire or Mavic Pro. But most of these are small and cannot carry larger external cameras. However the cameras that these drones are equipped with can deliver very high quality images – and they continue to get better and better. The use of larger drones for video applications is more specialist, however globally it is a large market. Whether Sony can compete in the more specialist area of larger drones that carry heavier payloads is yet to be seen. I hope the succeed.
One thing I intend to do in the next few years as the Sun enters the more active phase of it’s 11 year solar cycle is to shoot the Aurora from a drone and a camera like the A7S III and a larger, stable drone would be perfect. But there is no indication of pricing yet and a drone of this size won’t be cheap. So unless I decide to do a lot more drone work than I do already, perhaps it will be better to hire someone with the right kit. But that’s not as much fun as doing it yourself!
For more information on Airpeak do take a look at their website. There is already some impressive footage of it being used to shoot a Vision-S car on a test track.
Sony Airpeak Website.
Raw Isn’t Magic. With the right tools Log does it too.
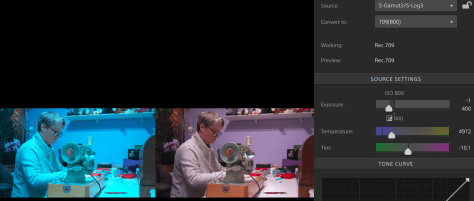
As that raw frame is still nothing more than a normal bitmap all the cameras settings such as white balance, ISO etc are in fact baked in to the recording. Each pixel only has one single value and that value will have been determined by the way the camera is setup. Nothing you do in post production can change what was actually recorded. Most CMOS sensors are daylight balanced, so unless the camera adjusts the white balance prior to recording – which is what Sony normally do – your raw recording will be daylight balanced.
Modern cameras when shooting log or raw also record metadata that describes how the camera was set when the image was captured.
So the recorded raw file already has a particular white balance and ISO. I know lots of people will be disappointed to hear this or simply refuse to believe this but that’s the truth about a raw bitmap image with a single code value for each pixel and that value is determined by the camera settings.
This can be adjusted later in post production, but the adjustment range is not unlimited and it is not the same as making an adjustment in the camera. Plus there can be consequences to the image quality if you make large adjustments.
But then many people will tell you that you can’t grade log as well as raw. Often they will give photographers as an example where there is a huge difference between what you can do with a raw photo and a normal image. But we also have to remember this is typically comparing what you can do with a highly compressed 8 bit jpeg file and an often uncompressed 12 or 14 bit raw file. It’s not a fair comparison, of course you would expect the 14 bit file to be better.
The other argument often given is that it’s very hard to change the white balance of log in post, it doesn’t look right or it falls apart. Often these issues are nothing to do with the log recording but more to do with the tools being used.


It’s the reduced compression and deeper bit depth possible with raw that can lead to higher quality recordings and as a result may bring some grading advantages compared to a normal ProRes or other compressed file. The best bit is there is no significant file size penalty. So you have the same amount of data, but you data should be of higher quality. So given that you won’t need more storage, which should you use? The higher bit depth less compressed file or the more compressed file?
But, not all raw files are the same. Some cameras feature highly compressed 10 bit raw, which frankly won’t be any better than most other 10 bit recordings as you are having to do all the complex math to create a colour image starting with just 10 bit. Most cameras do this internally at at least 12 bit. I believe raw needs to be at least 12 bit to be worth having.
Raw Myths. You Can’t Change The white Balance Of the Camera Or ISO in Post.
It’s amazing how often people will tell you how easy it is to change the white balance or adjust the ISO of raw footage in post. But can you, is it really true and is it somehow different to changing the ISO or white balance of Log footage?
Let’s start with ISO. If ISO is sensitivity, or the equivalent of sensitivity how on earth can you change the sensitivity of the camera once you get into post production. The answer is you can’t.
But then we have to consider how ISO works on an electronic camera. You can’t change the sensor in a video camera so in reality you can’t change how sensitive an electronic camera is (I’m ignoring cameras with dual ISO for a moment). All you can do is adjust the gain or amplification applied to the signal from the sensor. You can add gain in post production too. So, when you adjust the exposure or using the ISO slider for your raw footage in post all you are doing is adjusting how much gain you are adding. But you can do the same with log or any other gamma.
One thing that makes a difference with raw is that the gain is applied in such a way that what you see looks like an actual sensitivity change no matter what gamma you are transforming the raw to. This makes it a little easier to make changes to the final brightness in a pleasing way. But you can do exactly the same thing with log footage. Anything you do in post must be altering the recorded file, it can never actually change what you captured.
Changing the white balance in post: White Balance is no different to ISO, you can’t change in post what the camera captured. All you can do is modify it through the addition or subtraction of gain.
Think about it. A sensor must have a certain response to light and the colours it sees depending on the material it’s made from and the colour filters used. There has to be a natural fixed white balance or a colour temperature that it works best at.
The Silicon that video sensors are made from is almost always more sensitive at the red end of the spectrum than the blue end. So as a result almost all sensors tend to produce the best results with light that has a lot of blue (to make up for the lack of blue sensitivity) and not too much red. So most cameras naturally perform best with daylight and as a result most sensors are considered daylight balanced.
If a camera produces a great image under daylight how can you possibly get a great image under tungsten light without adjusting something? Somehow you need to adjust the gain of the red and blue channels.
Do it in camera and what you record is optimised for your choice of colour temperature at the time of shooting. But you can always undo or change this in post by subtracting or adding to whatever was added in the camera.
If the camera does not move away from its native response then if you want anything other than the native response you will have to do it in post and you will be recording at the cameras native white balance. If you want a different colour temp then you need to add or subtract gain to the R & B channels in post to alter it.
Either way what you record has a nominal white balance and anything you do in post is skewing what you have recorded using gain. There is no such thing as a camera with no native white balance, all cameras will favour one particular colour temperature. So even if a manufacturer claims that the white balance isn’t baked in what they mean is they don’t offer the ability to make any adjustments to the recorded signal. If you want the very best image quality, the best method is to adjust at the time of recording. So, as a result a lot of camera manufacturers will skew the gain of the red and blue channels of the sensor in the camera when shooting raw as this optimises what you are recording. You can then skew it again in post should you want a different balance.
With either method if you want to change the white balance from what was captured you are altering the gain of the red and blue channels. Raw doesn’t magically not have a white balance, so shooting with the wrong white balance and correcting it in post is not something you want to do. Often you can’t correct badly balanced raw any better than you can correct incorrectly balanced log.
How far you can adjust or correct raw depends on how it’s been compressed (or not), the bit depth, whether it’s log or linear and how noisy it is. Just like a log recording really, it all depends on the quality of the recording.
The big benefit raw can have is that the amount of data that needs to be recorded is considerably reduced compared conventional component or RGB video recordings. As a result it’s often possible to record using a greater bit depth or with much less compression. It is the greater bit depth or reduced compression that really makes a difference. 16 bit data can have up to 65,536 luma gradations, compare that to the 4096 of 12 bit or 1024 of 10 bit and you can see how a 16 bit recording can have so much more information than a 10 bit one. And that makes a difference. But 10 bit log v 10 bit raw, well it depends on the compression, but well compressed 10 bit log will likely outperform 10 bit raw as the all important colour processing will have been done in the camera at a much higher bit depth than 10 bit.
Streaming and Live Feeds.
With some difficult times ahead and the need for most of us to minimise contact with others there has never been a greater need for streaming and online video services that now.
I’m setting up some streaming gear in my home office so that I can do some presentations and online workshops over the coming weeks.
I am not an expert on this and although I did recently buy a hardware RTMP streaming encoder, like many of us I didn’t have a good setup for live feeds and streaming.
So like so many people I tried to buy a Blackmagic Design Atem, which is a low cost all in one switcher and streaming device. But guess what? They are out of stock everywhere with no word on when more will become available. So I have had to look at other options.
The good news is that there are many options. There is always your mobile phone, but I want to be able to feed several sources including camera feeds, the feed from my laptop and the video output from a video card.
OBS to the rescue!
The good news is that there is a great piece of open source software called OBS – Open Broadcast System and the Open Broadcast Studio streaming software.

OBS is s great piece of software that can convert almost any video source connected to a computer into a live stream that can be sent to most platforms including Facebook and YouTube etc. If the computer is powerful enough it can switch between different camera sources and audio sources. If you follow the tutorials on the OBS website it’s pretty quick and easy to get it up and running.
So how am I getting video into the laptop that’s running OBS? I already had a Blackmagic Mini Recorder which is an HDMI and SDI to thunderbolt input adapter and I shall be using this to feed the computer. There are many other options but the BM Mini Recorders are really cheap and most dealers stock them as well as Amazon. it’s HD only but for this I really don’t need 4K or UHD.

Taking things a step further I also have both an Atomos Sumo and an Atomos Shogun 7. Both of these monitor/recorders have the ability to act as a 4 channel vision switcher. The great thing about these compared to the Blackmagic Atem is that you can see all your sources on a single screen and you simply touch on the source that you wish to go live. A red box appears around that source and it’s output from the device.

So now I have the ability to stream a feed via OBS from the SDI or HDMI input on the Blackmagic Mini Recorder, fed from one of 4 sources switched by the Atomos Sumo or Shogun 7. A nice little micro studio setup. My sources will be my FS5 and FX9. I can use my Shogun as a video player. For workflow demos I will use another laptop or my main edit machine feeding the video output from DaVinci Resolve via a Blackmagic Mini Monitor which is similar to the mini recorder but the mini monitor is an output device with SDI and HDMI outputs. The final source will be the HDMI output of the edit computer so you can see the desktop.
Don’t forget audio. You can probably get away with very low quality video to get many messages across. But if the audio is hard to hear or difficult to understand then people won’t want to watch your stream. I’m going to be feeding a lavalier (tie clip) mic directly into the computer and OBS.
I think really my main reason for writing this was really to show that many of us probably already have most of the tools needed to put together a small streaming package. Perhaps you can offer this as a service to clients that need to now think about online training or meetings. I was lucky enough to have already had all the items listed in this article, the only extras I have had to but are an extra thunderbolt cable as I only had one. But even if you don’t have a Sumo or Shogun 7 you can still use OBS to switch between the camera on your laptop and any other external inputs. The OBS software is free and very powerful and this really is the keystone to making this all work.
I will be starting a number of online seminars and sessions in the coming weeks. I do have some tutorial videos that I need to finish editing first, but once that’s done expect to see lots of interesting online content from me. Do let me know what topics you would like to see covered and subject to a little bit of sponsorship I’ll see what I can do.
Stay well people. This will pass and then we can all get back on with life again.
Why Can’t I Get Third Party BP-U Batteries any more?
In the last month or so it has become increasingly hard to find dealers or stores with 3rd party BP-U style batteries in stock.
After a lot of digging around and talking to dealers and battery manufacturers it became apparent that Sony were asking the manufacturers of BP-U style batteries to stop making and selling them or face legal action. The reason given being that the batteries impinge on Sony’s Intellectual Property rights.
Why Is This Happening Now?
It appears that the reason for this clamp down is because it was discovered that the design of some of these 3rd party batteries was such that the battery could be inserted into the camera in a way that instead of power flowing through the power pins to the camera, power was flowing through the data pins. This will burn out the circuit boards in the camera and the camera will no longer work.
Users of these damaged cameras, unaware that the problem was caused by the battery were sending them back to Sony for repair under warranty. I can imagine that many arguments would have then followed over who was to pay for these potentially very expensive repairs or camera replacements.
So it appears that to prevent further issues Sony is trying to stop potentially damaging batteries from being manufactured and sold.
This is good and bad. Of course no one wants to use a battery that could result in the need to replace a very expensive camera with a new one (and if you were not aware it was the battery you could also damage the replacement camera). But many of us, myself included, have been using 3rd party batteries so that we can have a D-Tap power connection on the battery to power other devices such as monitors.
Only Option – BP-U60T?
Sony don’t produce batteries with D-Tap outlets. They do make a battery with a hirose connector (BP-U60T), but that’s not what we really want and compared to the 3rd party batteries it’s very expensive and the capacity isn’t all that high.
So where do we go from here?
If you are going to continue to use 3rd party batteries, do be very careful about how you insert them and be warned that there is the potential for serious trouble. I don’t know how widespread the problem is.
We can hope perhaps that maybe Sony will either start to produce batteries with a D-Tap of their own. Or perhaps they can work with a range of chosen 3rd party battery manufacturers to find a way to produce safe batteries with D-Tap outputs under licence.
What is Dual Base ISO and why is it important?
Almost all modern day video and electronic stills cameras have the ability to change the brightness of the images they record. The most common way to achieve this is through the addition of gain or through the amplification of the signal that comes from the sensor.
On older video cameras this amplification was expressed as dB (decibels) of gain. A brightness change of 6dB is the same as one stop of exposure or a doubling of the ISO rating. But you must understand that adding gain to raise the ISO rating of a camera is very different to actually changing the sensitivity of a camera.
The problem with increasing the amplification or adding gain to the sensor output is that when you raise the gain you increase the level of the entire signal that comes from the sensor. So, as well as increasing the levels of the desirable parts of the image, making it brighter, the extra gain also increases the amplitude of the noise, making that brighter too.
Imagine you are listening to an FM radio. The signal starts to get a bit scratchy, so in order to hear the music better you turn up the volume (increasing the gain). The music will get louder, but so too will the scratchy noise, so you may still struggle to hear the music. Changing the ISO rating of an electronic camera by adding gain is little different. When you raise the gain the picture does get brighter but the increase in noise means that the darkest things that can be seen by the camera remain hidden in the noise which has also increased in amplitude.
Another issue with adding gain to make the image brighter is that you will also normally reduce the dynamic range that you can record.
This is because amplification makes the entire signal bigger. So bright highlights that may be recordable within the recording range of the camera at 0dB or the native ISO may be exceed the upper range of the recording format when even only a small amount of gain is added, limiting the high end.

At the same time the increased noise floor masks any additional shadow information so there is little if any increase in the shadow range.
Reducing the gain doesn’t really help either as now the brightest parts of the image from the sensor are not amplified sufficiently to reach the cameras full output. Very often the recordings from a camera with -3dB or -6dB of gain will never reach 100%.

A camera with dual base ISO’s works differently.
Instead of adding gain to increase the sensitivity of the camera a camera with a dual base ISO sensor will operate the sensor in two different sensitivity modes. This will allow you to shoot at the low sensitivity mode when you have plenty of light, avoiding the need to add lots of ND filters when you want to obtain a shallow depth of field. Then when you are short of light you can switch the camera to it’s high sensitivity mode.
When done correctly, a dual ISO camera will have the same dynamic range and colour performance in both the high and low ISO modes and only a very small difference in noise between the two.
How dual sensitivity with no loss of dynamic range is achieved is often kept very secret by the camera and sensor manufacturers. Getting good, reliable and solid information is hard. Various patents describe different methods. Based on my own research this is a simplified description of how I believe Sony achieve two completely different sensitivity ranges on both the Venice and FX9 cameras.
The image below represents a single microscopic pixel from a CMOS video sensor. There will be millions of these on a modern sensor. Light from the camera lens passes first through a micro lens and colour filter at the top of the pixel structure. From there the light hits a part of the pixel called a photodiode. The photodiode converts the photons of light into electrons of electricity.

In order to measure the pixel output we have to store the electrons for the duration of the shutter period. The part of the pixel used to store the electrons is called the “image well” (in an electrical circuit diagram the image well would be represented as a capacitor and is often simply the capacitance of the the photodiode itself).

Then as more and more light hits the pixel, the photodiode produces more electrons. These pass into the image well and the signal increases. Once we reach the end of the shutter opening period the signal in the image well is read out, empty representing black and full representing very bright.
Consider what would happen if the image well, instead of being a single charge storage area was actually two charge storage areas and there is a way to select whether we use the combined image well storage areas or just one part of the image well.

When both areas are connected to the pixel the combined capacity is large. So it will take more electrons to fill it up, so more light is needed to produce the increased amount of electrons. This is the low sensitivity mode.
If part of the charge storage area is disconnected and all of the photodiodes output is directed into the remaining, now smaller storage area then it will fill up faster, producing a bigger signal more quickly. This is the high sensitivity mode.
What about noise?
In the low sensitivity mode with the bigger storage area any unwanted noise generated by the photodiode will be more diluted by the greater volume of electrons, so noise will be low. When the size of the storage area or image well is reduced the noise from the photodiode will be less diluted so the noise will be a little bit higher. But overall the noise will be much less that that which would be seen if a large amount of extra gain was added.
Note for the more technical amongst you: Strictly speaking the image well starts full. Electrons have a negative charge so as more electrons are added the signal in the image well is reduced until maximum brightness output is achieved when the image well is empty!!
As well as what I have illustrated above there may be other things going on such as changes to the amplifiers that boost the pixels output before it is passed to the converters that convert the pixel output from an analog signal to a digital one. But hopefully this will help explain why dual base ISO is very different to the conventional gain changes used to give electronic cameras a wide range of different ISO rating.
On the Sony Venice and the PXW-FX9 there is only a very small difference between the noise levels when you switch from the low base ISO to the high one. This means that you can pick and choose between either base sensitivity level depending on the type of scene you are shooting without having to worry about the image becoming unusable due to noise.
NOTE: This article is my own work and was prepared without any input from Sony. I believe that the dual ISO process illustrated above is at the core of how Sony achieve two different base sensitivities on the Venice and FX9 cameras. However I can not categorically guarantee this to be correct.