Category Archives: Workflow

Using S-log2 and S-Log3 from the A7S (or any Alpha camera) in post production.

If you have followed my guide to shooting S-Log2 on the A7s then you may now be wondering how to use the footage in post production.

This is not going to be a tutorial on editing or grading. Just an outline guide on how to work with S-log2, mainly with Adobe Premiere and DaVinci Resolve. These are the software packages that I use. Once upon a time I was an FCP user, but I have never been able to get on with FCP-X. So I switched to Premiere CC which now offers some of the widest and best codec support as well as an editing interface very similar to FCP. For grading I like DaVinci Resolve. It’s very powerful and simple to use, plus the Lite version is completely free. If you download Resolve it comes with a very good tutorial. Follow that tutorial and you’ll be editing and grading with Resolve in just a few hours.

The first thing to remember about S-Log2/S-gamut material is that it has a different gamma and colour space used by almost every TV and monitor in use today. So to get pictures that look right on a TV we will need to convert the S-Log2 to the standard used by normal HD TV’s which is know as Rec-709. The best way to do this is via a Look Up Table or LUT.

Don’t be afraid of LUT’s. It might be a new concept for you, but really LUT’s are easy to use and when used right they bring many benefits. Many people like myself share LUT’s online, so do a google search and you will find many different looks and styles that you can download for your project.

So what is a LUT? It’s a simple table of values that converts one set of signal levels to another. You may come across different types of LUT’s… 1D, 3D, Cube etc. At a basic level these all do the same thing, there are some differences but at this stage we don’t need to worry about those differences. For grading and post production correction, in the vast majority of cases you will want to use a 3D Cube LUT. This is the most common type of LUT. The LUT’s that you use must be designed for the gamma curve and colour space that the material was shot in and the gamma curve and colorspace you want to end up in. So, in the case of a Sony camera, be that an A7s, A7r, A6300 or whatever  we want LUT’s that are designed for either S-Log2 and S-Gamut or S-Log3 and SGamut3.cine.  LUT’s designed for anything other than this will still transform the footage, but the end results will be unpredictable as the tables input values will not match the correct values for S-Log2/S-Log3.

One of the nice things about LUT’s is that they are non-destructive. That is to say that if you add a LUT to a clip you are not actually changing the original clip, you are simply altering the way the clip is displayed. If you don’t like the way the clip looks you can just try a different LUT.

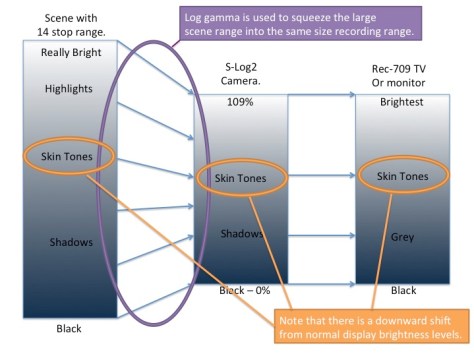
If you followed the A7s shooting guide then you will remember that S-Log2 or S-Log3 takes a very large shooting scene dynamic range (14 stops) and squeezes that down to fit in a standard video camera recording range. When this squeezed or compressed together range is then shown on a conventional REC-709 TV with a relatively small dynamic range (6 stops) the end result is a flat looking, low contrast image where the overall levels are shifted down a bit, so as well as being low contrast and flat the pictures may also look dark.


To make room for the extra dynamic range and the ability to record very bright objects, white and mid tones are shifted down in level.
The on screen contrast appears reduced as the capture contrast is greater than the display contrast.

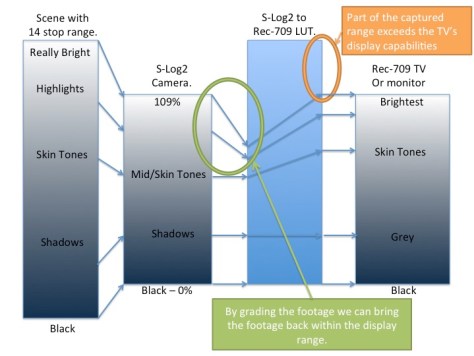
To make the pictures on our conventional 709 TV or computer moniotr have a normal contrast range, in post production we need to expand the  the squeezed recorded S-Log2/S-Log3 range to the display range of REC-709. To do this we apply an S-Log2 or S-Log3 to Rec-709 LUT to the footage during the post production process. The LUT table will shift the S-log input values to the correct REC-709 output values. This can be done either with your edit software or dedicated grading software. But, we may need to do more than just add the LUT.

Adding a LUT in post production expands the squeezed S-Log2 recording back to a normal contrast range.

There is a problem because normal TV’s only have a limited display range, often smaller that the recorded image range. So when we expand the squeezed S-Log2/S-Log3  footage back to a normal contrast range the amount of dynamic range in the recording exceeds the dynamic range that the TV can display so the highlights and brighter parts of the picture are lost, they are no longer seen and as a result the footage may now look over exposed.

With the dynamic range now expanded by the LUT the recordings brightness range exceeds the range that the TV or monitor can show, so while the contrast is correct, the pictures may look over exposed.

But don’t panic! The brightness information is still there in your footage, it hasn’t been lost, it just can’t be displayed. So we need to tweak and fine tune the footage to bring the brighter parts of the image back in to range. This is typivally called “grading” or color correcting the material.

Normally you want to grade the clip before it passes through the LUT as prior to the LUT the full range of the footage is always retained. The normal procedure is to add the LUT to the clip or footage as an output LUT, that is to say the LUT is on the output from the grading system. Although it’s preferable to have the LUT after any corrections, don’t worry too much about where your LUT goes. Most edit and grading software will still retain the full range of everything you have recorded, even if you can’t always see it on the TV or monitor.

By grading or adjusting the footage before it enters the LUT we can bring the highlights back within the range that the TV or monitor can show.

If you chose to deliberately over expose the camera by a stop or two to get the best from the 8 bit recordings (see part one of the guide) then the LUT that you should use should also incorporate compensation for this over exposure. The LUT sets that I have provided for the Sony Alpha cameras includes LUTs that have compensation for +1 and +2 stops of over exposure.

IN PRACTICE.

So how do we do this in practice?

First of all you need some LUT’s. If you haven’t already downloaded my LUT’s please download one or both of my LUT sets:

20 Cube LUT’s for S-Log2 and A7 (also work with any S-Log2 camera).

Or

LUTs for S-Log3 (These work just fine with S-Log3 material from the Alpha cameras, although I recommend using S-Log2 with any 8 bit camera)

To start off with you can just edit your S-Log footage as you would normally. Don’t worry too much about adding a LUT at the edit stage. Once the edit is locked down you have two choices. You can either export your edit to a dedicated grading package, or, if your edit package supports LUT’s you can add the LUT’s directly in the edit application.

Applying LUT’s in the edit application.

In FCP, Premiere CS5 and CS6 you can use the free LUT Buddy Plug-In from Red Giant to apply LUT’s to your clips.

In FCP-X you can use a plugin called LUT Utility from Colorgrading Central.

In Premiere CC you use the built in Lumetri filter plugin found under the “filters”, “color correction filters” tab (not the Lumetri Looks).

In all the above cases you add the filter or plugin to the clip and then select the LUT that you wish to use. It really is very easy. Once you have applied the LUT you can then further fine tune and adjust the clip using the normal color correction tools. To apply the same LUT to multiple clips simply select a clip that already has the LUT applied and hit “copy” or “control C” and then select the other clips that you wish to apply the LUT to and then select “paste – attributes” to copy the filter settings to the other clips.

Exporting Your Project To Resolve (or another grading package).

This is my preferred method for grading as you will normally find that you have much better correction tools in a dedicated grading package. What you don’t want to do is to render out your edit project and then take that render into the grading package. What you really want to do is export an edit list or XML file that contains the details of your project. The you open that edit list or XML file in the grading package. This should then open the original source clips as an edited timeline that matches the timeline you have in your edit software so that you can work directly with the original material. Again you would just edit as normal in your edit application and then export the project or sequence as preferably an XML file or a CMX EDL. XML is preferred and has the best compatibility with other applications.

Once you have imported the project into the grading package you then want to apply your chosen LUT. If you are using the same LUT for the entire project then the LUT can be added as an “Output” LUT for the entire project. In this way the LUT acts on the output of your project as a final global LUT. Any grading that you do will then happen prior to the LUT which is the best way to do things. If you want to apply different LUT’s to different clips then you can add a LUT to individual clips. If the grading application uses nodes then the LUT should be on the last node so that any grading takes place in nodes prior to the LUT.

Once you have added your LUT’s and graded your footage you have a couple of choices. You can normally either render out a single clip that is a compilation of all the clips in the edit or you can render the graded footage out as individual clips. I normally render out individual clips with the same file names as the original source clips, just saved in a different folder. This way I can return to my edit software and swap the original clips for the rendered and graded clips in the same project. Doing this allows me to make changes to the edit or add captions and effects that may not be possible to add in the grading software.

How to create a user LUT for the PMW-F5 or F55 in Resolve (or other grading software).

It’s very easy to create your own 3D LUT for the Sony PMW-F5 or PMW-F55 using DaVinci Resolve or just about any grading software with LUT export capability. The LUT should be a 17x17x17 or 33x33x33 .cube LUT (this is what Resolve creates by default).

Simply shoot some test Slog2 or Slog3 clips at the native ISO. You must use the same Slog and color space as you will be using in the camera.

Import and grade the clips in Resolve as you wish the final image to look. Then once your happy with your look, right click on the clip in the timeline and “Export LUT”. Resolve will then create a .cube LUT.

Then place the .cube LUT file created by the grading software on an SD card in the PMWF55_F5 folder. You may need to create the following folder structure on the SD card, so first you have a PRIVATE folder, in that there is a SONY folder and so on.

PRIVATE   :   SONY   :    PRO   :   CAMERA   :    PMWF55_F5

Put the SD card in the camera, then go to the File menu and go to “Monitor 3D LUT” and select “Load SD Card”. The camera will offer you a 1 to 4 destination memory selection, choose 1,2,3 or 4, this is the location where the LUT will be saved. You should then be presented with a list of all the LUT’s on the SD card. Select your chosen LUT to save it from the SD card to the camera.

Once loaded in to the camera when you choose 3D User LUT’s you can select between user LUT memory 1,2,3 or 4. Your LUT will be in the memory you selected when you copied the LUT from the SD card to the camera.

Flicker, jaggies and moire in down converted 4K.

I kind of feel like we have been here once before. That’s probably because we have and I wrote about it first time around.

A typical video camera has a special filter in it called an optical low pass filter (OLPF). This filter deliberately reduces the contrast of fine details in the image that comes from the cameras lens and hits the sensor to prevent aliasing, jagged edges and moiré rainbow patterns. It’s a very important part of the cameras design. An HD camera will have a filter designed with a significant contrast reduction on parts of the image that approach the limits of HD resolution. So very fine HD details will be low contrast and slightly soft.

When you shoot with a 4K camera, the camera will have an OLPF that operates at 4K. So the camera captures lots of very fine, very high contrast HD information that would be filtered out by an HD OLPF. There are pro’s and con’s to this. It does mean that if you down convert from 4K or UHD to HD you will have an incredibly sharp image with lots of very fine high contrast detail. But that fine detail might cause aliasing or moiré if you are not careful.

The biggest issue will be with consumer or lower cost 4K cameras that add some image sharpening so that when viewed on a 4K screen the 4K footage really “pops”. When these sharpened and very crisp images are scaled down to HD the image can appear to flicker or “buzz”. This will be especially noticeable if the sharpening on the HD TV is set too high.

So what can you do? The most important thing is to include some form of anti-aliasing to the image when you down scale from 4K to HD.  You do need to use a scaling process that will perform good quality pixel blending, image re-sampling or another form of anti-aliasing. A straight re-size will result in aliasing which can appear as either flicker, moire or a combination of both. Another alternative is to apply a 2 or 3 pixel blur to the 4K footage BEFORE re-sizing the image to HD. This seems a drastic measure but is very effective and has little impact on the sharpness of the final HD image. Also make sure that the sharpening on your TV is set reasonably low.

I previously wrote about this very same subject when HD cameras were being introduced and many people were using them for SD productions. The same issues occurred then. Here are the original articles:

Getting good SD from HD Part 1.

Getting good SD from HD Part 2.

Remember to take a look in the TECH NOTES for info like this. There’s a lot of information in the XDCAM-USER archives now.

Are You Screwing Up Your Footage In Resolve?

First of all let me say that DaVinci Resolve is a great piece of software. Very capable, very powerful and great quality. BUT there is a hidden “Gotcha” that not many are aware of and even more are totally confused by (including me for a time).

This has taken me days of research, fiddling, googling and messing around to finally be sure of exactly what is going on inside Resolve. I am NOT a Resolve expert, so if anyone thinks I have this wrong do please let me know, but here goes……

These are the important things to understand about Resolve.

Internally Resolve Always Works With Data Levels (bit 0 to bit 1023 or CV0-CV1023 – CV stands for Code Value).

Resolve’s Scopes Always Measure The Internal Data Levels – These are NOT necessarily the Output Levels.

There Are 3 Data Ranges Used For Video – Data CV0 to CV1023, Legal Video 0-100IRE = CV64 to CV940 and Extended Range Video 0-109IRE CV64 to CV1023 (1019 over HDSDI).

Most Modern Video Cameras Record Using Extended Range Video, 0-109IRE or CV64 to CV1019.

Resolve Only Has Input Options For Data Levels or Legal Range Video. There is no option for Extended Range video.

If Transcoding Footage You May Require Extended Range Video Export. For example converting SLog video or footage from the majority of modern cameras which record up to 109IRE.

Resolve Only Has Output Options For Data Levels or Legal Range Video. There is no simple option to output, monitor or export using just the 64 to 1019 range as a 64 to 1019 range.

So, clearly anyone wanting to work with Extended Range Video has a problem. Not so much for grading perhaps, but a big issue if you want to transcode anything. Do remember that almost every modern video camera makes use of the full extended video range. It’s actually quite rare to find a modern camera that does not go above 100IRE.

So why not just use data levels for everything? Well that is an option. You can set your clips attributes (in the media pane) to Data Levels, set you monitor output to Data Levels and when you render choose Data Levels. In fact this is what YOU MUST DO if you want to convert files from one format to another without any scaling or level shifts. But be warned, never, ever, grade like this unless you add a Soft Clip LUT (more on that in a bit) as you will end up with illegal super blacks, blacks that are blacker than black and will not display correctly on most devices.

There are probably an awful lot of people out there using Resolve to convert XAVC or other formats to ProRes and in the process unwittingly making a mess of their footage, especially SLog2 and  hypergammas.

On input you can choose clip attributes for Data 0-1023 or Video 64-940 as well as Auto (in most cases if Resolve detects luma levels under 64 the footage is treated as Data, otherwise video levels). Anything set to video levels or detected as video levels gets scaled from the sources  CV64-940 range to Resolve’s internal CV0-1023 range.

As Resolves waveform/vector scopes etc always measure the internal scaled range there is no way to tell just by looking at the scopes what range your original material was in or whether it’s been scaled. If you do want to check the range of the source clip, try reducing the video level in the colour panel. If your clip is extended range then you should be able to se the previously hidden high range by pulling the levels down. A legal range clip on the other hand will have nothing above Resolves 1023 so the peak level will just drop.

On output you can choose Data 0-1023 or Legal Video 64-960 for your output or monitoring range (Resolve uses 960 which is the CbCr max value, Y is 940). For Resolve to handle the majority of modern cameras and many modern workflows where outputting 64-1023  may be required, there is no option!!!!!! So if you are working with video levels, anything you want to work with using extended range ends up either scaled on input or clipped/range restricted, blacks crushed, on output.

For example:

Import Hypergamma or SLog which is 64-1023, don’t touch or grade the footage, then export using video levels and the range is clipped and will no longer have the highlights recorded above 100IRE in the original. The original input files will be CV64-1023 but the video range output files will be CV64-940, the range is clipped off at 940 (100IRE).  If you set the clip attributes to “video 64-940” then on input CV940 is mapped to CV1023 in Resolve, so anything you shot between 100 and 109IRE (940-1019) goes out of range and is not seen on the output (It’s still there inside Resolve, but you can’t get to it unless you grade the footage). There just isn’t a correct option to pass through Full Range video 1:1, unless you use data in, data out, but then you run the risk of having illegal super blacks. If you leave the clip attributes as video and the export using Data Levels then your original CV64 black gets pulled down to CV0 so your blacks are crushed, however you do then retain the stuff above 100IRE.

If you’re using Resolve to convert XAVC SLog2 or SLog3 to something else, ProRes perhaps, this means that any Look Up Tables used in the downstream application will not behave as expected because your output clip will have the wrong levels. So for file conversions you MUST use data levels on the input clip attributes and data levels on output to pass the video through as per the original, even though you are working with footage that complies with perfectly correct, Extended Range video standards. But you must never edit or grade like this as you will get super blacks on your output….. Unless you generate a soft clip LUT.

 If you import a full range video clip that goes from CV64 to CV1019(1023) (0 to 109IRE) and do nothing to it then it will come out of Resolve as either data levels CV0 to CV1023 (-7IRE to 109IRE) or legal video CV64 to CV940 (0 – 100IRE), neither of which is ideal when transcoding footage. 

 So what can you do if you really need an Extended Range workflow? Well you can generate a Soft Clip LUT in Resolve to manage your output range. For this to work correctly you need to work entirely with data levels. Clip attributes must be set to Data levels, Monitor out to Data Levels and Exports should be at Data Levels. This is NOT necessary for direct 1:1 transcoding as the assumption is that you want a direct 1:1 copy of the original data, just in a different format.

You use Resolves Soft Clip LUT generator (on the Look Up Tables settings page) to create a 1D LUT with a Black Clip of 64 and a White Clip of 1019. This LUT is then applied as a 1D Output LUT. If you are using an existing output LUT (1D or 3D) then you can use the Soft Clip LUT generator to make a modified version of that existing LUT, adding the 64 and 1019 clip levels.

 So what is it doing?

As you are working at Data Levels your clips and footage will come in to Resolve 1:1. So a clip with a range of CV0-1023 will come in as CV0-1023, a CV64-940 clip will come in with CV64-940 and a CV64-1019 clip as CV64-1019. Most video clips from a modern camera will use CV64-1019.  A clip using CV64-1019 will be imported and handled as CV64-1019 within the full 0-1023 range, but the levels are not shifted or altered so if it’s CV220 in the original it will be CV220 inside Resolve. One immediate benefit is that Resolves scopes are now showing the actual original levels of the source clip, as shot. Phew – that’s a lot of CV’s in that paragraph, hope your following along OK.

You grade your footage as normal. The Soft Clip LUT will clip anything below CV64 (0 IRE, video black) but allow the full extended video range up to CV1019(1023) to be used. It won’t shift the level, just not allow anything to go below CV64. If grading for output do ensure that you really do want extended range (If you want to stay broadcast safe use video range).

The output to your HDSDI monitor will be unscaled data CV0-1019, but because of the LUT clipping at 64, there will be nothing below 64, no super blacks, this is how it should be, this is correct and what you want for an extended range workflow, perhaps for passing your footage on to another video editing application for finishing or where it will be mixed with other full range footage. The majority of grading workflows however will probably be conventional Legal Video Range.

When you render a file using data levels, the file will go from CV0-1019 but again because of the Soft Clip LUT there will be nothing below 64 (black) but you can use the Full Range above CV940 so super whites etc will be passed through correctly to the rendered file. This way you can make use of the complete extended video range.

 In Summary:

If you want to use Resolve to convert files from one codec to another, without changing your levels you must ensure the Clip Attributes are set to Data, your monitor out must be set to Data Levels and you must Render using Data Levels. If you don’t there is a very high likelihood that your levels will be incorrect or altered, almost certainly different to what you shot.

If you wish to grade and output anything above 100IRE (perhaps when mixing graded footage with full range camera footage) then again you must use data levels throughout the workflow but you should add a Soft Clip LUT with CV1019 as the upper clip and CV64 as the lower clip to prevent illegal black levels but retain full video range to 109IRE.

It would be so much simpler if Resolve had an extended range video out option.

ACES: Try it, it might make your life simpler!

ACES is a workflow for modern digital cinema cameras. It’s designed to act as a common standard that will work with any camera so that colourist can use the same grades on any camera with the same results.

A by-product of the way ACES works is that it can actually simplify your post production workflow as ACES takes care of an necessary conversions to and from different colour spaces and gammas. Without ACES when working with raw or log footage you will often need to use LUT’s to convert your footage to the right output standard. Where you place these LUT’s in your workflow path can have a big impact on your ability to grade your footage and the quality or your output. ACES takes care of most of this for you, so you don’t need to worry about making sure you are grading “under the LUT” etc.

ACES works on footage in Scene Referred Linear, so on import in to an ACES workflow conventional gamma or log footage is either converted on the fly from Log or Gamma to Linear by the IDT (Input Device Transform) or you use something like Sony’s Raw Viewer to pre convert the footage to ACES EXR. If the camera shoots linear raw, as can the F5/F55 then there is still an IDT to go from Sony’s variation of scene referenced linear to the ACES variation, but this is a far simpler conversion with fewer losses or image degradation as a result.

The IDT is a type of LUT that converts from the camera’s own recording space to ACES Linear space. The camera manufacturer has to provide detailed information about the way it records so that the IDT can be created. Normally it is the camera manufacturer that creates the IDT, but anyone with access to the camera manufacturers colour science or matrix/gamma tables can create an IDT. In theory, after converting to ACES, all cameras should look very similar and the same grades and effects can be applied to any camera or gamma and the same end result achieved. However variations between colour filters, dynamic range etc will mean that there will still be individual characteristics to each camera, but any such variation is minimised by using ACES.

“Scene Referred” means linear light as per the actual light coming from the scene. No gamma, no color shifts, no nice looks or anything else. Think of it as an actual measurment of the true light coming from the scene. By converting any camera/gamma/gamut to this we should be making them as close as possible as now the pictures should be a true to life linear representation of the scene as it really is. The F5/F55/F65 when shooting raw are already scene referred linear, so they are particularly well suited to an ACES workflow.

Most conventional cameras are “Display Referenced” where the recordings or output are tailored through the use of gamma curves and looks etc so that they look nice on a monitor that complies to a particular standard, for example 709. To some degree a display referenced camera cares less about what the light from the scene is like and more about what the picture looks like on output, perhaps adding a pleasing warm feel or boosting contrast. These “enhancements” to the image can sometimes make grading harder as you may need to remove them or bypass them. The ACES IDT takes care of this by normalising the pictures and converting to the ACES linear standard.

After application of an IDT and conversion to ACES, different gamma curves such as Sony’s SLog2 and SLog3 will behave almost exactly the same. But there will still be differences in the data spread due to the different curves used in the camera and due to differences in the recording Gamut etc. Despite this the same grade or corrections would be used on any type of gamma/gamut and very, very similar end results achieved. (According to Sony’s white paper, SGamut3 should work better in ACES than SGamut. In general though the same grades should work more or less the same whether the original is Slog2 or Slog3).

In an ACES workflow the grade is performed in Linear space, so exposure shifts etc are much easier to do. You can still use LUT’s to apply a common “Look” to a project, but you don’t need a LUT within ACES for the grade as ACES takes care of the output transformation from the Linear, scene referenced grading domain to your chosen display referenced output domain. The output process is a two stage conversion. First from ACES linear to the RRT or Reference Rendering Transform. This is a very computationally complex transformation that goes from Linear to a “film like” intermediate stage with very large range in excess of most final output ranges. The idea being that the RRT is a fixed and well defined standard and all the complicated maths is done getting to the RRT. From the RRT you then add a LUT called the ODT or Output Device Transform to convert to your final chosen output type. So Rec709 for TV, DCI-XYZ for cinema DCP etc. This means you just do one grading pass and then just select the type of output look you need for different types of master.

Very often to simplify things the RRT and ODT are rolled into a single process/LUT so you may never see the RRT stage.

This all sounds very complicated and complex and to a degree what’s going on under the hood of your software is quite sophisticated. But for the colourist it’s often just as simple as choosing ACES as your grading mode and then just selecting your desired output standard, 709, DCI-P3 etc. The software then applies all the necessary LUT’s and transforms in all the right places so you don’t need to worry about them. It also means you can use exactly the same workflow for any camera that has an ACES IDT, you don’t need different LUT’s or Looks for different cameras. I recommend that you give ACES a try.

It’s all in the grade!

So I spent much of last week shooting a short film and commercial (more about the shoot in a separate article). It was shot in raw using my Sony F5, but could have been shot with a wide range of cameras. The “look” for this production is very specific. Much of it set late in the day or in the evening and requiring a gentle romantic look.

In the past much of this look would have been created in camera. Shooting with a soft filter for the romantic look, shifting the white balance with warming cards or a dialled in white balance for a warm golden hour evening look. Perhaps a custom picture profile or scene file to alter the look of the image coming from the camera. These methods are still very valid, but thanks to better recording codecs and lower cost grading and post production tools, these days it’s often easier to create the look in post production.

When you look around on YouTube or Vimeo at most of the showreels and demo reels from people like me they will almost always have been graded. Grading is a huge, modern,  part of the finishing process and it makes a huge difference to the final look of a production. So don’t automatically assume everything you see on-line looked like that when it was shot. It probably didn’t and a very, very big part of the look tends to be created in post these days.

One further way to work is to go half way to your finished look in camera and then finish off the look in post. For some productions this is a valid approach, but it comes with some risks and there are some things that once burnt into the recording can be hard to then subsequently change in post, for example any in camera sharpening is difficult to remove in post as are crushed blacks or skewed or offset white balance.

Also understand that there is a big difference between trying to grade using the color correction tools in an edit suite and using a dedicated editing package. For many, many years I used to grade using my editing software, simply because that was what I had. Plug-ins such as Magic Bullet looks are great and offer a quick and effective way to get a range of looks, but while you can do a lot with a typical edit color corrector, it pales into insignificance compared to what can be done with a dedicated grading tool, for example not only creating a look but then adjusting individual elements of the image.

When it comes to grading tools then DaVinci Resolve is probably the one that most people have heard of. Resolve Lite is free, yet still incredibly capable (provided you have a computer that will run it). There are lots of other options too like Adobe Speed Grade, but the key thing is that if you change your workflow to include lots of grading, then you need to change the way you shoot too. If you have never used a proper grading tool then I urge you to learn how to use one. As processing power improves and these tools become more and more powerful they will play an ever greater role in video production.

So how should you shoot for a production that will be graded? I’m sure you will have come across the term “shoot flat” and this is often said to be the way you should shoot when you’re going to grade. Well, yes and no. It depends on the camera you are using, the codec, noise levels and many other factors. If you are the DP, Cinematographer or DiT, then it’s your job to know how footage from your camera will behave in post production so that you can provide the best possible blank canvas for the colourist.

What is shooting flat exactly? Lets say your monitor is a typical LCD monitor. It will be able to show 6 or 7 stops of dynamic range. Black at stop 0 will appear to be black and whites at stop 7 will appear bright white. If your camera has a 7 stop range then the blacks and whites from the camera will be mapped 1:1 with the monitor and the picture will have normal contrast. But what happens when you then have a camera that can capture double that range, say 12 to 14 stops?. The bright whites captured by the camera will be significantly brighter than before. If you then take that image and try to show it on the same LCD monitor you have an issue because the LCD cannot go any brighter than before, so the much brighter whites from the high dynamic range shot are shown at the same brightness as the original low dynamic range shot. Not only that but the now larger tonal range is now squashed together into the monitors limited range. This reduces the contrast in the viewed image and as a result it looks flat.

That’s a real “shoot flat” image (a wide dynamic range shown on a typical dynamic range monitor), but you have to be careful because you can also create a flat looking image by raising the cameras black level or black gamma or reducing the white level. Doing this reduces the contrast in the shadows and mid tones and will make the pictures look low contrast and flat. But raising the black level or black gamma or reducing the white point rarely increases the dynamic range of a camera, most cameras dynamic range is limited by the way they handle highlights and over exposure, not shadows, dark or white level. So just beware, not all flat looking images bring real post production advantages, I’ve seen many examples of special “flat” picture profiles or scene files that don’t actually add anything to the captured image, it’s all about dynamic range, not contrast range. See this article for more in depth info on shooting flat.

If you’re shooting for grading, shooting flat with a camera with a genuinely large dynamic range is often beneficial as you provide the colourist with a broader dynamic range image that he/she/you can then manipulate so that it looks good on typically small dynamic range TV’s and monitors, but excessively raising the black level or black gamma rarely helps the colourist as this just introduces an area that will need to be corrected to restore good contrast rather than adding anything new or useful to the image. You also need to consider that it’s all very well shooting with a camera that can capture a massive dynamic range, but as there is no way to ever show that full range, compromises must be made in the grade so that the picture looks nice. An example of this would be a very bright sky. In order to show the clouds in the sky the rest of the scene may need to be darkened as the sky is always brighter than everything else in the real world. This might mean the mid tones have to be rather dark in order to preserve the sky. The other option would be to blow the sky out in the grade to get a brighter mid range. Either way, we don’t have a way of showing the 14 stop range available from cameras like the F5/F55 with current display technologies, so a compromise has to be made in post and this should be in the back of your mind when shooting scenes with large dynamic ranges. With a low dynamic range camera, you the camera operator would choose whether to let the highlights over expose to preserve the mid range or whether to protect the highlights and put up with a darker mid range. But now with these high dynamic range cameras that decision is largely moved to post production, but you should still be looking at your mid tones and if needed adding a bit of extra illumination so that the mids are not fighting the highlights.

In addition to shooting flat there is a lot of talk about using log gamma curves, S-Log, S-log2, LogC etc. Again IF the camera and recording codec are optimised for Log then this can be an extremely good approach. Remember that if you choose to use a log gamma curve then you will also need to adjust the way you expose to place skin tones etc in the correct part of the log curve. It’s no longer about exposing for what looks good on the monitor or in the viewfinder, but about exposing the appropriate shades in the correct part of the log curve.  I’ve written many articles on this so I’m not going to go into it here, other than to say log is not a magic fix for great results and log needs a 10 bit codec if your going to use it properly. See these articles on Log: S-Log and 8 bit  or Correct Exposure with Log. Using Log does allow you to capture the cameras full range, it will give you a flat looking image and when used correctly it will give the colourist a large blank canvas to play with. When using log it is vital that you use a proper grading tool that will apply log based corrections to your footage as adding linear corrections in a typical edit application to log footage will not give the best results.

So what if your camera doesn’t have log? What can you do to help improve the way the image looks after post production? First of all get your exposure right. Don’t over expose. Anything that clips can not be recovered in post. Something that’s a little too dark can easily be brightened a bit, but if it’s clipped it’s gone for good. So watch those highlights. Don’t under expose,  just expose correctly. If you’re having a problem with a bright sky don’t be tempted to add a strong graduated filter to the camera to darken the sky. If the colorist tries to adjust the contrast of the image the grad may become more extreme and objectionable. It’s better to use a reflector or some lights to raise the foreground rather than a graduated filter to lower the highlight.

One thing that can cause grading problems is any knee compression. Most video cameras by default use something called the “Knee” to compress highlights. This does give the camera the ability to capture a greater dynamic range, but this is done by aggressively compressing together the highlights and it’s either on or off. If the light changes during the shot and the cameras knee is set to auto (as most are by default) then the highlight compression will change mid shot and this can be a nightmare to grade. So instead of using the cameras default knee settings use a scene file or picture profile to set the knee to manual or use an extended range gamma curve like a Hypergamma or Cinegamma that does not have a knee and instead uses a progressive type of highlight compression.

Another thing that can become an issue in the grading suite is image sharpening. In camera sharpening such as detail correction works by boosting contrast around edges. So if you take an already sharpened image into the grading suite and then boost the contrast in post, the sharpening will become more visible and the pictures may take on more of a video look or become over sharpened. It’s just about impossible to remove image sharpening in post, but to add a bit of sharpening is quite easy. So, if you’re shooting for post consider either turning off the detail correction circuits all together or at the very least reduce the levels applied by a decent amount.

Color and white balance: One thing that helps keep things simple in the grade is having a consistent image. The last thing you want is the white balance changing half way through the shot, so as a minimum use a fixed white balance or preset white balance. I find it better to shoot with preset white when shooting for a post heavy workflow as even if the light changes a little from scene to scene or shot to shot the RGB gain levels remain the same so any corrections applied have a similar effect, the colourist then just tweaks the shots for any white balance differences. It’s also normally easier to swing the white balance in post if preset is used as there won’t be any odd shifts added as can sometimes happen if you have used a grey/white card to white balance.

Just as the brightness or luma of an image can clip if over exposed then so too can the colour. If you’re shooting colourful scenes, especially shows or events with coloured lights then it will help you if you reduce the saturation of the colour matrix by around 20%, this allows you to record stronger colours before they clip. Colour can then be added back in in the grade if needed.

Noise and grain: This is very important. The one thing above all the others that will limit how far you can push your image in post is noise and grain. There are two sources of this, camera noise and compression noise. Camera noise is dependant on the cameras gain and chosen gamma curve. Aways strive to use as little gain as possible, remember that if the image is just a little dark you can always add gain in post, so don’t go adding un-necessary gain in camera. A proper grading suite will have powerful noise reduction tools and these normally work best if the original footage is noise free and then gain added in post, rather than trying to de-noise grainy camera clips.

The other source of noise and grain is compression noise. Generally speaking, the more highly compressed the video stream is then the greater the noise will be. Compression noise is often more problematic than camera noise as in many cases it will have a regular pattern or structure which makes it visually more distracting than random camera noise. More often than not the banding seen in images across the sky or flat surfaces is caused by compression artefacts rather than anything else and during grading any artefacts such as these can become more visible. So try to use as little compression as possible, this may mean using an external recorder but these can be purchased or hired quite cheaply these days. As always, before a big production test your workflow. Shoot some sample footage, grade it and see what it looks like. If you have a banding problem, suspect the codec or compression ratio first, not whether it’s 8 bit or 10 bit, in practice it’s not 8 bit that causes banding, but too much or poor quality compression (so even a camera with only an 8 bit output like the FS700 will benefit from recording on a better quality external recorder).

RAW: Of course the best way of providing the colourist (even if that’s yourself) the best blank canvas is to shoot with a camera that can record the raw sensor data. By shooting raw you do not add any in camera sharpening or gamma curves that may then need to be removed in post. In addition raw normally means capturing the cameras full dynamic range. But that’s not possible for everyone and generally involves working with very large amounts of data. If you follow my guidelines above you should at least have material that will allow you a good range of adjustment and fine tuning in post. This isn’t “fix it in post”, we are not putting right something that is wrong. We are shooting in a way that allows us to make use of the incredible processing power available in a modern computer to produce great looking images. You are making those last adjustments that make a picture look great using a nice big monitor (hopefully calibrated) in a normally more relaxed environment than on most shoots.

The way videos are produced is changing. Heavy duty grading used to be reserved for high end productions, drama and movies. But now it is common place, faster and easier than ever. Of course there are still many applications where there isn’t the time for grading, such as TV news, but grading is going to play an every greater part in more and more productions, so it’s worth learning how to do it properly and how to adjust your shooting setup and style to maximise the quality of the finished production.

ACES – What’s it all about, do I need to worry about it?

You may have heard the term “ACES”  in presentations or workflow discussions for a while now. You may know that it is the Academy Color Encoding System and is a workflow for post producing high end material, but what does it mean in simple terms?

This isn’t a guide on how to use or work with ACES, it’s hopefully an easy to understand explanation of the basics of what it does, why it does it and what advantages it brings.

One of the biggest problems in the world of video and cinema production today is the huge number of different standards in use for acquisition and viewing. There are different color spaces, different gamma curves, different encoding standards, different camera setups and different output requirements. All in all it’s a bit of a confusing mess. ACES aims to mitigate many of these issues at the same time as increasing the image quality beyond that which is normally allowed with existing workflows.

There are 3 different conversion processes within the ACES workflow, plus the actual post production and grading process. These conversions are called IDT, RRT and ODT. It all sounds very confusing but actually when you break it down it’s fairly straight forward, on paper at least!

The first stage is the IDT or Input Device Transformation. This process takes the footage from your camera and converts it to the ACES standard. The IDT must be matched specifically to the camera and codec you are using, you can’t use a Red IDT for a Sony F55 or Arri Alexa. You must use exactly the right IDT.  Using the IDT (a bit like a look up table) you convert your footage to an ACES OpenEXR file. OpenEXR is the file format, like .mov or DPX etc.

Unlike most conventional video cameras the ACES files do not have any gamma or other similar curves to mimic the way our eyesight or film responds to light. ACES is a linear format. The idea is to record and store the light coming from the scene as accurately as technically possible. This is referred to as “Scene Referenced” as you are capturing the light as it comes from the scene, not as you would show it on a monitor to make it look visually pleasing. Most traditional video systems are said to be “Display Referenced” as the are based on what looks nice on a monitor or cinema screen. This normally involves gamma compression which reduces the range of information captured in the highlights. We don’t want this if we are to maximise our grading and post production possibilities so ACES is Scene Referenced and this means a linear response to match the actual physical behaviour of light which is very different to the way we see light or film responds to light. That linear response means lots and lots of data in highlights and as a result large file sizes, there is no limit to the dynamic range ACES can handle. The other thing ACES has is an unrestricted color space. Most traditional systems (including film) have narrow or restricted color space in order to save space for transmission or distribution. If a TV screen can only show a certain range of colours, why capture more than this – this is “Display Referencing”. But ACES is designed to be able to store the full spectrum of the original scene, it is “Scene Referenced”.

In addition  by carefully matching the IDT to the camera, after converting to ACES all your source material should look the same, even if it was shot by different cameras. Now there will be differences due to differing dynamic ranges, colour accuracy, and noise etc, but the ACES material should be as close as technically possible to the original physical scene so a grade applied to one camera make or model should also work for a different camera model in exactly the same way.

Now this big color space may well currently be impossible to capture and display, but by deliberately not restricting the color space ACES has the ability to grow and output files using any existing color space.

So… using the IDT we have now converted our footage to ACES linear saving it as an OpenEXR file. Or as in the case of some grading packages like resolve we have told it to convert our material into ACES as part of the grading process. But how do we view it? ACES Linear looks all wrong on conventional monitors, we now need a way to convert back from ACES to conventional video so we can see what our finished production will look like. Well there are two stages to this. The first is called the RRT, the second the ODT, sometimes these are combined into a single process.

The RRT or Reference Rendering Transform is designed to convert the  ACES linear to an ultra high quality but slightly less complicated standardised intermediate reference format. From this standardised format you can then apply the ODT or Output Device Transformation to convert from that common RRT intermediate to whatever output standard you need. In practice no-one sees or works with the RRT, it is just there as a fixed starting point for the ODT and in most cases the RRT and ODT operations are combined into a single process a bit like adding a viewing LUT. The RRT transformation is incredibly complex while the ODT is a much simpler process. By doing the difficult maths with one single RRT and then keeping the ODT’s simpler it’s easier to create a large range of ODT’s for specific applications. So from one grading pass you can produce masters for broadcast TV, the web or Cinema DCP just by changing the ODT part of the calculations used for the final output.

If your using a conventional HD monitor then you will need to use an ODT for Rec-709 so that the ACES material get converted to Rec-709 for accurate monitoring. It should be noted now though that as you are monitoring in the restricted Rec-709 color space and gamma range that you are not seeing the full range of the ACES footage or RRT intermediate.

So, it all sounds very complicated. In practice what you have to do is convert your footage using the right IDT to an ACES OpenEXR file (or tell the grading application to convert to ACES on the fly). You set up your grading workspace to use ACES and then set your output RRT/ODT to output using the standard you are viewing with (typically Rec-709) and do your grading as you would normally. One limitation of ACES is that due to the large color space many conventional LookUp Tables won’t work as expected within the ACES environment. They are simply too small. You need at least a 64x64x64 LUT which is massive. At the end of the grade you then choose the ODT for your master render, this might be 709 for TV or sRGB for the web and render you master. If your taking your project for finishing elsewhere then you can output your files without the RRT/ODT as ACES OpenEXR.

The advantages of ACES are: Standardised workflow with standardised files, so any ACES OpenEXR file from any camera will look and behave just like an ACES OpenEXR file from any other camera (or at least as closely as technically possible).

Unlimited dynamic range and color space, so no matter what your final output you are getting the very best possible image. Of course limited by the capture capabilities of the camera or film stock, but the workflow and recording format itself is not a limiting factor.

Fast output to multiple standards by doing the difficult maths using a common high quality RRT (Reference Render transform) followed by a simpler ODT specific to the format required. Very often these two functions are combined into a single ODT process.

So is ACES for you? Maybe it is, maybe not. If you use a lot of LUT’s in your grade then perhaps ACES is not going to work for you. If your camera already shoots linear raw then your already a long way towards ACES anyway so you may not see any benefit from the extra stages. However if your shooting with different cameras and there are IDT’s available for all the cameras your using then ACES should help make everything consistent and easier to manage. ACES OpenEXR files will be large compared to conventional video, so that needs to be taken into account.