I’m sitting here in the UK, Its February and it almost 20c (68f). Very nice indeed for the UK this time of year. Just a couple of weeks ago I was in Northern Norway, up above the arctic circle running one of my annual Northern Lights adventure tours. The weather there was very different. At no time did the temperature get above -15c(5f) and for most of the trip it was around -24c(-11f) both during the day and during the night.
Now, you might consider me a sadist when I say this, but for my Northern Lights trips I normally want it to be -20c or colder. The reason being that when it’s very cold like this we normally get beautifully clear skies. And we need clear skies to see the Aurora.
Everyone all wrapped up for the hour long ride by snow scooter and sledge to the cabins that we stay at.
After many years of taking a full size video camera up to Norway I decided to go light this year and just take my trusty A7S and A6300 cameras. We get around on snow scooters and on sledges towed behind the snow scooters. This can make lugging around a larger camera tricky and there are times when you just can’t take a big camera. But in order to get the very best from these cameras I also decided to take an Atomos Ninja V.
Out and about on the snow scooter. It really is a very beautiful place in the winter.
The Ninja V is the first of a new generation of recorders and monitors from Atomos. It’s much smaller than the Shogun range of recorders making it a better size and weight match for smaller cameras and DSLR’s. It has a very, very nice 5″ screen with a maximum brightness of 1000 Nits. The 1000 Nit output and Atomos’s clever way of driving it means it can display both SDR and HDR images depending on how it is set up. A key difference between the Shogun and the Ninja devices is that the Shoguns have both SDI inputs and HDMI inputs while the Ninja only has an HDMI input. But if your using this with a DSLR than only has an HDMI output, as I was, the lack of SDI connectors is not a problem.
Shooting a sunset with the Ninja V on my A6300. We were way up on the Finnmarksvidda when this image was taken, absolutely in the middle of nowhere and it was -27c!
The build quality of the Ninja V is really good. Most of the body is made of aluminium. The rear part where the slots for the SSD and battery are is made from plastic, but it appears to be a good high quality and tough plastic. A new feature is an “AtomX” expansion port tucked inside the battery compartment. The expansion port allow different modules to be attached to the Ninja V to add functionality such a video over IP (ethernet) using the Newtek NDI protocol for live streaming or to turn the Ninja V into an IP connected monitor. There is also an AtomX sync module that allows you to wirelessly synchronise timecode and control multiple Ninja V”s on a single network and to use Bluetooth remote control. You can find out more about the AtomX modules here https://www.atomos.com/AtomX
Anyway – back to Norway. We were very lucky with the weather, and with the Northern Lights. On the first night at the cabins we stay at the Aurora put on a pretty good display. I was shooting with my Sony A7S with a Sigma Art 20mm f1.4 lens. I was shooting a mix of time-lapse, in which case I simply record the raw frames in the camera on it’s internal SD cards as well as real time video.
The Aurora put on a great display for us on several nights.
The Northern Lights are only rarely very bright. Most of the time they are fairly dim. So I was using the Sigma lens wide open, shooting at 24fps and with the shutter at 1/24th. The adjusting the cameras ISO to get a nice bright image. At times this did mean I was using some very high ISO’s with a lot of gain. Shooting like this is going to put a lot of strain on any codec. But the Long GOP XAVC-S codec used in the A7S is going to be very hard pushed to not introduce a lot of additional artefacts. In addition my older original A7S can only record HD internally.
By using the Ninja V I was able to record video of the Northern Lights in 4K using the ProRes codec. I used ProRes HQ and ProResHQ uses much less compression than XAVC-S. So even though both the internal recordings and the external recordings are limited to 8 bit (due to the cameras HDMI output limitations rather than any limitation of the Ninja) the ProRes recordings are far more robust and will noise reduce in post much better than the XAVC-S.
Just to prove it really was -27c!!
When you’re working outside for extended periods and it’s -27c(-17f) it’s tough on the gear and tough on you. When shooting the Aurora my camera are outside all night, exposed to the cold. Typical problems include frost and ice on the front element of the lens. The moisture from your own body can easily freeze onto the lens if you stand close to the camera. If you look at the lens to check it for frost and breath out you will leave it coated in ice.
Wires and cables that are soft and flexible in normal temperatures become as stiff as steel rods and can crack and fracture if you try to bend them. All batteries will loose some of their capacity. Very small batteries are worst affected. Larger batteries tend to fair a bit better, but there is a tremendous difference between the way most cheap budget batteries behave in the cold to good quality brand name batteries. For this reason I power my complete setup from a single PAG PAGLink V-Mount battery. The PAGlink batteries are great for all sorts of different applications, but for these trips a big benefit is that a small plug type charger can be used to charge many PAGlink batteries by stacking the batteries together. Then to power multiple devices I use the clip-on PAG Power hub plate to provide 5V for the camera battery adapters that I use, 12V for the lens heaters I use and another 12V feed for the Ninja V.
This is what the kit looks like when you bring it into the warm after many hours out in the cold. The thing with the yellow strap on the lens is a lens heater to prevent frost from building up on the lens. The lens is a sigma 20mm f1.4, the camera is an A7S and the recorder is the Atomos Ninja V.
After more than a few minutes outside the camera kit itself will have become extremely cold. If you then take that kit inside into a nice warm cabin the warm moist air in the cabin will condense onto the cold camera body. Because the camera body will be extremely cold this will then freeze. Before you know it the camera kit is covered in ice. What you can’t see is that it’s likely that there will also be some ice and moisture inside the camera. It can take hours to warm the camera back up again and get it dried out properly. Bagging the camera before you take it indoors can help, but taking the camera in and out many times over the coarse of a shoot like this can cause a lot of damage. So I prefer to leave all the camera kit outside for the duration of the trip.
Another view of the frozen Ninja V after a night shooting the Aurora. Don’t worry, the screen isn’t damaged, that’s just frost and ice on the screens surface.
This means that when you come to fire it up you are often trying to switch on an absolutely frozen camera. In the past I have had problems with cold recorders that wouldn’t start up. But I’m pleased to report that the Ninja V always came to life no matter how cold it was. Whenever I pressed the record button it went into record. Operating the touch screen in the cold was not an issue. In fact using touch screen gloves, the Ninja was really easy to use. Pressing small fiddly buttons isn’t easy, even with thin gloves, but the touch screen turned out really easy to work with.
A big change on the Ninja V over previous models is the operating system. The new operating system looks really good and is quite logically laid out. Gone is the old AtomHDR slider that changes the brightness of the screen when in HDR. This is replaced with dedicated viewing modes for Native, 709, PQ HDR and HLG HDR and viewing via a LUT. I prefer the new fixed HDR modes over the Atom HDR slider modes as it eliminates the uncertainty that can sometimes creep in when you use a slider to change the brightness of the display. In my case, when shooting during the day using S-Log2 I would simply select S-Log2 as the source and then use PQ to display an HDR image on the screen. At night when shooting the Aurora I used Rec-709.
You can see how the normal size 2.5″ SSD sticks out a bit from the side of the Ninja V. The SSDMini’s don’t stick out in the same way. Also note that even though I am shooting using S-Log2 on the A6300 the Ninja V is showing a nice contrasty image thanks to the PQ HDR display option.
The Ninja V can take the same size 2.5″ SSD caddies as the current Shogun recorders. So I was able to use the SSD’s that I already own. However to keep the size of the recorder down it has been designed around a new slightly shorty SSD form factor called SSDMini. When you use a standard size 2.5″ SSD it does stick out from the side of the recorder by about 25mm. If you use an SSDMini it doesn’t stick out at all. SSDMini’s are currently being manufactured by Angelbird and Sony. They have the same sata connector as regular 2.5″ SSD’s and the SSDMini’s can also be used on the larger Atomos Shoguns.
A basic lightweight but effective setup. Atomos Ninja V, Sony A6300, Miller Compass 15 head and Solo tripod.
By the time we were ready to leave Norway we had seen the Northern Lights on 3 different nights. By day we had seen some beautiful sunrises as well as other optical effects like sun dogs caused by the light from the sun being refracted by ice crystals in the air. The Atomos Ninja V had impressed me hugely. It just worked perfectly despite the extreme cold. It allowed me to record at higher quality than would have been possible without it and turned out to be easy to operate. What more can you want really?
Hello all. So after numerous problems for some people trying to download the official Sony s709 LUT for Venice, I decided to create my own Venice Look LUT’s. These LUT’s have been created using image matching techniques plus some small tweaks and adjustments to make the LUT’s work well with the 14 stop cameras.
Venice is a 15 stop camera with a new sensor and as a result the official s709 LUT’s are not quite right for the current 14 stop cameras like the FS5, PMW-F55, FS7 and even the A7 series. So the LUT that I have created is slightly different to allow for this.
The end result is a LUT that gets you really close to the way Venice looks. It won’t magically turn your FS5 into a Venice, there is something very, very nice about the way Venice handles the extremes of it’s dynamic range, plus Venice has Sony’s best colour filters (similar to the F55 and F65). So Venice will always be that one very nice step up. But these LUT’s should get you close to the default Venice 709 look. This LUT should NOT be used with Venice as it this LUT is restricted to 14 stops.
Of course do remember that the default look and indeed the official s709 LUT was designed as a first pass look. An instant viewing output for a DIT or for on set viewing. It is not really meant to be the final finished look. It would be normal to grade the Venice material, perhaps from scratch rather than using the s709 LUT for the final output. But, s709 is what comes out of the cameras SDI connectors if you use the default LUT/Look. This is what this LUT set mimics, with some tweaks for the lower cost cameras.
This is one of the largest and most comprehensive LUT sets I have ever created. There are versions designed specifically for grading in Resolve or other grading suites. The bulk of the LUT’s are designed to be used with S-Log3 and SGamut3.cine. There are monitoring versions with offsets for use in monitors such as the Atomos range. I have created a set with offsets for both the Zacuto and Small HD viewfinders and monitors and finally I have also created sets of LUT’s for use with S-Log2 so users of the original A7s or those that wish to shoot with S-Log2 on an 8 bit camera are not left out.
The LUT’s work best with the PMW-F55 as this has the closest native color to the Venice camera, but I think they work really well on the rest of the Sony range.
If you find the LUT’S useful, please consider buying me a beer or a coffee using the “Buy Now” button below. There are different drink options depending on what you feel is fair, it takes time to prepare these and there are costs associated with hosting the files. I’m not paid to run this website and every little bit helps and is greatly appreciated.
If you don’t wish to buy me a coffee, that’s cool. But please don’t host the files elsewhere. Feel free to link back here and share the link, but please don’t distribute these anywhere else.
Here’s the link to the zip file containing the my Venice Look LUT set:
If you are new to XDCAM-USER.COM please take a look around at the various tutorials, guides, tips and tricks that are hosted here. Click on the green search button at the top right to open a search window or follow the links in the drop down menus at the top of the page. Thanks for visiting!
It’s that time of year again. After another simply amazing trip to northern Norway I am pleased to be able to share with you my latest Aurora video. It was shot with a Sony A7s and a Sony A6300. The lenses used were a Sigma 20mm f1.4 art lens. An older Sigma 20mm f1.8, a samyang 14mm f2.8 and a Sony 16mm f2.8 pancake lens. A Metabones Speedbooster Ultra was used on the A6300. For the slider shots I used a home built track (made so it fits my suitcase perfectly) and a Cinetics Cinemoco controller. Hope you enjoy it.
I produced 3 video blogs during my trip to Norway to shoot the northern lights. These blogs are now on youtube for you to watch. In the first video I take a look at some of the equipment that I took to Norway for the trip. I also look at how I like to lay everything out before I pack it and give some insight into some of the accessories that I like to take.
The second video looks back at the first week of the trip. You will see examples of the weather we had to deal with as well as some information on how some of the time lapse sequences of the aurora were shot.
The third video is about shooting a sunrise with 3 different cameras. The Sony a6300, FDR-AX3000 Action Cam and the PXW-FS5.
Packing for the shoot.
At the bottom of the page you’ll find a quick cut of a small selection of some of the Aurora footage shot on this trip.
As an owner of both the A7s and AX100 and as someone that has shot with the PXW-X70, if I had to choose one which would it be? That’s tough because although they really are very different cameras they both have strengths that are nice to have. The A7s produces a prettier picture and can be used run and gun, with limitations. I use the kit 28-70mm f3.5-f5.6 and it works well, good auto focus, smooth aperture changes etc. BUT and it is a very big BUT you need a really good set of ND’s or a strong ND fader to use it outdoors due to the extreme sensitivity. Add to that the minimal 3x zoom and it’s pretty restrictive as to what you can shoot without switching lenses and fiddling around. Sure you can add something like the new Tamron 16-300mm f3.5-f6.3 but the autofocus tends to hunt a lot more, manual focus is fiddly and you still need to mess around with ND’s. I think you need to be a fairly competent cameraman and need to be very careful over lens choices etc to use the A7s for run and gun successfully. Plus don’t forget the cost of all the extra lenses, filters etc adds up and makes the kit bulkier.
The new Sony PXW-X70 XDCAM camcorder, the pro version of the AX100.
The AX100 (or PXW-X70) on the other hand really is a grab and go camera. Easy to use, great zoom range, built in ND’s. It’s quick and easy to use and may get you shots that you will miss with the A7s. But the pictures are not as pretty, primarily they lack the dynamic range of the A7s. But they are very easy to use, so well suited to those that are full auto shooters or rely heavily on auto functions to keep life simple. The X70 has much better ergonomics than the AX100 but is a bit more expensive. Both are very compact packages and as you don’t need to buy extra lenses or filters work out substantially cheaper than an A7s kit with a set of lenses to cover the same focal lengths at reasonable apertures.
Anyway, if I had to give up one of mine (A7s or AX100), for me it would be the AX100 that would go. I would be prepared to sacrifice the ease of use of the AX100 for the better images from the A7s. But I normally shoot manually anyway. I’m used to swapping lenses, working with ND filters etc. If you not used to shooting manually then the AX100 may be the better choice. Great images are of course important, but the best camera to own is a camera you will use. It’s all very well having fancy pictures and the ability to swap lenses etc. But if fiddling around means you don’t use it very often, then there is no point in having it. You would be better off with a camera that you will be comfortable with, that you will use regularly.
When you think of cine lenses then there are several brands that immediately come to mind. Zeiss, Arri, Cooke and Angenieux are probably the most familiar names but there are many others too. One brand I have been looking at more and more recently is Schneider.
Schneider Kreuznach have been making lenses since 1913. Based in Kreuznach in Germany they have long been know for their innovative designs and they won an Oscar in 2001 for Technical Achievement for their Super-Cinelux motion picture lenses.
A few years ago I met one of their lens engineers at NAB. I don’t think I have ever met a man as passionate about a lens design before or since. Every Schneider lens that I have ever used has been brilliant. They always seem to have near zero breathing, are always extremely solidly built and produce great images. So when I got a call from Manfrotto, the UK distributor to see if I would like a chance to play with some of the new Xenon FF (Full Frame) lenses I grabbed the opportunity.
Another view of the 50mm Schneider Xenon FF lens.
The Xenon FF lenses are cine style lenses available with either Canon, Nikon or PL mounts. The mounts can be changed should you need to switch mounts at a later date. They are priced to directly compete with the Zeiss compact primes. At the moment there are only 3 lenses available, a 35mm, 50mm and 75mm, all are T2.1. In the near future there will also be a 25mm and 100mm T2.1 as well as an 18mm T2.4 Yum Yum! I’d love to have one of those for my Northern Lights or Storm Chasing expeditions. They are all the same size, have a 100mm front diameter, all have a 95mm lens thread. This means that swapping lenses during a shoot is straight forward as you don’t have to change Matte Box donuts or re-position the follow focus if you’re using one. Being Full Frame lenses and rated for 4K these should be a great match with the Sony A7s.
I got to play with a 35mm and 50mm with EF mount and decided to try them on my full frame A7s shooting in HD as well as taking a few still photos (which are the equivalent to 4.5K) on a cloudy and rainy day.
14 blade iris and EF mount on the 35mm Xenon FF.
Straight out of the box you cannot help but be impressed by the build quality. These are substantial lenses, weighing in at around 1.25kg each with the EF mount. I could not find any plastic on these lenses, they look built to last.
The focus scale is large and easy to read, each lens being individually calibrated. Focus travel is a full 300 degrees. Even as you get to the far end of the focus ring the distances are still nicely spaced. From 9ft(3m) to infinity is around 100 degrees. Compare that to most DSLR lenses where the same focus range might be compressed into just 5 or 10 degrees and you can see that precise focus is much easier. Although sometimes a very large focus travel can make focus pulls a little harder simply because or the large distance the focus ring has to be turned. But I’ll take a big focus throw lens over small throw any day.
The lenses have 14 curved iris blades giving a very round aperture even when stopped right down. I love peering into these lenses at the aperture blades as they are a work of art (but really hard to take a photo of). You can also see in the photo that the coatings of the lens are a distinct orange colour.
Photo taken with the 50mm Xenon FF. Click on the image to enlarge or view at original resolution.
In practice the lenses did not disappoint. It did seem a bit odd to have such a large and heavy lens on the diminutive A7s, but as image quality starts with the lens a good lens can make all the difference. I shot at various apertures from wide open at T2.1 down to about T8 and didn’t notice any significant change in resolution across the range (I took photos as well as video to check the lens performance).
The lenses do tend to flare a little bit, the 35mm more than the 50mm, but I thought the flares were quite pleasing, others may disagree. Take a look at the video to get an idea of what they are like. There was a bit more flare at T2.1 compared to T2.8 or T4 on both lenses.
I did some big focus pulls to see how much breathing there was and as with all the Schneider lenses I’ve used breathing was very minimal. There is some breathing, these are not like the Cine-Xenars which have virtually zero breathing, but the breathing really is small.
Frame grab, shooting through trees. 35mm Xenon FF and A7s.
Another test shot was to shoot some tree branches silhouetted against the sky to check for CA and colour fringing. Basically I can’t see any. Maybe right out in the very corners of the frame there is the tiniest bit of CA, but you really have to hunt for it.
Shopping basket frame grab. 35mm Xenon FF. I love the smoothness to the highlights.
Colour wise there is no obvious colour shift, if anything perhaps very, very slightly warm. As expected the lenses are very sharp and crisp, from corner to corner, but not excessively so. I found that the images contained a lot of detail but had a pleasing roundness too them that I really like. I shot a chrome shopping basket and the reflections of the bright chrome look really nice. I think this is a combination of a little bit of flare without excessive sharpness. I think it’s a very nice natural look. This can be one of the benefits of a video lens over a stills lens. Stills lenses must be incredibly sharp to work with 24 or 36 mega pixel sensors. Sometimes this results is a super sharp image that lacks character. Arguably if you start with a very sharp image you can always soften it a bit in post, but sometimes it’s nice to start off with a more rounded image. Look at how popular Cooke lenses are, they are well known for their rounded rather than super sharp images.
As expected from a 14 blade iris the bokeh is very creamy and smooth. Both near and far out of focus areas look very good indeed. Out of focus edges are smooth and don’t show any obvious double edges or other distortions.
It’s really easy to get a very shallow DoF with a full frame sensor. Xenon FF 50mm and A7s.
Take a look at the video for a better idea of the lens flares and the overall image quality. I really like the look you get from these lenses and wouldn’t mind a set of them for myself. I feel they have a lot in common with Cooke lenses, but at a much more affordable price. I hope to test them further in the near future and to a wider variety of scenes. I suspect they will be very good on skin tones and faces.
This guide is for the A7S and A7SII. The A7SIII does not in my opinion need the same degree of over exposure as documented here. So please bear this in mind if using the A7SIII.
This document has been prepared independently of Sony. It is based on my own findings having used the camera and tested various exposure levels and methods. Part 2 which explains how to use LUT’s to correct the footage in the edit suite or post production is here: https://www.xdcam-user.com/2014/10/using-s-log2-from-the-a7s-in-post-production/
If you find this useful please consider buying me a coffee or a beer. I’m not paid to write these articles.
One of the really nice features of the Sony A7s and Sony’s other Alpha cameras, including the A6300, A6500 etc is the ability to use different gamma curves and in particular the Sony S-Log2 gamma curve.
What are gamma curves?
All conventional cameras use gamma curves. The gamma curve is there to make the images captured easier to manage by making the file size smaller than it would be without a gamma curve. When TV was first developed the gamma curve in the camera made the signal small enough to be broadcast by a transmitter and then the gamma curve in the TV set (which is the inverse of the one in the camera) expanded the signal back to a normal viewing range. The current standard for broadcast TV is called “Recommendation BT-709”, often shortened to Rec-709. This gamma curve is based on standards developed over 60 years ago and camera technology has advanced a lot since then! Even so, almost every TV and monitor made today is made to the Rec-709 standard or something very similar. Many modern cameras can capture a brightness range, also known as dynamic range, that far exceed the Rec-709 standard.
The limitations of standard gammas.
As gamma effects the dark to light range of the image, it also effects the contrast of the image. Normal television gamma has a limited dynamic range (about 6 to 7 stops) and as a result also has a limited contrast range.
When shooting a high contrast scene with conventional gamma the brightest highlights and the darkest shadows cannot be recorded. The contrast on the TV or monitor will however be correct as the camera captures the same contrast range as the monitor is able to display.
Normally the gamma curve used in the camera is designed to match the gamma curve used by the TV or monitor. This way the contrast range of the camera and the contrast range of the display will be matched. So the contrast on the TV screen will match the contrast of the scene being filmed and the picture will look “normal”. However the limited dynamic range may mean that very bright or very dark objects cannot be accurately reproduced as these may exceed the gammas dynamic range.
Although the dynamic range of Rec-709 may not always capture the entire range of the scene being shot, as the gamma of the camera matches the gamma of the TV the contrast will appear correct.
The over exposure typical of a restricted range gamma such as Rec-709 is commonly seen as bright clouds in the sky becoming white over exposed blobs or bright areas on faces becoming areas of flat white. Objects in shade or shadow areas of the scene are simply too dark to be seen. But between the overexposed areas and any under exposure the contrast looks natural and true to life.
Typical limited Rec-709 exposure range. Contrast is good but the clouds are over exposed and look un-natural.
Log Gamma.
Log gamma, such as Sony’s S-Log2, allows the camera to capture a much greater brightness range or dynamic range than is possible when shooting with conventional television gamma. Dynamic range is the range from light to dark that the camera can capture or the range that the monitor or TV can display within one image. It is the range from the deepest blacks to the brightest whites that can be captured or shown at the same time.
There are some things that need to be considered before you get too excited about the possibility of capturing this much greater dynamic range. The primary one being that if the camera is set to S-log2 and the TV or monitor is a normal Rec-709 TV (as most are) then there is no way the TV can correctly display the image being captured, the TV just doesn’t have the range to show everything that the camera with it’s high range log gamma can capture accurately.
Fixed Recording Range For Both Standard and Log Gamma.
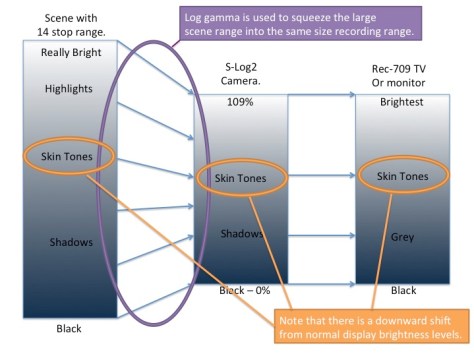
The signal range and signal levels used to record a video signal are normally described in percent. Where black is 0% and the brightest thing that can be recorded is normally recorded at 100% to 109%. Most modern video cameras actually record the brightest objects at 109%. The important thing to remember though is that the recording range is fixed. Even when you change gamma curve the camera is still constrained by the zero to 109% recording range. The recording range does not change whether you are recording Rec-709 or S-log2. So log gamma’s like S-Log2 must squeeze a much bigger signal range into the same recording range as used by conventional Rec-709 recordings.
Log gamma squeezes the scenes large range to fit in the camera’s normal 0%-109% recording range.
Recording S-Log2.
In order to record using S-log2 with the A7s you need to use a picture profile. The picture profiles give you several recording gamma options. For S-log2 you should use Picture Profile 7 which is already set up for S-log2 and S-Gamut by default (for information on gamuts see this article). In addition you should ALWAYS use the cameras native ISO which is 3200 ISO and it is normally preferable to use a preset white balance. Using any other ISO with S-log2 will not allow you to get the full benefit of the full 14 stops of dynamic range that S-log2 can deliver. In most of the Alpha cameras you now also have the ability to use a different version of S-log, – S-Log3 and this is found in picture profiles 8 and 9. You can use S-Log3 if you wish, but S-Log2 was designed from the outset by Sony to work with digital camera sensors. S-Log3 is based on an older curve designed for film transfers to a 10 bit recording. As a result when using a camera that only has 8 bit recording with a limited number of code values, S-Log2 tends to be more efficient and yield a better end result. This is what it was designed for.
Grey Cards and White Cards.
Before I go further let me introduce you to grey and white cards in case you have not come across them before. Don’t panic you don’t have to own one, although I would recommend getting a grey card such as the Lastolite EzyBalance if you don’t have one. But it is useful to understand what they are.
The 90% White Card.
The 90% white card is a card or chart that reflects 90% of the light falling on it. This will be a card that looks very similar in brightness to a piece of ordinary white paper, it should be pure white, some printer papers are bleached or coloured very slightly blue to make them appear “brilliant white” (as you will see later in many cases it is possible to use an ordinary piece of white paper in place of a 90% white card for exposure).
The Grey Card.
The 18% grey card, also often called “middle grey” card, is a card that reflects 18% of the light falling on it. Obviously it will appear much darker than the white card. Visually to us humans an 18% grey card appears to be half way between white and black, hence it’s other name, “middle grey”.
Middle grey is important because the average brightness level of most typical scenes tends to be around the middle grey brightness value. Another key thing about middle grey is that because it falls in the middle of our exposure range it makes it a very handy reference level when measuring exposure as it is less likely to be effected by highlight compression than a 90% white card.
Exposing White and Middle Grey.
Coming back to Rec-709 and conventional TV’s and monitors. If we want a piece of white paper to look bright and white on a TV we would record it and then show it at somewhere around 85% to 95% of the screens full brightness range. This doesn’t leave much room for things brighter than a white piece of paper! Things like clouds in the sky, a shiny car, a bright window or a direct light source such as a lamp or other light. In order to make it possible for S-log2 to record a much greater dynamic range the recording level for white and mid tones is shifted down. Instead of recording white at 85%-95%, when using S-log2 or S-Log3 it is recommended by Sony that white is recorded at around 60%. For S-Log2 Middle grey moves down too, instead of being recorded at 42%-43% (the normal level for Rec-709) it’s recorded at just 32% with S-Log2 (S-log3 uses 41%).
By recording everything white (ie a white piece of paper) and darker in a lower range, we free up lot of extra space above the white recording level, within the full recording range, to record all those bright highlights in any scene that would be impossible to record with conventional gammas where there is only 10% to 20% from white at 90% to the peak of the recording range at 100 to 109%.
To make room for the extra dynamic range and the ability to record very bright objects, white and mid tones are shifted down in level by the S-log2 gamma curve. As a result, white, mid tones etc will be displayed darker than normally expected with conventional gamma.
As S-Log2 and S-Log3 normally shift a lot of the recording levels downwards, if we show a scene shot with S-Log2 or S-log3 that has been exposed correctly on a conventional TV or monitor it will look dark due to the lower recording levels. In addition it will look flat with very low contrast as we are now squeezing a much bigger dynamic range into the limited conventional Rec-709 display range of a normal TV or computer monitor.
The on screen contrast appears reduced as the capture contrast is greater than the display contrast.
This on screen reduction in contrast and the darker levels are actually perfectly normal when shooting using log gamma, this is how it is supposed to look on a normal monitor or TV. So don’t be alarmed if when shooting using S-Log your images look a little darker and flatter than perhaps you are used to when shooting with a standard gamma. You will adjust the S-Log footage in post production to restore the brightness and contrast later.
Correctly exposed S-Log2 can look dark and washed out.
The post production adjustment of S-Log2 and S-log3 is very important and one of the keys to getting the very best finished images. The S-Log recording acts as a digital negative and by “processing” this digital negative in post production (normally referred to as “grading”) we manipulate the large 14 stop dynamic range of the captured image to fit within the limited display range of a Rec-709 TV in a pleasing manner. This may mean pulling up the mid range a bit, pulling down the highlights and bit and generally shifting the brightness and colour levels of different parts of the image around (see PART 2 for more post production information).
SLog-2 and 10 bit or 8 bit data.
Originally Slog-2 was designed for use on high end digital cinema cameras such as Sony’s F65 camera. These cameras have the ability to record using 10 bit data. A 10 bit recording can have up to around 1000 shades of grey from black to white. The A7s however uses 8 bit recording which only has a maximum of 235 shades from black to white. Normally 8 bit recording is perfectly OK as most transmission and display standards are also 8 bit. Shoot with an 8 bit camera and then display that image directly via an 8 bit system and nothing is lost. However when you start to grade and manipulate the image the difference between 8 bit and 10 bit becomes more significant. If you start to shift levels around, perhaps stretching out some parts of the image then the increased tonal resolution of a 10 bit recording helps maintain the very highest image quality. Photographers that have shot using both jpeg and raw will know how much more flexibility the 12 bit (or more) raw files have compared to the 8 bit jpeg’s. However they will also know that 8 bit jpeg’s can be also adjusted, provided you don’t need to make very large adjustments.
Contrary to popular belief heavy grading of 8 bit footage does not necessarily lead to banding in footage across smooth surfaces except in extreme cases. Banding is more commonly a result of compression artefacts such as macro blocking. This is especially common with very highly compressed codecs such as AVCHD. The 50Mbps XAVC-S codec used in the Sony Alpha cameras is a very good codec, far superior to AVCHD and as a result compression artefacts are significantly reduced, so banding will be less of an issue than with other lower quality codecs. If you’re going to shoot using S-Log2, some grading will be necessary and as we only have 8 bit recordings we must take care to expose our material in such a way as to minimise how far we will need to push and pull the material.
Getting Your Exposure Right.
When S-Log2 was developed the engineers at Sony produced tables that specified the correct exposure levels for s-Log2 which are:
As you can see the nominal “correct” exposure for S-Log2 is a lot lower than the levels used for display on a typical Rec-709 TV or monitor. This is why correctly exposed s-log2 looks dark on a conventional TV. The implication of this is that when you grade your footage in post production you will have to shift the S-log2 levels up quite a long way. This may not be ideal with an 8 bit codec, so I decided to carefully test this to determine the optimum exposure level for the A7s.
Correct Exposure.
The panel of images below is from the A7s recording S-log2 and exposed at the Sony recommended “correct” 32% middle grey level. The correct exposure was determined using a grey card and an external waveform monitor connected to the cameras HDMI output. Then the S-log2 was corrected in post production to normal Rec-709 levels using a Look Up Table (LUT – more on LUT’s in part 2). You can also see the viewfinder display from the camera. If you click on the image below you can expand it to full size. Sorry about the shadow from the laundry line, I didn’t see this when I was shooting the test shots!
Correctly exposed S-Log2 from A7s.
From this you can see just how dark and low contrast looking the original correctly exposed S-log2 is and how much more vibrant the corrected Rec-709 image is. I have also indicated where on the cameras histogram middle grey and white are. Note how much space there is to the right of white on the histogram. This is where the extra highlight or over exposure range of S-log2 can be recorded. When correctly exposed S-log2 has an exposure range of 6 stops above middle grey and 8 stops under.
Over Exposing or “Pushing” S-log2.
If we deliberately raise the exposure level above the Sony recommended levels (known as pushing the exposure), assuming you grade the image to the same final levels some interesting things happen.
For each stop we raise the exposure level you will have 1 stop (which is the same as 6db) less noise. So the final images will have half as much noise for each stop up you go. This is a result of exposing the image brighter and as a result not needing to raise the levels in post as far as you would if exposed at the normal level.
You will loose one stop of over exposure headroom, but gain one stop of under exposure headroom.
Bright highlights will be moved upwards into the most compressed part of the log gamma curve. This can result in a loss of texture in highlights.
Skin tones and mid tones move closer to normal Rec-709 levels, so less manipulation is need for this part of the image in post production.
This last point is important for the A7s with it’s 8 bit codec, so this is the area I looked at most closely. What happens to skin tones and textures when we raise the exposure?
Exposing at +1, +2 and +3 Stops.
Below are another 3 panels from the A7s, shot at +1 stop, +2 stops and +3 stops. Again you can click on the images if you wish to view them full size.
A7s S-Log2 over exposed by one stop.
A7s S-Log2 over exposed by 2 stops.
A7s S-Log2 over exposed by 3 stops.
Looking at these results closely you can see that when you increase the exposure by 1 stop over the Sony specified correct level for S-log2 there is a very useful reduction in noise, not that the A7s is particularly noisy to start with, but you do get a noticeably cleaner image.
Below are 4 crops from the same images, after grading. I really recommend you view these images full size on a good quality monitor. Click on the image to view larger or full size.
Crops at different exposure of LUT corrected A7s S-log2 footage.
The noise reduction at higher exposures compared to the base exposure is very clear to see if you look at the black edge of the colour checker chart (the coloured squares), although the difference between +2 and +3 stops is very small. You can also see further into the shadows in the +3 stop image compared to the base exposure. A more subtle but important effect is that as the exposure goes up the visible texture of the wooden clothes peg decreases. The grain can be clearly seen at the base level but by +3 stops it has vanished. This is caused by the highlights creeping into the more compressed part of the log gamma curve. The same thing is happening to the skin tones in the +3 stop image, there is some reduction of the most subtle textures.
From this we can see that for mid tones and skin tones you can afford to expose between 1 and 2 stops above the Sony recommended base level. More than 2 stops over and brighter skin tones and any other brighter textures start to be lost. The noise reduction gain by shooting between one and 2 stops over is certainly beneficial. The down side to this though is that we are reducing the over amount of exposure headroom.
As you raise the exposure level you reduce the over exposure headroom.
Given everything I have seen with this 8 bit and almost every other 8 bit camera my recommendation is to shoot between the Sony recommended base S-log2 level and up to two stops over this level. I would try to avoid shooting more than 2 stops over as this is where you will start to see some loss of texture in brighter skin tones and brighter textures. Exactly where you set your exposure will depend on the highlights in the scene. If you are shooting a very bright scene you will possibly need to shoot at the Sony recommended level to get the very best over exposure headroom. If you are able to expose higher without significantly compromising any highlights then you should aim to be up to 2 stops over base. But whatever you do never expose darker than the Sony base level, this will normally look really nasty.
Determining The Correct Exposure.
The challenge of course is determining where your exposure actually is. Fortunately as we have seen, provided you in the right ball park, S-log2 is quite forgiving, so if you are a little bit over exposed it’s probably not going to hurt your images much. If you have a waveform monitor then you can use that to set your exposure according to the table below. If you don’t have proper white or grey cards you can use a piece of normal white paper. Although slightly less accurate this will get you very close to where you want to be. Do note that white paper tends to be a little brighter than a dedicated 90% reflectivity white card. If you don’t have any white paper then you can use skin tones, again a bit less accurate but you should end up in the right zone.
My suggested exposure levels for the Sony A7s. The “sweet spot” is from normal to +2 over.
If you don’t have an external waveform monitor then you do still have some good options. Sadly although the camera does have zebras, these are not terribly useful for S-log2 as the lowest the zebras can go is 70%.
Light Meter: You could use a conventional photography light meter. If you do choose to use a light meter I would recommend checking the calibration of the light meter against the camera first.
Mark 1 Eyeball: You could simply eyeball the exposure looking at the viewfinder or rear screen but this is tricky when the image is very flat.
In Camera Metering: The cameras built in metering system, like the majority of DSLR’s is calibrated for middle grey. By default the camera uses multi-point metering to measure the average brightness of several points across the scene to determine the scenes average brightness and from there set the correct base S-log2 exposure.
Auto Exposure:
When you are using S-Log2, auto exposure in most cases will be very close to the correct base exposure if you use the default Multi-Zone exposure metering. The camera will take an average exposure reading for the scene and automatically adjust the exposure to the Sony recommended 32% middle grey exposure level based on this average. In the P, A and S modes you can then use the exposure compensation dial to offset the exposure should you wish. My recommendation would be to add +1 or +2 stops via the dial. Then observe the histogram to ensure that you don’t have any significant over exposure. If you do then reduce the exposure compensation. Lots of peaks to the far right of the histogram is an indication of over exposure.
Manual Exposure And Internal Metering.
If you are exposing manually you will see a small M.M. indication at the bottom of the LCD display with a +/- number. In the eyepiece viewfinder this appears as a scale that runs from -5 to +5, in S-log2 only the -2 to +2 part of the scale is used. In both cases this is how far the camera thinks you are away from the optimum exposure. + meaning the camera is over exposed, – meaning under.
A7s Viewfinder indications in manual exposure mode showing both M.M. offset from metered exposure and histogram.
In the image above we can see the M.M. indication is +0.3, in the eyepiece you would see a small arrow one bar to the right of “0” , indicating the cameras multi zone metering thinks the shot is just a little over exposed, even though the shot has been carefully exposed using a grey card and external waveform monitor. This error is probably due to the large amount of white in the shot, white shirt, white card, test charts with a lot of brighter than grey shades. In practice an error of 0.3 of a stop is not going to cause any real issues, so even if this was exposed by setting the exposure so that you have “M.M. 0.0” the exposure would be accurate enough. But it shows that multi point exposure averaging is easily confused.
The scene above is a fairly normal scene, not excessively bright, not particularly dark. If shooting a snow scene for example the cameras multi point averaging would almost certainly result in an under exposed shot as the camera attempts to bring the bright snow in the scene down to the average middle grey level. If shooting a well lit face against a very dark background then the averaging might try to bring the background up and the shot may end up overexposed.
If you want really accurate exposure then you should put the cameras metering system into the spot metering mode where instead of taking an average of various points across the scene the camera will just measure the exposure at the very center of the image.
A7s Spot Metering Mode.
You can then use a grey card to very accurately set the exposure. Simply place the circular shaped symbol at the center of the viewfinder display over a grey card and set the exposure so that M.M is 0.0 for the correct S-Log2 base exposure. To expose 1 stop over with a grey card, set M.M. +1.0 and two stops over M.M. +2.0 (not flashing, flashing indicates more than +2 stops).
Using Spot Metering to set exposure correctly for S-log2. MM 0.0.
One small issue with this is that the camera will only display a M.M. range of -2.0 to +2.0 stops. Provided you don’t want to go more than 2 stops over base then you will be fine with a grey card.
Using White Instead of Grey:
If you don’t have a grey card then you can use a 90% reflectivity white target. As white is 2 stops brighter than middle grey when S-Log2 is correctly exposed the 90% white should indicate M.M +2.0.
Using spot metering to set the correct exposure for S-Log2. M.M should read M.M +2.0 for a 90% reflectivity white target.
Once you have established the correct exposure you can then open the iris by 1 or two stops to increase the exposure. Or halve the shutter speed to gain a one stop brighter exposure. Each time you halve the shutter speed your exposure becomes one stop brighter, so divide the shutter speed by 4 to gain a 2 stop increase in exposure. As always you should observe the histogram to check for any over exposure. White peaks at the far right of the histogram or disappearing completely off the right of the histogram is an indication of over-exposure. In this case reduce your exposure back down towards the base exposure level (M.M 0.0 with a a grey card).
Exposure Summary:
I recommend using an exposure between the “correct” base S-Log2 exposure level of middle grey at 32% and two stops over this. I would not recommend going more than 2 stops over over base.
In the P, A and S auto exposure modes, when using the default multi-zone metering the camera will set the base S-log2 exposure based on the average scene brightness. For most typical scenes this average should be very close to middle grey. This exposure can then be increased (brightened) by up to 2 stops using the exposure compensation dial.
In manual exposure the “M.M.” number displayed at the bottom of the viewfinder display is how far you are from the correct base S-log2 exposure. M.M. +2.0 indicates +2 stops over base. If using multi zone metering (the cameras default) this exposure will be based on the scenes average brightness.
If you set the metering to “Spot” you can use a grey card centred in the image to determine the correct base exposure and up to 2 stops of over exposure via the M.M. indication when shooting manually.
In Part 2:
In part two I will take a look at grading the S-log2 from the A7s and how to get the very best from the S-log2 images by using Look Up Tables (LUT’s).
Don’t forget I run storm chasing and Northern Lights expeditions every year. These are amazing expeditions by snowmobile up on to the Finnmarksvidda. We go ice fishing, dog sledding, exploring, cook a meal in a tent and enjoy traditional Norwegian saunas.
I’ve been doing a lot of work on shooting SLog-2 with the A7s. I realised almost straight away that a set of LUT’s for this camera would really help speed up my grading and testing. In addition as the camera is only 8 bit I have found that I am actually getting the best results from the Slog-2 if I over expose it just a little bit, depending of course on the scene. So I created a set of LUT’s that includes compensation for shooting at the nominal correct exposure as well as either 1 or 2 stops over exposed. In all there are 20 LUT’s in two sets. One is Rec-709 based LUT’s and the other Filmic LUT’s to act as starting points for further grading.
I am in the process of creating the complete workflow and SLog-2 guide for the A7s which I should be publishing later next week which will have much more information on how to use these LUT’s. But in the mean time here are the LUT’s if anyone want’s to play (and I would like feedback on what you think of them).
The LUT naming goes something like this:
AC A7S 709(800) ZERO
AC (That’s me!). A7S (The Camera).
709(800) = Output gamma or style. ZERO = Exposure off set.
The exposure offset refers to the number of stops the footage is over exposed by relative to the normal SLog2 exposure level of Middle Grey at 32% and 90% white at 59%. ZERO menas no exposure offset. 1STOP would be used when the SLog2 was exposed 1STOP over and in this case the LUT then shifts the exposure back down 1 stop to compensate.
709 = Vanilla Rec-709, very contrasty, but limited highlight response and hard clip of over exposure.
709(800) = Rec-709 gamma with 800% (high) dynamic range. Will be slightly low contrast but deals much better with over exposure or bright highlights than vanilla 709.
Film-Like1 = An extended range gamma with highlight roll off (+400% range), slightly de-saturated, slightly more film like color (small red/yellow removed).
Filmic2 = Extended range low contrast gamma with very good over exposure handling. Slightly de-saturated. Good grading start point.
Filmic3 = Similar to Filmic2 but a little more contrast at the expense of a little less highlight roll off.
Click on the links below to download the LUT sets. PLEASE DO NOT HOST THESE ELSEWHERE OR DISTRIBUTE THESE ELSEWHERE OR VIA ANY MEANS OTHER THAN A LINK TO THIS PAGE.
My old Metabones MK1 adapter is not suitable for full frame lenses on the new Sony A7s. So in anticipation of the arrival of my A7s I ordered a cheap CommLite full frame autofocus ready adapter on ebay. This adapter (CN-EF-NEX) was only $90 USD so I thought I would give it a try, much cheaper than the metabones.
To be honest I wasn’t expecting much, but now I have the adapter in my hands I am pleasantly surprised. It appears well made and very solid. It even carries a CE mark. It works just fine on my NEX5N and FS700. On the NEX5N I have working autofocus. If the lens has image stabilisation this works too. I have tried a wide variety of Sigma and Tamron Canon EF lenses with it and they all work. Even my new Tamron 16-300mm works with this adapter, this lens doesn’t work with a number of other adapter.
Autofocus is a little slow, especially if the light is bad. Having not used the MK3 Metabones I don’t know how this compares but certainly this adapter works and is quite useable. It’s said to be compatible with full frame lenses on the A7, but as yet I have not been able to test this. The little mounting post is easily and quickly removable, but a real boon on the NEX5N with bigger lenses. For the price, you can’t go far wrong, really quite impressed considering how little it cost.
Manage your privacy
To provide the best experiences, we use technologies like cookies to store and/or access device information. Consenting to these technologies will allow us to process data such as browsing behavior or unique IDs on this site. Not consenting or withdrawing consent, may adversely affect certain features and functions.
Functional
Always active
The technical storage or access is strictly necessary for the legitimate purpose of enabling the use of a specific service explicitly requested by the subscriber or user, or for the sole purpose of carrying out the transmission of a communication over an electronic communications network.
Preferences
The technical storage or access is necessary for the legitimate purpose of storing preferences that are not requested by the subscriber or user.
Statistics
The technical storage or access that is used exclusively for statistical purposes.The technical storage or access that is used exclusively for anonymous statistical purposes. Without a subpoena, voluntary compliance on the part of your Internet Service Provider, or additional records from a third party, information stored or retrieved for this purpose alone cannot usually be used to identify you.
Marketing
The technical storage or access is required to create user profiles to send advertising, or to track the user on a website or across several websites for similar marketing purposes.