If you are using Zebras to measure the exposure of a log gamma curve you should consider using a narrower Zebra window.
Why?
From middle grey to white (50% to 90%) in the world of standard dynamic range Rec-709 each stop occupies approximately 16% of the recording range. Typically the default zebra window or zebra range used by most cameras is 10% (often +/- 5%). So, when Zebras are set to 70% they will appear at 65% and go away at 75%. For Rec-709 and most conventional SDR gammas this window or range is around 3/4 of a stop, so less than 1 full stop and generally reasonably accurate.
But if using most Cineon based log curves, such as Sony’s S-Log3, between middle grey and white (41% to 61%) each stop only occupies around 8% of the recording range, half the range used by Rec-709. As a result if you use a default 10% zebra window, zebras will appear over a 1.2 stop range, this is excessive and introduces a large margin of exposure error. Compared to Rec-709 the zebras will only be half as precise, especially if you are trying to measure the brightness of a grey card or white card.
I recommend reducing the width of the Zebra window to 6% when using Zebras to measure skin tones within the S-Log3 image (if measuring a Rec-709 LUT there is no need to change the window). This will then give a similar range and accuracy to a 10% window in 709. If you are using zebras to measure a white card or grey card then consider bringing the zebra window down to 2% to gain a more accurate reading of the white/grey card.
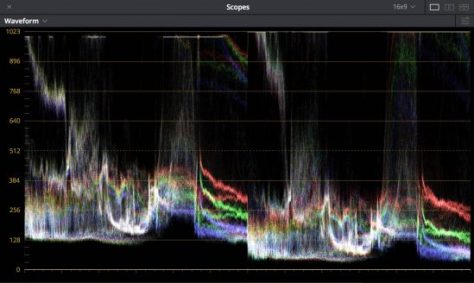
FX6(left) and FX3 (right) zebras set to measure S-Log3 white card exposure.
The zebra window or range can normally adjusted in the cameras menu under the zebra settings. On the Sony Alpha’s and and FX3/FX30 you can adjust the range of the C1 and C2 custom zebras.
There is a video on YouTube right now where the author claims that the Sony Alpha cameras don’t record correctly internally when shooting S-Log2 or S-Log3. The information contained in this video is highly miss-leading and the conclusion that the problem is with the way Sony record internally is incorrect. There really isn’t anything wrong with the way Sony do their recordings. Neither is there anything wrong with the HDMI output. While centered around the Alpha cameras the information below is also important for anyone that records S-Log2 or S-log3 externally with any other camera.
Some background: Within the video world there are 2 primary ranges that can be used to record a video signal.
Legal Range uses code value 16 for black and code value 235 for white (anything above CV235 is classed as a super-white and these can still be recorded but considered to be beyond 100%).
Full or Data Range uses code value 0 for black and code value 255 for white or 100%.
Most cameras and most video systems are based on legal range. ProRes recordings are almost always legal range. Most Sony cameras use legal range and do include super-whites for some of the curves such as Cinegammas or Hypergammas to gain a bit more dynamic range. The vast majority of video recordings use legal range. So most software defaults to legal range.
But very, very importantly – S-log2 and S-log is always full/data range.
Most of the time this doesn’t cause any issues. When you record internally in the camera the internal recordings have metadata that tells the playback, editing or grading software that the S-Log files have been recorded using full range. Because of this metadata the software will play the files back and process them at the correct levels. However if you record the S-Log with an external recorder the recorder doesn’t always know that what it is getting is full range and not legal range, it just records it, as it is, exactly as it comes out of the camera. That then causes a problem later on because the externally recorded file doesn’t have the right metadata to ensure that the full range S-Log material is handled correctly and most software will default to legal range if it knows no different.
Lets have a look at what happens when you import an internally recorded S-Log2 .mp4 file from a Sony A7S into Adobe Premiere:
Internal S-Log2 in Premiere.
A few things to note here. One is Adobe’s somewhat funky scopes where the 8 bit code values don’t line up with the normally used IRE values used for video productions. Normally 8 bit code value 235 would be 100IRE or 100%, but for some reason Adobe have code value 255 lined up with 100%. My suspicion is that the scope % scale is not video % or IRE but instead RGB%. This is really confusing. A further complication is that Adobe have code value 0 as black, again, I think, but am not sure that this is RGB code value 0. In the world of video Black should be code value 16. But the scopes appear to work such that 0 is black and that 100 is full scale video out. Anything above 100 and below 0 will be clipped in any file you render out.
Looking at the scopes in the screen grab above, the top step on the grey scale chart is around code value 252. That is the code value you would expect it to be, that lines up just nicely with where the peak of an S-Log2 recording should be. This all looks correct, nothing goes above 100 or below 0 so nothing will be clipped.
So now lets look at an external ProRes recording, recorded at exactly the same time as the internal recording and see what Premier does with that:
External ProRes in Adobe Premiere
OK, so we can see straight away something isn’t quite right here. In an 8 bit recording it should be impossible to have a code value higher that 255, but the scopes are suggesting that the recording has a peak code value of something around CV275. That is impossible, so alarm bells should be ringing. Something is not quite right here. In addition the S-Log2 appears to be going above 100, so that means if I were to simply export this as a new file, the top of the recording will be clipped and it won’t match the original. This is very clearly not right.
Now lets take a look at what happens in Adobe Premiere when you apply Sony’s standard S-Log2 to Rec-709 LUT to a correctly exposed internal recording:
Internal S-Log2 with 709 LUT applied.
This all looks good and as expected. Blacks are sitting down just above the 0 line (which I think we can safely assume is black) and the whites of the picture are around code value 230 or 90, whatever that means. But they are certainly nice and bright and are not in the range that will be clipped. So I can believe this as being more or less correct and as expected.
So next I’m going to add the same standard LUT to the external recording to see what happens.
External S-Log2 with standard 709 LUT applied.
OK, this is clearly not right. Our blacks now go below the 0 line and they look clipped. The highlights don’t look totally out of place, but clearly there is something going very, very wrong when we this normal LUT to this correctly exposed external recording. There is no way our blacks should be going below zero and they look crushed/clipped. The internal recording didn’t behave like this. So what is going on with the external recording?
To try and figure this out lets take a look at the same files in DaVinci Resolve. For a start I trust the scopes in Resolve much more and it is a far better programme for managing different types of files. First we will look at the internal S-Log2 recording:
Internal S-Log2, all looks good.
Once again the levels of the internal S-Log2 recordings look absolutely fine. Our peak is around code value 1010 which would be 252 in 8 bit. Right where the brightest bits of an S-log2 file should be. Now lets take a look at the external recording.
External ProRes S-Log2 (Full Range)
If you compare the two screen grabs above you can see that the levels are exactly the same. Our peak level is around CV1010/CV252, just where it should be and the blacks look the same also. The internal and external recordings have the same levels and look the same. There is no difference (other then perhaps less compression and fewer artefacts in the ProRes file). There is nothing wrong with either of these recordings and certainly nothing wrong with the way Sony record S-Log2 internally. This is absolutely what I expect to see.
BUT – I’ve been a little bit sneaky here. As I knew that the external recording was a full range recording I told DaVinci Resolve to treat it as a full range recording. In the media bin I right clicked on the clip and under “clip attributes” I changed the input range from “auto” to “full”. If you don’t do this DaVinci Resolve will assume the ProRes file to be legal range and it will scale the clip incorrectly in the same way as Premiere does. But if you tell Resolve the clip is full range then it is handled correctly.
This is what it looks like if you allow Resolve to guess at what range the S-Log2 full range clip is by leaving the input range setting to “auto”:
External ProRes S-Log2 Auto Range
In the above image we can see how in Resolve the clip becomes clipped because in a legal range recording anything over CV235/CV940 would be an illegal super white. Resolve is scaling the clip and pushing anything in the original file that was above CV235/CV940 off the top of the scale. The scaling is incorrect because Resolve doesn’t know the clip is supposed to be full range and therefore not scaled. If we compare this to what Premiere did with the external recording it’s actually very similar. Premiere also scaled the clip, only Premiere will show all those “illegal” levels above it’s 100 line instead of clipping then as Resolve does. That’s why Premiere can have those “impossible” 8 bit code values going up to CV275.
Just to be complete here, I did also test the internal .mp4 recordings in Resolve switching between “auto” and “full” range and in both cases the levels stayed exactly the same. This shows that Resolve is correctly handling the internally record full range S-Log as full range.
What about if you add a LUT? Well you MUST tell Resolve to treat the S-Log2 ProRes clip as a full range clip otherwise the LUT will not be right, if your footage is S-Log3 you also have to tell Resolve that it is full range:
Resolve: Internal recording with the standard 709 LUT applied, all is exactly as expected. Deep shadows and white right at the top of the range.Resolve: External recording with the standard 709 LUT applied, clip input range set to “full”. Everything is once again as you would expect. Deep shadows and white at the top of the range. Also not that it is near perfect match to the internal recording. No hue or color shift (Premiere introduces a color shift, more on that later).Resolve: External recording with the standard 709 LUT applied, clip input range set to “auto”. This is clearly not right. The highlights are clipped and the blacks are crushed and clipped. It is so important to get the input range right when working with LUT’s!!
CONCLUSIONS:
Both the internal and external recordings are actually exactly the same. Both have the same levels, both use FULL range. There is absolutely nothing wrong with Sony’s internal recordings. The problem stems from the way most software will assume that the ProRes files are legal range. But if it’s an S-Log2 or S-Log3 recording it will in fact be full (data) range. Handling a full range clip as legal range means that highlights will be too high/bright or clipped and blacks will be crushed. So it’s really important that your software handles the footage correctly. If you are shooting using S-Log3 this problem is harder to spot as S-Log3 has a peak recording level that is well with the legal range, so you often won’t realise it’s being scaled incorrectly as it won’t necessarily look clip. If you use LUT’s and your ProRes clips look crushed or highlights look clipped you need to check that the input scaling is correct. It’s really important to get this right.
Why is there no difference between the levels when you shoot with a Cinegamma? Well when you shoot with a cinegamma the internal recordings are legal range so the internal recordings get treated as legal range and so do the external recordings, so they don’t appear to be different (In the YouTube video that led to this post the author discovers that if you record with a normal profile first and then switch to a log profile while recording the internal and external files will match. But this is because now the internal recording has the incorrect metadata, so it too gets scaled incorrectly, so both the internal and external files are now wrong – but the the same).
Once again: There is nothing wrong with the internal recordings. The problem is with the way the external recordings are being handled. The external recordings haven’t been recorded incorrectly, they have been recorded as they should be. The problem is the edit software is incorrectly interpreting the external recordings. The external recordings don’t have the necessary metadata to mark the files as full range because the recorder is external to the camera and doesn’t know what it’s being sent by the camera. This is a common problem when using external recorders.
What can we do in Premiere to make Premiere work right with these files?
You don’t need to do anything in Premiere for the internal .mp4 recordings. They are handled correctly but Premiere isn’t handling the full/data range ProRes files correctly.
My approach for this has always been to use the legacy fast color corrector filter to transform the input range to the required output range. If you apply the fast color corrector filter to a clip you can use the input and output level sliders to set the input and output range. In this case we need to set the output black level to CV16 (as that is legal range black) and we need to set output white to CV235 to match legal range white. If you do this you will then see that the external recording appears to have almost exactly the same values as the internal recording. However there is some non-linearity in the transform, it’s not quite perfect. So if anyone knows of a better way to do this do please let me know.
Using the legacy “fast color corrector” filter to transform the external recording to the correct range within Premiere.
Now when you apply a LUT the picture and the levels are more or less what you would expect and almost identical to the internal recordings. I say almost because there is a slight hue shift. I don’t know where the hue shift comes from. In Resolve the internal and external recordings look pretty much identical and there is no hue shift. In Premiere they are not quite the same. The hue is slightly different and I don’t know why. My recommendation – use Resolve, it’s so much better for anything that needs any form of grading or color correction.
Tomorrow (December 12th) I am doing an online webinar in association with Sony and Visual Impact on gamma curves, what they do, which to use etc. So if you want to know more follow the link below to sign up for this free online interactive session.
UPDATE: JUST TO BE CLEAR, THERE IS NOTHING WRONG WITH SONY’S 12 BIT LINEAR RAW. BUT YOU REALLY SHOULD BE AWARE OF IT’S LIMITATIONS COMPARED TO 16 BIT RAW OR POSSIBLY EVEN 10 BIT LOG.
This came up in the comments today and it’s something that I get asked about quite a lot.
Sony’s high end cameras, designed for raw – F5, F55, F65 all use 16 bit linear data. This linear data contains an impressively large amount of picture information across the entire range from the darkest shadows to the brightest highlights. This huge amount of data gives footage that can be pushed and pulled in post all over the place. 16 bit raw gives you 65,536 discreet values.
The FS7 and FS5 use 12 bit linear raw. 12 bit data gives you 4096 discreet values, 1/15th of the values, a small fraction of what 16 bit has. This presents a problem as to record 14 stops with linear data you need more than 12 bits.
Not Enough Code Values.
There just aren’t enough code values with only 12 bits (which is why no one else does it). So Sony do some clever math to make it workable. This reduces the amount of tonal steps in in the shadows. On it’s own this isn’t a huge problem, just make sure you expose brightly to avoid trying to pull to much info out of the shadows and definitely don’t use it for low light. On high key scenes 12 bit raw is very nice indeed, this is where it excels. On low key scenes it can appear very grainy, noisy and shadows often look coarse and lack smooth textures. Expose nice and bright and you will get great highly gradable footage. Expose dark and you will have big problems.
Transcoding can add to the problems.
Where you really can run into problems is if you take 12 bit raw (with it’s reduced shadow data) and convert that to 10 bit log (which has reduced highlight data relative to the scene you are shooting).
What you end up with is 10 bit log with reduced shadow data compared to a straight 10 bit log recording. If you compare the direct 10 bit S-log from an FS7 (or F5/F55) to 10 bit S-log derived from 12 bit raw from an FS5, the FS7 internal 10 bit log picture will have a little more shadow information while the highlights from both will be similar. So the direct internal 10 bit log recording from an FS7 will typically be a little better in the shadows than any log created from the 12 bit raw and there will little, if any, highlight benefit. It’s a little different for the FS5 as in UHD this is limited to 8 bit, so the raw, converted to log from the FS5 will have better highlight data, but still be a touch weak in the darkest shadow areas. Overall 10bit log derived from 12 bit linear will be better than 8 bit log, but not better than 10 bit log.
If 4K S-Log is really important to you – get an FS7, F5 or F55.
So I’d much rather have an FS7 (F5 or F55) if I want to shoot UHD or 4K S-log. That’s what these cameras are designed for. But, if you only have an FS5, the raw to log workflow will outperform the limited 8 bit UHD log, so it is still definitely beneficial for FS5 owners to shoot raw and convert it to 10 bit S-Log with an external recorder. But better still record raw, then you really will have a better image.
Raw with the FS7.
On the FS7 the benefits of recording 12 bit raw over 10 bit S-Log are less clear. For bright, well exposed scenes the 12 bit raw will have a definite edge. For low light or under exposed scenes there is no benefit to shooting 12 bit raw you will get nothing extra.
On the FS7 it is not a good idea to take the 12 bit raw output and record it as 10 bit S-Log on an external recorder. While you may have a less compressed codec, you will be compromising the shadows compared to the cameras own internally generated 10 bit log recordings. In most cases you would be better off simply taking the HDMI output and recording that as it avoids the 12 bit linear shadow bottleneck.
Again though – exposing nice and bright is the key to a good result. Get the data up into the brighter parts of the recording and the raw can be fantastic.
Internal and external log brightness shifts.
When you record S-Log internally on the Sony cameras the recordings use full range data levels to maximise the codec performance. You can use data range (which exceeds the normal video range) as it is assumed the data will be graded and as part of this process restored to video range data for viewing. However when recording on an external recorder the recordings sometimes use full video range rather than data range or if it’s data range don’t have the right metadata. This shouldn’t be a huge problem if the grading software behaves itself and treats each type of content correctly, shifting each to one unified range, but sadly this is rarely the case (especially with Adobe). So not only do the internal and externally recorded images come out with different brightness and contrast, but also LUT’s designed for one don’t work the same with the other. It’s a bit of a minefield to be honest and one of the reason why I prefer to always grade with dedicated grading software like resolve which handles the levels conversions properly (most of the time at least).
Just a reminder that my guide to shooting with Cine EI for the PMW-F5 and F55 cameras is still just as valid today as it was when I wrote it back in 2013. There have been a few tweaks to the cameras menu here and there, but the principles and basic operation have not changed.
So if you are new to Cine-EI please take a look at the guide. It takes you through how to shoot with Cine EI, which LUT’s to use and how to expose them.
I’ve written about this many times before, but still it comes up again and again. Which is better? Which should I use? I hear all kinds of crazy comments and a lot of incorrect information, so first of all lets dispel a few myths:
S-Log2 captures more dynamic range than S-Log3, it goes to a higher level on the waveform, S-Log3 clips the highlights sooner.
On most of Sony’s current cameras S-Log2 and S-Log3 both currently record exactly the same dynamic range as this is limited by the sensors that Sony are using. The S-log3 curve could be used in a future camera to capture up to 16 stops and in fact the new Venice camera records over 15 stops. But as all of Sony’s other cameras sensors can only see 14 stops and the S-Log3 curve is designed to go beyond 14 stops, stop No. 14 is not recorded all the way at the top of the recording range. S-Log2 is a 14 stop maximum curve, so the peak level is recorded right at the top of the recording range. There is no space held in reserve for anything beyond 14 stops.
In Sonys current camera range (other than Venice) the limit is 14 stops whether it’s S-Log2 or S-Log3. The chart that Sony provide showing both S-Log2 and S-Log3 is a little confusing as it shows the entire gamma curve rather than what the camera can actually “see”. In their current implementations both curves stop at +6 stops over middle grey, both capture the same dynamic range, there is no difference.
S-Log2 is brighter than S-Log3 so it must be capturing highlights better.
No, not really, see above. Playback and on screen brightness comes from the levels chosen to record something at and is dependant on the shape and range of the gamma curve. But the actual captured range is dependant on what the sensor can cope with. As we are not changing the sensor, the captured dynamic range, brightness range and shadow range does not change between S-Log2 and S-log3, both of which take the entire sensor range (they just store that same range using slightly different levels or code values). After applying a LUT or other conversion to your normal viewing gamma both S-Log2 and S-log3 will have the same brightness, same highlight and same shadow range.
S-Log3 has noisy shadows.
No, not really. Shadows appear noisy with S-Log3 as the shadow part of the curve is stored using higher code values compared to S-Log2. So when you view S-Log3 uncorrected the shadows are raised and stretched on your conventional monitor and this gives the impression of a noisy picture. In reality once you restore the levels to normal there is no additional noise. See this article for a full explanation.
Chart showing S-Log2 and S-Log3 plotted against f-stops and code values. Note how little data there is for each of the darker stops, the best data is above middle grey. Note that current sensors only go to +6 stops over middle grey so S-Log2 and S-Log record to different peak levels.
S-Log3 is newer than S-Log2 so it must be better.
Newer, perhaps not. Better, no not really. S-Log3 is based on the industry standard Cineon log gamma curve. This curve was developed in the 1980’s to allow the digitising of film using 10 bit data. So S-Log3 matches a curve designed to work with negative film and is capable of storing more than the 14 stops that most of the current cameras sensors can see. In effect it is an old log gamma curve. As it is a curve designed for more than 14 stops, when used in a 14 stop camera some of the available recording data is empty and wasted.
S-Log2 was specifically designed by Sony to work with an electronic sensor with 14 stops of dynamic range and is optimised to match the performance characteristics of video sensors. By using a 14 stop curve with a 14 stop camera almost every bit of available data is utilised, there is no wastage. So S-Log2 makes better use of the data you have available to you,
BUT THERE ARE SOME OTHER FACTORS WE NEED TO CONSIDER.
S-Log2 and S-Gamut:
As well as the gamma curve we also have different Gamuts or color ranges. S-Log2 was originally designed for the F65 camera. The F65 sensor can capture a huge color range beyond the range that most conventional video sensors can see. So as well as S-Log2 Sony introduced S-Gamut which was matched to the very wide color range of the F65 sensor. S-Log2 is designed to be used with S-Gamut. But many of the cameras we use, like the FS7, F5, FS5 cannot see this color range (Sony’s F55 and Venice can). In addition this very large color range can be a little tricky to deal with in post production. Add to this the fact that S-Log2 is quite different to the quite common Cineon gamma curve and behaves differently to other curves in post. The end result was that in the early days of S-Log2 there were a number of complaints and comments that Sony’s S-log2 material was difficult to grade.
S-Log3 and S-Gamut3.
Because some people were struggling a bit with S-Gamut and S-Log2 in post production (Resolve and many of the other tools we have today were not as well developed 4 years ago), Sony introduced S-Gamut3 and S-log3 as well as a further Gamut called S–Gamut3.cine. S-Log3 was based on Cineon as that’s what people were familiar with. Arri’s Log-C is also based on Cineon as are many other log curves. This makes it a more “familiar” grading experience for many colorists. In addition Sony created a modified version of the super large S-Gamut to make it easier to grade. S-Gamut3 is just as big as S-Gamut but some tweaks inside make it easier to grade (fewer color shifts). At the same time Sony realised that most users were producing content for TV, the web or digital cinema that had little use for the huge color range of S-Gamut/S-Gamut3. So S-Gamut3.cine was developed as a smaller, more manageable version of S-Gamut3 and it incorporated a few tweaks to the color science to provide colors closer to those used by other manufacturers. S-Gamut3.cine is also a better match for cameras with sensors that cannot see the full S-Gamut range (like the FS5, FS7, F5, A7).
The end result is that in general most people prefer or find it easier to grade S-Log3/S-Gamut3.cine material than S-Log2/S-Gamut. Plus you can often use LUT’s designed for Log-C or Cineon with S-log3 material (this isn’t optimum, but it can work).
SGamuts Compared.
Getting the data from camera to post.
In terms of getting the data from your cameras sensor in to post production S-Log2 is the better choice (unless you have a Sony Venice which only has S-Log3). S-Log2 is optimised for the way an electronic sensor works. S-log3 is essentially a curve designed for negative film applications, not video and no matter how you look at it, these are electronic video cameras. However, if you are recording 10 bit or greater you have a lot of data whichever curve you use, so in practice it will be rare to see any difference in the final result.
So use the curve you find easiest to work with. It is true that S-Log 3 allocates a little more data to the shadows and less to the highlights than S-Log2, but don’t confuse data and code values with more range. S-Log3 has a few extra code values in it’s darkest stops, S-log2 has a few extra in the bright stops, but the dynamic range, highlight and shadow handling is governed by the sensor not the gamma curve. Overall S-Log3 has fewer code values than S-Log2, S-Log2 makes better use of the data available, but with 10 bit this really isn’t going to make a huge difference.
8 Bit Recording.
But if you are only recording with an 8 bit codec you are already at a disadvantage. When recording 8 bit you really need to maximise the way what little data you have is used. For that reason I will always recommend that S-Log2 is used when recording 8 bit on a camera like the FS5 in UHD or A7s or similar (FS5 is 10 bit in HD). By using S-Log2 you are using as many of the limited code values available as you can. This doesn’t mean you can’t use S-log3, it just wouldn’t be my choice.
The end result should be the same.
At the end of the day, if you were to use matching LUTs, S-log2 and S-log3 material should look more or less exactly the same after grading or application of the LUT, no matter what the scene you are shooting. If they do look significantly different then you are doing something wrong. So your choice of curve, other than for 8 bit recordings will most likely come down to ease of use rather than anything else.
If your camera doesn’t have LUT’s then S-Log2 can be easier to work with as it is more contrasty. This makes it a bit easier to focus and also makes it easier to gauge exposure. If your camera has LUT’s and you use them, then you may decide to use S-Log3 simply because you should find it a little easier to work with in post. Either way both curves capture the same range of picture information and both should give more or less the same end result.
There may be some very, very subtle differences due to the small differences in data distribution, but often these will be hard to really see in the final image.
UPDATE: It appears that Adobe may have now addressed this. Luma and YC scopes now show the same levels, not different ones and the scaling of S-Log XAVC. signals now appears to be correct.
This came up as the result of a discussion on the FS5 shooters group on Facebook. An FS5 user shooting S-log2 was very confused by what he was seeing on the scopes in Adobe Premiere. Having looked into this further myself, I’m not surprised he was confused because it’s also confused me as there is some very strange behaviour with S-Log2 XAVC material.
First: BE WARNED THE “LUMA” SCOPE APPEARS TO BE A RELATIVE LUMINANCE SCOPE AND NOT A “LUMA” SCOPE.
THIS IS THE “LUMA” Scope, I suggest you don’t use it! Look at the scale on the left side of the scope, it appears to be a % scale, not unlike the % scale we are all used to working with in the video world. In the video world 100% would be the maximum limit for broadcast TV, 90% would be white and the absoulte maximum recording level would be 109%. These % (IRE) levels have very specific data or code values. For luma, 100IRE has a code value of 940 in 10 bit or 235 in 8 bit. Then look at the scale on the right side of the luma scope. This appears to be an 8 bit code value scale, after all it has those key values of 128, 255 etc.
100% is not Code Value 235 as you would normally expect (Lumtri scopes).
Now look again at the above screen grab of the lumetri luma scope in Premiere 2017 – V11. On the left is what appears to be that familiar % scale. But go to 100% and follow the line across to where the code values are. It appears that on these scopes 100% means code value 255, this is not what anyone working in broadcast or TV would expect because normally code value 255 means 109.5%.
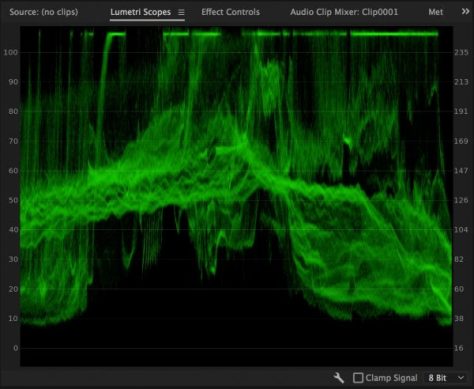
I suggest you use the YC waveform display instead.
Lumetri YC Scope showing S-log2
The YC waveform shown on the above screen capture is of an S-Log2 frame. If you go by the % scale it suggests that this recording has a peak level of only 98% when in fact the recording actually goes to 107%.
But here’s where it gets even stranger. Look at the below screen capture of another waveform display.
Lumetri YC scope and Cinegamma 1
So what is going on here? The above is a screen grab of Cinegamma 1 recorded in UHD using 8 bit XAVC-L. It goes all the way up to 109% which is the correct peak level for Cinegamma 1. So why does the S-Log2 recording only reach 98% but the Cinegamma recording, recorded moments later using the same codec reach 109%. This is a value 10% higher than S-Log2 and I know that the Cinegammas cannot record at a level 10% greater than S-Log2 (the true difference is only about 2%).
Lets now compare the difference between how Premiere and Resolve handle these clips. The screen grab below shows the S-Log2 and Cinegamma 1 recordings side by side as handled in Adobe Premiere. On the left is the S-Log2, right Cinegamma1. Look at the very large difference in the peak recording levels. I do not expect to see this, there should only be a very small difference.
Lumetri YC scope with XAVC S-Log2 on the left and XAVC Cinegamma 1 on the right.
Now lets look at exactly the same clips in DaVinci Resolve. Note how much smaller the difference in the peak levels is. This is what I would expect to see as S-Log2 gets to around 107% and Cinegamma 1 reaches 109%, only a very small difference. Resolve is handling the files correctly, Premiere is not. For reference to convert 8 bit code values to 10 bit just multiply the 8 bit value by 4. So 100IRE which is CV235 in 8 bit is CV940 in 10 bit.
S-log2 on the left, Cinegamma 1 on the right. Notice the very small difference in peak levels. This is expected and correct.
So, until I get to the bottom of this all I can say is be very, very careful and don’t use the “Luma” scope, use the YC scope if you want to know your code values. It also appears that Premiere scales the code values of S-Log recordings differently to normal gammas.
Additionally: Record exactly the same S-Log2 or S-Log3 image using XAVC internally in the camera and at the same time record a ProRes version on an external recorder. Bring both of these clips, which are actually recorded using exactly the same levels into Premiere and Premiere handles them differently. The XAVC squashed into a reduced range while the ProRes fills the larger range.
Lumetri YC scope and a ProRes S-Log2 recording. Note how this goes all the way to 107%.
This has huge implications if you use LUT’s!!!!
The same LUT will result in a very different looking image from the XAVC and PRoRes material. There should not be a difference, but there is and it’s big. So this isn’t just a scopes issue, it’s an internal signal handling issue.
I’ve always preferred doing my color grading in a dedicated grading package with external scopes. It’s stuff like this that reminds me of why I prefer to work that way. I always end up with a better end result when I grade in Resolve compared to Premiere/Lumetri.
As I learn more about this I will post a new article. Use the subscribe button on the left to subscribe to the blog to be notified of new posts.
Here’s a little experiment for you to try if you have a PMW-F5, PMW-F55 or PMW-FS7. It should help you understand a few key things about the way these cameras behave, notably:
1: Why ISO does not actually reflect the sensitivity of the camera.
2: Why it is beneficial to expose S-Log2 or S-Log3 brighter than the Sony recommended levels.
3: How to get the best possible S-Log footage.
4: Why S-log may be a poor choice for low light.
Ideally you will want to use an external waveform monitor connected to the cameras SDI output, but it is possible to use the built in waveform display.
Start with the camera in Custom mode. Choose “STD” gamma and Rec-709. Set the gain/ISO settings so that the camera is showing ISO.
Set the ISO to the base ISO (800 ISO on F5/FS7, 500 ISO on F55).
Expose a 90% white card so that white is 90% on the waveform display. This doesn’t need to be 100% accurate, you can use a piece of paper if you don’t have a proper white card. Don’t change the ISO/Gain, light the white card if you need to. Make a note of the aperture.
Now change the gamma selection to S-Log2, do not change the exposure.
Note how white now drops down to about 70% and also note that the ISO becomes 2000 ISO on an F5 or FS7 and 1250 ISO on an F55.
Think about this for a moment: If the ISO has gone up, how can white and the bulk of my image become darker?
Now switch the camera to show dB gain instead of ISO, the gain should be showing 0dB. Repeat the above switching from Standard 709 gamma to S-Log2 and note that the gain remains at 0dB for both rec-709 and S-Log2.
Think about this: The gain is the same for both 709 and S-log2 but the S-Log2 image is darker. As the gain is NOT changing then the sensitivity is not actually changing, so why does the ISO change?
If you were to use a light meter and start off with the light meter set to 800 (500) ISO the light meter would tell you to set the aperture to whatever it is you currently have to give the correct exposure in rec-709 with white at 90%. If you had a light meter and you change the ISO setting on the light meter from 800(500)ISO to 2000(1250) ISO the light meter will tell you to close the aperture by 1.3 stops.
So, on your camera, while it is set to S-Log2 close the aperture from it’s original setting by 1.3 stops. Now you will find that white will be at the recording levels given by Sony for S-Log2 which is 59% for white and 32% for middle grey.
So what have we learnt from this? The gain is the same for both standard gamma and S-Log2, even though the ISO changes from 800(500) to 2000(1250) ISO. So the sensitivity and amount of noise coming from the sensor is the same in both cases. But the indicated ISO changes so that if you are using an external light meter, when you switch to S-Log the higher indicated ISO will make the light meter tell you to close the aperture. This means there is less light falling on the sensor. This means that the recorded image will have a worse signal to noise ratio (noise remains the same, but signal is smaller).
To solution of course to this poorer signal to noise ratio is simply to open the aperture back up again by 1.3 stops. When shooting S-Log2 or S-Log3 using the CineEI mode I always recommend using 800EI on an F5 or FS7 or 640EI on an F55. This means your aperture becomes the same as it would be when shooting in vanilla Rec-709, the end result is the same, improved, signal to noise ratio. If you are not using CineEI or LUT’s, then expose white at 70%.
The new Sony A6300 is making quite a stir. This compact interchangeable lens camera has an amazing feature set that is very similar to the features found on it’s bigger brothers the A7sII and A7RII.
As a video camera it’s also capable recording using the XAVC-S codec in both HD and UHD(4K). It can even shoot at 120fps in HD. It also has picture profiles so you can tailor the look of the pictures or to suit different shooting conditions. The Cinegammas are very useful for challenging lighting conditions as they offer an improved highlight roll-off. As well as the Cinegammas the camera also has the S-Log2 and S-Log3 log gamma curves as well as S-Gamut, S-Gamut3 and S-Gamut3.cine.
Log gamma curves are very different to conventional gamma curves. Conventional gamma curves (like rec-709 or Cinegamma) are designed to produce a pleasing on screen image without any post production work (although the cinegammas do typically benefit with some tweaking in post). To do this conventional gammas keep the mid-range contrast compatible with conventional TV’s and monitors, so the picture has natural contrast when viewed on a TV. Then to help deal with bright highlights conventional gammas use some kind of highlight roll off or knee to increase the brightness range the camera can capture without effecting the mid range. Unfortunately this means that the highlights are somewhat compromised, looking very flat, lacking contrast and this is often what gives video the “video look”. In addition it also means that if you are over exposed when you shoot, the picture will look bad and no amount of post production correction will ever make it look good. Most TV camera operators will be very familiar with the phrase “protect your highlights”, meaning don’t over expose, if anything under expose a tiny bit to keep the highlights looking good.
Log gamma curves such as S-Log2 and S-Log3 are very different. They extended the dynamic range that the camera can capture. To do this they no longer try to be directly compatible with conventional TV’s and monitors and just focus on capturing the biggest possible range. The pictures will be made compatible with the TV or monitor via adjustments made during editing or in post production. So working with S-log2 and S-Log3 is a two step process – shooting and grading (grading is the term used for adjusting the look of an image in post production).
Because log gamma no longer needs to have a contrast range that matches the display range, more dynamic range can be squeezed into a conventional recording codec. It also means that there is no longer a need to use any highlight roll off or knee, so there is a lot more picture information in the highlights and brighter parts of the image. As a result exposing log gamma extra brightly is not normally a problem and in many cases brings lot of advantages. Log gamma curves do have a shadow roll off that mimics the real world shadow roll off. As a result log gammas really don’t like being under exposed, instead they prefer to be over exposed. So unlike conventional gamma where we “protect the highlights” with log gamma you need to “protect the shadows”. Under exposed log looks bad. It will lack color and it will be noisy and grainy.
For most camera operators it’s quite disconcerting to start shooting very slightly over exposed as it goes against everything you’ve learnt about shooting with a conventional video camera. But trust me, shooting 1 to 2 stops brighter than the recommended levels given by Sony on the A6300 (and any other Sony Log camera) will normally bring the best results.
The very same techniques can be used with the A6300, A7SII and A7RII. The A6300 etc also have S-Log3, but as these are 8 bit cameras (even when using an external recorder) I would still recommend that you use S-Log2. Besides, viewing and monitoring S-Log3 is tough as the pictures look even flatter than S-Log3.
If you follow the link below you will find a set of LUT’s (Look Up Tables) that can be applied to A6300 footage in post production to give different looks. There are some film-look LUT’s and 709 (normal TV look) LUT’s and in each case there are LUT’s for normal exposure as well as footage exposed 1 stop and 2 stops brighter. If a LUT name includes “1OVER” this means that the LUT is designed to work with footage that has been exposed 1 stop brighter than the levels given by Sony. My recommendation is to shoot at between 1 and 2 stops bright. For both S-Log2 and S-Log3 this would mean setting zebras to 70% and exposing a piece of white paper so that zebras are just starting to appear on the white paper.
If you find these LUT’s useful please consider buying me a coffee or a beer. I’m not paid to write these articles. For the LUT set I would appreciate a Cocktail, but am happy with whatever you feel is appropriate or affordable.
One of the most common questions I get asked is “which gamma curve should I use?”.
Well it’s not an easy one to answer because it will depend on many things. There is no one-fits-all gamma curve. Different gamma curves offer different contrast and dynamic ranges.
So why not just use the gamma curve with the greatest dynamic range, maybe log? Log and S-Log are also gamma curves but even if you have Log or S-Log it’s not always going to be the best gamma to use. You see the problem is this: You have a limited size recording bucket into which you must fit all your data. Your data bucket, codec or recording medium will also effect your gamma choice.
If your shooting and recording with an 8 bit camera, anything that uses AVCHD or Mpeg 2 (including XDCAM), then you have 235 bits of data to record your signal. A 10 bit camera or 10 bit external recorder does a bit better with around 940 bits of data, but even so, it’s a limited size data bucket. The more dynamic range you try to record, the less data you will be using to record each stop. Lets take an 8 bit camera for example, try to record 8 stops and that’s about 30 bits per stop. Try to extend that dynamic range out to 11 stops and now you only have about 21 bits per stop. It’s not quite as simple as this as the more advanced gamma curves like hypergammas, cinegammas and S-Log all allocate more data to the mid range and less to highlights, but the greater the dynamic range you try to capture, the less recorded information there will be for each stop.
In a perfect world you would choose the gamma you use to match each scene you shoot. If shooting in a studio where you can control the lighting then it makes a lot of sense to use a standard gamma (no knee or knee off) with a range of up to 7 stops and then light your scene to suit. That way you are maximising the data per stop. Not only will this look good straight out of the camera, but it will also grade well provided your not over exposed.
However the real world is not always contained in a 7 stop range, so you often need to use a gamma with a greater dynamic range. If your going direct to air or will not be grading then the first consideration will be a standard gamma (Rec709 for HD) with a knee. The knee adds compression to just the highlights and extends the over-exposure range by up to 2 or 3 stops depending on the dynamic range of the camera. The problem with the knee is that because it’s either on or off, compressed or not compressed it can look quite electronic and it’s one of the dead giveaways of video over film.
If you don’t like the look of the knee yet still need a greater dynamic range, then there are the various extended range gammas like Cinegamma, Hypergamma or Cinestyle. These extend the dynamic range by compressing highlights, but unlike the knee, the amount of compression starts gradually and get progressively greater. This tends to look more film like than the on/off knee as it tends to roll off highlights much more gently. But, to get this gentle roll-off the compression starts lower in the exposure range so you have to be very careful not to over expose your mid-range as this can push faces and skin tones etc into the compressed part of the curve and things won’t look good. Another consideration is that as you are now moving away from the gamma used for display in most TV’s and monitors the pictures will be a little flat so a slight grade often helps with these extended gammas.
Finally we come to log gammas like S-Log, C-Log etc. These are a long way from display gamma, so will need to be graded to like right. In addition they are adding a lot of compression (log compression) to the image so exposure becomes super critical. Normally you’ll find the specified recording levels for middle grey and white to be much lower with log gammas than conventional gammas. White with S-Log for example should only be exposed at 68%. The reason for this is the extreme amount of mid to highlight compression, so your mid range needs to be recorded lower to keep it out of the heavily compressed part of the log gamma curve. Skin tones with log are often in the 40 – 50% range compared to the 60-70% range commonly used with standard gammas. Log curves do normally provide the very best dynamic range (apart from raw), but they will need grading and ideally you want to grade log footage in a dedicated grading package that supports log corrections. If you grade log in your edit suite using linear (normal gamma) effects your end results won’t be as good as they could be. The other thing with log is now your recording anything up to 13 or 14 stops of dynamic range. With an 8 bit codec that’s only 17 – 18 bits per stop, which really isn’t a lot, so for log really you want to be recording with a very high quality 10 bit codec and possibly an external recorder. Remember with a standard gamma your over 30 bits per stop, now were looking at almost half that with log!
Shooting flat: There is a lot of talk about shooting flat. Some of this comes from people that have seen high dynamic range images from cameras with S-Log or similar which do look very flat. You see, the bigger the captured dynamic range the flatter the images will look. Consider this: On a TV, with a camera with a 6 stop range, the brightest thing the camera can capture will appear as white and the darkest as black. There will be 5 stops between white and black. Now shoot the same scene with a camera with a 12 stop range and show it on the same TV. Again the brightest is white and black is black, but the original 6 stops that the first camera was able to capture are now only being shown using half of the available brightness range of the TV as the new camera is capturing 12 stops in total, so the first 6 stops will now have only half the maximum display contrast. The pictures would look flatter. If a camera truly has greater dynamic range then in general you will get a flatter looking image, but it’s also possible to get a flat looking picture by raising the black level or reducing the white level. In this case the picture looks flat, but in reality has no more dynamic range than the original. Be very careful of modified gammas said to give a flat look and greater dynamic range from cameras that otherwise don’t have great DR. Often these flat gammas don’t increase the true dynamic range, they just make a flat picture with raised blacks which results in less data being assigned to the mid range and as a result less pleasing finished images.
So the key points to consider are:
Where you can control your lighting, consider using standard gamma.
The bigger the dynamic range you try to capture, the less information per stop you will be recording.
The further you deviate from standard gamma, the more likely the need to grade the footage.
The bigger the dynamic range, the more compressed the gamma curve, the more critical accurate mid range exposure becomes.
Flat isn’t always better.
Manage your privacy
To provide the best experiences, we use technologies like cookies to store and/or access device information. Consenting to these technologies will allow us to process data such as browsing behavior or unique IDs on this site. Not consenting or withdrawing consent, may adversely affect certain features and functions.
Functional
Always active
The technical storage or access is strictly necessary for the legitimate purpose of enabling the use of a specific service explicitly requested by the subscriber or user, or for the sole purpose of carrying out the transmission of a communication over an electronic communications network.
Preferences
The technical storage or access is necessary for the legitimate purpose of storing preferences that are not requested by the subscriber or user.
Statistics
The technical storage or access that is used exclusively for statistical purposes.The technical storage or access that is used exclusively for anonymous statistical purposes. Without a subpoena, voluntary compliance on the part of your Internet Service Provider, or additional records from a third party, information stored or retrieved for this purpose alone cannot usually be used to identify you.
Marketing
The technical storage or access is required to create user profiles to send advertising, or to track the user on a website or across several websites for similar marketing purposes.


 The new Sony A6300 is making quite a stir. This compact interchangeable lens camera has an amazing feature set that is very similar to the features found on it’s bigger brothers the A7sII and A7RII.