Shooting in cold weather and shooting snow scenes. Updated.

A couple of years ago I wrote a guide to help people that might have to shoot in the cold.  I’ve recently updated this article and as I know many of you won’t have seen it before I’ve provided a link to the page below

LINK: This article deals with shooting in the cold and how that might effect your camera.

LINK: Some ideas and suggestions for clothing in very cold conditions.

Here also are some tips for shooting snow scenes with conventional gammas. Of course you can also shoot with log or raw, if you do just make sure your exposure is nice and bright for the best results, generally when there is a lot of snow around dynamic range isn’t a huge problem as the snow acts as a reflector to fill in a lot of shadows.

With conventional gammas such as Rec-709 exposing for snow is tricky. You want it to look bright, but you don’t want to overexpose and it’s very easy to end up with a lot of the bright snow in your scene up in the knee or highlights where it will be compressed and loose contrast. This makes the snow look odd as it will have no texture, it can all too easily look over exposed when in fact it is not. In reality, although we often think of snow as bright and white, often you really don’t want to expose it too high.  With Rec-709 if your camera has a high level zebra set them to 90% (Zebra 2 on most Sony cameras). This way you will get a zebra pattern on the snow as it starts to enter the compressed knee or highlight area. If you are using Sony’s cinegammas or hypergammas I would lower the highlight zebras to 80% -85%.

On overcast or flat light snow days I prefer not to use Hypergammas/Cinegammas  as the highlight roll off can make the snow look very flat unless you grade the images a little and boost the contrast in post. However on bright higher contrast snow days with clear skies and strong shadows the Hyoegammas/Cinegammas work very well. You may want to consider using a little bit of negative black gamma to put a bit more contrast into the image.

You also want your snow to look white, so do a manual white balance using a proper white card or better still a grey card. Don’t try to white balance off the snow itself as snow can reflect a lot of blue light and skew the white balance a bit.  If you are shooting during golden hour at the beginning or end of the day and want to retain that warm look you might want to use a 5600K preset rather than a manual white balance to capture either the golden hour light or the blue light that follows it.

If the overall scene is very bright you may need to watch your aperture. In most cases you don’t want to have the camera stopped down to an aperture of f11 or smaller.  Due to an effect called diffraction limiting, in HD, at f11 a 2/3″ camera will start to show a slightly soft image.  A 1/2″ sensor camera will be just starting to get slightly soft at f8.  In 4K/UHD a super 35mm camera will start to show a slightly softer image from f11 – f16. So use you ND filters to control you light levels so you do not have too small an aperture. You may need to add additional ND in very bright scenes to avoid diffraction limiting.

One last tip. If you are standing around in the cold and get cold feet you should find something to stand on. Small twigs and branches, a rubber car mat anything like that will help insulate your feet from the cold ground helping keep them warm.

Notes on Timecode and Timecode Sync for cinematographers.

This is part 1 of two articles. In this article I will look at what timecode is and some common causes of timecode drift problems. In part 2 I will look at the correct way to synchronise timecode across multiple devices.

This is a subject that keeps cropping up from time to time. A lot of us camera operators don’t always understand the intricacies of timecode. If you live in a PAL/50Hz area and shoot at 25fps all the time you will have few problems. But start shooting at 24fps, 23.98 fps or start trying to sync different cameras or audio recorders and it can all get very complicated and very confusing very quickly.

So I’ve written these notes to try to help you out.

WHAT IS TIMECODE?

The timecode we normally encounter in the film and video world is simply a way to give every frame that we record a unique ID number based on the total number of frames recorded or the time of day.  It is a counter that counts whole frames. It can only count whole frames, it cannot count fractions of frames, as a result the highest accuracy is 1 frame. The timecode is normally displayed as Hour:Minute:Second:Frame in the following format

HH:MM:SS:FF

RECORD RUN AND FREE RUN

The two most common types of timecode used are “Record Run” and “Free Run”. Record run, as the name suggests only runs or counts up when the camera is recording. It is a cumulative frame count, which counts the total number of frames recorded. So if the first clip you record starts with the time code clock at 00:00:00:00 and runs for 10 seconds and 5 frames then the TC at the end of the clip will be 00:00:10:05. The first frame of the next clip you record will continue the count so will be 00:00:10:06 and so on. When you are not recording the timecode stops counting and does not increase.

With “Free Run” the timecode clock in the camera is always counting according to the frame rate the camera is set to. It is common to set the free run clock so that it matches the time of the day. Once you set the time in the timecode clock and enable “Free Run” the clock will start counting up whether you are recording or not.

HERE COMES A REALLY IMPORTANT BIT!

In “Free Run” once you have set the timecode clock it will always count the number of frames recorded and in some cases this will actually cause the clock to drift away from the actual time of day.

SOME OF THE PROBLEMS.

An old problem is that in the USA and other NTSC areas the frame rate is a really odd frame rate, it’s 29.97fps (this came about to prevent problems with the color signal when color TV was introduced). Timecode can only count actual whole frames, so there is no way to account for the missing 0.03 frames in every second. As a result timecode running at 29.97fps runs slightly slower than a real time clock.

If the frame rate was actually 30fps in 1 hour there would be 108,000 frames. But at 29.97fps after one real time hour you will have only recorded  107,892 frames, the frame counter TC, won’t reach one hour for another 3.6 seconds.

DROP FRAME TIMECODE.

To eliminate this 3.6 seconds per hour (relative to real time) timecode discrepancy in footage filmed at 29.97fps a special type of time code was developed called “Drop Frame Timecode“. Drop Frame Timecode (DF) works by: every minute, except each tenth minute, two timecode numbers are dropped from the timecode count. So there are some missing numbers in the timecode count but after exactly 1 real time hour the time code value will increment by 1 hour. No frames themselves are dropped, only numbers in the frame count.

WHEN TO USE DROP FRAME (DF) OR NON DROP FRAME (NDF).

Drop Frame Timecode is only ever used for material shot at  29.97fps, which includes 59.94i. (We will often incorrectly refer to this as 60i or 30fps – virtually all 30fps video these days is actually 29.97fps). If you are using “Rec Run” timecode you will almost never need to use Drop Frame as generally you will not by syncing with anything else.

If you are using 29.97fps  “Free Run” you should use Drop Frame (DF) when you want your timecode to stay in sync with a real time clock. An example would be shooting a long event or over several days where you want the timecode clock to match the time on your watch or the watch of an assistant that might be logging what you are shooting.

If you use 29.97fps Non Drop Frame  (NDF) your cameras timecode will drift relative to the actual time of day by a minute and a half each day. If you are timecode syncing multiple cameras or devices it is vital that they are all using the same type of timecode, mixing DF and NDF will cause all kinds of problems.

It’s worth noting that many lower cost portable audio recorders that record a “timecode” don’t actually record true timecode. Instead they record a timestamp based on a real time clock. So if you record on the portable recorder for lets say 2 hours and then try to sync the 1 hour point (01:00:00:00 Clock Time) with a camera recording 29.97fps NDF timecode using the 1 hour timecode number (01:00:00:00 NDF Timecode) they will be out of sync by 3.6 seconds. So this would be a situation where it would be preferable to use DF timecode in the camera as the cameras timecode will match the real time clock of the external recorder.

WHAT ABOUT 23.98fps?

Now you are entering a whole world of timecode pain!!

23.98fps is a bit of a oddball standard that came about from fitting 24fps films into the NTSC 29.97fps frame rate. It doesn’t have anything to do with pull up, it’s just that as NTSC TV runs at 29.97fps rather than true 30fps movies are sped up by 0.1% to fit in 29.97fps.

Now 23.98fps exists as a standalone format. In theory there is still a requirement for Drop Frame timecode as you can’t have 0.02 frames in a timecode frame count, each frame must have a whole number. Then after a given number of frames you go to the next second in the count. With 23.98fps we count 24 whole frames and the increment the timecode count by one second, so once again there is a discrepancy between real time and the timecode count of 3.6 seconds per hour. The time on a camera running at 23.98fps will run fast compared to a real time clock.  Unlike 29.97fps there is no Drop Frame (DF) standard for 23.98, it’s always treated as a 24fps count (TC counts 24 frames, then adds 1 to the second count), this is because there  is no nice way to adjust the count and make it fit real time as there is with 29.97fps. No matter how you do the math or how many frames you drop there would always be a fraction of a frame left over.

So 23.98fps does not have a DF mode. This means that after 1 hour of real time the timecode count on a camera shooting at 23.98 fps will be 00:01:03:14. If you set the camera to “Free Run” the timecode will inevitably drift relative to real time, again over the course of a day the camera will be fast by almost one and a half minutes compared to a real time clock or any other device using either drop frame timecode, 24fps or 25fps.

So, as I said earlier 23.98fps timecode can be painful to deal with.

24fps timecode does not have this problem as there are exactly 24 frames in every second, so a video camera shooting at 24fps should not see any significant timecode drift or loss of timecode sync compared to a real time clock.

It’s worth considering here the problem of shooting sync sound (where sound is recorded externally on a remote sound recorder). If your sound recorder does not have 23.98fps timecode the timecode  will drift relative to a camera shooting at 23.98fps. If your sound recorder only has a real time timecode clock you might need to consider shooting at 24fps instead of 23.98fps to help keep the audio and picture time codes in sync. Many older audio recorders designed for use alongside film cameras can only do 24fps timecode.

In part 2 I will look at the correct way to synchronise timecode across multiple devices.

CLICK HERE FOR PART 2


Incorrect Lumetri Scope Scales and incorrect S-Log range scaling in Adobe Premiere.

UPDATE: It appears that Adobe may have now addressed this. Luma and YC scopes now show the same levels, not different ones and the scaling of S-Log XAVC. signals now appears to be correct.


This came up as the result of a discussion on the FS5 shooters group on Facebook. An FS5 user shooting S-log2 was very confused by what he was seeing on the scopes in Adobe Premiere. Having looked into this further myself, I’m not surprised he was confused because it’s also confused me as there is some very strange behaviour with S-Log2 XAVC material.

First: BE WARNED THE “LUMA” SCOPE APPEARS TO BE A RELATIVE LUMINANCE SCOPE AND NOT A “LUMA” SCOPE.

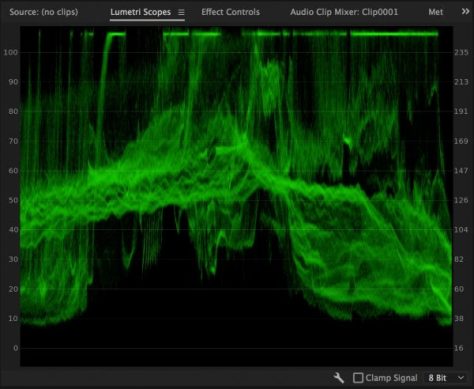
THIS IS THE “LUMA” Scope, I suggest you don’t use it! Look at the scale on the left side of the scope, it appears to be a % scale, not unlike the % scale we are all used to working with in the video world. In the video world 100% would be the maximum limit for broadcast TV, 90% would be white and the absoulte maximum recording level would be 109%. These % (IRE) levels have very specific data or code values. For luma, 100IRE has a code value of 940 in 10 bit or 235 in 8 bit. Then look at the scale on the right side of the luma scope. This appears to be an 8 bit code value scale, after all it has those key values of 128, 255 etc.

100% is not Code Value 235 as you would normally expect (Lumtri scopes).

Now look again at the above screen grab of the lumetri luma scope in Premiere 2017 – V11. On the left is what appears to be that familiar % scale. But go to 100% and follow the line across to where the code values are. It appears that on these scopes 100% means code value 255, this is not what anyone working in broadcast or TV would expect because normally code value 255 means 109.5%.

I suggest you use the YC waveform display instead.

Lumetri YC Scope showing S-log2

The YC waveform shown on the above screen capture is of an S-Log2 frame. If you go by the % scale it suggests that this recording has a peak level of only 98% when in fact the recording actually goes to 107%.

But here’s where it gets even stranger. Look at the below screen capture of another waveform display.

Lumetri YC scope and Cinegamma 1

So what is going on here? The above is a screen grab of Cinegamma 1 recorded in UHD using 8 bit XAVC-L. It goes all the way up to 109% which is the correct peak level for Cinegamma 1. So why does the S-Log2 recording only reach 98% but the Cinegamma recording, recorded moments later using the same codec reach 109%.  This is a value 10% higher than S-Log2 and I know that the Cinegammas cannot record at a level 10% greater than S-Log2 (the true difference is only about 2%).

Lets now compare the difference between how Premiere and Resolve handle these clips. The screen grab below shows the S-Log2 and Cinegamma 1 recordings side by side as handled in Adobe Premiere. On the left is the S-Log2, right Cinegamma1. Look at the very large difference in the peak recording levels. I do not expect to see this, there should only be a very small difference.

Lumetri YC scope with XAVC S-Log2 on the left and XAVC Cinegamma 1 on the right.

Now lets look at exactly the same clips in DaVinci Resolve. Note how much smaller the difference in the peak levels is. This is what I would expect to see as S-Log2 gets to around 107% and Cinegamma 1 reaches 109%, only a very small difference. Resolve is handling the files correctly, Premiere is not. For reference to convert 8 bit code values to 10 bit just multiply the 8 bit value by 4. So 100IRE which is CV235 in 8 bit is CV940 in 10 bit.

S-log2 on the left, Cinegamma 1 on the right. Notice the very small difference in peak levels. This is expected and correct.

So, until I get to the bottom of this all I can say is be very, very careful and don’t use the “Luma” scope, use the YC scope if you want to know your code values.  It also appears that Premiere scales the code values of S-Log recordings differently to normal gammas.

Additionally: Record exactly the same S-Log2 or S-Log3 image using XAVC internally in the camera and at the same time record a ProRes version on an external recorder. Bring both of these clips, which are actually recorded using exactly the same levels into Premiere and Premiere handles them differently. The XAVC squashed into a reduced range while the ProRes fills the larger range.

Lumetri YC scope and a ProRes S-Log2 recording. Not how this goes all the way to 107%.
Lumetri YC scope and a ProRes S-Log2 recording. Note how this goes all the way to 107%.

This has huge implications if you use LUT’s!!!!

The same LUT will result in a very different looking image from the XAVC and PRoRes material. There should not be a difference, but there is and it’s big. So this isn’t just a scopes issue, it’s an internal signal handling issue.

I’ve always preferred doing my color grading in a dedicated grading package with external scopes. It’s stuff like this that reminds me of why I prefer to work that way. I always end up with a better end result when I grade in Resolve compared to Premiere/Lumetri.

As I learn more about this I will post a new article. Use the subscribe button on the left to subscribe to the blog to be notified of new posts.

Sony Memory Media Utility.

If you use Sony’s SXS cards or USB Hard Drives, Sony have a utility that allows you to check the status of your media and correctly format the media. This is particularly useful for reading the number of cycles your SXS card has reached.

The utility can also copy SXS cards to multiple destinations for simultaneous backups of your content. You can download the utility for free via the link below.

http://www.sony.net/Products/memorycard/en_us/px/dlcondition_mmu.html

Looking For LUT’s for the Sony S-Log2 and S-Log3 Cameras?

This website has a great feature. If you look up in the top left corner of every page you will see a small magnifying glass symbol. If you click on that it will allow you to search the entire site for information… and there’s lots and lots of hint, tips and guides going back many years.

One thing though that a lot of people keep asking about is LUT’s or Look Up Tables. I have lots and they are all (for the moment at least) provided for free. There will be some paid LUT sets coming soon. If you follow the link below you will get a single page that lists all the current LUT articles on the web site. Links to my free LUT sets will be included in these articles.

Remember that LUT’s for S-Log2 and S-Log3 can be used in any camera with S-Log2 or S-Log3. So a LUT for the FS7 can also be used in the FS5 for example.

Here’s the link: https://www.xdcam-user.com/?s=LUT%27s

Big Update for Sony Raw Viewer.

Sony's Raw Viewer for raw and X-OCN file manipulation.
Sony’s Raw Viewer for raw and X-OCN file manipulation.

Sony’s raw viewer is an application that has just quietly rumbled away in the background. It’s never been a headline app, just one of those useful tools for viewing or transcoding Sony’s raw material. I’m quite sure that the majority of users of Sony’s raw material do their raw grading and processing in something other than raw viewer.

But this new version (2.3) really needs to be taken very seriously.

Better Quality Images.

For a start Sony have always had the best de-bayer algorithms for their raw content. If you de-bayer Sony raw in Resolve and compare it to the output from previous versions of Raw Viewer, the raw viewer content always looked just that little bit cleaner. The latest versions of Raw Viewer are even better as new and improved algorithms have been included! It might not render as fast, but it does look very nice and can certainly be worth using for any “problem” footage.

Class 480 XAVC and X-OCN.

Raw Viewer version 2.3 adds new export formats and support for Sony’s X-OCN files. You can now export to both XAVC class 480 and class 300, 10 or 12bit ProRes (HD only unfortunately), DPX and SStP.  XAVC Class 480 is a new higher quality version of XAVC-I that could be used as a ProResHQ replacement in many instances.

Improved Image Processing.

Color grading is now easier than ever thanks to support for Tangent Wave tracker ball control panels along with new grading tools such as Tone Curve control. There is support for EDL’s and batch processing with all kind of process queue options allowing you to prioritise your renders. Although Raw Viewer doesn’t have the power of a full grading package it is very useful for dealing with problem shots as the higher quality de-bayer provides a cleaner image with fewer artefacts. You can always take advantage of this by transcoding from raw to 16 bit DPX or Open EXR so that the high quality de-bayer takes place in Raw Viewer and then do the actual grading in your chosen grading software.

HDR and Rec.2100

If you are producing HDR content version 2.3 also adds support for the PQ and HLG gamma curves and Rec.2100 It also now includes HDR waveform displays. You can use Raw Viewer to create HDR LUT’s too.

So all-in-all Raw Viewer has become a very powerful tool for Sony’s raw and XOCN content that can bring a noticeable improvement in image quality compared to de-bayering in many of the more commonly used grading packages.

Download Link for Sony Raw Viewer: http://www.sonycreativesoftware.com/download/rawviewer


Latest Apple Pro Video Formats Update Adds MXF Playback.

If you are running the latest Mac Sierra OS the recent Pro Video Formats update, version 2.0.5 adds the ability to play back MXF OP1a files in Quick Time Player without the need to transcode.

Direct preview of an XAVC MXF file in the finder of OS Sierra.

You can also preview MXF files in the finder window directly! This is a big deal and very welcome, finally you don’t need special software to play back files wrapped in one of the most commonly used professional media wrappers. Of course you must have the codec installed on your computer, it won’t play a file you don’t have the codec for, but XAVC, ProRes and many other pro codecs are include in the update.

At the moment I am able to play back most MXF files including most XAVC and ProRes MXF’s. However some of my XAVC MXF’s are showing up as audio only files. I can still play back these files with 3rd party software, there is no change there. But for some reason I can’t play back every XAVC MXF file directly in Quicktime Player, so play as audio only. I’m not sure why some files are fine and others are not, but this is certainly a step in the right direction. Why it’s taken so long to make this possible I don’t really know, although I suspect it is now possible due to changes in the core Quicktime components of OS Sierra.  You can apply this same Video Formats update to earlier OS’s but don’t gain the MXF playback.

Thanks to reader Mark for the heads-up!

Why Do We Need To Light?

Lets face it cameras are becoming more and more sensitive. We no longer need the kinds of light levels that we once used to need. So why is lighting still so incredibly important. Why do we light?

Starting at a most basic level, there are two reason for lighting a scene. The first and perhaps most obvious is to add enough light for the camera to be able to “see” the scene, to get an adequate exposure. The other reason we need to light, the creative reason why we need to light is to create shadows.

It is not the light in a scene that makes it look interesting, it is the shadows. It is the contrast between light and dark that makes an image intriguing to our eyes and brain. Shadows add depth, they can be used to add a sense of mystery or draw the viewers gaze to the brighter parts of the scene. Without shadows, without contrast most scenes will be visually uninteresting.

Take a typical daytime TV show. Perhaps a game show. Look at how it has been lit. In almost every case it will have been lit to provide a uniform and even light level across the entire set. It will be bright so that the cameras can use a reasonable aperture for a deep depth of field. This helps the camera operators keep everything focus. The flat, uniform light means that the stars or contestants can go anywhere in the set and still look OK. This is lighting for exposure, where the prime driver is a well exposed image.  The majority of the light will be coming from the camera side of the set or from above the set with all the light flooding inwards into the set.

Typical TV lighting, flat, very few shadows, light coming from the camera side of the set or above the set.

Then look at a well made movie. The lighting will be very different. Often the main source of light will be coming from the side or possibly even the rear of the scene. This creates dark shadows on the opposite side of the set/scene. It will cast deep shadows across faces and it’s often the shadow side of a face that is more interesting than the bright side.

Striking example of light coming from opposite the camera to create deep shadows - Bladerunner.
Striking example of light coming from opposite the camera to create deep shadows – Bladerunner.

A lot of movie lighting is done from diagonally opposite the cameras to create very deep shadows on faces and to keep the background of the shot dark. If, as is typical in TV production your lights are placed where the cameras are and pointed into the set, then all the light will go into set and illuminate the set from front to back. If your lights are towards the side or rear of the set and are facing towards the cameras the light will be falling out of and away from the set rather than into the set. This means you can then keep the rear of the set dark much more easily. Having the main light source opposite the camera is also why you see far more lens flare effects in movies compared to TV as the light is often shining into the camera lens.

Another example of the main light sources comming towards the camera. The assasination of Jesse James by the coward Robert Ford.
Another example of the main light sources coming towards the camera. The assassination of Jesse James by the coward Robert Ford.

If you are shooting a night scene and you want to get nice clean pictures from your camera then contrast becomes key. When we think of what things look like at night we automatically think “dark”. But cameras don’t like darkness, they like light, even the modern super sensitive cameras still work better when there is a a decent amount of light. So one of the keys to a great looking night scene is to light the foreground faces of your cast well but keep the background very dark. You expose the camera for the bright foreground (which means you should not have any noise problems) and then rely on the fact that the background is dark to make the scene look like a night scene.  Again the reason to light is for better shadows, to make the darker parts of the scene appear very dark relative to the foreground and a high level of contrast will make it look like night. Consider a bright moonlit night, faces will be bright compared to everything else.

A well lit face against a very dark background means low noise night shot. Another example from The assassination of Jesse James by the coward Robert Ford.

So in cinematography, very often the reason to add light is to create shadows and contrast rather than to simply raise the overall light level. To make this easier we need to think about reflections and how the light that we are adding will bounce around the set and reduce the high contrast that we may be seeking. For this reason most film studios have black walls and floors. It’s amazing how much light bounces of the floor. Black drapes can be hung against walls or placed on the floor as “negative fill” to suck up any stray light. Black flags can be used to cut and control any undesired light output from your lamps and a black drape or flag placed on the shadow side of a face will often help increase the contrast across that face by reducing stray reflections. Flags are as important as lights if you want to control contrast. Barn doors on a lamp help, but if you really want to precisely cut a beam of light the flag will need to be closer to the subject.

I think most people that are new to lighting focus too much on the lights themselves and don’t spend enough time learning how to modify light with diffusers, reflectors and flags. Good video lights are expensive, but if you can’t control and modify that light you may as well just by a DIY floodlight from your local hardware store.

Also consider using fewer lights. More is not necessarily better. The more lights you add the more light sources you need to control and flag. The more light you will have bouncing around your set reducing your contrast and spilling into your otherwise nice shadows. More lights means multiple shadows going in different directions that you will have to deal with.  Instead of using lots of lights be more careful about where you place the lights you do have, make better use of diffusion perhaps by bringing it closer to your subject to get more light wrap around rather than using separate key and fill lights.


What does Rec-2020 on the PXW-FS7 II really mean?

So, as you should have seen from my earlier post Sony has included Rec-2020 as a colorspace in custom mode on the new FS7 II. But what does this mean and how important is it? When would you use it and why?

Recommendation ITU BT.2020 is a set of standards created by the International Telecommunications Union for the latest and next generation of televisions. Within the standard there are many sub-standards that define things such as bit depth, frame size, frame rates, contrast, dynamic range and color.

The colorspaces that Sony's cameras can capture.
The colorspaces that Sony’s cameras can capture.

The Rec-2020 addition in the the FS7 II specifically refers to the color space that is recorded, determining the range of colors that can be recorded and the code values used to represent specific tones/hues.

First of all though it is important to remember that the FS7 II shares the same sensor as the original FS7, the FS5 and F5. Sony has always stated that this sensor is essentially a “709” sensor. The sensor in Sony’s PMW-F55 can capture a much greater color range (gamut) than the F5, FS5 and FS7, only the F55 can actually capture the full Rec-2020 color space, the FS7 II sensor cannot. It’s very difficult to measure the full color gamut of a sensor, but from the tests that I have done with the F5 and FS7 I estimate that this sensor can capture a color gamut close to that of the DCI-P3 standard, so larger than Rec-709 but not nearly as large as Rec-2020 (I’d love someone to provide the actual color gamut of this sensor).

So given that the FS7 II’s sensor can’t actually see colors all that far beyond Rec-709 what is the point of adding Rec-2020 recording gamut as the camera can’t actually fill the recording Gamut? Similarly the F5/FS5/FS7 cannot fill S-Gamut or S-Gamut3.

The answer is – To record the colors that are captured with the correct values. If you capture using Rec-709 and then play back the Rec-709 footage on a Rec-2020 monitor the colors will look wrong. The picture will be over saturated and the hues slightly off. In order for the picture to look right on a Rec-2020 monitor you need to record the colors at the right values. By adding Rec-2020 to the FS7 II Sony have given users the ability to shoot Rec-2020 and then play back that content on a Rec-2020 display and have it look right. You are not capturing anything extra (well, maybe a tiny bit extra), just capturing it at the right levels so it at least looks correct.

As well as color, Rec-2020 defines the transfer functions, or gamma curves to you and me, that should be used. The basic transfer function is the same as used for Rec-709, so you can use Rec-709 gamma with Rec-2020 color to get a valid Rec-2020 signal. For full compatibility this should be 3840×2160 progressive and 10bit (the Rec-2020 standard is a minimum of 10bit and as well as 3840×2160 also includes 7680×4320).

But, one of the hot topics right now in the high quality video world is the ability to display images with a much greater dynamic range than the basic Rec-709 or Rec-2020 standards allow. There is in fact a new standard called Rec-2100 specifically for HDR television. Rec-2100 uses the same colorspace as Rec-2020 but then pairs that bigger colorspace with either Hybrid Log Gamma or ST2084 gamma, also know as PQ (Perceptual Quantiser). As the FS7 II does not have PQ or HLG as gamma curves you cannot shoot material that is directly compatible with Rec-2100. But what you can do is shoot using S-Log2/S-Log3 with S-Gamut/S-Gamut3/SGamut3.cine which will give you the sensors full colorspace with the sensors full 14 stop dynamic range. Then in post production you can grade this to produce material that is compatible with the Rec-2100 standard or the Rec-2020 standard. But of course you can do this with an original FS7 (or F5) too.

So, when would you actually  use the FS7 II’s Rec-2020 colorspace rather than S-Log/S-Gamut?

First of all you don’t want to use it unless you are producing content to be shown on Rec-2020 displays. Recording using Rec-2020 color gamut and then showing the footage on a Rec-709 display will result in washed out colors that don’t look right.

You would probably only ever use it if you were going to output directly from the camera to a monitor that only supports Rec-2020 color or for a project that will be specifically shown on a standard dynamic range Rec-2020 display. So, IMHO this extra colorspace is of very limited benefit. For most productions regular Rec-709 or S-Log/S-Gamut will still be the way forward unless Sony add Hybrid Log Gamma or PQ gamma to the camera as well. Adding HLG or PQ however has problems of it’s own as the existing viewfinders can only show standard dynamic range images, so an external HDR capable monitor would be needed.

Rec-2020 recording gamut is a nice thing to have and for some users it may be important. But overall it’s not going to be a deal breaker if you only have a standard FS7 as the S-Log workflow will allow you to produce Rec-2020 compatible material.