It’s very easy to create your own User3D LUT for the Sony PXW-FS7 using DaVinci Resolve or just about any grading software with LUT export capability. The LUT should be a 17x17x17 or 33x33x33 .cube LUT (this is what Resolve creates by default).
Simply shoot a correctly exposed Slog3 clip at the native ISO. You must use the same Gamut as you intend to use in any other productions that will use this LUT, I recommend SGamut3.cine.
Import the clip in to Resolve and grade it as you wish the final image to look. A very good way to do this is to include a MacBeth chart or DSC Labs OneShot or CDM chart within the test shot. Then use Resolves excellent chart matching tool to get create a starting point for the grade. The big benefit of this approach is that Resolve will provide a very good gamma correction moving your footage from Slog3 to Rec-709. Once you have used the chart to move you into the correct gamma range just tweak and fine tune the image to get your desired look. Then once your happy with your look, right click on the clip in the timeline and “Export LUT”. Resolve will then create a .cube LUT.
Then place the .cube LUT file created by the grading software on an SD card in the PMWF55_F5 folder. You may need to create the following folder structure on the SD card, so first you have a PRIVATE folder, in that there is a SONY folder and so on.
PRIVATE/SONY/PRO/CAMERA/PMWF55_F5
Put the SD card in the camera, then go to the File menu and go to “Monitor 3D LUT” and select “Load SD Card”. The camera will offer you a 1 to 4 destination memory selection, choose 1,2,3 or 4, this is the location where the LUT will be saved. You should then be presented with a list of all the LUT’s on the SD card. Select your chosen LUT to save it from the SD card to the camera.
Once loaded in to the camera when you choose 3D User LUT’s you can select between user LUT memory 1,2,3 or 4. Your LUT will be in the memory you selected when you copied the LUT from the SD card to the camera.
NOTE: If you use a Mac to copy the LUT to the SD card the Mac will place some junk files on the SD card with almost exactly the same name as the LUT. The camera will see this junk file and display it in the list of LUT files. The junk file will have a “._” before the LUT name. Don’t try to load these junk files by mistake, they won’t work. Make sure you scroll down the LUT list to the real LUT file when you try to load the LUT’s in to the camera.
I have created two new sets of film look LUT’s for the FS7, F5 and F55. These LUT’s should be used in conjunction with S-Log3 and SGamut3.cine. They will give you a high contrast film like look that mimics Kodak film stock with slightly blue dark and mid tones and warm skin tones. The are 3D cube LUT’s and the two sets include LUT’s with compensation for under and over exposure.
To use the LUT’s in camera on the PXW-FS7, PMW-F5 or PMW-F55 then the LUT’s need to be placed in the PMWF55_F5 folder on an SD card. The correct folder structure should look like this:
PRIVATE – SONY – PRO – CAMERA – PMWF55_F5
Slog3_cine-film-look-luts
If you find the LUT’s useful please consider buying me a drink, they did take some time to create:
This is not going to be a tutorial on editing or grading. Just an outline guide on how to work with S-log2, mainly with Adobe Premiere and DaVinci Resolve. These are the software packages that I use. Once upon a time I was an FCP user, but I have never been able to get on with FCP-X. So I switched to Premiere CC which now offers some of the widest and best codec support as well as an editing interface very similar to FCP. For grading I like DaVinci Resolve. It’s very powerful and simple to use, plus the Lite version is completely free. If you download Resolve it comes with a very good tutorial. Follow that tutorial and you’ll be editing and grading with Resolve in just a few hours.
The first thing to remember about S-Log2/S-gamut material is that it has a different gamma and colour space used by almost every TV and monitor in use today. So to get pictures that look right on a TV we will need to convert the S-Log2 to the standard used by normal HD TV’s which is know as Rec-709. The best way to do this is via a Look Up Table or LUT.
Don’t be afraid of LUT’s. It might be a new concept for you, but really LUT’s are easy to use and when used right they bring many benefits. Many people like myself share LUT’s online, so do a google search and you will find many different looks and styles that you can download for your project.
So what is a LUT? It’s a simple table of values that converts one set of signal levels to another. You may come across different types of LUT’s… 1D, 3D, Cube etc. At a basic level these all do the same thing, there are some differences but at this stage we don’t need to worry about those differences. For grading and post production correction, in the vast majority of cases you will want to use a 3D Cube LUT. This is the most common type of LUT. The LUT’s that you use must be designed for the gamma curve and colour space that the material was shot in and the gamma curve and colorspace you want to end up in. So, in the case of a Sony camera, be that an A7s, A7r, A6300 or whatever we want LUT’s that are designed for either S-Log2 and S-Gamut or S-Log3 and SGamut3.cine. LUT’s designed for anything other than this will still transform the footage, but the end results will be unpredictable as the tables input values will not match the correct values for S-Log2/S-Log3.
One of the nice things about LUT’s is that they are non-destructive. That is to say that if you add a LUT to a clip you are not actually changing the original clip, you are simply altering the way the clip is displayed. If you don’t like the way the clip looks you can just try a different LUT.
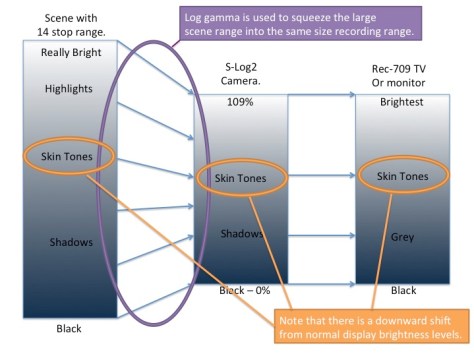
If you followed the A7s shooting guide then you will remember that S-Log2 or S-Log3 takes a very large shooting scene dynamic range (14 stops) and squeezes that down to fit in a standard video camera recording range. When this squeezed or compressed together range is then shown on a conventional REC-709 TV with a relatively small dynamic range (6 stops) the end result is a flat looking, low contrast image where the overall levels are shifted down a bit, so as well as being low contrast and flat the pictures may also look dark.
To make room for the extra dynamic range and the ability to record very bright objects, white and mid tones are shifted down in level.The on screen contrast appears reduced as the capture contrast is greater than the display contrast.
To make the pictures on our conventional 709 TV or computer moniotr have a normal contrast range, in post production we need to expand the the squeezed recorded S-Log2/S-Log3 range to the display range of REC-709. To do this we apply an S-Log2 or S-Log3 to Rec-709 LUT to the footage during the post production process. The LUT table will shift the S-log input values to the correct REC-709 output values. This can be done either with your edit software or dedicated grading software. But, we may need to do more than just add the LUT.
Adding a LUT in post production expands the squeezed S-Log2 recording back to a normal contrast range.
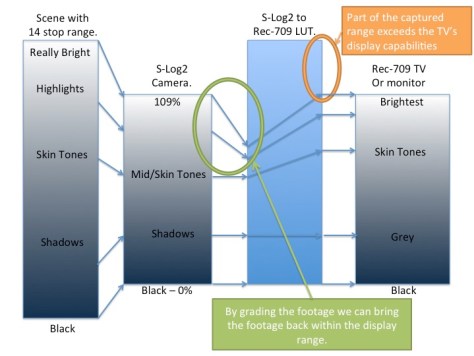
There is a problem because normal TV’s only have a limited display range, often smaller that the recorded image range. So when we expand the squeezed S-Log2/S-Log3 footage back to a normal contrast range the amount of dynamic range in the recording exceeds the dynamic range that the TV can display so the highlights and brighter parts of the picture are lost, they are no longer seen and as a result the footage may now look over exposed.
With the dynamic range now expanded by the LUT the recordings brightness range exceeds the range that the TV or monitor can show, so while the contrast is correct, the pictures may look over exposed.
But don’t panic! The brightness information is still there in your footage, it hasn’t been lost, it just can’t be displayed. So we need to tweak and fine tune the footage to bring the brighter parts of the image back in to range. This is typivally called “grading” or color correcting the material.
Normally you want to grade the clip before it passes through the LUT as prior to the LUT the full range of the footage is always retained. The normal procedure is to add the LUT to the clip or footage as an output LUT, that is to say the LUT is on the output from the grading system. Although it’s preferable to have the LUT after any corrections, don’t worry too much about where your LUT goes. Most edit and grading software will still retain the full range of everything you have recorded, even if you can’t always see it on the TV or monitor.
By grading or adjusting the footage before it enters the LUT we can bring the highlights back within the range that the TV or monitor can show.
If you chose to deliberately over expose the camera by a stop or two to get the best from the 8 bit recordings (see part one of the guide) then the LUT that you should use should also incorporate compensation for this over exposure. The LUT sets that I have provided for the Sony Alpha cameras includes LUTs that have compensation for +1 and +2 stops of over exposure.
IN PRACTICE.
So how do we do this in practice?
First of all you need some LUT’s. If you haven’t already downloaded my LUT’s please download one or both of my LUT sets:
To start off with you can just edit your S-Log footage as you would normally. Don’t worry too much about adding a LUT at the edit stage. Once the edit is locked down you have two choices. You can either export your edit to a dedicated grading package, or, if your edit package supports LUT’s you can add the LUT’s directly in the edit application.
In Premiere CC you use the built in Lumetri filter plugin found under the “filters”, “color correction filters” tab (not the Lumetri Looks).
In all the above cases you add the filter or plugin to the clip and then select the LUT that you wish to use. It really is very easy. Once you have applied the LUT you can then further fine tune and adjust the clip using the normal color correction tools. To apply the same LUT to multiple clips simply select a clip that already has the LUT applied and hit “copy” or “control C” and then select the other clips that you wish to apply the LUT to and then select “paste – attributes” to copy the filter settings to the other clips.
Exporting Your Project To Resolve (or another grading package).
This is my preferred method for grading as you will normally find that you have much better correction tools in a dedicated grading package. What you don’t want to do is to render out your edit project and then take that render into the grading package. What you really want to do is export an edit list or XML file that contains the details of your project. The you open that edit list or XML file in the grading package. This should then open the original source clips as an edited timeline that matches the timeline you have in your edit software so that you can work directly with the original material. Again you would just edit as normal in your edit application and then export the project or sequence as preferably an XML file or a CMX EDL. XML is preferred and has the best compatibility with other applications.
Once you have imported the project into the grading package you then want to apply your chosen LUT. If you are using the same LUT for the entire project then the LUT can be added as an “Output” LUT for the entire project. In this way the LUT acts on the output of your project as a final global LUT. Any grading that you do will then happen prior to the LUT which is the best way to do things. If you want to apply different LUT’s to different clips then you can add a LUT to individual clips. If the grading application uses nodes then the LUT should be on the last node so that any grading takes place in nodes prior to the LUT.
Once you have added your LUT’s and graded your footage you have a couple of choices. You can normally either render out a single clip that is a compilation of all the clips in the edit or you can render the graded footage out as individual clips. I normally render out individual clips with the same file names as the original source clips, just saved in a different folder. This way I can return to my edit software and swap the original clips for the rendered and graded clips in the same project. Doing this allows me to make changes to the edit or add captions and effects that may not be possible to add in the grading software.
I’ve been doing a lot of work on shooting SLog-2 with the A7s. I realised almost straight away that a set of LUT’s for this camera would really help speed up my grading and testing. In addition as the camera is only 8 bit I have found that I am actually getting the best results from the Slog-2 if I over expose it just a little bit, depending of course on the scene. So I created a set of LUT’s that includes compensation for shooting at the nominal correct exposure as well as either 1 or 2 stops over exposed. In all there are 20 LUT’s in two sets. One is Rec-709 based LUT’s and the other Filmic LUT’s to act as starting points for further grading.
I am in the process of creating the complete workflow and SLog-2 guide for the A7s which I should be publishing later next week which will have much more information on how to use these LUT’s. But in the mean time here are the LUT’s if anyone want’s to play (and I would like feedback on what you think of them).
The LUT naming goes something like this:
AC A7S 709(800) ZERO
AC (That’s me!). A7S (The Camera).
709(800) = Output gamma or style. ZERO = Exposure off set.
The exposure offset refers to the number of stops the footage is over exposed by relative to the normal SLog2 exposure level of Middle Grey at 32% and 90% white at 59%. ZERO menas no exposure offset. 1STOP would be used when the SLog2 was exposed 1STOP over and in this case the LUT then shifts the exposure back down 1 stop to compensate.
709 = Vanilla Rec-709, very contrasty, but limited highlight response and hard clip of over exposure.
709(800) = Rec-709 gamma with 800% (high) dynamic range. Will be slightly low contrast but deals much better with over exposure or bright highlights than vanilla 709.
Film-Like1 = An extended range gamma with highlight roll off (+400% range), slightly de-saturated, slightly more film like color (small red/yellow removed).
Filmic2 = Extended range low contrast gamma with very good over exposure handling. Slightly de-saturated. Good grading start point.
Filmic3 = Similar to Filmic2 but a little more contrast at the expense of a little less highlight roll off.
Click on the links below to download the LUT sets. PLEASE DO NOT HOST THESE ELSEWHERE OR DISTRIBUTE THESE ELSEWHERE OR VIA ANY MEANS OTHER THAN A LINK TO THIS PAGE.
It’s very easy to create your own 3D LUT for the Sony PMW-F5 or PMW-F55 using DaVinci Resolve or just about any grading software with LUT export capability. The LUT should be a 17x17x17 or 33x33x33 .cube LUT (this is what Resolve creates by default).
Simply shoot some test Slog2 or Slog3 clips at the native ISO. You must use the same Slog and color space as you will be using in the camera.
Import and grade the clips in Resolve as you wish the final image to look. Then once your happy with your look, right click on the clip in the timeline and “Export LUT”. Resolve will then create a .cube LUT.
Then place the .cube LUT file created by the grading software on an SD card in the PMWF55_F5 folder. You may need to create the following folder structure on the SD card, so first you have a PRIVATE folder, in that there is a SONY folder and so on.
PRIVATE : SONY : PRO : CAMERA : PMWF55_F5
Put the SD card in the camera, then go to the File menu and go to “Monitor 3D LUT” and select “Load SD Card”. The camera will offer you a 1 to 4 destination memory selection, choose 1,2,3 or 4, this is the location where the LUT will be saved. You should then be presented with a list of all the LUT’s on the SD card. Select your chosen LUT to save it from the SD card to the camera.
Once loaded in to the camera when you choose 3D User LUT’s you can select between user LUT memory 1,2,3 or 4. Your LUT will be in the memory you selected when you copied the LUT from the SD card to the camera.
When an engineer designs a gamma curve for a camera he/she will be looking to achieve certain things. With Sony’s Hypergammas and Cinegammas one of the key aims is to capture a greater dynamic range than is possible with normal gamma curves as well as providing a pleasing highlight roll off that looks less electronic and more natural or film like.
Recording a greater dynamic range into the same sized bucket.
To achieve these things though, sometimes compromises have to be made. The problem being that our recording “bucket” where we store our picture information is the same size whether we are using a standard gamma or advanced gamma curve. If you want to squeeze more range into that same sized bucket then you need to use some form of compression. Compression almost always requires that you throw away some of your picture information and Hypergamma’s and Cinegamma’a are no different. To get the extra dynamic range, the highlights are compressed.
Compression point with Hypergamma/Cinegamma.
To get a greater dynamic range than normally provided by standard gammas the compression has to be more aggressive and start earlier. The earlier (less bright) point at which the highlight compression starts means you really need to watch your exposure. It’s ironic, but although you have a greater dynamic range i.e. the range between the darkest shadows and the brightest highlights that the camera can record is greater, your exposure latitude is actually smaller, getting your exposure just right with hypergamma’s and cinegamma’s is very important, especially with faces and skin tones. If you overexpose a face when using these advanced gammas (and S-log and S-log2 are the same) then you start to place those all important skin tone in the compressed part of the gamma curve. It might not be obvious in your footage, it might look OK. But it won’t look as good as it should and it might be hard to grade. It’s often not until you compare a correctly exposed sot with a slightly over shot that you see how the skin tones are becoming flattened out by the gamma compression.
But what exactly is the correct exposure level? Well I have always exposed Hypergammas and Cinegammas about a half to 1 stop under where I would expose with a conventional gamma curve. So if faces are sitting around 70% with a standard gamma, then with HG/CG I expose that same face at 60%. This has worked well for me although sometimes the footage might need a slight brightness or contrast tweak in post the get the very best results. On the Sony F5 and F55 cameras Sony present some extra information about the gamma curves. Hypergamma 3 is described as HG3 3259G40 and Hypergamma 4 is HG4 4609G33. What do these numbers mean? lets look at HG3 3259G40
The first 3 numbers 325 is the dynamic range in percent compared to a standard gamma curve, so in this case we have 325% more dynamic range, roughly 2.5 stops more dynamic range. The 4th number which is either a 0 or a 9 is the maximum recording level, 0 being 100% and 9 being 109%. By the way, 109% is fine for digital broadcasting and equates to bit 255 in an 8 bit codec. 100% may be necessary for some analog broadcasters. Finally the last bit, G40 is where middle grey is supposed to sit. With a standard gamma, if you point the camera at a grey card and expose correctly middle grey will be around 45%. So as you can see these Hypergammas are designed to be exposed a little darker. Why? Simple, to keep skin tones away from the compressed part of the curve.
Here are the numbers for the 4 primary Sony Hypergammas:
I get asked a lot about settings for shooting in low light with the EX1 and EX3. To be honest there is not much that will make a big difference that can be done, beyond adding in camera gain. There are a few tweaks you can make to the picture profiles that will help minimise noise levels and give a slightly brighter picture without resorting to overall gain and I’ll go through those here.
Gamma: By using a brighter or higher gain gamma curve you can get a slightly brighter image without an across the board gain increase. Do however consider though that gamma does add gain so a brighter gamma curve has more gain and thus more noise than a darker gamma curve. Where you light range is limited or controlled then I recommend using Standard Gamma 2 with the black gamma set to +40. Raising the black gamma helps lift shadow and dark areas of the image. For scenes with bright highlights then it’s useful to have some extra dynamic range and in this case I would choose cinegamma 4, again with the black gamma raised, this time to +50.
If you are happy with turning detail off altogether then this may be a wise choice as it will prevent any noise from being enhanced. If not in order to keep the appearance of noise to a minimum I would decrease the detail level to -10. As we are shooting in low light then I will assume there are a lot of dark areas in the image. To keep noise less visible in low contrast areas I would set the crisping to +50. This will slightly soften the image but help control noise.
There are two principle forms of noise, chroma noise and luma noise. There’s not much we can do about luma noise other than controlling detail enhancement as above, but if we reduce the image colour saturation we can reduce the chroma noise. Better still using the low key sat function we can just reduce the chroma (colour) level in low key parts of the shot. So for my low light profile I would set Low Key Sat to somewhere around -50.
So by changing the gamma we can increase the sensitivity a little, turning off the detail correction or using crispening we can ensure that the visibility of any noise is as minimised and the Low Key Sat function will keep the noise to a manageable level.
These setting won’t turn your EX1 or EX3 into a mega low light monster, but they will give a small boost to the low light performance before you have to resort to adding gain. Talking of gain, do make sure you read this to understand what gain is doing.
EX1/EX3 Picture Profile suggestions for low light:
Gamma Standard 2, Black Gamma +40 OR Cinegamma 4, Black Gamma +50
Detail OFF or Detail Level -10, Crispening +50
Low Key Sat -50
Black level -3 (restores black to zero)
Manage your privacy
To provide the best experiences, we use technologies like cookies to store and/or access device information. Consenting to these technologies will allow us to process data such as browsing behavior or unique IDs on this site. Not consenting or withdrawing consent, may adversely affect certain features and functions.
Functional
Always active
The technical storage or access is strictly necessary for the legitimate purpose of enabling the use of a specific service explicitly requested by the subscriber or user, or for the sole purpose of carrying out the transmission of a communication over an electronic communications network.
Preferences
The technical storage or access is necessary for the legitimate purpose of storing preferences that are not requested by the subscriber or user.
Statistics
The technical storage or access that is used exclusively for statistical purposes.The technical storage or access that is used exclusively for anonymous statistical purposes. Without a subpoena, voluntary compliance on the part of your Internet Service Provider, or additional records from a third party, information stored or retrieved for this purpose alone cannot usually be used to identify you.
Marketing
The technical storage or access is required to create user profiles to send advertising, or to track the user on a website or across several websites for similar marketing purposes.