The version 8 firmware update for the PMW-F5 and PMW-F55 cameras is not available on the internet in Europe. In order to get a copy you have to contact prime support or your local service center providing the serial number of your camera, current firmware level and any options installed. Then, if your camera is safe for an end user upgrade they will issue you with a copy of the firmware and the update instructions appropriate for your serial number. If not they will advise you as to where you need to send it or take it for the update.
My understanding is that despite all the warnings there have been a lot of people that have tried to install the firmware on cameras where the install procedure is different. The end result being a camera that will no longer work and the need to replace one of the logic boards which is very expensive. To prevent this they are requiring the serial number before releasing the firmware to you.
I also recommend that if you do have a copy of the version 8 update that you do NOT share it. Please allow Sony to ensure that only owners of those cameras that can be upgraded by the end user get the firmware. This isn’t Sony trying to get more money from you, this is Sony trying to ensure that you don’t end up with an extremely expensive repair bill.
In Europe you should email Prime Support: PrimeSupport@eu.sony.com They will normally get back to you very quickly.
The Firmware is available online from the US site. BUT YOU MUST ENSURE YOUR CAMERA CAN BE USER UPGRADED. DO NOT ATTEMPT IF YOU ARE AT ALL UNSURE.
In the USA I would suggest contacting:
United States service centers:
Eastern Service Facility
Teaneck
Sony Service Center
Sony Electronics Inc.
123 W. Tryon Avenue
Teaneck, New Jersey 07666
Voice: 201-833-5300
FAX: 201-833-5312
E-mail: TeaneckService@am.sony.com
Western Service Facility
Los Angeles
Sony Service Center
Sony Electronics Inc.
2706 Media Center Drive; Suite 130
Los Angeles, California 90065
Voice: 323-352-5000
FAX: 323-352-5039
E-mail: LAService@am.sony.com
In Canada:
Sony of Canada (Customer Service Solutions Group)
Service Operations
211 Placer Court
Toronto, Ontario , M2H 3H9
Sony Montreal Service Center
Sony du Canada Ltée
2886 Boulevard Daniel?Johnson
Laval, QC H7P 5Z7
Fusion Cine
1469 Venables Street
Vancouver, BC V5L 2G1
Professional Technical Support (Vancouver)
Please have the following details ready:
First name
Last name
Email address
Company name if applicable
Business Phone
Country*
Which product do you own?
Serial Number (6 digit number)
Which firmware version is currently installed?
And confirm if the CBK-55PD option installed?*
I’ve written about this many times before, but still it comes up again and again. Which is better? Which should I use? I hear all kinds of crazy comments and a lot of incorrect information, so first of all lets dispel a few myths:
S-Log2 captures more dynamic range than S-Log3, it goes to a higher level on the waveform, S-Log3 clips the highlights sooner.
On most of Sony’s current cameras S-Log2 and S-Log3 both currently record exactly the same dynamic range as this is limited by the sensors that Sony are using. The S-log3 curve could be used in a future camera to capture up to 16 stops and in fact the new Venice camera records over 15 stops. But as all of Sony’s other cameras sensors can only see 14 stops and the S-Log3 curve is designed to go beyond 14 stops, stop No. 14 is not recorded all the way at the top of the recording range. S-Log2 is a 14 stop maximum curve, so the peak level is recorded right at the top of the recording range. There is no space held in reserve for anything beyond 14 stops.
In Sonys current camera range (other than Venice) the limit is 14 stops whether it’s S-Log2 or S-Log3. The chart that Sony provide showing both S-Log2 and S-Log3 is a little confusing as it shows the entire gamma curve rather than what the camera can actually “see”. In their current implementations both curves stop at +6 stops over middle grey, both capture the same dynamic range, there is no difference.
S-Log2 is brighter than S-Log3 so it must be capturing highlights better.
No, not really, see above. Playback and on screen brightness comes from the levels chosen to record something at and is dependant on the shape and range of the gamma curve. But the actual captured range is dependant on what the sensor can cope with. As we are not changing the sensor, the captured dynamic range, brightness range and shadow range does not change between S-Log2 and S-log3, both of which take the entire sensor range (they just store that same range using slightly different levels or code values). After applying a LUT or other conversion to your normal viewing gamma both S-Log2 and S-log3 will have the same brightness, same highlight and same shadow range.
S-Log3 has noisy shadows.
No, not really. Shadows appear noisy with S-Log3 as the shadow part of the curve is stored using higher code values compared to S-Log2. So when you view S-Log3 uncorrected the shadows are raised and stretched on your conventional monitor and this gives the impression of a noisy picture. In reality once you restore the levels to normal there is no additional noise. See this article for a full explanation.
Chart showing S-Log2 and S-Log3 plotted against f-stops and code values. Note how little data there is for each of the darker stops, the best data is above middle grey. Note that current sensors only go to +6 stops over middle grey so S-Log2 and S-Log record to different peak levels.
S-Log3 is newer than S-Log2 so it must be better.
Newer, perhaps not. Better, no not really. S-Log3 is based on the industry standard Cineon log gamma curve. This curve was developed in the 1980’s to allow the digitising of film using 10 bit data. So S-Log3 matches a curve designed to work with negative film and is capable of storing more than the 14 stops that most of the current cameras sensors can see. In effect it is an old log gamma curve. As it is a curve designed for more than 14 stops, when used in a 14 stop camera some of the available recording data is empty and wasted.
S-Log2 was specifically designed by Sony to work with an electronic sensor with 14 stops of dynamic range and is optimised to match the performance characteristics of video sensors. By using a 14 stop curve with a 14 stop camera almost every bit of available data is utilised, there is no wastage. So S-Log2 makes better use of the data you have available to you,
BUT THERE ARE SOME OTHER FACTORS WE NEED TO CONSIDER.
S-Log2 and S-Gamut:
As well as the gamma curve we also have different Gamuts or color ranges. S-Log2 was originally designed for the F65 camera. The F65 sensor can capture a huge color range beyond the range that most conventional video sensors can see. So as well as S-Log2 Sony introduced S-Gamut which was matched to the very wide color range of the F65 sensor. S-Log2 is designed to be used with S-Gamut. But many of the cameras we use, like the FS7, F5, FS5 cannot see this color range (Sony’s F55 and Venice can). In addition this very large color range can be a little tricky to deal with in post production. Add to this the fact that S-Log2 is quite different to the quite common Cineon gamma curve and behaves differently to other curves in post. The end result was that in the early days of S-Log2 there were a number of complaints and comments that Sony’s S-log2 material was difficult to grade.
S-Log3 and S-Gamut3.
Because some people were struggling a bit with S-Gamut and S-Log2 in post production (Resolve and many of the other tools we have today were not as well developed 4 years ago), Sony introduced S-Gamut3 and S-log3 as well as a further Gamut called S–Gamut3.cine. S-Log3 was based on Cineon as that’s what people were familiar with. Arri’s Log-C is also based on Cineon as are many other log curves. This makes it a more “familiar” grading experience for many colorists. In addition Sony created a modified version of the super large S-Gamut to make it easier to grade. S-Gamut3 is just as big as S-Gamut but some tweaks inside make it easier to grade (fewer color shifts). At the same time Sony realised that most users were producing content for TV, the web or digital cinema that had little use for the huge color range of S-Gamut/S-Gamut3. So S-Gamut3.cine was developed as a smaller, more manageable version of S-Gamut3 and it incorporated a few tweaks to the color science to provide colors closer to those used by other manufacturers. S-Gamut3.cine is also a better match for cameras with sensors that cannot see the full S-Gamut range (like the FS5, FS7, F5, A7).
The end result is that in general most people prefer or find it easier to grade S-Log3/S-Gamut3.cine material than S-Log2/S-Gamut. Plus you can often use LUT’s designed for Log-C or Cineon with S-log3 material (this isn’t optimum, but it can work).
SGamuts Compared.
Getting the data from camera to post.
In terms of getting the data from your cameras sensor in to post production S-Log2 is the better choice (unless you have a Sony Venice which only has S-Log3). S-Log2 is optimised for the way an electronic sensor works. S-log3 is essentially a curve designed for negative film applications, not video and no matter how you look at it, these are electronic video cameras. However, if you are recording 10 bit or greater you have a lot of data whichever curve you use, so in practice it will be rare to see any difference in the final result.
So use the curve you find easiest to work with. It is true that S-Log 3 allocates a little more data to the shadows and less to the highlights than S-Log2, but don’t confuse data and code values with more range. S-Log3 has a few extra code values in it’s darkest stops, S-log2 has a few extra in the bright stops, but the dynamic range, highlight and shadow handling is governed by the sensor not the gamma curve. Overall S-Log3 has fewer code values than S-Log2, S-Log2 makes better use of the data available, but with 10 bit this really isn’t going to make a huge difference.
8 Bit Recording.
But if you are only recording with an 8 bit codec you are already at a disadvantage. When recording 8 bit you really need to maximise the way what little data you have is used. For that reason I will always recommend that S-Log2 is used when recording 8 bit on a camera like the FS5 in UHD or A7s or similar (FS5 is 10 bit in HD). By using S-Log2 you are using as many of the limited code values available as you can. This doesn’t mean you can’t use S-log3, it just wouldn’t be my choice.
The end result should be the same.
At the end of the day, if you were to use matching LUTs, S-log2 and S-log3 material should look more or less exactly the same after grading or application of the LUT, no matter what the scene you are shooting. If they do look significantly different then you are doing something wrong. So your choice of curve, other than for 8 bit recordings will most likely come down to ease of use rather than anything else.
If your camera doesn’t have LUT’s then S-Log2 can be easier to work with as it is more contrasty. This makes it a bit easier to focus and also makes it easier to gauge exposure. If your camera has LUT’s and you use them, then you may decide to use S-Log3 simply because you should find it a little easier to work with in post. Either way both curves capture the same range of picture information and both should give more or less the same end result.
There may be some very, very subtle differences due to the small differences in data distribution, but often these will be hard to really see in the final image.
I was recently asked by Sony to produce some videos to help users get the most from the PXW-FS5. The videos and articles can now be found on Sony’s website by following the links below. Part 1 covers the camera setup including using Picture Profiles to change the way the images look. Part 2 covers the special effects modes including S&Q, super-slow-motion, clear image zoom and the variable ND filter. Part 3 looks at the raw option for the FS5.
In the first part of this 2 part article we saw how at some frame rates timecode will drift relative to a real time clock (Click Here for part 1). As well as drifting relative to real time due to the way timecode can only count the actual whole frames recorded, the internal clocks that govern the timecode generators in many devices may drift slightly over time.
For single camera operation this drift is rarely significant but as soon as you start using multiple cameras or recording sound separately to the camera, even very small differences of just a frame or two between each device can cause problems. A one frame error is enough to cause a visible lip sync error, by two frames the sync error is pretty obvious to most people.
So, very often we need to synchronise the timecode across multiple devices so that the audio timecode matches the camera timecode or multiple cameras all have the same timecode so that it’s easy to re-align everything in post production. Most professional video cameras will have a timecode in or timecode out connector and the simplest way to sync two cameras is to feed the timecode from one cameras timecode out to the other cameras timecode in. For this to work both cameras must be set to “Free Run” timecode.
BUT YOU ALSO NEED GENLOCK OR SYNC LOCK
This is the part that often gets overlooked. If you read the first part you should understand that when a video camera is recording the timecode is generated by counting the number of frames recorded. As a result the precise frame rate of the camera will determine how many frames are recorded in any given time period and as a result the timecode for that clip. When you press the record button to start a recording the cameras timecode will match any external timecode fed to the camera. But from that point forward until the end of the recording the timecode just counts the frames recorded and will ignore any external timecode.
So the only way to ensure 100% accurate timecode sync between multiple cameras or between a camera and some other external timecode source is by providing not only a common timecode source but also a sync source that is locked to the timecode. By feeding the camera sync that is locked to the timecode into the cameras genlock input the cameras frame rate will be locked to the master frame rate so you will not get any timecode drift.
It’s amazing how many people overlook the fact that a cameras timecode generator counts frames while recording, so if the cameras frame rate is a tiny bit off, even with an external timecode source it will drift. It’s only by synchronising the camera through sync and genlock that you can be sure to eliminate any timecode drift.
SYNC SOUND:
If you are recording sound remotely from the camera you need to keep the camera and audio recorders timecode in sync. The timecode in a camera is dependant on the actual frames recorded while the timecode on an audio recorder is often nothing more than a data or audio track that records the timecode signal. It is rarely locked to the recorders sampling or recording rate. Because of this the correct way to link the timecode in this scenario is from the camera to the recorder.
If you do it the other way around (which for some reason appears to be the most common way) you cannot be sure that you won’t get timecode drift unless the audio recorder is also sending sync to the cameras genlock input. Normally a small amount of drift will go un-noticed on shorter shots. The cameras timecode will re-sync with the external timecode when you stop recording, so the beginning of each shot will have the correct timecode. As a result you will normally get away with feeding timecode only from an audio recorder. But on longer takes, say shooting a music event it can become a significant issue as the camera and recorder drift apart over longer takes.
23.98fps.
As you should have learnt from part one, 23.98fps timecode can be particularly difficult to deal with as the timecode in a camera shooting at 23.98fps will always drift by 3.6 seconds an hour relative to real time. So be very, very careful if shooting 23.98fps but using an audio recorder that uses a real time clock. There is no way to satisfactorily sync a real time clock with a camera shooting 23.98fps. Over the course of a 1 minute clip you will see the timecode drift by over 1 frame. If you wish to do sync sound at 23.98fps you need to ensure your audio recorder supports either 23.98fps timecode or at a push Non Drop Frame 29.97fps timecode. You can only sync 23.98fps tmecode with 23.98fps timecode, but a free running, Non Drop Frame 29.97fps recorder should stay closer in sync than a real time clock.
If your audio recorder only has a real time clock I strongly suggest shooting at 24fps rather than 23.98fps where you can. 24fps is a whole number so 24fps timecode does not drift by 3.6 seconds per hour compared to real time. So any sync issues should be much reduced at 24fps compared to 23.98fps. If shooting 29.97fps (often mistakenly referred to as 30fps/60i) then you should use Drop Frame Timecode when working with recorders with a real time clock.
WHAT IF THE CAMERA DOESN’T HAVE TC IN?
There are a few pro cameras that don’t have a dedicated timecode in or timecode out port. The very popular Sony PXW-FS7 does not have timecode in and can’t be genlocked unless you add the optional extension unit to the camera. For cameras such as these, if you need to record sync sound on a separate recorder one option is to record the timecode output from the audio recorder as an audio signal on one of the cameras audio tracks. Timecode recorded on an audio track like this will rarely line up perfectly with the cameras own internal timecode so it should never be used as the main timecode for the recorded video. But there are plenty of software tools that will allow you to read this timecode in post production so that you can use it to line up your audio recordings with the video recording. This isn’t an ideal solution, but it’s better than relying on two different clocks, one in the camera, one in the recorder possibly running at quite different rates.
MULTICAMERA SHOOTS.
If you have multiple cameras or audio recorders it may be possible to loop the time code (and hopefully sync too) from camera to camera, so that every device is connected. Another option is to use a single master timecode and sync source and hard wire every camera to that. The problem with either of these is that if the venue is large you need a lot of cable. Sometimes it simply isn’t possible to use cables to connect everything together so instead of cables we connect the cameras wirelessly.
WIRELESS.
Wireless timecode connections normally work OK. If you momentarily loose the wireless timecode link the cameras timecode clock will just keep counting the frames recorded without issue. But as we have already seen, for true drift free timecode lock we also need to synchronise the camera via genlock. Sending genlock wirelessly is not normally a good idea. Any interruption of the sync signal will cause the cameras frame rate to jitter and that’s really bad. In practice it is quite common to link the timecode of several devices wirelessly without sync. Again for shot takes this is often perfectly OK. The lack of sync however can be an issue on longer takes. A good example of this would be a music concert where it really is vital that all the cameras and recorders run in sync.
Companies such as Ambient have wireless timecode and sync devices where each of the sync boxes (lockit box) has it’s own very high precision, temperature compensated sync clock. All the boxes then sync to one master device, should the wireless signal drop out the internal sync clocks will continue to provide both a genlock sync pulse and timecode that is so precise that you should not see any timecode or sync drift over several days.
A couple of years ago I wrote a guide to help people that might have to shoot in the cold. I’ve recently updated this article and as I know many of you won’t have seen it before I’ve provided a link to the page below
Here also are some tips for shooting snow scenes with conventional gammas. Of course you can also shoot with log or raw, if you do just make sure your exposure is nice and bright for the best results, generally when there is a lot of snow around dynamic range isn’t a huge problem as the snow acts as a reflector to fill in a lot of shadows.
With conventional gammas such as Rec-709 exposing for snow is tricky. You want it to look bright, but you don’t want to overexpose and it’s very easy to end up with a lot of the bright snow in your scene up in the knee or highlights where it will be compressed and loose contrast. This makes the snow look odd as it will have no texture, it can all too easily look over exposed when in fact it is not. In reality, although we often think of snow as bright and white, often you really don’t want to expose it too high. With Rec-709 if your camera has a high level zebra set them to 90% (Zebra 2 on most Sony cameras). This way you will get a zebra pattern on the snow as it starts to enter the compressed knee or highlight area. If you are using Sony’s cinegammas or hypergammas I would lower the highlight zebras to 80% -85%.
On overcast or flat light snow days I prefer not to use Hypergammas/Cinegammas as the highlight roll off can make the snow look very flat unless you grade the images a little and boost the contrast in post. However on bright higher contrast snow days with clear skies and strong shadows the Hyoegammas/Cinegammas work very well. You may want to consider using a little bit of negative black gamma to put a bit more contrast into the image.
You also want your snow to look white, so do a manual white balance using a proper white card or better still a grey card. Don’t try to white balance off the snow itself as snow can reflect a lot of blue light and skew the white balance a bit. If you are shooting during golden hour at the beginning or end of the day and want to retain that warm look you might want to use a 5600K preset rather than a manual white balance to capture either the golden hour light or the blue light that follows it.
If the overall scene is very bright you may need to watch your aperture. In most cases you don’t want to have the camera stopped down to an aperture of f11 or smaller. Due to an effect called diffraction limiting, in HD, at f11 a 2/3″ camera will start to show a slightly soft image. A 1/2″ sensor camera will be just starting to get slightly soft at f8. In 4K/UHD a super 35mm camera will start to show a slightly softer image from f11 – f16. So use you ND filters to control you light levels so you do not have too small an aperture. You may need to add additional ND in very bright scenes to avoid diffraction limiting.
One last tip. If you are standing around in the cold and get cold feet you should find something to stand on. Small twigs and branches, a rubber car mat anything like that will help insulate your feet from the cold ground helping keep them warm.
This is part 1 of two articles. In this article I will look at what timecode is and some common causes of timecode drift problems. In part 2 I will look at the correct way to synchronise timecode across multiple devices.
This is a subject that keeps cropping up from time to time. A lot of us camera operators don’t always understand the intricacies of timecode. If you live in a PAL/50Hz area and shoot at 25fps all the time you will have few problems. But start shooting at 24fps, 23.98 fps or start trying to sync different cameras or audio recorders and it can all get very complicated and very confusing very quickly.
So I’ve written these notes to try to help you out.
WHAT IS TIMECODE?
The timecode we normally encounter in the film and video world is simply a way to give every frame that we record a unique ID number based on the total number of frames recorded or the time of day. It is a counter that counts whole frames. It can only count whole frames, it cannot count fractions of frames, as a result the highest accuracy is 1 frame. The timecode is normally displayed as Hour:Minute:Second:Frame in the following format
HH:MM:SS:FF
RECORD RUN AND FREE RUN
The two most common types of timecode used are “Record Run” and “Free Run”. Record run, as the name suggests only runs or counts up when the camera is recording. It is a cumulative frame count, which counts the total number of frames recorded. So if the first clip you record starts with the time code clock at 00:00:00:00 and runs for 10 seconds and 5 frames then the TC at the end of the clip will be 00:00:10:05. The first frame of the next clip you record will continue the count so will be 00:00:10:06 and so on. When you are not recording the timecode stops counting and does not increase.
With “Free Run” the timecode clock in the camera is always counting according to the frame rate the camera is set to. It is common to set the free run clock so that it matches the time of the day. Once you set the time in the timecode clock and enable “Free Run” the clock will start counting up whether you are recording or not.
HERE COMES A REALLY IMPORTANT BIT!
In “Free Run” once you have set the timecode clock it will always count the number of frames recorded and in some cases this will actually cause the clock to drift away from the actual time of day.
SOME OF THE PROBLEMS.
An old problem is that in the USA and other NTSC areas the frame rate is a really odd frame rate, it’s 29.97fps (this came about to prevent problems with the color signal when color TV was introduced). Timecode can only count actual whole frames, so there is no way to account for the missing 0.03 frames in every second. As a result timecode running at 29.97fps runs slightly slower than a real time clock.
If the frame rate was actually 30fps in 1 hour there would be 108,000 frames. But at 29.97fps after one real time hour you will have only recorded 107,892 frames, the frame counter TC, won’t reach one hour for another 3.6 seconds.
DROP FRAME TIMECODE.
To eliminate this 3.6 seconds per hour (relative to real time) timecode discrepancy in footage filmed at 29.97fps a special type of time code was developed called “Drop Frame Timecode“. Drop Frame Timecode (DF) works by: every minute, except each tenth minute, two timecode numbers are dropped from the timecode count. So there are some missing numbers in the timecode count but after exactly 1 real time hour the time code value will increment by 1 hour. No frames themselves are dropped, only numbers in the frame count.
WHEN TO USE DROP FRAME (DF) OR NON DROP FRAME (NDF).
Drop Frame Timecode is only ever used for material shot at 29.97fps, which includes 59.94i. (We will often incorrectly refer to this as 60i or 30fps – virtually all 30fps video these days is actually 29.97fps). If you are using “Rec Run” timecode you will almost never need to use Drop Frame as generally you will not by syncing with anything else.
If you are using 29.97fps “Free Run” you should use Drop Frame (DF) when you want your timecode to stay in sync with a real time clock. An example would be shooting a long event or over several days where you want the timecode clock to match the time on your watch or the watch of an assistant that might be logging what you are shooting.
If you use 29.97fps Non Drop Frame (NDF) your cameras timecode will drift relative to the actual time of day by a minute and a half each day. If you are timecode syncing multiple cameras or devices it is vital that they are all using the same type of timecode, mixing DF and NDF will cause all kinds of problems.
It’s worth noting that many lower cost portable audio recorders that record a “timecode” don’t actually record true timecode. Instead they record a timestamp based on a real time clock. So if you record on the portable recorder for lets say 2 hours and then try to sync the 1 hour point (01:00:00:00 Clock Time) with a camera recording 29.97fps NDF timecode using the 1 hour timecode number (01:00:00:00 NDF Timecode) they will be out of sync by 3.6 seconds. So this would be a situation where it would be preferable to use DF timecode in the camera as the cameras timecode will match the real time clock of the external recorder.
WHAT ABOUT 23.98fps?
Now you are entering a whole world of timecode pain!!
23.98fps is a bit of a oddball standard that came about from fitting 24fps films into the NTSC 29.97fps frame rate. It doesn’t have anything to do with pull up, it’s just that as NTSC TV runs at 29.97fps rather than true 30fps movies are sped up by 0.1% to fit in 29.97fps.
Now 23.98fps exists as a standalone format. In theory there is still a requirement for Drop Frame timecode as you can’t have 0.02 frames in a timecode frame count, each frame must have a whole number. Then after a given number of frames you go to the next second in the count. With 23.98fps we count 24 whole frames and the increment the timecode count by one second, so once again there is a discrepancy between real time and the timecode count of 3.6 seconds per hour. The time on a camera running at 23.98fps will run fast compared to a real time clock. Unlike 29.97fps there is no Drop Frame (DF) standard for 23.98, it’s always treated as a 24fps count (TC counts 24 frames, then adds 1 to the second count), this is because there is no nice way to adjust the count and make it fit real time as there is with 29.97fps. No matter how you do the math or how many frames you drop there would always be a fraction of a frame left over.
So 23.98fps does not have a DF mode. This means that after 1 hour of real time the timecode count on a camera shooting at 23.98 fps will be 00:01:03:14. If you set the camera to “Free Run” the timecode will inevitably drift relative to real time, again over the course of a day the camera will be fast by almost one and a half minutes compared to a real time clock or any other device using either drop frame timecode, 24fps or 25fps.
So, as I said earlier 23.98fps timecode can be painful to deal with.
24fps timecode does not have this problem as there are exactly 24 frames in every second, so a video camera shooting at 24fps should not see any significant timecode drift or loss of timecode sync compared to a real time clock.
It’s worth considering here the problem of shooting sync sound (where sound is recorded externally on a remote sound recorder). If your sound recorder does not have 23.98fps timecode the timecode will drift relative to a camera shooting at 23.98fps. If your sound recorder only has a real time timecode clock you might need to consider shooting at 24fps instead of 23.98fps to help keep the audio and picture time codes in sync. Many older audio recorders designed for use alongside film cameras can only do 24fps timecode.
In part 2 I will look at the correct way to synchronise timecode across multiple devices.
UPDATE: It appears that Adobe may have now addressed this. Luma and YC scopes now show the same levels, not different ones and the scaling of S-Log XAVC. signals now appears to be correct.
This came up as the result of a discussion on the FS5 shooters group on Facebook. An FS5 user shooting S-log2 was very confused by what he was seeing on the scopes in Adobe Premiere. Having looked into this further myself, I’m not surprised he was confused because it’s also confused me as there is some very strange behaviour with S-Log2 XAVC material.
First: BE WARNED THE “LUMA” SCOPE APPEARS TO BE A RELATIVE LUMINANCE SCOPE AND NOT A “LUMA” SCOPE.
THIS IS THE “LUMA” Scope, I suggest you don’t use it! Look at the scale on the left side of the scope, it appears to be a % scale, not unlike the % scale we are all used to working with in the video world. In the video world 100% would be the maximum limit for broadcast TV, 90% would be white and the absoulte maximum recording level would be 109%. These % (IRE) levels have very specific data or code values. For luma, 100IRE has a code value of 940 in 10 bit or 235 in 8 bit. Then look at the scale on the right side of the luma scope. This appears to be an 8 bit code value scale, after all it has those key values of 128, 255 etc.
100% is not Code Value 235 as you would normally expect (Lumtri scopes).
Now look again at the above screen grab of the lumetri luma scope in Premiere 2017 – V11. On the left is what appears to be that familiar % scale. But go to 100% and follow the line across to where the code values are. It appears that on these scopes 100% means code value 255, this is not what anyone working in broadcast or TV would expect because normally code value 255 means 109.5%.
I suggest you use the YC waveform display instead.
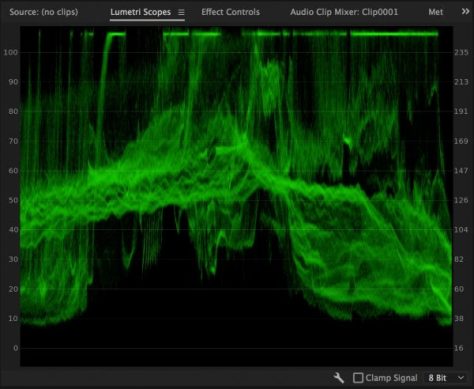
Lumetri YC Scope showing S-log2
The YC waveform shown on the above screen capture is of an S-Log2 frame. If you go by the % scale it suggests that this recording has a peak level of only 98% when in fact the recording actually goes to 107%.
But here’s where it gets even stranger. Look at the below screen capture of another waveform display.
Lumetri YC scope and Cinegamma 1
So what is going on here? The above is a screen grab of Cinegamma 1 recorded in UHD using 8 bit XAVC-L. It goes all the way up to 109% which is the correct peak level for Cinegamma 1. So why does the S-Log2 recording only reach 98% but the Cinegamma recording, recorded moments later using the same codec reach 109%. This is a value 10% higher than S-Log2 and I know that the Cinegammas cannot record at a level 10% greater than S-Log2 (the true difference is only about 2%).
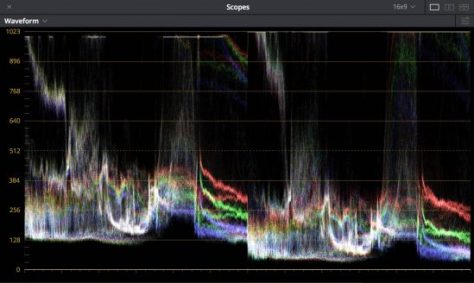
Lets now compare the difference between how Premiere and Resolve handle these clips. The screen grab below shows the S-Log2 and Cinegamma 1 recordings side by side as handled in Adobe Premiere. On the left is the S-Log2, right Cinegamma1. Look at the very large difference in the peak recording levels. I do not expect to see this, there should only be a very small difference.
Lumetri YC scope with XAVC S-Log2 on the left and XAVC Cinegamma 1 on the right.
Now lets look at exactly the same clips in DaVinci Resolve. Note how much smaller the difference in the peak levels is. This is what I would expect to see as S-Log2 gets to around 107% and Cinegamma 1 reaches 109%, only a very small difference. Resolve is handling the files correctly, Premiere is not. For reference to convert 8 bit code values to 10 bit just multiply the 8 bit value by 4. So 100IRE which is CV235 in 8 bit is CV940 in 10 bit.
S-log2 on the left, Cinegamma 1 on the right. Notice the very small difference in peak levels. This is expected and correct.
So, until I get to the bottom of this all I can say is be very, very careful and don’t use the “Luma” scope, use the YC scope if you want to know your code values. It also appears that Premiere scales the code values of S-Log recordings differently to normal gammas.
Additionally: Record exactly the same S-Log2 or S-Log3 image using XAVC internally in the camera and at the same time record a ProRes version on an external recorder. Bring both of these clips, which are actually recorded using exactly the same levels into Premiere and Premiere handles them differently. The XAVC squashed into a reduced range while the ProRes fills the larger range.
Lumetri YC scope and a ProRes S-Log2 recording. Note how this goes all the way to 107%.
This has huge implications if you use LUT’s!!!!
The same LUT will result in a very different looking image from the XAVC and PRoRes material. There should not be a difference, but there is and it’s big. So this isn’t just a scopes issue, it’s an internal signal handling issue.
I’ve always preferred doing my color grading in a dedicated grading package with external scopes. It’s stuff like this that reminds me of why I prefer to work that way. I always end up with a better end result when I grade in Resolve compared to Premiere/Lumetri.
As I learn more about this I will post a new article. Use the subscribe button on the left to subscribe to the blog to be notified of new posts.
If you use Sony’s SXS cards or USB Hard Drives, Sony have a utility that allows you to check the status of your media and correctly format the media. This is particularly useful for reading the number of cycles your SXS card has reached.
The utility can also copy SXS cards to multiple destinations for simultaneous backups of your content. You can download the utility for free via the link below.
This website has a great feature. If you look up in the top left corner of every page you will see a small magnifying glass symbol. If you click on that it will allow you to search the entire site for information… and there’s lots and lots of hint, tips and guides going back many years.
One thing though that a lot of people keep asking about is LUT’s or Look Up Tables. I have lots and they are all (for the moment at least) provided for free. There will be some paid LUT sets coming soon. If you follow the link below you will get a single page that lists all the current LUT articles on the web site. Links to my free LUT sets will be included in these articles.
Remember that LUT’s for S-Log2 and S-Log3 can be used in any camera with S-Log2 or S-Log3. So a LUT for the FS7 can also be used in the FS5 for example.
Sony’s Raw Viewer for raw and X-OCN file manipulation.
Sony’s raw viewer is an application that has just quietly rumbled away in the background. It’s never been a headline app, just one of those useful tools for viewing or transcoding Sony’s raw material. I’m quite sure that the majority of users of Sony’s raw material do their raw grading and processing in something other than raw viewer.
But this new version (2.3) really needs to be taken very seriously.
Better Quality Images.
For a start Sony have always had the best de-bayer algorithms for their raw content. If you de-bayer Sony raw in Resolve and compare it to the output from previous versions of Raw Viewer, the raw viewer content always looked just that little bit cleaner. The latest versions of Raw Viewer are even better as new and improved algorithms have been included! It might not render as fast, but it does look very nice and can certainly be worth using for any “problem” footage.
Class 480 XAVC and X-OCN.
Raw Viewer version 2.3 adds new export formats and support for Sony’s X-OCN files. You can now export to both XAVC class 480 and class 300, 10 or 12bit ProRes (HD only unfortunately), DPX and SStP. XAVC Class 480 is a new higher quality version of XAVC-I that could be used as a ProResHQ replacement in many instances.
Improved Image Processing.
Color grading is now easier than ever thanks to support for Tangent Wave tracker ball control panels along with new grading tools such as Tone Curve control. There is support for EDL’s and batch processing with all kind of process queue options allowing you to prioritise your renders. Although Raw Viewer doesn’t have the power of a full grading package it is very useful for dealing with problem shots as the higher quality de-bayer provides a cleaner image with fewer artefacts. You can always take advantage of this by transcoding from raw to 16 bit DPX or Open EXR so that the high quality de-bayer takes place in Raw Viewer and then do the actual grading in your chosen grading software.
HDR and Rec.2100
If you are producing HDR content version 2.3 also adds support for the PQ and HLG gamma curves and Rec.2100 It also now includes HDR waveform displays. You can use Raw Viewer to create HDR LUT’s too.
So all-in-all Raw Viewer has become a very powerful tool for Sony’s raw and XOCN content that can bring a noticeable improvement in image quality compared to de-bayering in many of the more commonly used grading packages.
To provide the best experiences, we use technologies like cookies to store and/or access device information. Consenting to these technologies will allow us to process data such as browsing behavior or unique IDs on this site. Not consenting or withdrawing consent, may adversely affect certain features and functions.
Functional
Always active
The technical storage or access is strictly necessary for the legitimate purpose of enabling the use of a specific service explicitly requested by the subscriber or user, or for the sole purpose of carrying out the transmission of a communication over an electronic communications network.
Preferences
The technical storage or access is necessary for the legitimate purpose of storing preferences that are not requested by the subscriber or user.
Statistics
The technical storage or access that is used exclusively for statistical purposes.The technical storage or access that is used exclusively for anonymous statistical purposes. Without a subpoena, voluntary compliance on the part of your Internet Service Provider, or additional records from a third party, information stored or retrieved for this purpose alone cannot usually be used to identify you.
Marketing
The technical storage or access is required to create user profiles to send advertising, or to track the user on a website or across several websites for similar marketing purposes.