Tag Archives: featured

A Guide the the FX6’s CineEI Mode.

The FX6 CineEI mode can be enabled via status page 4 or via the main menu and project settings.


Updated 12/12/2022 to include version 3 firmware changes.

See Also this article: Cine EI is not the same as conventional shooting.

WHAT IS CINE EI?

The FX6’s CineEI mode is designed to make shooting using S-Log3 or raw easy and straightforward. It optimises the camera so that settings such as the recording ISO, noise reduction and sharpening are all optimised for recording the highest possible quality S-Log3 or raw material with the largest possible dynamic range.

It makes sure that the S-Log3 or raw recordings are optimised for grading. In addition you can use a LUT (Look Up Table) in the viewfinder or on the HDMI/SDI output to provide a close approximation of how your footage will look after it’s been graded and this LUT will also to assist you in getting the exposure exactly right.

HINT: What is a LUT? A LUT is a simple Look Up Table of input values that represent different levels in the recording format (in this case S-Log3) and then converts those input values to new output values that are appropriate for the monitor or display range you are using. This conversion can included stylised adjustments to give the output image a specific look. A LUT can be applied to S-Log3 material to convert it so that it looks correct on a normal viewfinder or monitor.

To use the Cine EI mode correctly you must monitor what you are shooting via a LUT. Once you have a LUT enabled and you are viewing the LUT, either in the viewfinder or on a monitor an exposure offset can be applied to the LUT to make it darker or brighter than normal. This LUT brightness offset is used to allow you to deliberately offset how bright the recordings are, this is the “EI” or Exposure Index part of CineEI. More on that later.

BUILT IN LUTS

The FX6 has 3 built in LUTs, s709, 709(800) and S-Log3. In addition to the built in LUTs you can load your own “user MLUTs” into the camera as what the FX6 calls “Base Looks”. This makes this a very flexible and capable system. Sony refer to LUTs in the FX6 as MLUT’s or Monitor Look Up Tables. MLUTs = LUT’s they are not different.

Loading Your Own LUTs.

If you want to load you own LUTs into the camera these must be 3D Cube LUT’s and should be placed in the

— Private : SONY : PRO : LUT —

folder of an SD card or CFExpress card that has been formatted in card slot 2 of the FX6 (the lower slot).  The LUT should be 17x or preferably 33x cube LUT designed for use with S-Log3 and SGamut3.cine. They are loaded via the main menu PAINT – BASE LOOK page.

The FX6 has 3 included LUT’s, these are s709, 709(800) and S-Log3. The AC-BCST LUT seen here is a user LUT that has been saved to the camera.


CODEC CHOICE.

As your material will require grading in post production, if you are shooting UHD or 4K you should NOT use XAVC-L because in UHD/4K XAVC-L is 8 bit 4:2:0. A much better choice is XAVC-I which is always 10 bit 4:2:2 and/or raw.

FIXED RECORDING ISO.

Once the camera is set to use the CineEI mode the recording sensitivity is fixed to either 800 ISO when in Lo Base sensitivity or 12,800 ISO when the camera is set to Hi Base sensitivity. These values cannot be changed and your recordings will always take place at one of these sensitivity levels.

Note: ISO and EI are not the same thing, even though they use similar numbers. ISO is very specifically the sensitivity of the camera, it is a measure of the sensors response to light. EI (Exposure Index) is a camera setting that alters the cameras EXPOSURE settings, EI does not change the sensitivity of the camera in any way.


ENABLE A MLUT (LUT).

To take full advantage of the Cine EI mode the next step is to enable a MLUT for the viewfinder and also optionally for the HDMI and SDI outputs. YOU MUST ENABLE A MLUT FOR CINE EI TO WORK.

My recommendation is as a minimum to enable a MLUT for the viewfinder. If you wish to record S-Log3 to an external recorder then you should not add a MLUT to the SDI/HDMI output. But if you are using an external monitor purely for monitoring it may be desirable to enable an MLUT for the SDI/HDMI output.

MLUT’s are enabled and disabled via status page 5 or in the main menu under Shooting – LUT NO/OFF


The default MLUT is Sony’s s709 LUT. This is the same LUT as used by the Venice digital cinema camera. s709 is designed to be a starting point for a film style look. To achieve this film style look it uses brightness levels more commonly found in feature films rather than the levels normally used in the majority of regular TV shows.

The default LUT is s709. The LUT can be changed from Status Page 5 or in the main menu under PAINT – BASE LOOK – SELECT


LUT EXPOSURE LEVELS

There are some important things to understand about different MLUTs and Base Looks. Each MLUT/Look will have it’s own optimum brightness levels. They will not all be the same. Some will be brighter or darker than others when exposed correctly, so it’s vital that you understand what levels any MLUT that you chose to use needs to be exposed at.

Another MLUT that the FX6 includes is Sony’s 709(800) LUT. This MLUT is more closely aligned with the levels used in normal TV productions, so it looks quite different to s709 and has very different brightness levels when exposed correctly.

The chart below gives the “correct” exposure values for S-Log3 as well as some guide values based on my own measurements for the s709 and 709(800) MLUTs found in the FX6.

  Middle Grey Average Skin Tones 90% Reflectivity white card (add 2-3% for white paper).
S-Log3 41% 48-52% 61%
s709 44-45% 57-62% 77-78%
709(800) 45-46% 65-70% 89%

MEASURING THE EXPOSURE.

There are many ways to measure your exposure when shooting using S-Log3 and MLUT’s. You could choose to use a light meter, in which case the light meter would be set to match the EI (Exposure Index) value set in the camera.

You can just look at the image in the viewfinder and judge when it looks right. Most of the time this is going to be OK, but it isn’t particularly accurate and if shooting outside in bright sunshine it may be difficult to see an unshaded LCD screen correctly.

My preferred method is to use a white card or grey card and then use the cameras built in video signal monitor and the waveform display to actually measure the brightness of the grey card or white card.

Note: When referring to a “white” exposure this means the exposure level of a white card that reflects 90% of the light that falls on it. It is not how bright your highlights are, or how bright clouds are. It is the brightness of a diffuse white card. A piece of white paper or a white shirt  can be used if you don’t have a proper white card, but be aware that white printer paper or white fabrics are treated with brightening agents to make them look “bright” so white paper and white fabrics will be a little brighter, perhaps 94% reflectivity compared to 90% of a proper white card and this should be allowed for.

The Waveform Display.

The waveform display is enabled in the menu under MONITORING – DISPLAY ON/OFF – VIDEO SIGNAL MONITOR


If you are not familiar with a waveform display it is actually really easy to understand. The bottom of the waveform is black and the very top is 109%, the brightest that the camera can ever record to.

The left hand side is the left of the video image and the right is the right side of the video image. The thin grey reference lines across the waveform display are at 0% (the darkest a video image should ever normally be), 25%, 50%, 75% and 100%.

The levels shown by the FX6’s waveform display


In addition the FX6’s waveform display includes 2 yellow lines. The position of these yellow lines is determined by the levels that the cameras zebras are set to. By default the lower yellow line will be at 70% to match Zebra 1 and the upper line at 100% to match zebra 2.

WHAT ARE YOU MEASURING?

The waveform display measures the signal that is on the HDMI and the SDI output. So when you turn on the MLUT for the HDMI/SDI it is the levels of the MLUT that are being measured. If you don’t have an MLUT enabled for the SDI/HDMI then you will be measuring the recorded S-Log3 level. What the waveform is measuring is indicated just above the waveform display, in the example above we can see it is indicating LUT s709, so we are measuring the s709 LUT. 

UNDERSTANDING HOW IT ALL WORKS.

To make it easier to understand how CineEI works I find it easier to start  by turning OFF the LUT for the SDI and HDMI and measuring the exposure of the S-Log3. If you do this when the the Exposure Index (EI) is set so that it is equal to the Recording or Base ISO then you can use a white card or piece of white paper to establish the correct exposure for the S-Log3. Once you have done that you can then enable the MLUT and  check the exposure of the LUT. So, lets see how we do that:

FIRST CHECK AND SET THE EXPOSURE INDEX LEVELS.

With the cameras base ISO set to low / 800 ISO I recommend that you set the EI levels in the main menu SHOOTING – ISO/Gain/EI as follows: 

My recommended exposure index levels of 800/400/200 EI


ISO/GAIN BUTTON and CHANGING THE EI:

When using the CineEI mode you can change the EI value several ways. The most commonly used ways will likely be via the L/M/H  ISO/Gain switch or by pressing the ISO/Gain button and then using the multi-function dial (MFD) to change the EI.  Do note that when you use the multi-function dial or Direct Menu to change the EI this new EI setting changes the preset value associated with the current position of the L/M/H switch.

Personally I do not usually set an Exposure Index value that is higher than the base recording ISO value. The reason for this is that as you will see later, if you record using a high EI value your images will be noisy and grainy and could be very difficult to grade. Because you don’t ever see your final results until you get into post production, if you accidentally record noisy log you won’t really know how bad the footage will be until it is perhaps too late to do anything about it. So I set the EI for the Low Base 800 ISO as H>800EI,  M>400EI, L>200EI. The difference between each of these EI’s is one stop and sticking to exact 1 stop increments makes it easier when you are checking any exposure changes. 

For the 12,800 High base ISO I set the EI to H>12800EI, M>6400EI, L>3200EI.

FOR THIS EXAMPLE START AT LOW BASE/800 ISO and 800 EI.

By using the same EI as the base recording ISO there will be no offset or difference between the aperture, ND or shutter speed settings used for the correct exposure of the LUT and the correct, or “base exposure” for the S-Log3. Expose the LUT correctly and the S-Log3 will be also be normally exposed. Expose the S-Log3 normally and the LUT will look correct.

FOR THIS EXAMPLE LET’S START WITH THE SDI/HDMI LUT OFF.

For this example I am going to start with the LUT OFF for the SDI and HDMI, this way the waveform display will be measuring the S-Log3. Just above the waveform it should say SG3C/Slog3, telling you the waveform is measuring the S-Log3. 

When the LUT (MLUT) is off for the SDI/HDM the waveform will be measuring the S-Log3 exposure level.


Referring to the table of exposure levels earlier in this article we can see that the correct exposure for S-Log3 using a white card (90% reflectivity white) is 61% – if using a normal piece of printer paper I suggest using a value a little higher (around 63%) as white paper tends to be a little brighter than a proper white test card. So, when measuring the S-Log3 we want to expose a white card at 61%. We can use the cameras zebras to help us find 61%.

SETTING ZEBRA 1 TO 61%

To make finding where 61% is on the waveform I recommend setting Zebra 1 to 61% so that the lower of the two yellow zebra lines on the waveform display is at 61%.

Set Zebra 1 to 61% via the main menu and MONITORING – ZEBRA.


So now when checking the exposure of a white card when the waveform is measuring the S-Log3, it is simply a case of adjusting the exposure until the white card is at the same level as the 61% line. Alternately you could use an 18% grey card, in which case you would set Zebra 1 to 41%, however there are often times when I forget my grey card but I almost always have a piece of paper somewhere.

White target exposed at 61% when measuring the S-Log3


So now we know that the S-Log3 is correctly exposed lets turn ON the LUT for the SDI and HDMI outputs and check the exposure level of the s709 LUT (or any other LUT that you wish to use – by setting the S-Log3 exposure first, you can then determine the correct exposure level of any LUT that you might wish to use).

NOW TURN ON THE SDI/HDMI LUT – DON’T CHANGE ANYTHING ELSE.

MLUT’s are enabled and disabled via status page 5 or in the main menu under Shooting – LUT NO/OFF


And if we refer to the exposure chart given towards the top of the page we will see that white for the s709 LUT is 77%. So now let’s set Zebra 2 to 77% to make 77% easier to find on the waveform. Do remember however that other LUTs may need different levels, 77% is just for s709, 709(800) would require Zebra 2 to be set to 89%.

SET ZEBRA 2 TO 77% FOR s709

Set Zebra 2 to the correct white level for the LUT you are using via the main menu and MONITORING – ZEBRA.


Now with the LUT ON for the SDI/HDMI we should see the brightness of the white card line up with the upper yellow line that represents Zebra 2 and 77%.


As you can see from the above example when the Base ISO and Exposure Index are matched, in this case the base ISO is 800 and the EI is 800, when the LUT for the SDI/HDMI is OFF and the white card is at 61% on the waveform the S-Log3 is correctly exposed. Then when the s709 LUT is ON for the SDI/HDMI the white card will be at 77%.  We are correctly exposed. By having Zebra 1 set at 61% (for S-Log3) and Zebra 2 set for the white level for for your chosen LUT we can check either simply by turning the HDMI/SDI LUT ON or OFF.

USING THE 709(800) LUT INSTEAD

If you want a more contrasty looking image in the viewfinder and similar brightness levels to other video cameras – for example skin tones around 70% you might prefer to use the 709(800) LUT.  When using the 709(800) LUT to measure a white card you should set Zebra 2 to 89%. It’s also worth noting that with the 709(800) LUT, if you wish, you could just leave the zebras at their default settings with Zebra 1 at 70% where just like a conventional Rec-709 video camera they will appear over brighter skin tones when viewing via the LUT. 


CHANGING THE EXPOSURE INDEX TO OFFSET THE LOG EXPOSURE.

Sometimes it can be desirable to expose the S-Log3 a little brighter. For example when shooting scenes with a low average brightness level or scenes with large areas of shadows. The FX6 has very low noise levels at 800 ISO base. So, for most scenes with high average brightness levels there is not normally any need to expose the log any brighter than the normal Sony recommended levels.  There is however a bit more noise at 12,800 ISO base. As a result it can be beneficial to expose the S-Log3 a bit brighter than the base level when using 12,800 ISO base to help keep the noise in the final image low.

CineEI Allows Accurate Control Over Exposure.

The CineEI mode makes this very easy to do in a very controlled manner. Keeping the amount of over exposure constant helps speed up the grading process as all your material can be graded in exactly the same way.

Over exposing or underexposing Log does not change the captured dynamic range, it will always be the same. However exposing log brighter will reduce the highlight range while at the same time increasing the shadow range. A brighter exposure will result in less noise after grading.

Exposing log darker will increase the highlight range but decrease the shadow range. A darker exposure will result in more noise after grading. Because under exposed log can become very noisy, very quickly I do not recommend under exposing log,  because of this I strongly advise against ever using an EI that is higher than the base ISO as this will result in under exposed log.

CHANGING THE EI ONLY CHANGES THE LUT.

When you change the Exposure Index the only thing that actually changes is the brightness of the LUT. So for EI to work you must be monitoring via a LUT.

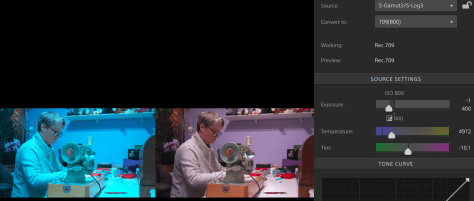
Below is what happens to the image in the viewfinder when you have a LUT enabled (s709 in this case) and you lower the EI from 800 EI down to 200 EI in 1 stop steps and make no changes to the exposure.

s709 at 800 EI and correctly exposed – note aperture is f8.
s709 with the EI set one stop lower at 400 EI but no change to the exposure made, aperture is still f8.
s709 now 2 stops darker at 200EI – no change to exposure, aperture is still f8


Changing the EI does not change the exposure in any way, the only thing changing is the brightness of the LUT. The recording levels have not yet changed in any way.

BUT NOW WE CHANGE THE EXPOSURE

At a lower than than base EI the image in the viewfinder is dark and the white card no longer reaches the correct exposure for the LUT, because we see this dark image and the level of the white card too low we now adjust the exposure to compensate.

In this example I simply opened the aperture by 2 stops from f8 to f4 to match the 2 stop change in the LUT brightness. Now the image in the viewfinder looks correct again and the white card is meeting the upper yellow line again (77% as set by Zebra 2 level).

The EI is at 200 but now the aperture has been opened by 2 stops to f4 so now the LUT is exposed correctly again.


BECAUSE THE EXPOSURE IS BRIGHTER THE S-LOG3 IS NOW ALSO BRIGHTER.

Because I have opened the aperture by 2 stops to make the 200 EI LUT exposure look right the S-Log3 recordings will now be 2 stops brighter. If I turn off the LUT for the SDI/HDMI we can see that the S-Log3 that will be recorded is now 2 stops brighter, the S-log3 white card level becomes 79%, so it appears slightly above the 77% Zebra 1 line.

After increasing the exposure by 2 stops to compensate for the 2 stop darker LUT (200EI) the S-Log3 recordings become 2 stops brighter and the S-Log3 white card level becomes approx 79%


By making the LUT darker by 2 stops, then adjusting the exposure upwards 2 stops to return the LUT to the original brightness we have made our recordings 2 stops brighter. This is how you use CineEI to alter the brightness of your recordings. A lower EI leads to a darker LUT and because the LUT looks dark we increase the exposure making the recording brighter. A brighter recording will have less noise than a darker recording.


At Low base ISO (800 ISO) the FX6 is a low noise camera, so there is no need to routinely over expose the log as there is with more noisy cameras like the FS5 or FS7. So I normally shoot at 800 EI. When using the high base ISO or 12,800 ISO there is a bit more noise and when using high base I will typically set the EI to 6400 EI as the 1 stop brighter recordings that this will result in helps compensate for the increased recording noise.

DYNAMIC RANGE and HIGHLIGHT/SHADOW RANGE:

When you shoot with a low EI the LUT will be dark and as a result f the dark viewfinder image you will expose brighter putting more light onto the cameras sensor. This brighter exposure will decrease the amount of noise in the final image and give you a greater shadow range. But at the same time it will decrease the highlight range that can be captured.

The S-Log3 levels that you will get when the EI value matches the cameras base ISO value, 800 ISO + 800 EI or 12,800 ISO + 12,800 EI. This is the base exposure and it gives 6 stops above middle grey and 8 stops below middle grey.


The S-Log3 levels that you will get when the EI value is 2 stops lower than the cameras base ISO value, in this case 800 ISO and 200 EI. Note how you now have 4 stops above middle grey and 10+ stops below. The final image will have less noise.


If you use a high EI value then the opposite happens. The brighter viewfinder image and higher LUT levels will make you want to expose darker to compensate. The resulting darker S-Log3 recording will have an increased highlight range but it will be considerably more noisy than recordings done at the base EI and will have a reduced shadow range. Generally I try to avoid ever using an EI value higher than the base ISO value. In a low light situation using a high EI value will make the image in the viewfinder brighter but on a small screen you won’t see the noise. I do not recommend using high EI values.

The S-Log3 levels that you will get when the EI value is 2 stops higher than the cameras base ISO value, in this case 800 ISO and 3200 EI. Note how you now have 8 stops above middle grey and 6+ stops below, the shadow range is reduced and the final image will also have significantly more noise.


IF YOU DON’T HAVE A WHITE CARD?

In the examples given here I have used a white card to measure and set the exposure. This is accurate and highly repeatable. But there will be times where you may not have a white card. At these times CineEI can still be used either by setting the Zebras to the appropriate skin tone levels for the chosen LUT (see the table towards the beginning) or by carefully “eyeballing” the brightness of the LUT image on the viewfinder screen or a monitor screen – if it looks right, it probably is right. If you are eyeballing it I highly recommend a deep sunshade or other device to exclude as much light as possible from the viewfinder. With a properly shaded viewfinder or monitor it is perfectly possible to shoot just by eyeballing the LUT’d image on the screen. As an exposure that is a little too dark is often going to cause more problems than an exposure that is a little too bright, if “eyeballing” the image I suggest using an EI that is 1 stop lower than the base EI. So in the case of the FX6 I would use 400 EI for low base ISO and 6400 EI for high base ISO.

CLIP PLAYBACK QUIRKS (YOU MUST ENSURE YOU HAVE UPDATED YOUR CAMERAS FIRMWARE as there was a bug in the initial release firmware that caused the playback EI to be applied back to front).

One great FX6 feature is that when you play back clips in the CineEI mode the camera can apply a LUT to the clip. Simply enable the LUT you want to use as you would when shooting. The FX6 applies then the EI offset that you have assigned to the L/M/H gain/ISO switch.

HOWEVER YOU DO THIS BE AWARE THAT THE L/M/H Gain switch alters the brightness of the clips when played back via a LUT. The only time there is no playback offset is when the switch is set to 800EI. So make sure you understand what EI it is you are looking at when playing back clips in CineEI as if you use the wrong EI your clips may appear over or under exposed.

I hope you found this guide useful. Good luck with your FX6, it is a very capable camera.

Changing the way the camera looks and using LUTs in Custom Mode:

You can also use any user LUTs that you have loaded into the camera to alter the base look when you are shooting in custom mode. For more information on that please watch the video below.

New LUT – Chess

Here’s a new LUT for you, inspired by a the look of the Netfix show “the Queen’s Gambit. I’ve called the LUT “Chess”. It’s designed for use with S-Log3 and SGamut3.cine and I think it works really well with most Sony S-Log3 capable cameras including the FX6, FX9, FS7, FS5, F5 and F55 etc. As well as Sony’s video cameras it will also work with the A7SIII and other Sony Alpha cameras.

In the download you will find 2 LUTs. The 65x version is for post production and grading, the 33x version is for use as a camera LUT.  While I have aimed to replicate much of the look of the TV series it must be noted that grading is only a small part of the look. Set design, the colour of the sets and costume also play a significant roll.

S-Log3 to s709 Standard look.
S-Log3 to Chess Look LUT
S-Log3 to s709
S-Log3 ro Chess look LUT

If you find this LUT useful please consider buying me a cocktail or other beverage. Thank you! It does take a while to develop these LUT’s and contributions are a good incentive for me to create more!


Your choice:


Click Here to Download the Chess LUT


You can use this LUT as a camera LUT or for grading. If you are using the Sony FX6 you can use this LUT in Custom Mode as a Base Look. For more information on how to do that please watch the video below.


Raw Isn’t Magic. With the right tools Log does it too.

Raw can be a brilliant tool, I use it a lot. High quality raw is my preferred way of shooting. But it isn’t magic, it’s just a different type of recording codec.
 
All too often – and I’m as guilty as anyone – people talk about raw as “raw sensor data” a term that implies that raw really is something very different to a normal recording. In reality it’s really not that different. When shooting raw all that happens is that the video frames from the sensor are recorded before they are converted to a colour image. A raw frame is still a picture, it’s just that it’s a bitmap image made up of brightness values, each pixel represented by a single brightness code value rather than a colour image where each location in the image is represented by 3 values one for each of Red, Green and Blue or Luma, Cb and Cr.

As that raw frame is still nothing more than a normal bitmap all the cameras settings such as white balance, ISO etc are in fact baked in to the recording. Each pixel only has one single value and that value will have been determined by the way the camera is setup. Nothing you do in post production can change what was actually recorded. Most CMOS sensors are daylight balanced, so unless the camera adjusts the white balance prior to recording – which is what Sony normally do – your raw recording will be daylight balanced.

Modern cameras when shooting log or raw also record metadata that describes how the camera was set when the image was captured. 

So the recorded raw file already has a particular white balance and ISO. I know lots of people will be disappointed to hear this or simply refuse to believe this but that’s the truth about a raw bitmap image with a single code value for each pixel and that value is determined by the camera settings.

This can be adjusted later in post production, but the adjustment range is not unlimited and it is not the same as making an adjustment in the camera. Plus there can be consequences to the image quality if you make large adjustments. 

Log can be also adjusted extensively in post too. For decades feature films shot on film were scanned using 10 bit Cineon log (which is the log gamma curve S-Log3 is based on) and 10 bit log used for post production until 12 bit and then 16 bit linear intermediates came along like OpenEXR. So this should tell you that actually log can be graded very well and very extensively.

But then many people will tell you that you can’t grade log as well as raw. Often they will give photographers as an example where there is a huge difference between what you can do with a raw photo and a normal image. But we also have to remember this is typically comparing what you can do with a highly compressed 8 bit jpeg file and an often uncompressed 12 or 14 bit raw file. It’s not a fair comparison, of course you would expect the 14 bit file to be better.

The other argument often given is that it’s very hard to change the white balance of log in post, it doesn’t look right or it falls apart. Often these issues are nothing to do with the log recording but more to do with the tools being used.

When you work with raw in your editing or grading software you will almost always be using a dedicated raw tool or raw plugin designed for the flavour of raw you are using. As a result everything you do to the file is optimised for the exact flavour of raw you are dealing with. It shouldn’t come as a surprise to find that to get the best from log you should be using tools specifically designed for the type of log you are using. In the example below you can see how Sony’s Catalyst Browse can perfectly correctly change the white balance and exposure of S-log material with simple sliders just as effectively as most raw formats.
 
On the left is the original S-Log3 clip with the wrong white balance (3200K) and on the left is the corrected image. The only corrections made are via the Temperature slider and exposure slider.
 
Applying the normal linear or power law (709 is power law) corrections found in most edit software to Log won’t have the desired effect and basic edit software rarely has proper log controls. You need to use a proper grading package like Resolve and it’s dedicated log controls. Better still some form of colour managed workflow like ACES where your specific type of log is precisely converted on the fly to a special digital intermediate and the corrections are made to the intermediate file. There is no transcoding, you just tell ACES what the footage was was shot on and magic happens under the hood. Once you have done that you can change the white balance or ISO of log material in exactly the same way as raw. There is very, very little difference.
 
The same S-Log3 clip as in the above example, this time in DaVinci Resolve using ACES. The only corrections being made are via the Temp slider for the white balance change and the Log-Offset wheel which in ACES provides a precise exposure adjustment.
 
When people say you can’t push log, more often than not it isn’t a matter of can’t, it’s a case of can – but you need to use the right tools.
 
This is what log shot with completely the wrong white balance and slightly over exposed looks like after using nothing but the WB and ISO sliders in Catalyst Browse. I don’t believe raw would have looked any different.
 
Less compression or a greater bit depth are where the biggest differences between a log or raw recording come from, not so much from whether the data is log or raw.  Don’t forget raw is often recorded using log, which kind of makes the “you can’t grade log” argument a bit daft.
 
Camera manufactures and raw recorder manufacturers are perfectly happy to allow everyone to believe raw is magic and worse still, let people believe that ANY type of raw must be better than all other types of recordings. Read though any camera forum and you will see plenty of examples of “it’s raw so it must be better” or “I need raw because log isn’t as good” without any comprehension of what raw is and how in reality it’s the way the raw is compressed and the bit depth that really matters.

If we take ProRes Raw as an example: For a 4K 24/25fps file the bit rate is around 900Mb/s. For a conventional ProRes HQ file the bit rate is around 800Mb/s. So the file size difference between the two is not at all big.
 
But the ProRes Raw file only has to store around 1/3 as many data points as the component ProResHQ file. As a result, even though the ProRes Raw file often has a higher bit depth, which in itself usually means better a better quality recording, it is also much, much less compressed and as a result will have fewer artefacts. 

It’s the reduced compression and deeper bit depth possible with raw that can lead to higher quality recordings and as a result may bring some grading advantages compared to a normal ProRes or other compressed file. The best bit is there is no significant file size penalty. So you have the same amount of data, but you data should be of higher quality. So given that you won’t need more storage, which should you use? The higher bit depth less compressed file or the more compressed file?

But, not all raw files are the same. Some cameras feature highly compressed 10 bit raw, which frankly won’t be any better than most other 10 bit recordings as you are having to do all the complex math to create a colour image starting with just 10 bit. Most cameras do this internally at at least 12 bit. I believe raw needs to be at least 12 bit to be worth having.

If you could record uncompressed 12 bit RGB or 12 bit component log from these cameras that would likely be just as good and just as flexible as any raw recordings. But the files would be huge. It’s not that raw is magic, it’s just that raw is generally much less compressed and  depending on the camera may also have a greater bit depth. That’s where the benefits come from.

Changing the FX6’s base look in Custom Mode using LUT’s

This is extremely cool! You can change the FX6’s base look in custom mode using LUTs. This is not the same as baking in a LUT in Cine EI as in custom mode you can change the gain or ISO just as you would with any other gamma. But there’s more than that – you can even adjust the look of the LUT by changing the detail settings, black level, matrix and multi-matrix. Watch the video to see how it’s done.


The LUT’s used in the video can be downloaded from here. https://www.xdcam-user.com/2014/11/new-film-look-luts-for-the-pxw-fs7-pmw-f5-and-pmw-f55/

Or from here: https://pro.sony/en_SC/technology/alister-chapman-blockbuster-lut-v2

Can You Shoot Anamorphic with the PXW-FX9?

The simple answer as to whether you can shoot anamorphic on the FX9 or not, is no, you can’t. The FX9 certainly to start with, will not have an anamorphic mode and it’s unknown whether it ever will. I certainly wouldn’t count on it ever getting one (but who knows, perhaps if we keep asking for it we will get it).

But just because a camera doesn’t have a dedicated anamorphic mode it doesn’t mean you can’t shoot anamorphic. The main thing you won’t have is de-squeeze. So the image will be distorted and stretched in the viewfinder. But most external monitors now have anamorphic de-squeeze so this is not a huge deal and easy enough to work around.

1.3x or 2x Anamorphic?

With a 16:9 or 17:9 camera you can use 1.3x anamorphic lenses to get a 2:39 final image. So the FX9, like most 16:9 cameras will be suitable for use with 1.3x anamorphic lenses out of the box.

But for the full anamorphic effect you really want to shoot with 2x  anamorphic lenses. A 2x anamorphic lens will give your footage a much more interesting look than a 1.3x anamorphic. But if you want to reproduce the classic 2:39 aspect ratio normally associated with anamorphic lenses and 35mm film then you need a 4:3 sensor rather than a 16:9 one – or do you?

Anamorphic on the PMW-F5 and F55.

It’s worth looking at shooting 2x Anamorphic on the Sony F5 and F55 cameras. These cameras have 17:9 sensors, so they are not ideal for 2x Anamorphic. However the cameras do have a dedicated Anamorphic mode. When shooting with a 2x Anamorphic lens because the 17:9 F55 sensor, like most super 35mm sensors, is not tall enough, after de-squeezing you will end up with a very narrow 3.55:1 aspect ratio. To avoid this very narrow final aspect ratio, once you have de-squeezed the image you need to crop  the sides of the image by around 0.7x and then expand the cropped image to fill the frame. This not only reduces the resolution of the final output but also the usable field of view. But even with the resolution reduction as a result of the crop and zoom it was still argued that because the F55 starts from a 4K sensor that this was roughly the equivalent of Arri’s open gate 3.4K. However the loss of field of view still presents a problem for many productions.

What if I have Full Frame 16:9?

The FX9 has a 6K full frame sensor and a full frame sensor is bigger, not just wider but most importantly it’s taller than s35mm. Tall enough for use with a 2x s35 anamorphic lens! The FX9 sensor is approx 34mm wide and 19mm tall in FF6K mode.

In comparison the Arri  35mm 4:3 open gate sensor is area is 28mm x 18.1mm and we know this works very well with 2x Anamorphic lenses as this mimics the size of a full size 35mm cine film frame. The important bit here is the height – 18.1mm with the Arri open gate and 18.8mm for the FX9 in Full Frame Scan Mode.

Sensor sizes and Anamorphic coverage.

Crunching the numbers.

If you do the maths – Start with the FX9 in FF mode and use a s35mm 2x anamorphic lens. 

Because the image is 6K subsampled to 4K the resulting recording will have 4K resolution.

But you will need to crop the sides of the final recording by roughly 30% to remove the left/right vignette caused by using an anamorphic lens designed for 35mm movie film (the exact amount of crop will depend on the lens). This then results in a 2.8K ish resolution image depending on how much you need to crop.

4K Bayer doesn’t won’t give 4K resolution.

That doesn’t seem very good until you consider that a 4K 4:3 bayer sensor would only yield about 2.8K resolution anyway.

Arri’s s35mm cameras are open gate 3.2K bayer sensors so will result in an even lower resolution image, perhaps around 2.2K. Do remember that the original Arri ALEV sensor was designed when 2K was the norm for the cinema and HD TV was still new. The Arri super 35 cameras were for a long time the gold standard for Anamorphic because their sensor size and shape matches the size and shape of a full size 35mm movie film frame. But now cameras like Sony’s Venice that can shoot both 6K and 4K 4:3 and 6:5 are starting now taking over.

The FX9 in Full Frame scan mode will produce a great looking image with a 2x anamorphic lens without losing any of the field of view. The horizontal resolution won’t be 4K due to the left and right edge crop required, but the horizontal resolution should be higher than you would get from a 4K 16:9 sensor or a 3.2K 4:3 sensor. Unlike using a 16:9 4K sensor where both the horizontal and vertical resolution are compromised the FX9’s vertical resolution will be 4K and that’s important.

What about Netflix?

While Netflix normally insist on a minimum of a sensor with 4K of pixels horizontally for capture, they are permitting sensors with lower horizontal pixel counts to be used for anamorphic capture. Because the increased sensor height needed for 2x anamorphic means that there are more pixels vertically. The total usable pixel count when using the Arri LF with a typical 35mm 2x anamorphic lens is 3148 x 2636 pixels. Thats a total of  8 megapixels which is similar to the 8 megapixel total pixel count of a 4K 16:9 sensor with a spherical lens.  The argument is that the total captured picture information is similar for both, so both should be, and are indeed allowed. The Arri format does lead to a final aspect ratio slightly wider than 2:39.

Alexa LF v FX9 and super 35mm 2x anamorphic.


So could the FX9 get Netflix approval for 2x Anamorphic?

The FX9’s sensor has is 3168 pixel tall when shooting FF 16:9  as it’s pixel pitch is finer than the Arri LF sensor.  When working with a 2x anamorphic super 35mm lens the image circle from the lens will cover around 4K x 3K of pixels, a total of 12 megapixels on the sensor when it’s operating in the 6K Full Frame scan mode. But then the FX9 will internally down scale this to that vignetted 4K recording that needs to be cropped.

6K down to 4K means that the 4K covered by the lens becomes roughly 2.7K. But then the 3.1K from the Arri when debayered will more than likely be even less than this, perhaps only 2.1K

But whether Netflix will accept the in camera down conversion is a very big question. The maths indicates that the resolution of the final output of the FX9 would be greater than that of the LF, even taking the necessary crop into account. But this would need to be tested and verified in practice. If the math is right, I see no reason why the FX9 won’t be able to meet Netflix’s minimum requirements for 2x anamorphic production. If this is a workflow you wish to pursue I would recommend taking the 10 bit 4:2:2 HDMI out to a ProRes recorder and record using the best codec you can until the FX9 gains the ability to output raw. Meeting the Netflix standard is speculation on my part, perhaps it never will get accepted for anamorphic, but to answer the original question –

 – Can you shoot anamorphic with the FX9 – Absolutely, yes you can and the end result should be pretty good. But you’ll have to put up with a distorted image with the supplied viewfinder (for now at least).

Picture Profiles for the PXW-FS5.

PXW-FS5 Picture Profiles

The Sony PXW-FS5 is a great little camera. It’s a camera I really enjoy shooting with as I can just grab it and go, picking up some great pictures with the minimum of effort. The built in Picture Profiles offer a wide range of different looks that can be quickly selected by pressing the P Profile button and choosing a profile. But one of the best parts is that you can tweak and adjust each profile to suit different shooting applications.

I tend to leave Picture Profile 7 alone. This is the S-Log2/S-Gamut profile that you must use when shooting raw and S-Log2 is my preferred log curve for shooting 8 bit UHD. But that leaves profiles 1 to 6 to play with and adjust, plus profiles 8 and 9 if you don’t use S-Log3. If you want to go back to the factory settings each profile can be reset individually (using “reset” within the profile settings).

Perhaps the two most challenging situations to shoot in are scenes that are high contrast and bright or low light scenes. Often you may encounter both types of scene on the same shoot, so it would be good if the pictures were at least similar. So we don’t want to use totally different color settings. But you can use different gamma settings to help better deal with the differing lighting levels and contrast ranges.

For brighter scenes I am a big fan of Sony’s “Cinegammas”. The Cinegammas differ from the standard gammas in the way they handle highlights. Basic television gamma has a very limited dynamic range, around 6 stops. Then to extend the dynamic range something called a “knee” is added to the top of the gamma curve. The point where the curve transitions from normal gamma to the knee is called the “knee point”. Everything above the knee is is compressed or squeezed. So in effect below the Knee 1 stop  is record with 1 stops worth of data, but above the knee 3 or 4 stops may be recorded in the same space.

cinegammas

In practice this means anything brighter than the knee point will have very little contrast, when you have low contrast it is also hard to see any detail. So the highlights in the image look flat, lack texture and detail. If you have bright skin tones up in the knee they just look like blobs of color. Cotton wool clouds come out as white blobs in the sky and it is the knee that is largely responsible for the “video look”.

Sony’s Cinegammas are different. They do not have a knee. Instead of a hard knee point where you switch instantly from not compressed to compressed they have a slow and gradual transition from not compressed to very compressed. This is not unlike the way film behaves and is typically called a “highlight roll-off”. In practice because this transition is gradual it is less obvious. Because it is less obvious you can start the transition lower down the gamma curve which means you have more recording range for the highlights and can therefore increase the captured dynamic range. But to get the best looking recordings you want to keep faces and skin tones below the more aggressive parts of the roll off, so often you need to expose marginally darker than you would with conventional gamma.

For standard gammas it is typical to set the cameras zebras to 70% and have zebras just starting to appear on skin tones. With the Cinegammas I recommend reducing the zebras to 60%. See this article for more info on the correct exposure https://www.xdcam-user.com/2013/07/correct-exposure-levels-with-sony-hypergammas-and-cinegammas/

If you want to use the Cinegammas and are doing anything for broadcast TV that will not be graded and the video levels corrected to the 100% maximum required for broadcast then you should only ever use Cinegamma 2. All the other Cinegammas allow recording up to 109%.

All the Cinegammas record a similar extended dynamic range, Cinegamma 2 will almost always appear a little darker as it’s recording range is shrunk to ensure it does not exceed 100%., but even though it may appear a little darker, the captured dynamic range is the same.

For brighter scenes Cinegamma 1 is my go-to gamma curve on the FS5. It captures a large dynamic range. For darker scenes I will often use Cinegamma 4 as this raises shadows and the mid range. Cinegamma 4 is also useful for shooting back lit scenes.

Cinegamma 3 is a little more contrasty than Cinegamma 1 so if you want a picture with higher contrast this is the curve you should consider.

What about color?

The standard color mode is OK, but I find it a little gaudy. If you want a more film like look then the Cinema mode works quite well to give a more de-saturated look. But my favourite color mode is the Pro color mode. It’s not as vibrant or highly saturated as the standard or ITU709 color modes but it does produce very accurate colors. It’s a bit less green that the standard color mode. If you want a more vibrant image you can increase the saturation, I find Pro Color at +14 saturation gives great color straight out of the camera.

The Color Depth control is a bit of an odd control. It works by targeting a particular color, but instead of increasing/decreasing the saturation of the color it makes the luminance level of objects that are that color brighter or darker. If you make a red car darker in brightness it makes the color appear stronger relative to the brightness. A positive setting makes the luminance darker, so the color appears stronger, a negative setting makes the luminance brighter so the color appears slightly more washed out.

First the standard look (notice the blobby, flat, no texture look to the clouds from the knee):

PXW-FS5 Standard Settings

So, here are some suggested settings for different shooting conditions. Remember, you can mix and match the color and gamma settings, so if you like the colors from one profile you can take the color settings and use them with the contrast settings (gamma, black gamma) of another.

1: AC-GPMC – General purpose, medium contrast (good all-round profile).

Gamma: Cine3, Black Gamma Middle -7, Color Mode Pro, Saturation +16 (substitute Cine3 with Cine2 for direct to air broadcast).

Alister's PXW-FS5 Profile AC-GPMC
Alister’s PXW-FS5 Profile AC-GPMC

2: AC-GPBT – General purpose for bright high contrast scenes.

Gamma: Cine1, Black Gamma Low -3, Color Mode Pro, Saturation +16 (substitute Cine1 with Cine2 for direct to air broadcast).

Alister's PXW-FS5 Profile AC-GPBT
Alister’s PXW-FS5 Profile AC-GPBT

3: AC-GPGD – General purpose, looks good direct but good if going to be graded (shadows raised to help in grading)

Gamma: Cine1, Black Gamma Low +4, Color Mode Pro, Saturation 0 (substitute Cine1 with Cine2 for direct to air broadcast).

Alister's PXW-FS5 profile AC-GPGD
Alister’s PXW-FS5 profile AC-GPGD

4: AC-GPLL – General purpose profile for darker scenes (raised shadows to make grading easier).

Gamma: Cine4, Black Gamma High +7, Color Mode Pro, Saturation +6 (substitute Cine4 with Cine2 for direct to air broadcast).

Alister's PXW-FS5 Picture Profile AC-GPLL
Alister’s PXW-FS5 Picture Profile AC-GPLL

5: AC-EXLL – For use in very low light levels (is the equivalent to adding +6db gain, does increase noise).

Gamma: ITU709(800), Black Gamma Low +7, Color Mode Pro, Saturation 0.

Alister's PXW-FS5 Picture Profile for very low light AC-EXLL
Alister’s PXW-FS5 Picture Profile for very low light AC-EXLL

6: AC-ASIA1 – Vibrant colors, slight boost to reds/blues.

Gamma: Cine3, Black Gamma Middle -7, Color Mode ITU709, Saturation +10, Color Depth R+5, G-3, B+2, C+1, M0, Y-2.

Alister's PXW-FS5 Picture Profile AC-ASIA1. Vibrant vivid colors.
Alister’s PXW-FS5 Picture Profile AC-ASIA1. Vibrant vivid colors.

AC-FILM1 – Film like color and contrast.

Gamma Cine1, Black Gamma Middle -7, Color Mode Cinema, Saturation +8, Phase -3, Color Depth R+4, G-1, B+1, C0, M0, Y-4.

Alister's PXW-FS5 Picture Profile AC-FILM1, a film-like profile.
Alister’s PXW-FS5 Picture Profile AC-FILM1, a film-like profile.


Deeper Understanding Of Log Gamma. Experiments with a Waveform Display.

I started writing this as an explanation of why I often choose not to use log for low light. But instead it’s ended up as an experiment you can try for yourself if you have a waveform monitor that will hopefully allow you to better understand the differences between log and standard gamma. Get a waveform display hooked up to your log camera and try this for yourself.

S-Log and other log gammas are wonderful things, but they are not the be-all and end-all of video gammas. They are designed for one specific purpose and that is to give cameras using conventional YCbCr or RGB recording methods the ability to record the greatest possible dynamic range with a limited amount of data, as a result there are some compromises made when using log. Unlike conventional gammas with a knee or gammas such as hypergammas and cinegammas, log gammas do not normally have any highlight roll off, but do have a shadow roll-off. Once you get above middle grey log gammas normally record every stop with almost exactly the same amount of data, right up to the clipping point where they hard clip. Below middle grey there is a roll off of data per stop as you go down towards the black clip point (as there is naturally less information in the shadows this is expected). So in many respects log gammas are almost the reverse of standard gammas. The highlight roll off that you may believe that you see with log is often just the natural way that real world highlights roll off anyway, after all there isn’t an infinite amount of light floating around (thank goodness). Or that apparent roll off is simply a display or LUT limitation.

An experiment for you to try.

Click on the chart to go to larger versions that you can download. Display it full screen on you computer and use it as a test chart. You may need to de-focus the camera slightly to avoid aliasing from the screens pixels.
Click on the chart to go to larger versions that you can download. Display it full screen on your computer and use it as a test chart. You may need to de-focus the camera slightly to avoid aliasing from the screens pixels.

If you have a waveform display and a grey scale chart you can actually see this behaviour. If you don’t have a chart use the grey scale posted here full screen on your computer monitor. Start with a conventional gamma, preferably REC-709. Point the camera at the chart and gradually open up the aperture. With normal gammas as you open the aperture you will see the steps between each grey bar open up and the steps spread apart until you reach the knee point, typically at 90% (assuming the knee is ON which is the default for most cameras).  Once you hit the knee all those steps rapidly squash back together again.

What you are seeing on the waveform is conventional gamma behaviour where for each stop you go up in exposure you almost double the amount of data recorded, thus capturing the real world very accurately (although only within a limited range). Once you hit the knee everything is compressed together to increase the dynamic range using only a very small recording range, leaving the shadows and all important mid range well recorded. It’s this highlight compression that gives video the “video look”, washed out highlights with no contrast that look electronic.

If you repeat the same exercise with a hypergamma or cinegamma once again in the lower and mid range you will see the steps stretch apart on the waveform as you increase the exposure. But once you get to about 65-70% they stop stretching apart and now start to squeeze together. This is the highlight roll off of the hypergamma/cinegamma doing it’s thing. Once again compressing the highlights to get a greater dynamic range but doing this in a progressive gradual manner that tends to look much nicer than the hard knee. Even though this does look better than 709 + Knee in the vast majority of cases, we are still compressing the highlights, still throwing away a lot of data or highlight picture information that can never be recovered in post production no matter what you do.

Conventional video = Protect Your Highlights.

So in the conventional video world we are taught as cameramen to “protect the highlights”. Never overexpose because it looks bad and even grading won’t help a lot. If anything we will often err on the side of caution and expose a little low to avoid highlight issues. If you are using a Hypergamma or Cinegamma you really need to be careful with skin tones to keep them below that 65-70% beginning of the highlight roll off.

Now repeat the same experiment with Slog2 or S-log3. S-log2 is best for the experiment as it shows what is going on most clearly. Before you do it though mark middle grey on your waveform display with a piece of tape or similar. Middle grey for S-log2 is 32% (41% for S-log3).

Now open up the aperture and watch those steps between the grey scale bars. Below middle grey, as with the standard gammas you will see the gap between each bar open up. But take careful note of what happens above middle grey. Once you get above middle grey and all the way to the clip point the gap between each step remains the same.

So what’s happening now?

Well this is the S-log curve recording each stop above middle grey with the same amount of data. In addition there is NO highlight roll off. Even the very brightest step just below clipping will be same size as the one just above middle grey. In practice what this means is that it doesn’t make a great deal of difference where you expose for example skin tones, provided they are above middle grey and below clipping. After grading it will look more or less the same. In addition it means that that very brightest stop contains a lot of great, useable picture information. Compare that to Rec-709 or the Cinegammas/Hypergammas where the brightest  stops are all squashed together and contain almost no contrast or picture information.

Now add in to the equation what is going on in the shadows. Log has less data in the shadows than standard gammas because you are recording a greater overall dynamic range, so each stop is recorded with overall less data.

Standard Gammas = More shadow data per stop, much less highlight data = Need to protect highlights.

Log= Less shadow data per stop, much more highlight data = Need to protect shadows.

Hopefully now you can see that with S-log we need to flip the way we shoot from protecting highlights to protecting shadows. When you shoot with conventional gammas most people expose so the mid range is OK, then take a look at the highlights to make sure they are not too bright and largely ignore whats going on in the shadows. With Log you need to do the opposite. Expose the mid range and then check the shadows to make sure they are not too dark. You can ignore the highlights.

Yes, thats’ right, when shooting log: IGNORE the highlights!

Cinegamma highlight roll off. Note how the tree branches in the highlights look strangled and ugly due to the lack of highlight data, hence "protect your highlights".
Cinegamma highlight roll off. Note how the tree branches in the highlights look strangled and ugly due to the lack of highlight data, hence “protect your highlights”.

Graded S-Log2. Note how nice the same tree branches look because there is a lot of data in the highlights, but the shadows are a little crunchy. Hence: protect your shadows.

For a start you monitor or viewfinder isn’t going to be able to accurately reproduce the highlights as bright as they are . So typically they will look a lot more over exposed than they really are. In addition there is a ton of data in those highlights that you will be able to extract in the grade. But most importantly if you do underexpose your mid range will suffer, it will get noisy and your shadows will look terrible because there will be no data to work with.

When I shoot with log I always over expose by at least 1 stop above the manufacturer recommended levels. If you are using S-log2 or S-log3 that can be achieved by setting zebras to 70% and then checking that you are JUST starting to see zebras on something white in your shot such as a white shirt or piece of paper. If your camera has CineEI use an EI that is half of the cameras native ISO (I use 1000 or 800 EI for my FS7 or F5).

I hope these experiments with a grey scale and waveform help you understand what is going on with you gamma curves. One thing I will add is that while controlled over exposure is beneficial it can lead to some issues with grading. That’s because most LUT’s are designed for “correct” exposure so will typically look over exposed. Another issue is that if you simply reduce the gain level in post to compensate than the graded footage looks flat and washed out. This is because you are applying a linear correction to log footage. Fo a long tome I struggled to get pleasing results from over exposed log footage. The secret is to either use LUT’s that are offset to compensate for over exposure or to de-log the footage prior to grading using an S-Curve. I’ll cover both of these in a later article.

Chart showing S-Log2 and S-Log3 plotted against f-stops and code values.


What about shooting in low light?

OK, now lets imagine we are shooting a dark or low light scene. It’s dark enough that even if we open the aperture all the way the brightest parts of the scene (ignoring things like street lights) do not reach clipping (92% with S-Log3 or 109% with S-Log2). This means two things. 1: The scene has a dynamic range less than 14 stops and 2: We are not utilising all of the recording data available to us. We are wasting data.

Log exposed so that the scene fills the entire curve puts around 100 code values (or luma shades) per stop above middle grey for S-log2 and 75 code values for S-Log3 with a 10 bit codec. If your codec is only 8 bit then that becomes 25 for S-log2 and 19 code values for S-Log3. And that’s ONLY if you are recording a signal that fills the full range from black clip to white clip.

3 stops below middle grey there is very little data, about thirty 10 bit code values for S-Log2 and about 45 for S-log3. Once again if the codec is 8 bit you have much less, about 7 for S-Log2 and about 11 for S-log2. As a result the darker parts of your recorded scene will be recorded with very little data and very few shades. This impacts how much you can grade the image in post as there is very little picture information in the darker parts of the shot and noise tends to look quite coarse as it is only recorded with a limited number of steps or levels (this is particularly true of 8 bit codecs and an area where 8 bit recordings can be problematic).

So what happens if we use a standard gamma curve?

Lets say we now shoot the same scene with a standard gamma curve, perhaps REC-709. One point to note with Sony cameras like the FS5, FS7, F5/F55 etc is that the standard gammas normally have a native ISO one to two stops lower than S-Log. That’s because the standard gammas ignore the darkest couple of stops that are recorded when in log. After all there is very little really useable picture information down there in all the noise.

Now our limited dynamic range scene will be filling much more of our recording range. So straight away we have more data per stop because we are utilising a bigger portion of the recording range. In addition because our recorded levels will be higher in our recording range there will be more data per stop, typically double the data especially in the darker parts of the recorded image. This means than any noise is recorded more accurately which results in smoother looking noise. It also means there is more data available for any post production manipulation.

But what about those dark scenes with problem highlights such as street lights?

This an area where Cinegammas or Hypergammas are very useful. The problem highlights like strret lights normally only make up a very small part of your your overall scene. So unless you are shooting for HDR display it’s a huge waste to use S-log just to bring some highlights into range as you make big compromises to the rest of the image and you’ll never be able to show them accurately in the finished image anyway as they will exceed the dynamic range of the TV display.  Instead for these situations a Hypergamma or Cinegamma works well because below about 70% exposure Hypergammas and cinegammas are very similar to Rec-709 so you will have lots of data in the shadows and mid range where you really need it. The highlights will be up in the highlight roll off area where the data levels or number of recorded shades are rolled off. So the highlights still get recorded, perhaps without clipping, but you are only giving away a small amount of data to do this. The highlights possibly won’t look quite as nice as if recorded with log, but they are typically only a small part of the scene and the rest of the scene especially the shadows and mid tones will end up looking much better as the noise will be smoother and there will be more data in that all important mid-range.


Treat it like a film camera!

If you have a modern camera that can record log or raw and has 13 stops or more of dynamic range you need to stop thinking “video” and think “film”.

A big mistake most traditional video camera operators make with these big DR cameras is to treat them as they would a typical limited dynamic range video camera and constantly worry and obsess about protecting highlights. Why do we do this? Well probably because that’s what you do with cameras with a very limited range and that’s probably what you have had drummed into you for years. But now with modern large sensor cameras everything changes. When you get to a 14 stop range camera, even if you choose to shoot 2 stops over exposed  (perhaps by using 500 EI on an FS7 or F5) you still have as much or more over exposure range as a conventional video camera and the highlight range that you do have is not subject to a knee or other similar acute highlight compression. So any highlights will contain a ton of high quality, usable picture information. By shooting over exposed by a controlled amount (1 to 2 stops), perhaps by using a low EI you gain very big improvements in the signal to noise ratio and get better saturated colors (opening the aperture lets more light onto the sensor, your colors will be better recorded). This allows you to pull a lot more information out of the data thin shadows and mid range. Most cameras that use log have very little data in the shadows. If you are recording with a 10 bit codec cameras that use variations of the Cineon log curve (Arri LogC, Sony S-Log3, Panasonic V-Log) only have about 80 luma shades covering the first 4 stops of exposure in total. Above the 4th stop the amount of data per stop increases rapidly so a little bit of deliberate over exposure really helps lift your darkest shadows up out of the noise and mire. Up in the highlights each stop has exactly the same amount of data, so over exposing a bit doesn’t compress the highlights as it would with a conventional camera, so a bit of mild over exposure is normally not noticeable.

Really with a 14 stop log camera you want to treat it like film, not video. Just like film, a 14 stop log camera will almost always benefit from a controlled amount of over exposure, highlights will rarely suffer or look bad just because you’re one stop hot, but he shadows and midtones will be significantly improved. And just like film, if you under expose log you will take a big hit. You will loose a lot of shadow information very quickly, have less color, it will be noisy and the highlight benefit will be marginal.

Tips for shooting in very cold weather.

(Updated 12/2023)

With winter well upon us I thought it would be good to share some of my arctic shooting experience. I’ve shot in temperatures down to -45c in the arctic in winter.

Overall modern tapeless cameras do OK in extreme cold. The most reliable cameras are generally larger solid state cameras. Larger cameras cool slower than small ones and larger cameras will hold on to heat generated internally better than small ones. Cameras and electronics with lots of cooling vents can sometimes also be troublesome as the vents allow them to cool more quickly. But cold is not necessarily going to be the biggest problem.

IMPORTANT NOTE: It is EXTREMELY dangerous to charge normal  lithium batteries that are below freezing. Below freezing the lithium in the battery migrates to the anode of the battery cell. This cuase permanent damage to the battery shortening its life and if enough builds up around the anode it can short the battery out causing a sudden fire/explosion. Each time you charge a very cold lithium battery more lithium builds up. It is possible for a lithium battery that has been charged when very cold to suddenly burst into flames some weeks/months/years later if bumped or knocked causing the lithium build around the anode to shift. Always warm up any lithium batteries before attempting to charge them.

Filming in a remote arctic area. Photo by Jan Helmer Olsen.

Condensation:

Condensation is the big deal breaker. When you take the very cold camera inside into a warm house/hotel/car/tent you will get condensation. If the camera is very cold this can then freeze on the body of camera including the glass of the lens. If there is condensation on the outside of the camera, there will almost certainly also be condensation inside the camera and this can kill your camera.

To prevent or at least reduce the condensation you can place the camera in a large ziplock or other sealed bag BEFORE taking it inside, take the camera inside in the bag. Then allow the camera to warm up to the ambient temperature before removing it from the bag. Peli cases are another option, but the large volume of the pelicase means there will be more moisture inside the case to condense and the insulating properties of the case mean that it could take many, many hours to warm up.

I don’t recommend storing a cold or damp camera in a Pelicase (or any other similar waterproof case) as there is nowhere for the moisture to go, so the camera will remain damp until the case is opened and everything dried out properly.

Rather than moving a camera repeatedly from outside to inside and repeatedly generating risky condensation you should consider leaving the camera outside. You can leave the camera outside provided it does not get below -30c. Below -30c you risk the LCD panel freezing and cracking. LCD  panels freeze at between -30 to -40c. If you are using a camera in very cold conditions and you notice the edges of the LCD screen going blue or dark you should start thinking about warming up that LCD panel as it may be close to freezing.

LCD displays will become slow and sluggish to respond in the cold. Your pictures may look blurry and smeary because of this. It doesn’t affect the recording, only what you see on the LCD.

Very often in cold regions houses will have an unheated reception room or porch. This is a good place to store your camera rather than taking it inside into the warm. Repeatedly taking a camera from cold to warm without taking precautions against condensation will shorten the life of your camera.
If you can, leave the camera on between shots. The camera generates some heat internally and this will prevent many issues.

BATTERY LIFE:

Li-Ion batteries are effected by the cold but they are not nearly as bad as Nicads or NiMh batteries which are all but useless below freezing. li-Ion battery life gets reduced by between 25 and 50% depending on how cold it is and the quality of the battery (very cheap cells may have a higher water content which can freeze causing the cell to dramatically lose capacity and the ability to deliver power).
Down to about -10c there is only a very marginal loss of capacity. Down to -25c you will lose about 20%-30% below -25c the capacity will fall away further and it becomes impossible to use the full capacity of the battery.

Keep your spare batteries in a pocket inside your coat or jacket until you need them. After use let the battery warm up before you charge it if you can. Charging a very cold battery will reduce the lifespan of the battery and it won’t fully charge (see note above – DO NOT CHARGE a battery that is below freezing, it is very dangerous). One top tip for shooting outside for extended periods is to get a cool box. Get some chemical hand warmers or better still electric rechargeable handwarmers and place them in the cool box with your batteries to keep them warm. If you don’t have hand warmers you can also use a hot water bottle. Chemical hand warms typically use an iron powder mixed with salts. The heat comes from the iron rapidly rusting. This process needs moisture to work. A chemical handwarmer will work great in a pocket close to your body moisture but when it is very cold there isn’t enough moisture in the air for a chemical warmer to work when it is away from your body moisture. As a result chemical warmers inside camera covers or in a cool box might not actually produce any heat.

Watch your breath

If your lens has and snow or ice on it, don’t be tempted to breath or blow on the lens to blow the ice off.  Do not to breath on the lens when cleaning it as your warm breath will condense on the cold glass and freeze.  Also try to avoid breathing out close to the viewfinder.  When it is very cold and if you are warm in your nice thick winter clothes even standing close to the camera can lead to frost and ice building up on it.  Small amounts of sweat from your body will evaporate and this moisture will find its way to the camera, even if you are a few feet (1 or 2m) from it. If doing a timelapse of the Northern Lights, once the camera is running you should move away from the camera.

A small soft paint brush is good for keeping your lens clean as in very cold conditions you’ll simply be able to brush and snow or ice off. Otherwise a large lens cloth.
Your lens will get cold and in some conditions you will get frost on the front element. To help combat this wrap some insulating fabric around the body of the lens. Wrist sweat bands are quite good for this or an old sock with the toes cut off.  For time-lapse long sessions in very cold weather you might want to get a lens heater for the lens. These are normally 12 volt or USB powered and wrap around the lens. They don’t use lots of power but they do warm the lens just enough to keep the worst of the condensation, dew and frost off the lens. They are sometimes also called “dew heaters” and are sold by most good telescope suppliers.

Covers.

Conventional plastic rain covers become brittle below about -15c and can even shatter like glass  below -20c. The clear plastic panels in other covers can also suffer the same fate. So use if you use a cover use one made out of fabric. Special insulated cold weather covers often called “polar bears” can be used and these often have pockets inside for chemical heat packs (although when very cold these don’t work, use a USB hand warmer instead). These are well worth getting if you are going to be doing a lot of arctic shooting with a larger camera and will help keep the camera warm. But for very small cameras the bulk of a thick cover can make it almost impossible to use. As an alternative wrap the camera in a scarf or cut the sleeves of an old sweater to make a tube you can slide over the camera. If you have a sewing machine you could make a simple cover out of some fleece type material.
For DSLR’s and stills cameras a balaclava can be used to cover the camera body to provide some protection. However unheated covers don’t make a big difference when the camera is outside in very cold temperatures for extended periods unless it is always left turned on, eventually the cold will get to it.

Brittle Plastic.

Plastics get brittle at low temperatures so be very gentle with anything plastic, especially things made from very hard, cheap plastic. The plastic Sony use appears to be pretty tough even at low temps. Wires and cables may become as rigid as a steel rod. Be gentle, bend then too much and the insulation may split and the cable break. I try to avoid bending any cable once it has become very cold.

Other considerations are tripods. If outside in very low temps for more than 30mins or so the grease in the tripod will become very thick and may even freeze, so your fluid damping will become either very stiff or freeze up all together. Contact your tripod manufacturer to see what temperatures their greases can be used over. Vinten and some of the other tripod companies can winterise the tripod and replace the normal grease with arctic grease. If you are unsure put your tripod head in your deep freeze at home for a few hours and see if it still works when you take it out.

Looking after yourself.

I find that the best way to operate the camera is by wearing a pair of large top quality mittens (gloves are next to useless below -15c), Consider getting a pair of Army surplus arctic mittens, they are very cheap on ebay and from surplus stores and will normally have an additional “trigger finger”. This extra finger makes it easier to press the record button and things like that.  If you can get Swedish or Finnish military winter mittens, these are amongst the best. I wear a pair of thin “thinsulate” fleece gloves that will fit inside the mittens, i can then slip my hands in and out of the mittens to operate the camera. If you can get gloves with finger tips compatible with touch screens this will allow you to use any touch functions on a camera or your phone. Get extra large mittens, then it is easier to slip your hand in and out.

I keep a chemical hand warmer inside the mittens to warm my fingers back up after using the camera (or use heated mittens powered by a USB battery pack).

The hardest thing to keep warm is your feet. If you’ll be standing in snow or standing on ice then conventional hiking boots etc will not keep your feet warm. A Scandinavian trick if standing outside for long periods is to get some small twigs and tree branches to stand on and help insulate your feet from the cold ground. If your feet get cold then you are at risk of frostbite or frost nip. Invest in or hire some decent snow boots like  Baffin’s.  There is almost nothing worse than having ice cold feet when working. Don’t forget that if you do get cold, moving around, running on the spot etc will help get your circulation going and help you to warm up. Also consider some high energy food and snacks, you will burn a lot more calories in the cold than you would do normally. Also a flask with a hot drink is always welcome.  I have an arctic clothing guide here; Arctic Clothing Guide |