 I have a crazy few weeks coming up. This week I will be filming at the Glastonbury festival, then next week I will be in Dubai for a workshop on virtual production with Sony’s Venice 2 camera. This will be a great opportunity for those that have never been to a virtual studio to have a look at how it all works and what’s involved – nad to see how Venice 2 is an excellent camera for VR thanks to it’s very fast sensor readout speed, frame size flexibility and wide range of frame rates. To join one of the sessions please RSVP to Omar.Abuaisha@sony.com
Category Archives: Venice
CineD Venice 2 Dynamic Range Tests
The recent publication of CineD’s Venice 2 lab tests has created quite a stir and many have asked what my view on this is. You can see the entire test here: https://www.cined.com/sony-venice-2-lab-test-rolling-shutter-dynamic-range-and-latitude/
I have not done any formal dynamic range testing with Venice 2 myself, but I have shot with it several times. I have also shot with most of Sony’s recent cameras including the original Venice, many different Red cameras and Arri ALexa’s.
Whenever I shot with Venice 2 the dynamic range has always impressed me. I have been able to pull lots of detail out of the deepest shadows without any issue, no nasty noise artefacts, no coloured blotches. When I shot the “London Vistas” video in London at night using available light I found the cameras noise floor to be very low, allowing me to get deep shadow textures without issue. The cameras highlight handling has also always impressed me and every time I’ve used Venice 2 I have been delighted with the dynamic range it delivers, it is up there with the Arri Alexa. From my real world shooting experience Venice 2 delivers more DR than my FX9 or FX6 and it delivers it in a very pleasing way. The way the far highlights and deep shadows behave is beautiful.
I would also point out that there are many great examples of deep shadow details and textures that are colour blotch free in Rob Hardy’s “Venizia” short film.
I would point out that CineD noted that the Venice 2 as the delivered the second highest dynamic range result they have seen in their lab when they recorded using the internal 4K ProRes recordings. Venice 2 comes in just 0.3 stops behind the Alexa in this mode in the CineD tests. CineD have put this down to downsampling from 8K plus the use of additional internal noise reduction. While DCT codecs like ProRes do normally incorporate some degree of NR, I doubt that Sony are doing any significant NR in camera as this tends to degrade the image in other areas. So I find the discrepancy between the results they are seeing between the 16 it X-OCN and the 10 bit ProResHQ very intriguing and it makes me wonder if something else is going on. Downsampling from 8K will certainly help lower the noise a little, but I feel that there is something odd with the X-OCN results, one thing I note is a very raised pedestal on the waveform of the X-OCN, which is somewhat odd, the bit depth should help separate the noise from the useable signal. A camera either has a dynamic range or it doesn’t, only rarely does NR make a significant difference as the sensor analog to digital converters tend to be the one of the main limiting factors. My own real world experience is that Venice 2 when shooting X-OCN has more useable DR than almost every other camera I have used.
Bottom line is – don’t go by the test, try the camera for yourself as I am quite sure you will find, like me, that one thing Venice 2 does not lack is dynamic range. I will try to do my own formal tests as soon as possible.
New SxS/AXS drivers and New Raw Viewer
 Over the last few days Sony have been busy releasing new drivers and new software to support not just Venice 2 but also the AXS-R7 and newer AXS-R1 SxS card readers on Apples M1 macs as well as Windows 11.
There is a new and updated version of Sony’s Raw Viewer software that includes support for the 8K Venice 2 files and which runs correctly on Apples newer M1 silicon. This can be downloaded from here: https://www.sonycreativesoftware.com/download/rawviewer
In addition Sony have released a new AXSM utility tool with new drivers for the AR1/AR3 to support the latest cards and formats as well as support for Apple M1 silicon and Windows 11. This is an essential update if you are using these new readers or Venice 2. This can be downloaded from here: https://www.sonycreativesoftware.com/axsmdrive#download
Cine2022 Dubai. A chance to play with a Sony VENICE 2 and the rest of Sony’s Cinema Line.
 To celebrate their 20th anniversary Advanced Media of Dubai are holding a special event called Cine2022. This will be the first opportunity to get your hands on and see the beautiful images from Sony’s Venice 2 in the Middle East. I will be there to talk about the camera and it’s workflow and we will have a Venice 2 for you to play with. So, if you are in Dubai between the 17th and 19th of March 2022, do please come and say hello and ask any questions you may have about any of Sony’s Cinema Line cameras. https://www.amt.tv/all-events/cine2022
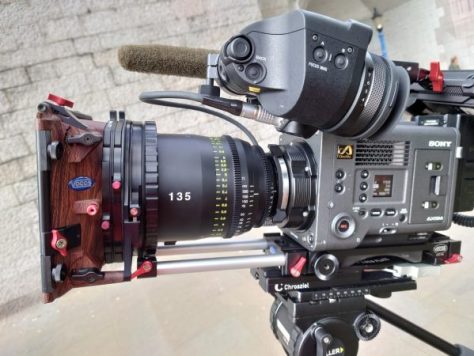
A Review of the Tokina Vista Prime Lenses
I was recently given the opportunity shoot some test footage with a Sony Venice II. A camera like Venice needs good glass, so I put out some feelers to see what lenses I could get for the shoot. I was offered the use of a set of the Tokina Vista primes, lenses I have been wanting to try for some time, so this was the perfect opportunity to try these interesting lenses on Sony’s newest cinema camera.

Lets cut straight to the point: I love these lenses and I loved using them with the Venice 2.
I guess I had some concerns at first over choosing the Tokina Vista’s. Lets face it, Tokina are not the first brand that springs into most peoples minds when you are thinking about high quality PL cinema lenses. But I had been hearing nothing other than good things about them and when I had played with them at a couple of different trade shows, they did always look nice.
There are currently 8 lenses in the Vista range starting at the very wide 18mm and going up to 135mm. All are t1.5, are beautifully constructed with all metal bodies. The focus and aperture rings (with approx 300 degrees of travel) are in the same position on every lens in the set, so lens swaps are easy. The 9 bladed iris works well to give pleasing smooth bokeh.
Many manufacturers claim that their lenses have minimal breathing and this is definitely true of the Tokina Vista. Focussing from near to far resulted in only a very small change of the image size on all the lenses I tried. The breathing is truly minimal.
As I was shooting using the Venice 2’s 8.2K 17:9 mode this was a good test of the lenses resolution and sharpness. In the video at the bottom of the page you will see a couple of shots where I added a slow post production zoom in to the image, reaching 2x magnification. If you watch the video in 4K you won’t see any appreciable drop in image quality during the zoom in where I am in effect expanding the original 8.2K pixel image by 200%. This to me is a clear indication that these lenses are plenty good enough for 8K capture.


But, at the same time I also felt that the lenses were not excessively sharp. There is a “roundness” to the images from these lenses that I really like. The Vista’s are also very slightly warm looking and this combined with the roundness of the image and very slight propensity to flare a little gives them a very appealing look. I guess I could describe it as a vintage look, but that might make them sound old fashioned. These are not old fashioned lenses, these are clearly modern, high performance lenses. But the images they deliver has a beautiful, almost old school look that I found to be very appealing.


Faces and skin tones looked really nice, of course this is a combination of both a great camera and great lenses, but the colour reproduction from the combination of Venice 2 and the Tokina Vistas was very pleasing.

I did have a play with most of the lenses in the set and they all appeared to perform similarly. But for the video shoot in London I focussed on the 18mm, 40mm and 135mm lenses.
The 18mm is very wide. It is not truly rectilinear, there is some barrel distortion, but nothing too severe. You do have to remember that this is a t1.5 lens and it’s not easy to produce very fast, very wide lenses for full frame. The 46.7mm image circle of all the Vista lenses means that they comfortably cover the full frame Venice sensor and even at 18mm there is barely any light fall off or vignetting at the edges of the frame.
One of the other things that really impressed me with all the Vista’s was the lack of chromatic aberration. Even when shooting very high contrast, backlit edges or specular reflections it was hard to spot any chromatic aberration. There is not a single shot amongst all of the material that I shot where I noticed anything nasty.

The only negative I can really find about the 18mm is the size and bulk. This is a big and heavy lens. All the Vista have the same external diameter of 114mm. The 18mm is no different in that regard. But the 18mm is one of the longest lenses in the set, it’s 180mm from front to back. And it weighs almost 2.7Kg. A big part of the weight probably comes from the bulbous front element of the lens – which you will be glad to know does not protrude beyond the end of the lens housing, giving it some protection from accidental damage.
When you have an 8K camera, wide angle lenses can be used to capture a very wide frame that can then be cropped into to re-frame in post, so having that maximum t1.5 aperture which helps maintain a shallow DoF is important.

The 40mm lens is also really nice. 40mm is an interesting focal length, a shade longer than 35mm and wider than 50mm. I found it to be a very nice focal length for a lot of different types of shots with the Venice Full Frame sensor. At 2.24kg it is a much lighter lens than the 18mm and a fair bit shorter at 160mm. Once again extremely small amount of breathing and near total lack of chromatic aberrations makes this a lovely lens to shoot with. When shooting high contrast point light sources such as street lights at night there is a bit of circular flare around the light source, but I find this to be quite pleasing. Strong light sources just out of frame can lead to some minor veiling flare on all the lenses in the set, but this is no worse than seen with most other similar quality lenses and the lens coatings give the flare a slight warmth that again, I find very appealing.

The 135mm lens doesn’t disappoint either, shooting at 135mm and t1.5 delivers a very narrow depth of field. As expected this is one of the larger lenses in the set. It’s 187mm long so a bit shorter than the 18mm but it is heavier with the PL mount version coming in very close to 3kg. There isn’t much more I can say about this lens that I haven’t covered with the other lenses, extremely minimal breathing, near zero chromatic aberration etc all make for a great image. The consistent look across all the lenses means this too shares that well rounded not too clinical and very slight warmth that makes these all of these lenses very appealing.

The Tokina Vista’s are not re-housed photo lenses, they were designed specifically for digital cinematography. They are available in a range of mounts including PL, Canon EF, MFT, LPL and Sony E. I had heard good things about them from other users before I tried them and now I have had a chance to shoot with them I have to say that they are lenses that I will want to use again. Perhaps in particular when the project would benefit from a slight vintage or romantic look without being soft and without giving up any resolution. For the money they are great looking lenses and would recommend anyone that hasn’t tried them to give them a go.
Sony Launches Venice II

Today Sony launched Venice II. Perhaps not one of the very best kept secrets with many leaks in the last few weeks, but finally we officially know that it’s called Venice II and it has an 8K (8.6K maximum) sensor recording 16 bit linear X-OCN or ProRes to 2 built in AXS card slots.
The full information about the new camera is here. https://pro.sony/en_GB/products/digital-cinema-cameras/venice2
Venice II is in essence the original Venice camera and the AXS-R7 all built into a single unit. But to achieve this the ability to use SxS cards has been dropped, Venice II only works with AXS cards. The XAVC-I codec is also gone. The new camera is only marginally longer than the original Venice camera body.

As well as X-OCN (the equivalent of a compressed raw recording) Venice II can also record 4K ProRes HQ and 4K ProRes 444. Because the sensor is an 8.6K sensor that 4K 444 will be “real” 444 with a real Red, Green and Blue sample at every position in the image. This will be a great format for those not wishing to use X-OCN. But why not use X-OCN? the files are very compact and full of 16 bit goodness. I find X-OCN just as easy to work with as ProRes.
One thing that Venice II can’t do is record proxies. Apparently user feedback is that these are rarely used. I guess in a film style workflow where you have an on set DIT station it’s easy for proxies to be created on set. Or you can create proxies in most edit applications when you ingest the main files, but I do wonder if proxies are something some people will miss if they only have X-OCN files to work from.
New Sensor:

There has been a lot of speculation that the sensor used in Venice II is the same as the sensor in the Sony A1 mirrorless camera, after all the pixel count is exactly the same. We already know that the A1 sensor is a very nice and very capable sensor. So IF it were to be the same sensor but paired with significantly more and better processing power and an appropriate feature set for digital cinema production it would not be anything to complain about. But it is unlikely that it is the very same sensor. It might be based on the A1 sensor (and the original Venice sensor is widely speculated to be based on the A9 sensor) but one thing you don’t want on these sensors are the phase detection sites used for autofocus.
When you expand these very high quality images on to very big screens, even the smallest of image imperfections can become an issue. The phase detection pixels and the wires that interconnect them can form a very, very faint fixed pattern within the image. In a still photograph you would probably never see this. In a highly compressed image, compression artefacts might hide it (although both the FX6 and FX9 exhibit some fixed pattern noise that might in part be caused by the AF sites). But on a giant screen, with a moving image this faint fixed pattern may be perceptible to audiences and that just isn’t acceptable for a flagship cinema camera. So, I am led to believe that the sensors used in both the original Venice and Venice II do not have any AF phase detection pixels or wire interconnects. Which means these can not the very same sensors as found in the A1 or A9. They are most likely specifically made for Venice.
Also most stills camera based sensors are only able to be read at 12 bit when used for video, again perhaps a key difference is that when used with the cooling system in the Venice cameras these sensors can be read at 16 bit at video frame rates rather than 12 or 14 bits.
The processing hardware in Venice II has been significantly upgraded from the original Venice. This was necessary to support the data throughput need to shoot at 8.6K and 60fps as well as the higher resolution SDI outputs and much improved LUT processing. Venice II can also be painted live on set via both wiFi and Ethernet. So the very similar exterior appearances do in fact hide the fact that this really is a completely new camera.

My Highlights:
I am not going to repeat all the information in the press releases or on the Sony website here. But what I will say is I like what I see. Integrating the R7 into the Venice II body makes the overall package smaller. There are no interconnections to go wrong. The increase in dynamic range to 16 stops, largely thanks to a lower noise floor is very welcome. There was nothing wrong with the original Venice, but this new sensor is just that bit better.
The default dynamic range split gives the same +6 stops as most of Sony’s current cameras but goes down to -10 stops. But with the very low noise floor that this sensor has rating the camera higher than the rated 800 base ISO to gain a bit of extra headroom shouldn’t be an issue. Sample footage from Venice II shows that the way the highlights do reach their limits is very nice.
The LUT processing has been improved and now you can have 3D LUTs in 4K on SDI’s 1&2 which are 12G and in HD at the same time on SDI’s 3&4 which are 3G – as well as on the monitor out and in the VF. This is actually quite a significant upgrade, the original Vence is a little bit lacking in the way it handles LUTs. The ART look system is retained if you want even higher quality previews than that possible with 33x LUTs. There is also built in ACES support with a new RRT, this makes the camera extremely easy to use for ACES workflows and the 16 bit linear X-OCN is a great fit for ACES.

It retains the ability to remove the sensor head so it can be used on the end of an extension cable. Venice II can use either the original 6K Venice sensor or the new 8K sensor, however a new extension cable which won’t be available until until some time in 2023 is needed before the head can be separated, so Venice 1 will still have a place for some considerable time to come.

Moving the dual ISO from 500/2500 to 800/3200 brings Venice II’s lower base ISO up to the same level as the majority of other Cinema cameras. I know that some found 500 ISO slightly odd to work with. This will just make it easier to work alongside other similarly rated cameras.
Another interesting consideration is that you can shoot at 5.8K pixels with a Super 35mm sized scan. This means that the 4K Super 35mm material will have greater resolution than the original Venice or many other S35 cameras that only use 4K of pixels at S35. There is a lot of very beautiful super 35mm cine glass available and being able to shoot using classic cinema glass and get a nice uplift in the image resolution is going to be really nice. Additionally there will be some productions where the shallower DoF of Full Frame may not be desirable or where the 8.6K files are too big and unnecessary. I can see Venice II being a very nice option for those wishing to shoot Super 35.
But where does this leave existing Venice owners?
For a start the price of Venice 1 is not going to change. Sony are not dropping the cost. This new Venice is an upgrade over the original and more expensive (but the price does include the high frame rate options). Although my suspicion is that Venice II will not be significantly more expensive that the cost of the current Venice + R7 + HFR licence. Sony want this camera to sell well, so they won’t want to make it significantly more as then many would just stick with Venice 1. The original remains a highly capable camera that produces beautiful images and if you don’t need 8.6K the reasons to upgrade are fewer. The basic colour science of both cameras remains the same, so there is no reason why both can’t be used together on the same projects. Venice 1 can work with lower cost SxS cards and XAVC-I if you need very small files and a very simple workflow, Venice II pushes you to a AXS card based workflow and AXS cards are very expensive.
If you have productions that need the Rialto system and the ability to un-dock the sensor, then this isn’t going to be available for Venice II for some time. So original Venice cameras will still be needed for Rialto applications (it will be 2023 before Rialto for Venice II becomes available).
Of course it always hurts when a new camera comes out, but I don’t think existing Venice owners should be too concerned. If customers really felt they needed 8.6K then they would have already likely been lost to a Red camera and the Red ecosystem. But at least now that there is an 8K Venice option that might help keep the original Venice viable for second unit, Rialto (for now at least) or secondary roles within productions shooting primarily in 8K.
I like everything I see about Venice II, but it doesn’t make Venice 1 any less of a camera.
New Sony CineALta Camera to be announced on November 15th

I’m sure most of you will have seen this already, but here it is again. Sony will be announcing a new Cinealta camera next Monday, the 15th of November. See: https://pro.sony/en_GB/cinematography/cinematography-events/new-cinealta?
New Arri-Look LUT


UPDATE – Some issues with the original version of the LUT were found by some users, so I have created a revised version and the revised version is now linked below.
Arri Look LUT’s are clearly very popular with a lot of Sony users, so I have created an Arri-Look LUT for the FX3/FX6/FX9/Venice that can be used to mimic the look from an Arri camera. It is not designed to pretend to be a real Arri camera, but to instead provide an image with the look and feel of an Arri camera but tailored to the Sony sensors.
As usual the LUT is free to download, but if you do find it useful I do ask that you buy me a coffee or other drink as a thank you. All contributions are always most welcome. Additionally do let me know what you like about this LUT or don’t like, so I can look at what LUTs may be good to create in the future.
Click Here to download my Arri-Look LUT (latest version 2C),
And here is a warmer version (may be very slightly too warm), version 2B.
Click below to buy me a thank you drink if you like it and use it.
DaVinci resolve Frame Rendering Issue and XAVC
There is a bug in some versions of DaVinci Resolve 17 that can cause frames in some XAVC files to be rendered in the wrong order. This results in renders where the resulting video appears to stutter or the motion may jump backwards for a frame or two. This has now been fixed in version 17.3.2 so all user of XAVC and DaVinci Resolve are urged to upgrade to at least version 17.3.2.
https://www.blackmagicdesign.com/uk/support/family/davinci-resolve-and-fusion
SDI Failures and what YOU can do to stop it happening to you.
Updated 22/01/2024.
Sadly this is not an uncommon problem. Suddenly and seemingly for no apparent reason the SDI (or HDMI) output on your camera stops working. And this isn’t a new problem either, SDI and HDMI ports have been failing ever since they were first introduced. This issue affects all types of SDI and HDMI ports. But it is more likely with higher speed SDI ports such as 6G or 12G as they operate at higher frequencies and as a result the components used are more easily damaged as it is harder to protect them without degrading the high frequency performance.
Probably the most common cause of an SDI/HDMI port failure is the use of the now near ubiquitous D-Tap cable to power accessories connected to the camera. The D-Tap connector is sadly shockingly crudely designed. Not only is it possible to plug in many of the cheaper ones the wrong way around but with a standard D-Tap plug there is no mechanism to ensure that the negative or “ground” connection of the D-Tap cable makes or breaks before the live connection. There is a however a special but much more expensive D-Tap connector available that includes electronic protection against this very issue (although a great product, even these cannot totally provide protection from a poor ground connection) – see: https://lentequip.com/products/safetap
Imagine for a moment you are using a monitor that’s connected to your cameras SDI or HDMI port. You are powering the monitor via the D-Tap on the cameras battery as you always do and everything is working just fine. Then the battery has to be changed. To change the battery you have to unplug the D-Tap cable and as you pull the D-Tap out, the ground pin disconnects fractionally before the live pin. During that extremely brief moment there is still positive power going to the monitor but because the ground on the D-Tap is now disconnected the only ground route back to the battery becomes via the SDI/HDMI cable and back through the camera. For a fraction of a second the SDI/HDMI cable becomes the power cable and that power surge blows the SDI/HDMI driver chip or damages the cameras motherboard.
After you have completed the battery swap, you turn everything back on and at first all appears good, but now you can’t get the SDI or HDMI output to work. There’s no smoke, no burning smells, no obvious damage as it all happened in a tiny fraction of a second. The only symptom is a dead SDI or HDMI.
And it’s not only D-Tap cables that can cause problems. A lot of the cheap DC barrel connectors have a center positive terminal that can connect before the outer barrel makes a good connection. There are many connectors where the positive can make before the negative.
You can also have problems if the connection between the battery and the camera isn’t perfect. A D-Tap connected directly to the battery might represent an easier route for power to flow back to the battery if there is corrosion on the battery terminals or a loose batter plate or adapter.
It can also happen when powering the camera and monitor (or other SDI connected devices like a video transmitter or timecode box) via separate mains adapters. The power outputs of most of the small, modern, generally plastic bodied switch mode type power adapters and chargers are not connected to ground. They have a positive and negative terminal that “floats” above ground at some unknown voltage. Each power supplies negative rail may be at a completely different voltage compared to ground. So again an SDI or HDMI cable connected between two devices, powered by different power supplies will act as the ground between them and power may briefly flow down the SDI cable as the SDI cables ground brings both power supply negative rails to the same common voltage. Failures this way are much less common, but they do still occur.
For these reasons you should always connect all your power supplies, power cables, especially D-Tap or other DC power cables first. Avoid using adapters between the battery and the camera as each adapter plate is another possible cause of trouble.
Then while everything remains switched off the very last thing to connect should be the SDI or HDMI cables. Only when everything is connected should you turn anything on. But beware – there is a myth that turning cameras and monitors off before plugging or unplugging is enough to stop this issue. This simply isn’t true because power is fed to the monitor and camera even when they are switched off so power loops and surges can still occur.
If unplugging or re-plugging a monitor (or anything else for that matter) turn everything off first. Do not connect or disconnect anything while any of the equipment is on. Although the greatest moment of risk is the moment you connect or disconnect any power cables such as when swapping a battery where you are using a D-Tap to power any accessories.
So, if changing batteries, switch EVERYTHING off first, then disconnect your SDI or HDMI cables before disconnecting the D-Tap or other power cables. Seriously – you need to do this, disconnect the SDI or HDMI before changing the battery if the D-Tap cable has to be unplugged from the battery. Things are a quite a bit safer if any D-Tap cables are connected directly to the camera or a power plate that remains connected to the camera as this way you can change the battery without needing to unplug the D-Tap cables and this does reduce the risk of issues.
Also inspect your cables regularly, check for damage to the pins and the cable, if you suspect that a cable isn’t perfect – throw it away, don’t take the risk. I’ve seen plenty of examples of D-Tap cables where one of the wires has broken off the connector pins.
A great safety check is to turn on your monitor immediately after connecting the power, but before connecting any SDI or HDMI cables. If the monitor comes on OK, this is evidence that the power is correctly connected. Then you can connect the SDI or HDMI cable. However, while a really good idea, this only indicates that there is some power to the monitor, it does not ensure that the ground connection is 100% OK.
The reason Arri talk about shielded power cables is because most shielded power cables use connectors such as Lemo or Hirose where the body of the connector is grounded to the cable shield. This helps ensure that when plugging the power cable in it is the ground connection that is made first and the power connection after. Then when unplugging the power breaks first and ground after. When using properly constructed shielded power cables with Lemo or Hirose connectors it is much less likely that these issues will occur (but not impossible).
Is this an SDI/HDMI fault?
No, not really. The fault lies in the use of power cables that allow the power to make before the ground or the ground to break before the power. A badly designed power connector often made as cheaply as possible. D-Tap was originally designed to be used to be used with high power video lights, it wasn’t designed to be used with delicate monitors and the design will allow it to be plugged in the wrong way around if you force it.
Additionally it could be user error. I know I’m guilty of rushing to change a battery and pulling a D-Tap connector without first disconnecting the SDI on many occasions, but so far I’ve mostly gotten away with it (I have blown an SDI on one of my Convergent Design Odysseys).
If you are working with an assistant or as part of a larger crew do make sure that everyone on set knows not to plug or unplug power cables or SDI cables without checking that it’s OK to do so – and always unplug the SDI/HDMI before disconnecting or removing anything else.
If you are working with an assistant or as part of a larger crew do make sure that everyone on set knows not to plug or unplug power cables or SDI cables without checking that it’s OK to do so – and always unplug the SDI/HDMI before disconnecting or removing anything else.
How many of us have set up a camera, powered it up, got a picture in the viewfinder and then plugged in the monitor via an SDI or HDMI cable? Don’t do it! Plug and unplug in the right order – connect ALL power cables and power supplies first. Check power is going to the camera and check power is going to the monitor by turning them on, then finally plug in the SDI. When removing a battery, unplug the SDI/HDMI, power down the camera and only then remove the D-Tap from the battery.