What’s the difference between Full Format and Quick Format in the FX6?

The Sony FX6 offers two different ways to format the the SD cards and CFExpress cards. These are Quick Format and Full Format. 

What’s the difference and which should I use?

Full Format erases everything on the card and returns the card to a completely empty state. All footage is removed/deleted from the card and it cannot therefore be recovered later should you perform a Full Format by mistake. Because Full Format returns the card to a completely empty state removing any junk or other clutter it also ensures that the cards performance is maximised. Full Format should be used whenever possible as it ensures maximum performance. However once a card has been Fully Formatted you cannot ever recover lost files from it.

Quick Format erases the cards database about what files are on the card. Quick Format is faster than Full Format, but it does not actually remove your video files. When you then start a new recording on the card the new recording will use any empty space on the card if there is any. If there is no empty space then the new file will overwrite any existing files on the card. This does mean that in some cases if you have accidentally done a quick format you may be able to use data recovery software to rescue any files that have not already been overwritten.  But file recovery is not guaranteed and should not be relied upon. As quick format does not clear all data from the card, over time the performance of the card may be degraded, so a Full Format should be performed periodically to ensure the best card performance.

It’s also worth noting that if you want to load LUT’s into the FX6, the card should be formatted in Slot B so that the correct file structure including the LUT folder is added to the card. Once any LUT’s are placed in the LUT folder the card must be placed back in slot B to so you can load the LUTs into the camera. You cannot load LUTs via slot A.

For more FX6 posts and information click here: https://www.xdcam-user.com/camera-setup/ilme-fx6-sony-fx6/

ProGrade SD Cards For The FX6

I’ve been testing a lot of different SD cards with the Sony FX6. I have been a long time user of Integral, Lexar and SanDisk cards and generally found them to perform well and to be reliable. But in my search for affordable v90 SD cards I came across a good deal on the ProGrade v90 64Gb SD cards.

I hadn’t ever used the ProGrade brand before and their pricing almost seems too low. But I decided to purchase one to test. Well I have not been disappointed.  The card performs very well and has no problems at all with all of the XAVC-I frame rates up to and including 60fps. 

If you try to use it to record UHD at 100 or 120fps you will get an “unsupported media” warning but the camera will try to record to the card. Most of the time the recording will be OK provided you keep the duration short and don’t try to stop and then restart recording too quickly. Of all the SD cards I have tried this seems to be one of the best.

However you will still see recording failures with this card at 100 and 120fps. Often resulting in the card suddenly becoming completely full. So I still would not recommend relying on any SD card for 100/120fps UHD.  But, as I have said this is one of the better cards that I have come across and given the low price it seems like a winner.

Other cards I have been using successfully with the FX6 are:

Integral Ultima ProX v90 for all codecs including XAVC-I up to 60fps.

Lexar 1667x Professional v60 for all codecs including XAVC-I upto to 30fps.

Sony Tough CFExpress Type A 80GB for all recording modes and formats including UHD 100/120fps.

Catalyst BRowse and catalyst Prepare Updated.

Timed to coincide with the release of the ILME-FX6 camcorder Sony have updated both Catalyst Browse and Catalyst Prepare. These new  and long awaited versions add support for the FX6’s rotation metadata and clip flag metadata as well as numerous bug fixes. It should be noted that for the correct operation that a GPU that supports OpenGL is required. Also while the new versions support MacOS Catalina there is no official support for Big Sur. Catalyst Browse is free while Catalyst Prepare is not free. Prepare can perform more complex batch processing of files, checksum and file verification, per-clip adjustments as well as other additional features.

For more information go to the Sony Creative Software website.

Hypergamma LUT’s for the FX6 (and others).

The Sony FX6 does not have the same Hypergammas or Cinegammas as found in many other Sony camcorders. However you can load a LUT as a base look in the cameras Custom Mode. See this post for details about this.

So I have prepared a set of LUTs that mimic the Sony Hypergammas with rec709 colour.  These LUTs are for S-Log3/SGamut3.cine as used as the base input in the FX6. HG1 and HG2 are broadcast safe so these give you a broadcast ready option for the FX6.
 In addition to the Hypergamma LUT’s there is an additional ACBCST LUT. This is a broadcast safe version of the Sony s709 LUT with added contrast and saturation, suitable for broadcast and other direct to air applications.

As well as the FX6 these LUT’s will also work with any Sony camera that accepts LUTs and has S-Log3 and SGamut3.cine. They can also be used in post production.

If you find these LUT’s useful please consider buying me a coffee. Thank you!


Your choice:


CLICK HERE TO DOWNLOAD THE Hypergamma LUTs

Raw Isn’t Magic. With the right tools Log does it too.

Raw can be a brilliant tool, I use it a lot. High quality raw is my preferred way of shooting. But it isn’t magic, it’s just a different type of recording codec.
 
All too often – and I’m as guilty as anyone – people talk about raw as “raw sensor data” a term that implies that raw really is something very different to a normal recording. In reality it’s really not that different. When shooting raw all that happens is that the video frames from the sensor are recorded before they are converted to a colour image. A raw frame is still a picture, it’s just that it’s a bitmap image made up of brightness values, each pixel represented by a single brightness code value rather than a colour image where each location in the image is represented by 3 values one for each of Red, Green and Blue or Luma, Cb and Cr.

As that raw frame is still nothing more than a normal bitmap all the cameras settings such as white balance, ISO etc are in fact baked in to the recording. Each pixel only has one single value and that value will have been determined by the way the camera is setup. Nothing you do in post production can change what was actually recorded. Most CMOS sensors are daylight balanced, so unless the camera adjusts the white balance prior to recording – which is what Sony normally do – your raw recording will be daylight balanced.

Modern cameras when shooting log or raw also record metadata that describes how the camera was set when the image was captured. 

So the recorded raw file already has a particular white balance and ISO. I know lots of people will be disappointed to hear this or simply refuse to believe this but that’s the truth about a raw bitmap image with a single code value for each pixel and that value is determined by the camera settings.

This can be adjusted later in post production, but the adjustment range is not unlimited and it is not the same as making an adjustment in the camera. Plus there can be consequences to the image quality if you make large adjustments. 

Log can be also adjusted extensively in post too. For decades feature films shot on film were scanned using 10 bit Cineon log (which is the log gamma curve S-Log3 is based on) and 10 bit log used for post production until 12 bit and then 16 bit linear intermediates came along like OpenEXR. So this should tell you that actually log can be graded very well and very extensively.

But then many people will tell you that you can’t grade log as well as raw. Often they will give photographers as an example where there is a huge difference between what you can do with a raw photo and a normal image. But we also have to remember this is typically comparing what you can do with a highly compressed 8 bit jpeg file and an often uncompressed 12 or 14 bit raw file. It’s not a fair comparison, of course you would expect the 14 bit file to be better.

The other argument often given is that it’s very hard to change the white balance of log in post, it doesn’t look right or it falls apart. Often these issues are nothing to do with the log recording but more to do with the tools being used.

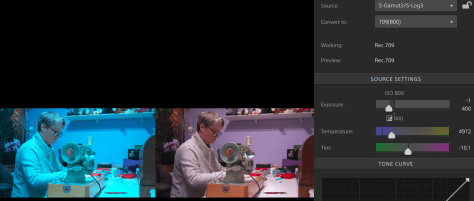
When you work with raw in your editing or grading software you will almost always be using a dedicated raw tool or raw plugin designed for the flavour of raw you are using. As a result everything you do to the file is optimised for the exact flavour of raw you are dealing with. It shouldn’t come as a surprise to find that to get the best from log you should be using tools specifically designed for the type of log you are using. In the example below you can see how Sony’s Catalyst Browse can perfectly correctly change the white balance and exposure of S-log material with simple sliders just as effectively as most raw formats.
 
On the left is the original S-Log3 clip with the wrong white balance (3200K) and on the left is the corrected image. The only corrections made are via the Temperature slider and exposure slider.
 
Applying the normal linear or power law (709 is power law) corrections found in most edit software to Log won’t have the desired effect and basic edit software rarely has proper log controls. You need to use a proper grading package like Resolve and it’s dedicated log controls. Better still some form of colour managed workflow like ACES where your specific type of log is precisely converted on the fly to a special digital intermediate and the corrections are made to the intermediate file. There is no transcoding, you just tell ACES what the footage was was shot on and magic happens under the hood. Once you have done that you can change the white balance or ISO of log material in exactly the same way as raw. There is very, very little difference.
 
The same S-Log3 clip as in the above example, this time in DaVinci Resolve using ACES. The only corrections being made are via the Temp slider for the white balance change and the Log-Offset wheel which in ACES provides a precise exposure adjustment.
 
When people say you can’t push log, more often than not it isn’t a matter of can’t, it’s a case of can – but you need to use the right tools.
 
This is what log shot with completely the wrong white balance and slightly over exposed looks like after using nothing but the WB and ISO sliders in Catalyst Browse. I don’t believe raw would have looked any different.
 
Less compression or a greater bit depth are where the biggest differences between a log or raw recording come from, not so much from whether the data is log or raw.  Don’t forget raw is often recorded using log, which kind of makes the “you can’t grade log” argument a bit daft.
 
Camera manufactures and raw recorder manufacturers are perfectly happy to allow everyone to believe raw is magic and worse still, let people believe that ANY type of raw must be better than all other types of recordings. Read though any camera forum and you will see plenty of examples of “it’s raw so it must be better” or “I need raw because log isn’t as good” without any comprehension of what raw is and how in reality it’s the way the raw is compressed and the bit depth that really matters.

If we take ProRes Raw as an example: For a 4K 24/25fps file the bit rate is around 900Mb/s. For a conventional ProRes HQ file the bit rate is around 800Mb/s. So the file size difference between the two is not at all big.
 
But the ProRes Raw file only has to store around 1/3 as many data points as the component ProResHQ file. As a result, even though the ProRes Raw file often has a higher bit depth, which in itself usually means better a better quality recording, it is also much, much less compressed and as a result will have fewer artefacts. 

It’s the reduced compression and deeper bit depth possible with raw that can lead to higher quality recordings and as a result may bring some grading advantages compared to a normal ProRes or other compressed file. The best bit is there is no significant file size penalty. So you have the same amount of data, but you data should be of higher quality. So given that you won’t need more storage, which should you use? The higher bit depth less compressed file or the more compressed file?

But, not all raw files are the same. Some cameras feature highly compressed 10 bit raw, which frankly won’t be any better than most other 10 bit recordings as you are having to do all the complex math to create a colour image starting with just 10 bit. Most cameras do this internally at at least 12 bit. I believe raw needs to be at least 12 bit to be worth having.

If you could record uncompressed 12 bit RGB or 12 bit component log from these cameras that would likely be just as good and just as flexible as any raw recordings. But the files would be huge. It’s not that raw is magic, it’s just that raw is generally much less compressed and  depending on the camera may also have a greater bit depth. That’s where the benefits come from.

FX9 Guide Videos

Here are the guide videos I produced for Sony about the FX9.  These videos cover most of the key features of the camera whether that’s shooting using S-Cinetone or S-log3 and Cine EI, farme rates and scan modes. Each video includes instructions on how to use the different modes as well as some guidance on things to watch out for.  Some of the videos were produced with version 1 firmware so there are now some changes to the base modes, previously you had Custom  Mode and Cine EI, now you have SDR – HDR – CineEI where SDR mode is the same as what was previously called custom mode. Also don’t miss the two videos linked at the end which cover most of the new features added in the version 2 firmware.


Touch Screen and Eye AF

https://pro.sony/en_GB/insight/filmmaking-tips/pxw-fx9-tutorial-videos-eye-af

MLUTS and HDR

https://pro.sony/en_GB/insight/filmmaking-tips/pxw-fx9-tutorial-videos-mluts-hdr

Changing the FX6’s base look in Custom Mode using LUT’s

This is extremely cool! You can change the FX6’s base look in custom mode using LUTs. This is not the same as baking in a LUT in Cine EI as in custom mode you can change the gain or ISO just as you would with any other gamma. But there’s more than that – you can even adjust the look of the LUT by changing the detail settings, black level, matrix and multi-matrix. Watch the video to see how it’s done.


The LUT’s used in the video can be downloaded from here. https://www.xdcam-user.com/2014/11/new-film-look-luts-for-the-pxw-fs7-pmw-f5-and-pmw-f55/

Or from here: https://pro.sony/en_SC/technology/alister-chapman-blockbuster-lut-v2

Correction re FX6 LANC Control.

Correction re FX6 Lanc: I wish to make everyone aware that I may have given incorrect information about the LANC control ports on the FX6. My excuse is: It was very hard to get official spec sheets from Sony and I hadn’t notice a subtle change. I apologize to anyone this may have affected. The hand grip on the FX6 appears to be the same as the FS5 hand grip, except it now uses a 3.5mm 4 pole plug instead of the 2.5mm 3 pole plug that the FS5 have. So the hand grip socket on the camera body is also now 3.5mm 4 pole and not 2.5mm 3 pole. THERE IS HOWEVER AN EXTRA 2.5mm LANC PORT THE SAME AS THE FS5 ON THE REAR OF THE CAMERA BODY. I have also discovered that the FX9 handgrip when plugged into the USB style Multi connector on the back of the FX6 will result in an unsupported device message. This might simply be a firmware issue, the cameras I have played with are pre-production with beta firmware. But I have not been able to confirm this.

The Sony FX6 is Full Frame – Sometimes!

Perhaps I’m splitting hairs here a little bit – and I still think the FX6 is an amazing camera. But the more I look at it’s different scan modes and recording mode the more I’ve realised that it’s only actually “Full Frame” in few certain settings. 

When the FX6 is set to UHD and operating from 1 to 60 fps then it’s full frame and the whole width of the sensor is used. Put a Full Frame lens on the camera and you get the same FoV as an FX9 or any other camera with a similar sized sensor.

But if you want to shoot 4K DCI then something strange happens. Switch the FX6 to 4K DCI and the sensor is cropped/windowed by 5% and instead of the field of view becoming 5% wider as happens on most cameras, it instead  becomes 5% narrower. In 4K DCI the FX6 is very slightly less than Full Frame. 

To shoot at more than 60fps the camera has to be in UHD. 60 fps and below it’s full frame but when you go above 60fps the image is cropped even more, this time by 10% so the FoV gets 10% narrower.

If you want to record UHD Raw at any frame rate the image is also cropped by 10% so UHD with raw out at 30fps results in a 10% narrower FoV than when you are not outputting raw. When you enable raw at 4K DCI raw it’s a 5% crop.

So while none of these crops are huge it is worth noting that the FX6 is actually a little less than full frame more often than not!

Just to put all this into some perspective the FX9’s Full Frame Crop 5K mode involves a 17% crop. The FX6 outputting UHD raw or recording UHD at more than 60fps is a 10% crop. That’s not a vast difference. In these modes the FX6 is closer to the FX9 5K mode than to Full Frame.

Why is this? Well the FX6’s sensor is 4.2K pixels across. In the “normal” UHD frame rates (up to 60fps) the full 4.2K is read and downscaled on the fly to 3840 x 2160 UHD.  When you shoot 4K DCI there is no downscale and instead the sensor is read out at 4K and the extra 0.2K of pixels at the edges of the frame are not used – 0.2K being 5% of 4.2K and thus you have a 5% crop and the FoV becomes 5% narrower in DCI 4K than in UHD.

When you shoot above 60 fps then the sensor is read directly at 3840 pixels rather than 4.2K to make the readout simpler and faster. So now we are reading 0.4K fewer pixels from the sides of the sensor which is 10% of the total pixels and we get a 10% narrower FoV above 60fps as a result.

As I said at the start, perhaps I’m splitting hairs. I certainly don’t think this detracts from the FX6 in any significant way. But if it’s a camera you are thinking of getting, you should be aware of this.